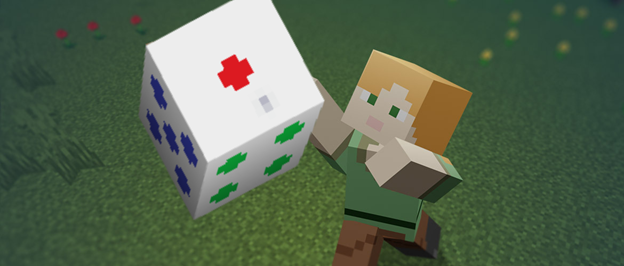
Minecraft's Behavior Packs and Resource Packs allow you to create amazing custom content for the game. Custom blocks are an excellent way for creators to start adding interactive content. Through this tutorial, you will build a custom die block (don't be scared, that just means a singular dice!) that has different textures and can be placed in the world by a player.
In this tutorial you'll learn the following:
- How to use JSON to define a new block.
- How to assign textures to a new block.
- Some of the behaviors and components that blocks can access.
- What .lang is and how it's used for in-game text.
Prerequisites
It is recommended that the following be completed before beginning this tutorial:
This video is an excellent way to quickly get up to speed!
- Getting Started with Add-On Development
- Introduction to Resource Packs
- Introduction to Behavior Packs
You'll also need to download the Vanilla Resource Pack.
Creating Custom Blocks with Resource and Behavior Packs
We even have a video for you to follow if that's your preference!
You'll be making changes in both a Resource Pack and a Behavior Pack to get custom looks and behavior for each custom block you will be creating. Here is the file structure we'll follow for this tutorial:
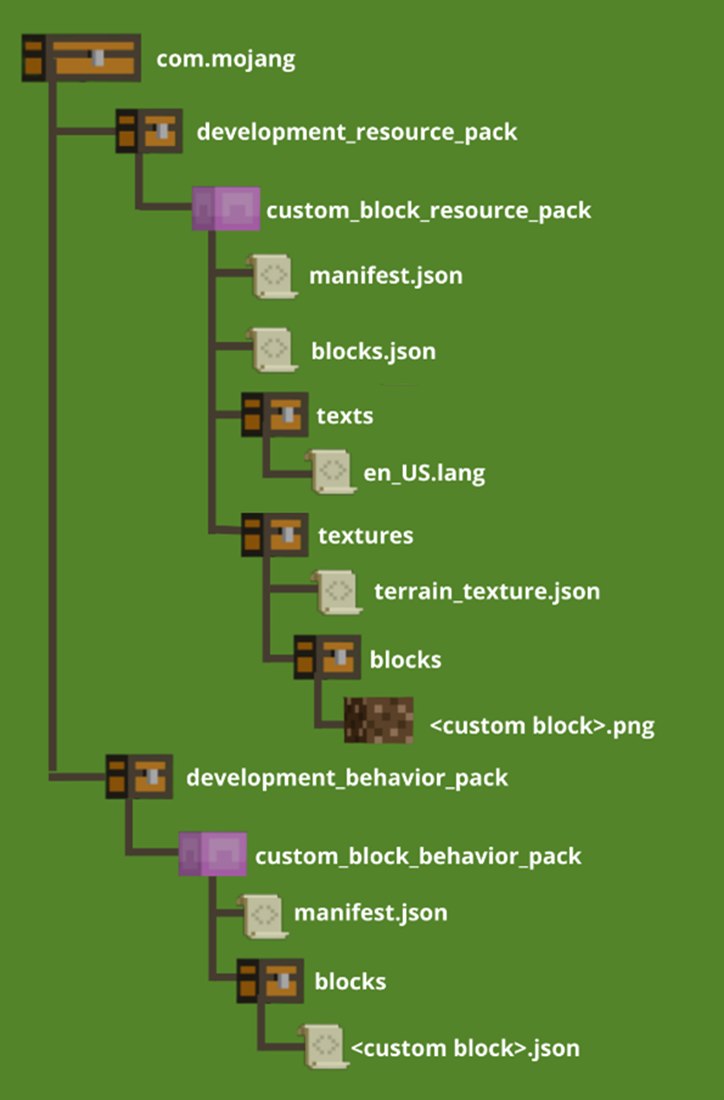
The Behavior Pack contains the <custom_block>.json file that holds all of the information about a block's behavior. It specifies components that give specific behaviors such as friction, flammability, destructibility, and more. Components can also control some visual elements such as geometry, materials, render methods, and lighting.
Note
If components are given in the Behavior Pack to control the visual properties of a block, they will override the visual properties specified for that block in the blocks.json file. That's why blocks.json becomes optional for everything but sounds once you start relying on Behavior Packs more heavily.
In this tutorial, we'll be making a fairly simple custom block. While it is recommended to complete this tutorial before moving forward, there is also a more advanced tutorial on using components called Advanced Custom Blocks.
Let's create a custom die block with six different-colored sides that becomes a different color in-hand. Small customizations like this can make a block feel more unique to players.
Behavior Pack
Create a Behavior Pack
We'll begin by creating a Behavior Pack for the custom block:
In File Explorer, navigate to the com.mojang folder.
- Press Win+R to open Run.
- If you are using main Minecraft releases, copy and paste the following into the Open field:
%appdata%\Minecraft Bedrock\users\shared\games\com.mojang - Alternatively, if you are using preview Minecraft versions, see more information about the folder to use in this article
- Click OK.
Open the development_behavior_packs folder.
Create a folder and name it custom_block_behavior_pack.
Open the custom_block_behavior_pack folder, and create a text file.
Rename the text file manifest.json.
Open manifest.json in a text editor.
Copy the code below into the manifest.json file.
Note
You can generate new UUIDs from UUIDgenerator.net.
{
 "format_version": 2,
 "header": {
  "description": "This is a Behavior Pack used to demo components!",
  "name": "Demo Behavior Pack",
  "uuid": "<UUID>",
  "version": [ 1, 0, 0 ],
  "min_engine_version": [1, 21, 80]
 },
 "modules": [
  {
   "description": "Demo Behavior Pack",
   "type": "data",
   "uuid": "<UUID>",
   "version": [ 1, 0, 0 ]
  }
 ],
 "dependencies": [
  {
   "uuid": "<Resource Pack UUID>",
   "version": [ 1, 0, 0 ]
  }
 ]
}
- Save the manifest.json file.
Now, let's create the custom block behavior JSON file in the Behavior Pack.
Inside the custom_block_behavior_pack folder, create a folder and name it blocks.
Open the blocks folder.
Inside the blocks folder, create a text document and name it die.json.
Open die.json in a text editor.
Create the behavior custom block JSON file
In the file, you will need to define what the block is, similar to the manifest.json file.
- Copy and paste the following code into your die.json file:
{
  "format_version": "1.19.30",
  "minecraft:block": {
    "description": {
      "identifier": "demo:die"
    },
    "components": {
    }
  }
}
- Save the file.
Custom block files have several requirements for them to be functional:
format_version should be the latest, in case any components change in the future.
minecraft:block is the block definition, which contains the "description" and "components" sections of a block.
The description object requires an identifier with a namespace, separated by a colon. In this case, the namespace is "demo" and the identifier is "die".
A components section contains the components that describe the block's behavior.
There are several components you may choose to use in custom blocks. To learn more, view the full list of custom block components in the reference documentation. For now, we'll leave the die block with only the identifier.
Resource Pack
Now that you've set up the custom block.json file in the Behavior Pack, it's time to include the resources Minecraft will need to create the block: geometry, textures, names, and even a fun sound for when players place or break the block.
Create a Resource Pack
We will begin by creating a Resource Pack for the custom block:
In File Explorer, navigate to the com.mojang folder.
Open the development_resource_packs folder.
Create a new folder named custom_block_resource_pack.
Inside the custom_block_resource_pack folder, create a manifest.json file.
Open the manifest.json file in a text editor.
Copy the code below into the manifest.json file. See the Introduction to Behavior Packs Tutorial to learn how to use UUIDs to create the dependency of this Behavior Pack on the Resource Pack, and get any new UUIDs from UUIDgenerator.net.
{
 "format_version": 2,
 "header": {
  "description": "This is a Resource Pack used to demo components!",
  "name": "Demo Resource Pack",
  "uuid": "<UUID>",
  "version": [ 1, 0, 0 ],
  "min_engine_version": [1, 21, 80]
 },
 "modules": [
  {
   "description": "Demo Resource Pack",
   "type": "resources",
   "uuid": "<UUID>",
   "version": [ 1, 0, 0 ]
  }
 ]
}
- Save the manifest.json file.
Set the block name with .lang
Let's add the name of the block using a .lang file—a file that's used to organize all the custom text in an add-on and to localize creator content.
Inside the custom_block_resource_pack folder, create a folder and name it texts.
Open texts and create a new text document called en_US.lang.
Open en_US.lang in a text editor.
Copy and paste the following into en_US.lang:
tile.demo:die.name=DieSave and close the .lang file.
This piece of code sets the name of the block to Die in the game.
Save the custom block textures
The die block texture still needs to be created and placed in your Resource Pack. When creating your own custom textures, make sure they are 16x16 for custom blocks that use a standard block geometry (geometry.full_block).
These were made in Paint and are 16x16 pixels. Notice that there are 7 images, because it's a 6-sided die block that also has a unique in-hand texture.
The image that shows the 1 side should be named die_1, 2 should be named die_2, and so on. The in-hand image should be named die_red.


Note
The images above have been provided for the die block tutorial, but feel free to use different textures to further customize your die block. If you do, just be careful to keep naming consistent throughout the tutorial!
If you're using the resources provided:
Download the
.pngfiles to your computer.Navigate to custom_block_resource_pack and create a folder inside named textures.
Inside the textures folder, create a folder named blocks.
Place the die block
.pngfiles in the blocks folder.
Add a friendly name in terrain_texture.json
The next step is to associate the texture names with a texture file path. This is done in a terrain_texture.json file.
In File Explorer, navigate to the custom_block_resource_pack folder and open the textures folder.
Inside the textures folder, create a text document and name it terrain_texture.json.
Open terrain_texture.json in a text editor.
Copy and paste the following code:
{
  "resource_pack_name": "custom_block_resource_pack",
  "texture_name": "atlas.terrain",
  "padding": 8,
  "num_mip_levels": 4,
  "texture_data": {
    "die_1": {
      "textures": "textures/blocks/die_1"
    },
    "die_2": {
      "textures": "textures/blocks/die_2"
    },
    "die_3": {
      "textures": "textures/blocks/die_3"
    },
    "die_4": {
      "textures": "textures/blocks/die_4"
    },
    "die_5": {
      "textures": "textures/blocks/die_5"
    },
    "die_6": {
      "textures": "textures/blocks/die_6"
    },
    "die_red": {
      "textures": "textures/blocks/die_red"
    }
  }
}
- Save the file.
In texture_data, the object with the label die_1 has created a friendly name we'll reference in other files. Cool!
Define sounds with blocks.json
Block definitions are handled differently in the Resource Pack. Blocks are stored in a single JSON file that will contain definitions for each custom block.
Open the development_resource_packs folder.
Open the custom_block_resource_pack folder.
Inside custom_block_resource_pack, create a text document and name it blocks.json.
Open blocks.json in a text editor.
The blocks.json file has a similar set up to the manifest.json file and has requirements that need to be met in order for it to work correctly. Those requirements are:
- A format version
- A namespaced name for our custom block (here, it's
demo:die)
Because this is a hard block, we're setting the sound to stone so that this block sounds like a stone when you place it down or walk over it.
- Copy the following text and paste it into your blocks.json file:
{
  "format_version": "1.19.30",
  "demo:die": {
    "sound": "stone"
     }
}
- Save the file.
Define the block geometry
From Minecraft: Bedrock Edition v1.21.80 and onward, all custom blocks need their geometry explicitly defined to prevent your Resource Pack from conflicting with vanilla block values. Two basic geometries are available out of the box, but you can always create your own custom geometries with the Blockbench Entity Wizard if those don't work for you. For this tutorial, we'll be using minecraft:geometry.full_block—the out of the box geometry for a basic cube.
We'll be using a material_instances component to specify the die textures individually by face with the friendly texture names we assigned in terrain_textures.json. Consult our Reference Documentation for more information on the material_instances component.
Textures can be specified as a string, or as an object with the textures broken down into sub-textures. We'll define sub-textures here as up, down, and the four cardinal directions to give each face a specific texture.
Note
Real-life dice are designed so that the two opposite sides of the die add up to 7.
The item_visual component lets you specify the texture(s) to use when the die block is in your hand, hotbar, and inventory. We're giving that the die_red texture here as a string, but this could also be given an object to specify a texture for each face, too. Check out our Block Components Reference Documentation for a complete list of Item Visual properties.
From the File Explorer, navigate to the custom_block_behavior_pack folder you created earlier.
Open the blocks folder you created there.
Open die.json in a text editor.
Replace the content you added earlier with the content below.
{
  "format_version": "1.21.80",
  "minecraft:block": {
    "description": {
      "identifier": "demo:die"
    },
    "components": {
      "minecraft:geometry": "minecraft:geometry.full_block",
      "minecraft:material_instances": {
        "north": {
          "texture": "die_3"
        },
        "south": {
          "texture": "die_4"
        },
        "east": {
          "texture": "die_2"
        },
        "west": {
          "texture": "die_5"
        },
        "up": {
          "texture": "die_1"
        },
        "down": {
          "texture": "die_6"
        }
      },
      "minecraft:item_visual": {
      "geometry": "minecraft:geometry.full_block",
      "material_instances": {
        "*": {
          "texture": "die_red",
          "render_method": "opaque"
          }
        }
      }
    }
  }
}
Test the block
With the die block defined in both the Behavior Pack and Resource Pack, you're ready to test it in-game!
Create a test world
The following are suggested settings for a test world, but feel free to tweak these as you see fit.
Flat world
Show coordinates
Cheats enabled
Always day
Keep inventory
No mob spawning
No weather cycle
Important
You will need to have a Minecraft world where cheats are enabled in order to add the block to your inventory using the /give command. You will also need to have both custom_block_resource_pack and custom_block_behavior_pack enabled in the world so you can get access to the die block.
Open the chat box.
Type the following command:
/give @s demo:die
Troubleshooting
If there's no custom block Resource Pack or Behavior Pack:
- Do you have a manifest file?
- Does your file structure match the minecraft-samples packs?
- Have you created a world with cheats enabled?
- Are you using Minecraft: Bedrock Edition version 1.19.20 or later?
If the
demo:diedoesn't appear in the game:- Is your Behavior Pack formatted correctly?
If your textures don't load correctly:
- Do your textures and terrain_texture.json file match the custom_block_resource_pack samples?
Now place your block anywhere you'd like. The die is red in hand and in the hotbar because of the carried_textures using the red die block. The sides will look like a colorful die when the block is placed, and walking on the block will use the stone sound.
Good luck!