この記事では、GitHub Actions と Power Automate クラウド フローを使用して、Power Platform でパイプラインを拡張する方法を示します。 パイプラインの展開が送信されると、クラウド フローによって GitHub ワークフローがトリガーされ、アーティファクトのソース コードがダウンロード、展開され、GitHub ブランチにコミットされます。
ワークフローの詳細
ワークフローは workflow_dispatch イベントによってトリガーされます。 ワークフローは ubuntu-latest 上で実行され、GitHub リポジトリ ブランチへの変更をコミットできる contents: write アクセス許可があります。
ワークフローは、次の手順で構成されます:
-
actions/checkout@v3: リポジトリをチェックアウトします。 -
create new branch if specified: 入力にtarget_branchが指定されている場合は、新しいブランチを作成します。 -
download solution from artifact: パイプラインによって作成されたアーティファクトからソリューションをダウンロードします。 -
unpack solution: ソリューションを展開します。 -
commit changes: 既存または新しいブランチへの変更をコミットします。 -
push to branch: コミットされた変更をソース ブランチにプッシュします。
ワークフロー入力
次のワークフロー入力は必須またはオプションです:
-
artifact_url(必須): パイプラインによって作成されたアーティファクトの Microsoft Dataverse 行 (レコード) ID の URL。 -
solution_name(必須): Dataverse 環境のソリューションの名前。 -
source_branch(必須): ソリューション コミットのブランチ。 -
target_branch(オプション): ソリューション コミット用に作成するブランチ。 指定しない場合、source_branchが使用されます。 -
commit_message(必須): コミットに指定するメッセージ。
ワークフロー シークレット
Dataverse と Microsoft Entra ID (AD) で構成されたアプリケーション ユーザーを使用して、Dataverse に接続するには、次のシークレットが必要です。 これらのシークレットは GitHub リポジトリ設定で構成します。
-
CLIENT_ID: 登録された Microsoft Entra アプリケーションのクライアント ID。 -
TENANT_ID: Microsoft Entra アプリケーションに関連付けられている Microsoft Entra ディレクトリのテナント ID。 -
CLIENT_SECRET: 登録された Microsoft Entra アプリケーションのクライアント シークレット。
詳細については、暗号化されたシークレットの作成と使用 と アプリケーション ユーザーの作成 を参照してください。
ワークフロー コード
以下に GitHub Actions ワークフロー コードを示します。
name: Download, unpack and commit the solution to git
run-name: Getting ${{ github.event.inputs.solution_name }} from pipelines host environment and committing
on:
  workflow_dispatch:
    inputs:
      artifact_url:
        description: "The url of the Dataverse record ID for the artifact created by the pipelines (Example: https://[your-env].crm.dynamics.com/api/data/v9.0/deploymentartifacts([your-artifact-id])/artifactfile/$value)."
        required: true
      solution_name:
        description: "Name of the Solution in Dataverse environment"
        required: true
      user_name:
        description: "User name for the commit"
        required: true
      source_branch:
        description: "Branch for the solution commit"
        required: true
      target_branch:
        description: "Branch to create for the solution commit"
        required: false
      commit_message:
        description: "Message to provide for the commit"
        required: true
permissions:
  contents: write
jobs:
  export-unpack-commit:
    runs-on: ubuntu-latest

    steps:
      - uses: actions/checkout@v3
        with:
            ref: ${{ github.event.inputs.source_branch }}

      # Commit changes to the existing or new branch
      - name: create new branch if specified
        shell: pwsh
        run: |
            if('${{ github.event.inputs.target_branch }}' -ne '') {
                git checkout -b ${{ github.event.inputs.target_branch }} ${{ github.event.inputs.source_branch }}
            }

      # Export the solution from the artifact created by pipelines
      - name: download solution from artifact
        env:
            CLIENT_ID: ${{secrets.CLIENT_ID}}
            TENANT_ID: ${{secrets.TENANT_ID}}
            CLIENT_SECRET: ${{secrets.CLIENT_SECRET}}
        shell: pwsh
        run: |
            $aadHost = "login.microsoftonline.com"
            $url = "${{ github.event.inputs.artifact_url }}"
            $options = [System.StringSplitOptions]::RemoveEmptyEntries
            $dataverseHost = $url.Split("://", $options)[1].Split("/")[0]

            $body = @{client_id = $env:CLIENT_ID; client_secret = $env:CLIENT_SECRET; grant_type = "client_credentials"; scope = "https://$dataverseHost/.default"; }
            $OAuthReq = Invoke-RestMethod -Method Post -Uri "https://$aadHost/$env:TENANT_ID/oauth2/v2.0/token" -Body $body
            $spnToken = $OAuthReq.access_token
            $headers = New-Object "System.Collections.Generic.Dictionary[[String],[String]]"
            $headers.Add("Authorization", "Bearer $spnToken")
            $headers.Add("Content-Type", "application/json")

            # Download the managed solution
            $response = Invoke-RestMethod "${{ github.event.inputs.artifact_url }}" -Method 'GET' -Headers $headers
            $bytes = [Convert]::FromBase64String($response.value)
            [IO.File]::WriteAllBytes("${{ github.event.inputs.solution_name }}_managed.zip", $bytes)

            # Download the unmanaged solution (for now we will need to use string manipulation to get the unmanaged solution URL, until the API provides this value)
            $unmanaged_artifact_url = "${{ github.event.inputs.artifact_url }}".Replace("artifactfile", "artifactfileunmanaged")
            $response = Invoke-RestMethod "$unmanaged_artifact_url" -Method 'GET' -Headers $headers
            $bytes = [Convert]::FromBase64String($response.value)
            [IO.File]::WriteAllBytes("${{ github.event.inputs.solution_name }}.zip", $bytes)

      # Unpack the solution
      - name: unpack solution
        uses: microsoft/powerplatform-actions/unpack-solution@v0
        with:
          solution-file: "${{ github.event.inputs.solution_name }}.zip"
          solution-folder: "${{ github.event.repository.name }}"
          solution-type: 'Both'
          process-canvas-apps: false
          overwrite-files: true

      # Commit changes to the existing or new branch
      - name: commit changes
        shell: pwsh
        run: |
          rm -rf ${{ github.event.inputs.solution_name }}.zip
          rm -rf ${{ github.event.inputs.solution_name }}_managed.zip
          git config user.name ${{ github.event.inputs.user_name }}
          git pull
          git add --all
          git commit -am "${{ github.event.inputs.commit_message }}" --allow-empty

      # Push the committed changes to the source branch
      - name: push to branch
        shell: pwsh
        run: |
          if('${{ github.event.inputs.target_branch }}' -ne '') {
              git push origin ${{ github.event.inputs.target_branch }}
          } else {
              git push origin ${{ github.event.inputs.source_branch }}
          }
注意
ソリューション アーティファクトのダウンロードに使用される Dataverse Web API には、最大 16 MB のファイルサイズ制限があります。
Power Automate フローの例
GitHub ワークフローを呼び出すには、Dataverse で展開要求が行われたときにトリガーされる Power Automate フローを作成できます。 必要な入力を GitHub ワークフローに渡すようにフローを構成できます。 Power Automate フローの作成方法の詳細については、フローの作成 を参照してください。
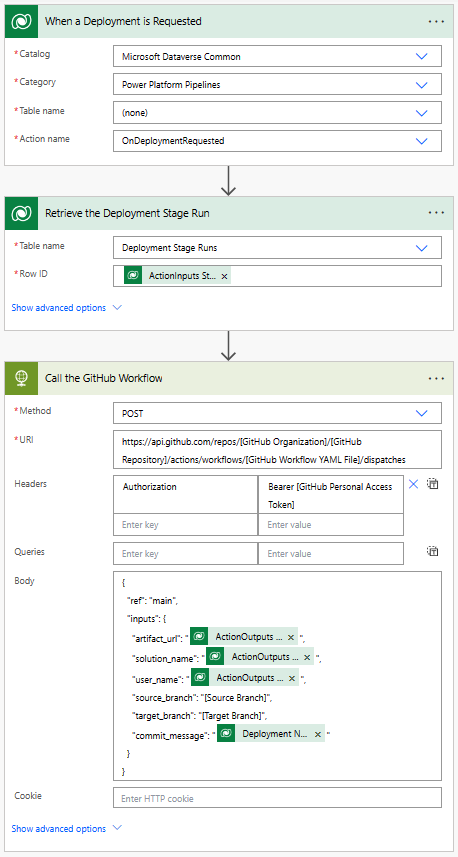
フローの詳細
フローは、OnDeploymentRequested アクションが Dataverse で実行されたときにトリガーされます。 フローは HTTP コネクタを呼び出して、GitHub ワークフローをトリガーします。 フローは、必要な入力を GitHub ワークフローに渡します。 要求本文に次の入力を含めます:
-
artifact_url: パイプラインによって作成された Dataverse ソリューション アーティファクトの URL。 -
solution_name: Dataverse 環境のソリューションの名前。 -
user_name: コミットのユーザー名。 -
source_branch: ソリューション コミットのソース ブランチ。 -
target_branch: ソリューション コミット用に作成するブランチ。 -
commit_message: コミットに指定するメッセージ。
artifact_url、solution_name、user_name に渡される値は、パイプラインをトリガーしたアクションの出力から取得されます。
commit_message は、Dataverse の展開ステージの実行行から取得されます。
-
artifact_url:@{triggerOutputs()?['body/OutputParameters/ArtifactFileDownloadLink']} -
solution_name:@{triggerOutputs()?['body/OutputParameters/ArtifactName']} -
user_name:@{triggerOutputs()?['body/OutputParameters/DeployAsUser']} -
commit_message:@{outputs('Retrieve_the_Deployment_Stage_Run')?['body/deploymentnotes']}
このフローでは、GitHub での認証に個人用アクセス トークン (PAT) も使用します。 GitHub 個人用アクセス トークンの作成方法の詳細については、個人用アクセス トークンの作成 を参照してください。 PAT は、HTTP 要求の Authorization ヘッダーで渡されます。
Flow の以下の値を更新します:
-
[GitHub Personal Access Token]- GitHub 個人用アクセス トークンに置き換えます。 -
[GitHub Organization]- GitHub 組織名に置き換えます。 -
[GitHub Repository]- GitHub リポジトリ名に置き換えます。 -
[GitHub Workflow YAML File]- GitHub ワークフローの YAML ファイル名に置き換えます。 -
[Source Branch]- ソリューションをコミットするには、Git ブランチに置き換えます。 -
[Target Branch]- ソリューション コミット用に作成する Git ブランチに置き換えます。Target Branchはオプションです。 ターゲット ブランチを指定しない場合、ソリューションはSource Branchにコミットされます。
次の手順
参照
GitHub Actions のクイック スタート
Power Platform でパイプラインを拡張する
クラウドフロートは ?