SharePoint Online を使用する場合、Azure AD でアプリケーションを定義することができ、これらのアプリケーションには SharePoint へのアクセス許可だけでなく、Office 365 の他のすべてのサービスへのアクセス許可が付与されます。 このモデルは、SharePoint Online を使用している場合に推奨されるモデルです。オンプレミスで SharePoint を使用している場合は、 こちらの説明に従って、ベースの Azure ACS 経由で SharePoint Only モデルを使用する必要があります。
重要
SharePoint Online 用の Azure ACS (Access Control Services) の使用は、2023 年 11 月 27 日の時点で廃止されました。詳細については、完全な廃止のお知らせをご覧ください。 SharePoint のコンテキストの外部で Azure ACS を使用することは、2018 年 11 月 7 日に既に廃止されており、現在は終了です。
廃止とは、機能が新しい投資を受け取ることを意味しますが、まだサポートされています。 有効期間が終了すると、この機能は廃止され、使用できなくなります。
アプリ専用のアクセス向けに Azure AD アプリを設定する
通常、Azure AD をアプリ専用として実行している場合は、証明書を使用してアクセスを要求します。証明書とその秘密キーを持つ人は、アプリケーションと、アプリケーションに付与されたアクセス許可を使用できます。 以下の手順は、このモデルの設定についての説明です。
アプリ専用アクセス トークンを使用して SharePoint Online を起動するための Azure AD アプリケーションを設定する準備が整いました。 これを行うには、自己署名された X.509 の証明書を作成して設定する必要があります。この証明書は、アプリ専用アクセス トークンを要求しながら Azure AD に対してアプリケーションを認証するために使用されます。 まず、自己署名 X.509 証明書を作成する必要があります。この証明書は、Windows SDK で使用できる makecert.exe ツールを使用して作成できます。このツールは、makecert または PnP PowerShell コマンドを使用する依存関係のない提供された PowerShell スクリプトを使用して作成します。 PowerShell スクリプトの使用が推奨され、この章では、その使用方法について説明します。
重要
管理者特権で以下のスクリプトを実行することが重要です。
自己署名証明書を作成するには、このスクリプトを使用します。
.\Create-SelfSignedCertificate.ps1 -CommonName "MyCompanyName" -StartDate 2017-10-01 -EndDate 2019-10-01
注:
日付は、ISO の日付形式 (YYYY-MM-dd) で用意されています。
証明書キーのアルゴリズムは RSA である必要があります。これは現在サポートされている唯一のアルゴリズムです
ここから、実際のスクリプトをコピーできます。
#Requires -RunAsAdministrator
<#
.SYNOPSIS
Creates a Self Signed Certificate for use in server to server authentication
.DESCRIPTION
.EXAMPLE
PS C:\> .\Create-SelfSignedCertificate.ps1 -CommonName "MyCert" -StartDate 2015-11-21 -EndDate 2017-11-21
This will create a new self signed certificate with the common name "CN=MyCert". During creation you will be asked to provide a password to protect the private key.
.EXAMPLE
PS C:\> .\Create-SelfSignedCertificate.ps1 -CommonName "MyCert" -StartDate 2015-11-21 -EndDate 2017-11-21 -Password (ConvertTo-SecureString -String "MyPassword" -AsPlainText -Force)
This will create a new self signed certificate with the common name "CN=MyCert". The password as specified in the Password parameter will be used to protect the private key
.EXAMPLE
PS C:\> .\Create-SelfSignedCertificate.ps1 -CommonName "MyCert" -StartDate 2015-11-21 -EndDate 2017-11-21 -Force
This will create a new self signed certificate with the common name "CN=MyCert". During creation you will be asked to provide a password to protect the private key. If there is already a certificate with the common name you specified, it will be removed first.
#>
Param(

   [Parameter(Mandatory=$true)]
   [string]$CommonName,

   [Parameter(Mandatory=$true)]
   [DateTime]$StartDate,

   [Parameter(Mandatory=$true)]
   [DateTime]$EndDate,

   [Parameter(Mandatory=$false, HelpMessage="Will overwrite existing certificates")]
   [Switch]$Force,

   [Parameter(Mandatory=$false)]
   [SecureString]$Password
)

# DO NOT MODIFY BELOW

function CreateSelfSignedCertificate(){

    #Remove and existing certificates with the same common name from personal and root stores
    #Need to be very wary of this as could break something
    if($CommonName.ToLower().StartsWith("cn="))
    {
        # Remove CN from common name
        $CommonName = $CommonName.Substring(3)
    }
    $certs = Get-ChildItem -Path Cert:\LocalMachine\my | Where-Object{$_.Subject -eq "CN=$CommonName"}
    if($certs -ne $null -and $certs.Length -gt 0)
    {
        if($Force)
        {

            foreach($c in $certs)
            {
                remove-item $c.PSPath
            }
        } else {
            Write-Host -ForegroundColor Red "One or more certificates with the same common name (CN=$CommonName) are already located in the local certificate store. Use -Force to remove them";
            return $false
        }
    }

    $name = new-object -com "X509Enrollment.CX500DistinguishedName.1"
    $name.Encode("CN=$CommonName", 0)

    $key = new-object -com "X509Enrollment.CX509PrivateKey.1"
    $key.ProviderName = "Microsoft RSA SChannel Cryptographic Provider"
    $key.KeySpec = 1
    $key.Length = 2048
    $key.SecurityDescriptor = "D:PAI(A;;0xd01f01ff;;;SY)(A;;0xd01f01ff;;;BA)(A;;0x80120089;;;NS)"
    $key.MachineContext = 1
    $key.ExportPolicy = 1 # This is required to allow the private key to be exported
    $key.Create()

    $serverauthoid = new-object -com "X509Enrollment.CObjectId.1"
    $serverauthoid.InitializeFromValue("1.3.6.1.5.5.7.3.1") # Server Authentication
    $ekuoids = new-object -com "X509Enrollment.CObjectIds.1"
    $ekuoids.add($serverauthoid)
    $ekuext = new-object -com "X509Enrollment.CX509ExtensionEnhancedKeyUsage.1"
    $ekuext.InitializeEncode($ekuoids)

    $cert = new-object -com "X509Enrollment.CX509CertificateRequestCertificate.1"
    $cert.InitializeFromPrivateKey(2, $key, "")
    $cert.Subject = $name
    $cert.Issuer = $cert.Subject
    $cert.NotBefore = $StartDate
    $cert.NotAfter = $EndDate
    $cert.X509Extensions.Add($ekuext)
    $cert.Encode()

    $enrollment = new-object -com "X509Enrollment.CX509Enrollment.1"
    $enrollment.InitializeFromRequest($cert)
    $certdata = $enrollment.CreateRequest(0)
    $enrollment.InstallResponse(2, $certdata, 0, "")
    return $true
}

function ExportPFXFile()
{
    if($CommonName.ToLower().StartsWith("cn="))
    {
        # Remove CN from common name
        $CommonName = $CommonName.Substring(3)
    }
    if($Password -eq $null)
    {
        $Password = Read-Host -Prompt "Enter Password to protect private key" -AsSecureString
    }
    $cert = Get-ChildItem -Path Cert:\LocalMachine\my | where-object{$_.Subject -eq "CN=$CommonName"}

    Export-PfxCertificate -Cert $cert -Password $Password -FilePath "$($CommonName).pfx"
    Export-Certificate -Cert $cert -Type CERT -FilePath "$CommonName.cer"
}

function RemoveCertsFromStore()
{
    # Once the certificates have been been exported we can safely remove them from the store
    if($CommonName.ToLower().StartsWith("cn="))
    {
        # Remove CN from common name
        $CommonName = $CommonName.Substring(3)
    }
    $certs = Get-ChildItem -Path Cert:\LocalMachine\my | Where-Object{$_.Subject -eq "CN=$CommonName"}
    foreach($c in $certs)
    {
        remove-item $c.PSPath
    }
}

if(CreateSelfSignedCertificate)
{
    ExportPFXFile
    RemoveCertsFromStore
}
秘密キーを暗号化するためのパスワードを入力するように求められ、.PFX ファイルと .CER ファイルの両方が現在のフォルダーにエクスポートされます。
注:
自己署名証明書は、 New-PnPAzureCertificate コマンドを使用して生成することもできます。
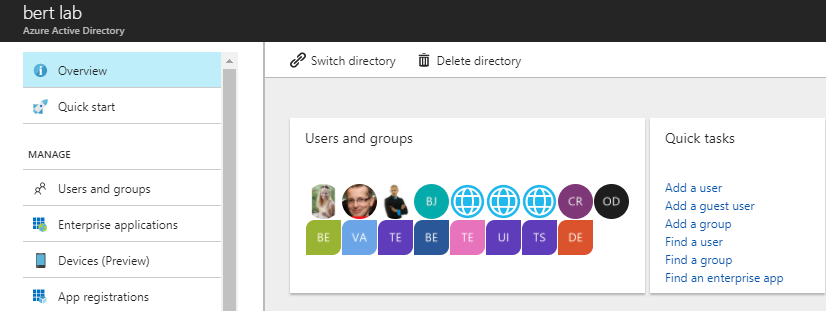
次の手順では、Office 365 テナントにリンクされている Azure Active Directory テナントに Azure AD アプリケーションを登録します。 そのためには、テナント グローバル管理者グループのユーザー メンバーのアカウントを使用して、Office 365 Admin センター (https://admin.microsoft.com) を開きます。 Office 365 管理センターの左側のツリー ビューにある "管理センター" グループの下にある "Azure Active Directory" リンクをクリックします。 開かれる新しいブラウザーのタブに、Microsoft Azure portal が表示されます。 アカウントで初めて Azure portal にアクセスする場合は、新しい Azure サブスクリプションを登録する必要があります。また、発生する支払いのために、いくつかの情報の提供とクレジットカードが必要となります。 ただし、Azure AD を試用し、Office 365 アプリケーションを登録する場合は、支払いは発生しませんのでご安心ください。 実際、これらの機能は無料で使用することができます。 Azure ポータル にアクセスしたら、[Azure Active Directory] セクションを選択し、[アプリの登録] オプションを選択します。 詳細については、次の図を参照してください。

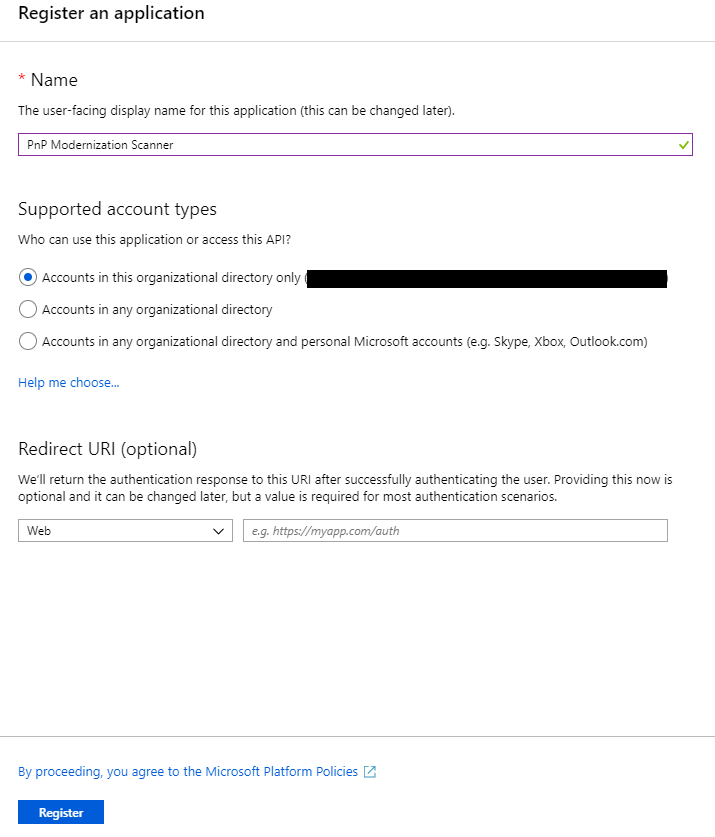
[アプリの登録] タブには、テナントに登録されている Azure AD アプリケーションのリストがあります。 ブレードの左上部にある [新規登録] ボタンをクリックします。 次に、アプリケーションの名前を指定し、ブレードの下部にある [登録] をクリックします。

重要
アプリケーションが作成されたら、後で必要に応じて "アプリケーション (クライアント) ID" をコピーします。
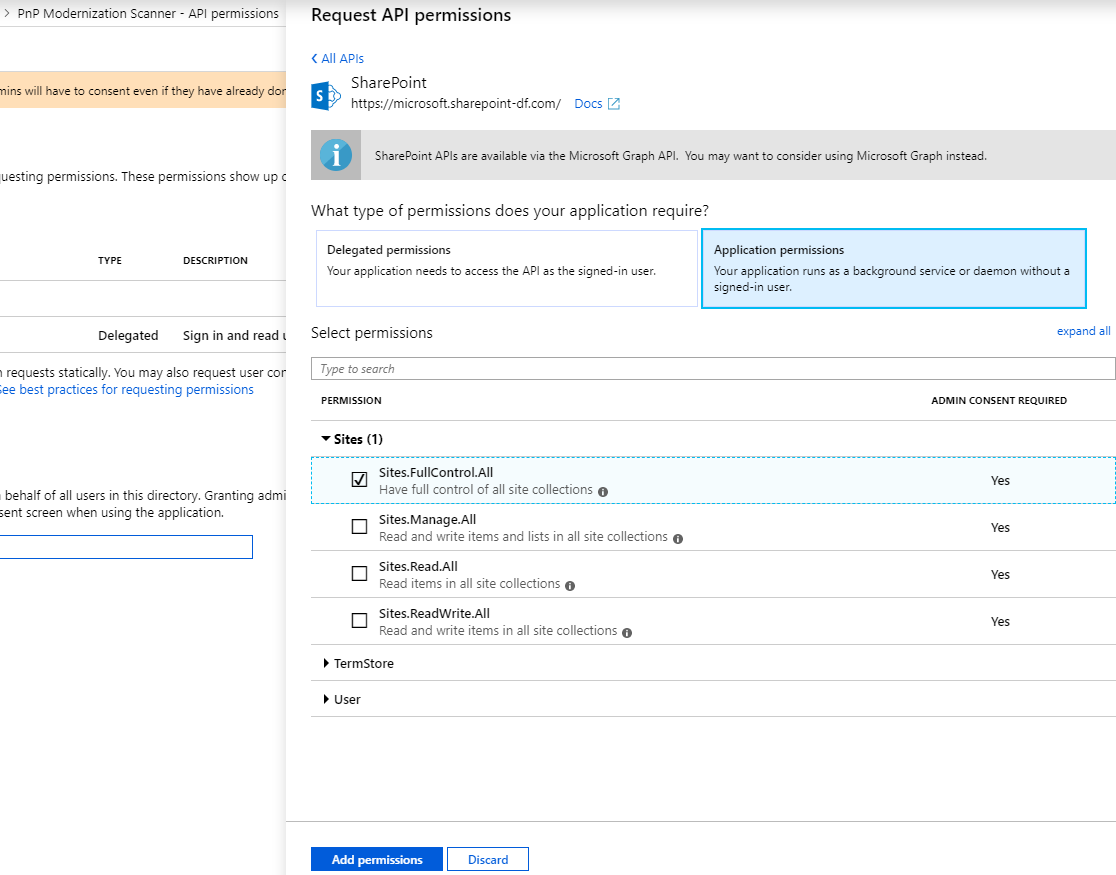
今度は左側のメニュー バーで [API のアクセス許可] をクリックし、[アクセス許可の追加] ボタンをクリックします。 新しいブレードが表示されます。 ここで、このアプリケーションに付与するアクセス許可を選択します。 すなわち、以下を選択します:
- SharePoint
- アプリケーションのアクセス許可
- サイト
- Sites.FullControl.All
- サイト
- アプリケーションのアクセス許可
下部にある青い [アクセス許可の追加] ボタンをクリックして、アプリケーションにアクセス許可を追加します。 "アプリケーションのアクセス許可" は、アプリ専用として実行している際にアプリケーションに付与されるものです。

最後の手順は、先ほど作成した証明書をアプリケーションに "接続" することです。 左側のメニュー バーで、[証明書と機密情報] をクリックします。 [証明書のアップロード] ボタンをクリックし、先ほど生成した .CER ファイルを選択し、[追加] をクリックしてこのファイルをアップロードします。
証明書が正常に登録されていることを確認するには、左側のメニュー バーで [マニフェスト] をクリックします。 keyCredentials プロパティを見つけます。 次のようになっているはずです。
  "keyCredentials": [
    {
      "customKeyIdentifier": "<$base64CertHash>",
      "endDate": "2021-05-01T00:00:00Z",
      "keyId": "<$guid>",
      "startDate": "2019-05-01T00:00:00Z",
      "type": "AsymmetricX509Cert",
      "usage": "Verify",
      "value": "<$base64Cert>",
      "displayName": "CN=<$name of your cert>"
     }
  ],
セクションがだいたいこのように表示される場合、証明書が正常に追加されたことになります。
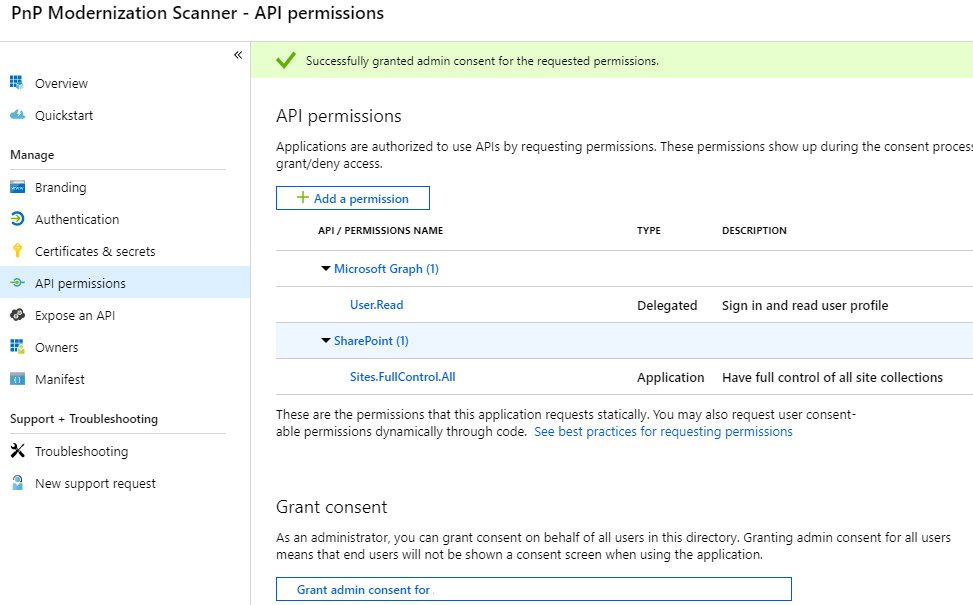
このサンプルでは、Sites.FullControl.All のアプリケーションのアクセス許可は、使用する前に、テナントの管理者の許諾を必要とします。 これを行うには、左側のメニューで [API アクセス許可] をもう一度クリックします。 下部に、[同意の付与] というセクションが表示されます。 [{{organization名}} に管理者の同意を付与する] ボタンをクリックし、上部に表示される [はい] ボタンをクリックしてアクションを確認します。

PnP PowerShell でこのプリンシパルを使用する
Azure AD アプリ専用プリンシパルを PnP PowerShell で使用する場合は、PnP PowerShell モジュールのインストール後に以下を使用して SharePoint Online 環境に接続できます。
Connect-PnPOnline -ClientId <$application client id as copied over from the AAD app registration above> -CertificatePath '<$path to the PFX file generated by the PowerShell script above>' -CertificatePassword (ConvertTo-SecureString -AsPlainText "<$password assigned to the generated certificate pair above>" -Force) -Url https://<$yourtenant>.sharepoint.com -Tenant "<$tenantname>.onmicrosoft.com"
これにより、このアプリ専用証明信頼を使用して、SharePoint Online 環境に対して PnP PowerShell を通して操作を実行できるようになります。
注:
PnP PowerShell はオープン ソース ソリューションであり、アクティブなコミュニティでサポートが提供されています。 Microsoft からのオープン ソース ツールのサポート SLA はありません。
SharePoint PnP Framework ライブラリを使用してアプリケーションでこのプリンシパルを使用する
最初の手順では、PnP Framework ライブラリ NuGet パッケージを追加します。 https://www.nuget.org/packages/PnP.Framework
完了したら、次のコードコンストラクトを使用できます。
using PnP.Framework;
using System;

namespace AzureADCertAuth
{
    class Program
    {
        static void Main(string[] args)
        {
            var authManager = new AuthenticationManager("<application id>", "c:\\temp\\mycert.pfx", "<password>", "contoso.onmicrosoft.com");
            using (var cc = authManager.GetContext("https://contoso.sharepoint.com/sites/demo"))
            {
                cc.Load(cc.Web, p => p.Title);
                cc.ExecuteQuery();
                Console.WriteLine(cc.Web.Title);
            };
        }
    }
}
注:
PnP Framework は、アクティブなコミュニティがサポートを提供するオープンソース ソリューションです。 Microsoft からのオープン ソース ツールのサポート SLA はありません。
PnP Framework ライブラリを使用して Powershell スクリプトでこのプリンシパルを使用する
Azure Automation Runbook を使用するには、まず共有リソースの下にある証明書オプションで、証明書 (.pfx) を追加し、次に Get-AutomationCertificate コマンドレットを使ってスクリプトで使用する証明書を取得します。
注:
まず、PnP.Framework モジュールを Automation アカウントに追加する必要があります。 このモジュールには、認証呼び出しを行うために必要なすべてのものが含まれています。
# path to installed modules
$path = "C:\Modules\User\SharePointPnPPowerShellOnline"

# reference to needed assemblies
Add-Type -Path "$path\Microsoft.SharePoint.Client.dll"
Add-Type -Path "$path\Microsoft.SharePoint.Client.Runtime.dll"
Add-Type -Path "$path\PnP.Framework.dll"
Add-Type -Path "$path\PnP.Core.dll"
Add-Type -Path "$path\Microsoft.Identity.Client.dll"

# reference to the certificate
$cert = Get-AutomationCertificate -Name 'NameOfCertificate'

# set the variables
$siteUrl = "https://<tenant>.sharepoint.com"
$appId = "<guid of the App>"
$domain = "<tenant>.onmicrosoft.com"
$azureEnv = [PnP.Framework.AzureEnvironment]::Production

try {
    # instantiate the object
    $clientContext = $null
    $authManager = new-object PnP.Framework.AuthenticationManager($appId, $cert, $domain, $null, $azureEnv)

    # configure the object
    $clientContext = $authManager.GetContext($siteUrl)

    # do some stuff
    $clientContext.Load($clientContext.Web)
    $clientContext.ExecuteQuery()
    $clientContext.Web.Title
}
catch {
    # catch error if needed
}
finally {
    $clientContext.Dispose()
}
アプリケーションでこのプリンシパルを使用し、Azure KeyVault を使用して証明書を保存し、 Azure 関数を使用して取得する
マネージド ID を Azure 関数に追加し、この ID アクセス (シークレットに対してアクセス許可を取得する) を KeyVault に許可します。
次に、証明書へのパスではなく実際の証明書を渡す、同じ AuthenticationManager メソッドの呼び出しが少し異なります。 Azure 関数のマネージド ID を使用して KeyVault から証明書に取得するための追加の関数が追加されました。この取得は、DefaultAzureCredential で "マジック" が発生するため、シームレスで透過的です。
このサンプルでは、2 つのライブラリを使用して、Key Vaultにアクセスします。
- Key Vaultに対する認証のための Azure.Identity
- 証明書を取得するための Azure.Security.KeyVault.Secrets
using Azure.Identity;
using Azure.Security.KeyVault.Secrets;
using Microsoft.SharePoint.Client;
using System.Security.Cryptography.X509Certificates;

using (var cc = new PnP.Framework.AuthenticationManager(
    "<application id>",
    GetKeyVaultCertificate("kv-spo", "AzureAutomationSPOAccess"),
    "contoso.onmicrosoft.com").GetContext("https://contoso.sharepoint.com/sites/demo"))
{
    cc.Load(cc.Web, p => p.Title);
    cc.ExecuteQuery();
    log.Info("Via PnP, we have site: " + cc.Web.Title);
};

static X509Certificate2 GetKeyVaultCertificate(string keyvaultName, string name)
{
    // Some steps need to be taken to make this work
    // 1. Create a KeyVault and upload the certificate
    // 2. Give the Function App the permission to GET certificates via Access Policies in the KeyVault
    // 3. Call an explicit access token request to the management resource to https://vault.azure.net and use the URL of our Keyvault in the GetSecret method
    Uri keyVaultUri = new Uri($"https://{keyvaultName}.vault.azure.net/");

    var client = new SecretClient(keyVaultUri, new DefaultAzureCredential());
    KeyVaultSecret secret = client.GetSecret(name);

    return new X509Certificate2(Convert.FromBase64String(secret.Value), string.Empty, X509KeyStorageFlags.MachineKeySet);
}
Pnp モダン化スキャナーでこのプリンシパルを使用する
Azure Active Directory アプリケーションの登録の作成は完了しているので、このプリンシパルをこのツールで使用するにはこちらの手順に従ってください。
FAQ
Azure AD アプリのアプリ専用アクセスを実現するために、証明書以外の方法を使用できますか?
いいえ、他のすべてのオプションは SharePoint Online によってブロックされ、アクセス拒否メッセージが表示されます。