SharePoint アドイン モデルでは、アプリ パーツを作成して SharePoint クラシック ページ用のカスタム Web パーツを作成することに慣れている。 新しいSharePoint Frameworkでは、クライアント側の Web パーツを作成することで、クラシック ページとモダン ページの両方で同じ結果を得ることができます。
この記事では、既存のアプリ パーツを最新のクライアント側 Web パーツに変換する方法について詳しく説明します。
必要に応じて、記事全体を読む代わりに、次のビデオをwatchできます。これは、より詳細なリファレンスと見なすことができます。

注:
SharePoint Framework Web パーツの作成の詳細については、「最初の SharePoint クライアント側 Web パーツをビルドする」を参照してください。
アプリ パーツをクライアント側 Web パーツに変換する
サイトの "共有ドキュメント" ライブラリ内のドキュメントの一覧をレンダリングするアプリ パーツがあるとします。 アプリ パーツは構成可能であり、項目に対して検索フィルターを定義できます。 次のスクリーンショットでは、アプリ パーツの UI を確認できます。
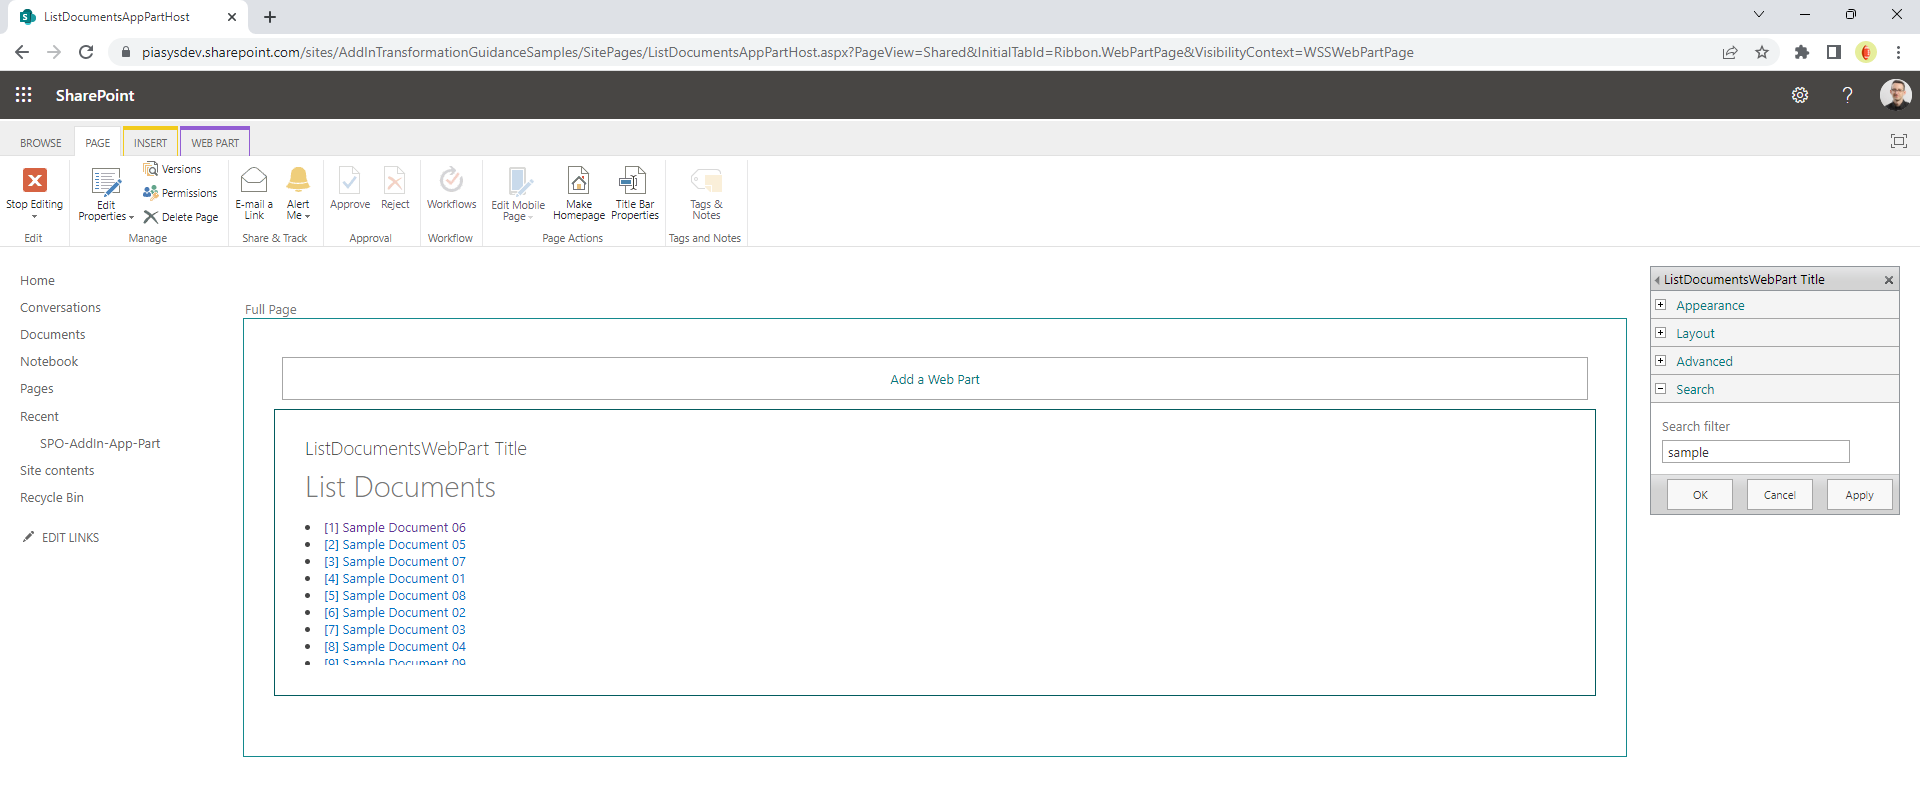
次に、アプリ パーツを、SharePoint Frameworkで構築された最新のクライアント側 Web パーツに変換します。
移行元の SharePoint アドイン モデル ソリューション
次のコードの抜粋では、アプリ パーツ JavaScript コードの実際の実装を確認できます。
var hostweburl;
var appweburl;
var clientContext;
var hostweb;
var documentsLibrary;
var docs;

// This code runs when the DOM is ready and creates a context object which is
// needed to use the SharePoint object model
$(document).ready(function () {
    hostweburl = decodeURIComponent(getQueryStringParameter("SPHostUrl"));
    appweburl = decodeURIComponent(getQueryStringParameter("SPAppWebUrl"));
    searchfilter = decodeURIComponent(getQueryStringParameter("SearchFilter"));

    clientContext = new SP.ClientContext.get_current();
    hostWebContext = new SP.AppContextSite(clientContext, hostweburl);
    hostweb = hostWebContext.get_web();
    listDocuments(searchfilter);
});

// This function retrieves the documents in the "Shared Documents" library of the parent site
function listDocuments(searchfilter) {
    documentsLibrary = hostweb.get_lists().getByTitle("Documents");
    if (searchfilter === undefined || searchfilter === '') {
        var camlQuery = SP.CamlQuery.createAllItemsQuery();
        docs = documentsLibrary.getItems(camlQuery);
    } else {
        var camlQuery = new SP.CamlQuery();
        var q = '<View><Query><Where><Contains><FieldRef ' +
            'Name="Title" /><Value Type="Text">' + searchfilter +
            '</Value></Contains></Where></Query></View>';
        camlQuery.set_viewXml(q);

        docs = documentsLibrary.getItems(camlQuery);
    }

    clientContext.load(docs);
    clientContext.executeQueryAsync(onListDocumentsSucceded, onListDocumentsFailed);
}

// In case of successful retrieval of the docs
function onListDocumentsSucceded(sender, args) {
    $("#listDocuments").empty();

    if (docs.get_count() > 0) {
        var docsEnumerator = docs.getEnumerator();

        $("#listDocuments").append('<ul>');
        while (docsEnumerator.moveNext()) {
            var doc = docsEnumerator.get_current();

            var docId = doc.get_item("ID");
            var docServerRedirectedEmbedUri = doc.get_serverRedirectedEmbedUri();
            var docTitle = doc.get_item("Title");

            $("#listDocuments").append('<li><a href="' + docServerRedirectedEmbedUri + '">[' + docId + '] ' + docTitle + '</a></li>');
        }
        $("#listDocuments").append('</ul>');
    }
}

// In case of failed retrieval of the docs
function onListDocumentsFailed(sender, args) {
    alert('Request failed ' + args.get_message() + '\n' + args.get_stackTrace());
}

function getQueryStringParameter(paramToRetrieve) {
    var params =
        document.URL.split("?")[1].split("&");
    var strParams = "";
    for (var i = 0; i < params.length; i = i + 1) {
        var singleParam = params[i].split("=");
        if (singleParam[0] == paramToRetrieve)
            return singleParam[1];
    }
}
ご覧のとおり、コードはクライアント側コード (JavaScript) に完全に基づいており、SharePoint JavaScript オブジェクト モデルを使用して、現在のサイトへの参照を取得し、"共有ドキュメント" のライブラリに対して取得し、ユーザーが選択したフィルターに基づいてドキュメントにクエリを実行します。
その後、アプリ パーツは XML マニフェスト ファイルで定義され、"検索フィルター" パラメーターも定義されます。
<?xml version="1.0" encoding="utf-8"?>
<Elements xmlns="http://schemas.microsoft.com/sharepoint/">
<ClientWebPart Name="ListDocumentsWebPart" Title="ListDocumentsWebPart Title" Description="ListDocumentsWebPart Description" DefaultWidth="300" DefaultHeight="200">
<!-- Content element identifies the location of the page that will render inside the client web part
Properties are referenced on the query string using the pattern _propertyName_
Example: Src="~appWebUrl/Pages/ClientWebPart1.aspx?Property1=_property1_" -->
<Content Type="html" Src="~appWebUrl/Pages/ListDocumentsWebPart.aspx?{StandardTokens}&SearchFilter=_SearchFilter_" />
<!-- Define properties in the Properties element.
Remember to put Property Name on the Src attribute of the Content element above. -->
<Properties>
<Property xmlns="http://schemas.microsoft.com/sharepoint/"
Name="SearchFilter"
DefaultValue=""
Multilingual="true"
PersonalizationScope="user"
PersonalizableIsSensitive="true"
Type="string"
RequiresDesignerPermission="false"
WebBrowsable= "true"
WebCategory="Search"
WebDescription="Define a custom search filter"
WebDisplayName="Search filter">
</Property>
</Properties>
</ClientWebPart>
</Elements>
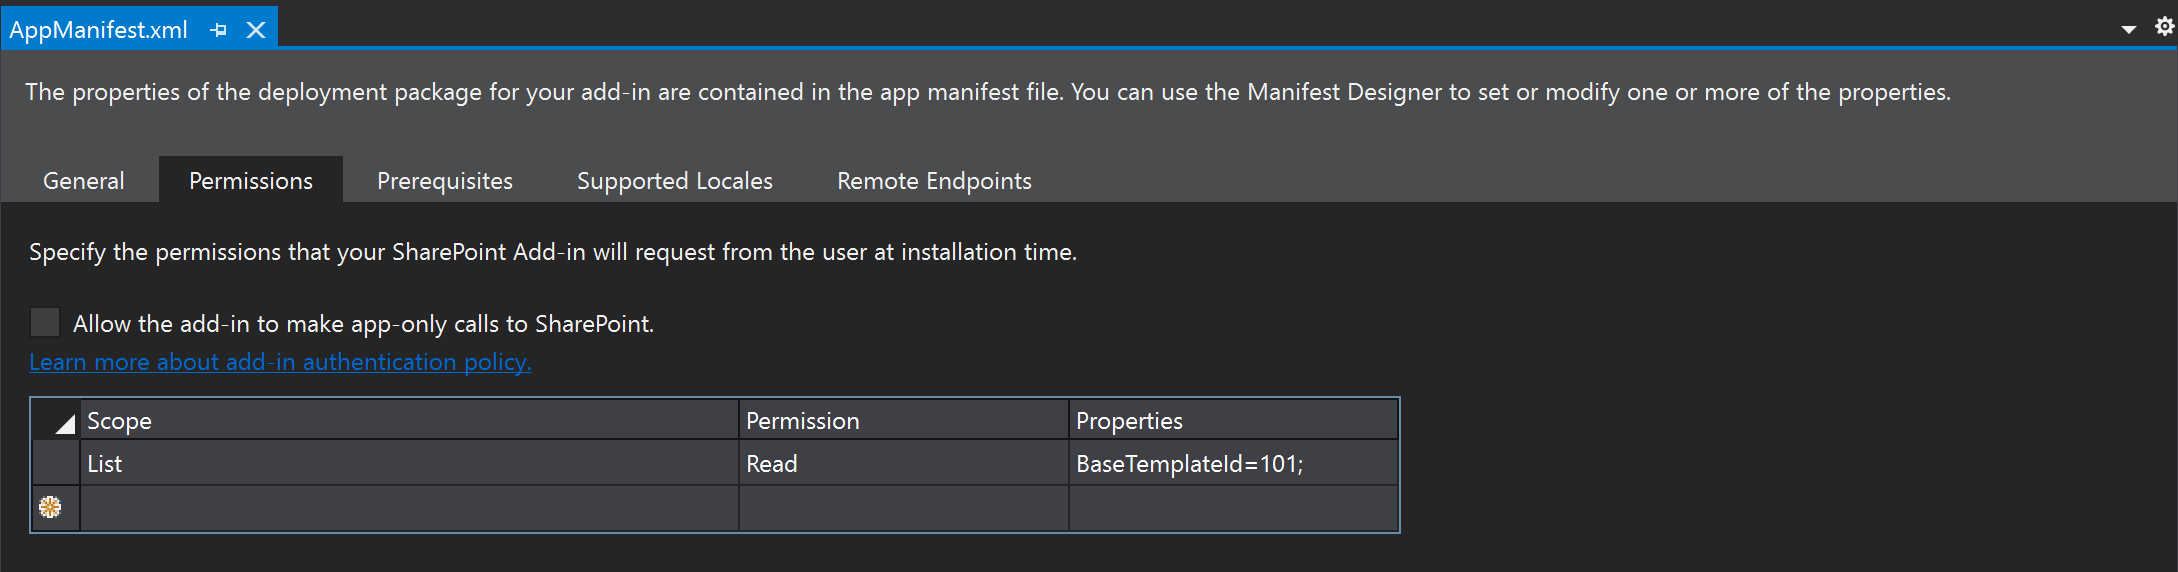
これを機能させるには、SharePoint アドイン モデル ソリューションの AppManifest.xml ファイルで定義されているライブラリの読み取りアクセス許可 (BaseTemplate=101) が必要です。 次のスクリーンショットでは、AppManifest.xml ファイルの構成を確認できます。
SharePoint Framework ソリューションの作成
次に、前の SharePoint アドイン モデル ソリューションの変換に使用する新しいSharePoint Framework ソリューションを作成しましょう。
まず、SharePoint Framework ソリューションをスキャフォールディングする必要があるため、コマンド プロンプトまたはターミナル ウィンドウを起動し、フォルダーを作成し、新しく作成したフォルダー内から次のコマンドを実行します。
重要
示された手順に従うには、開発環境にSharePoint Frameworkをインストールする必要があります。 環境の設定方法の詳細については、「SharePoint Framework開発環境を設定する」を参照してください。
yo @microsoft/sharepoint
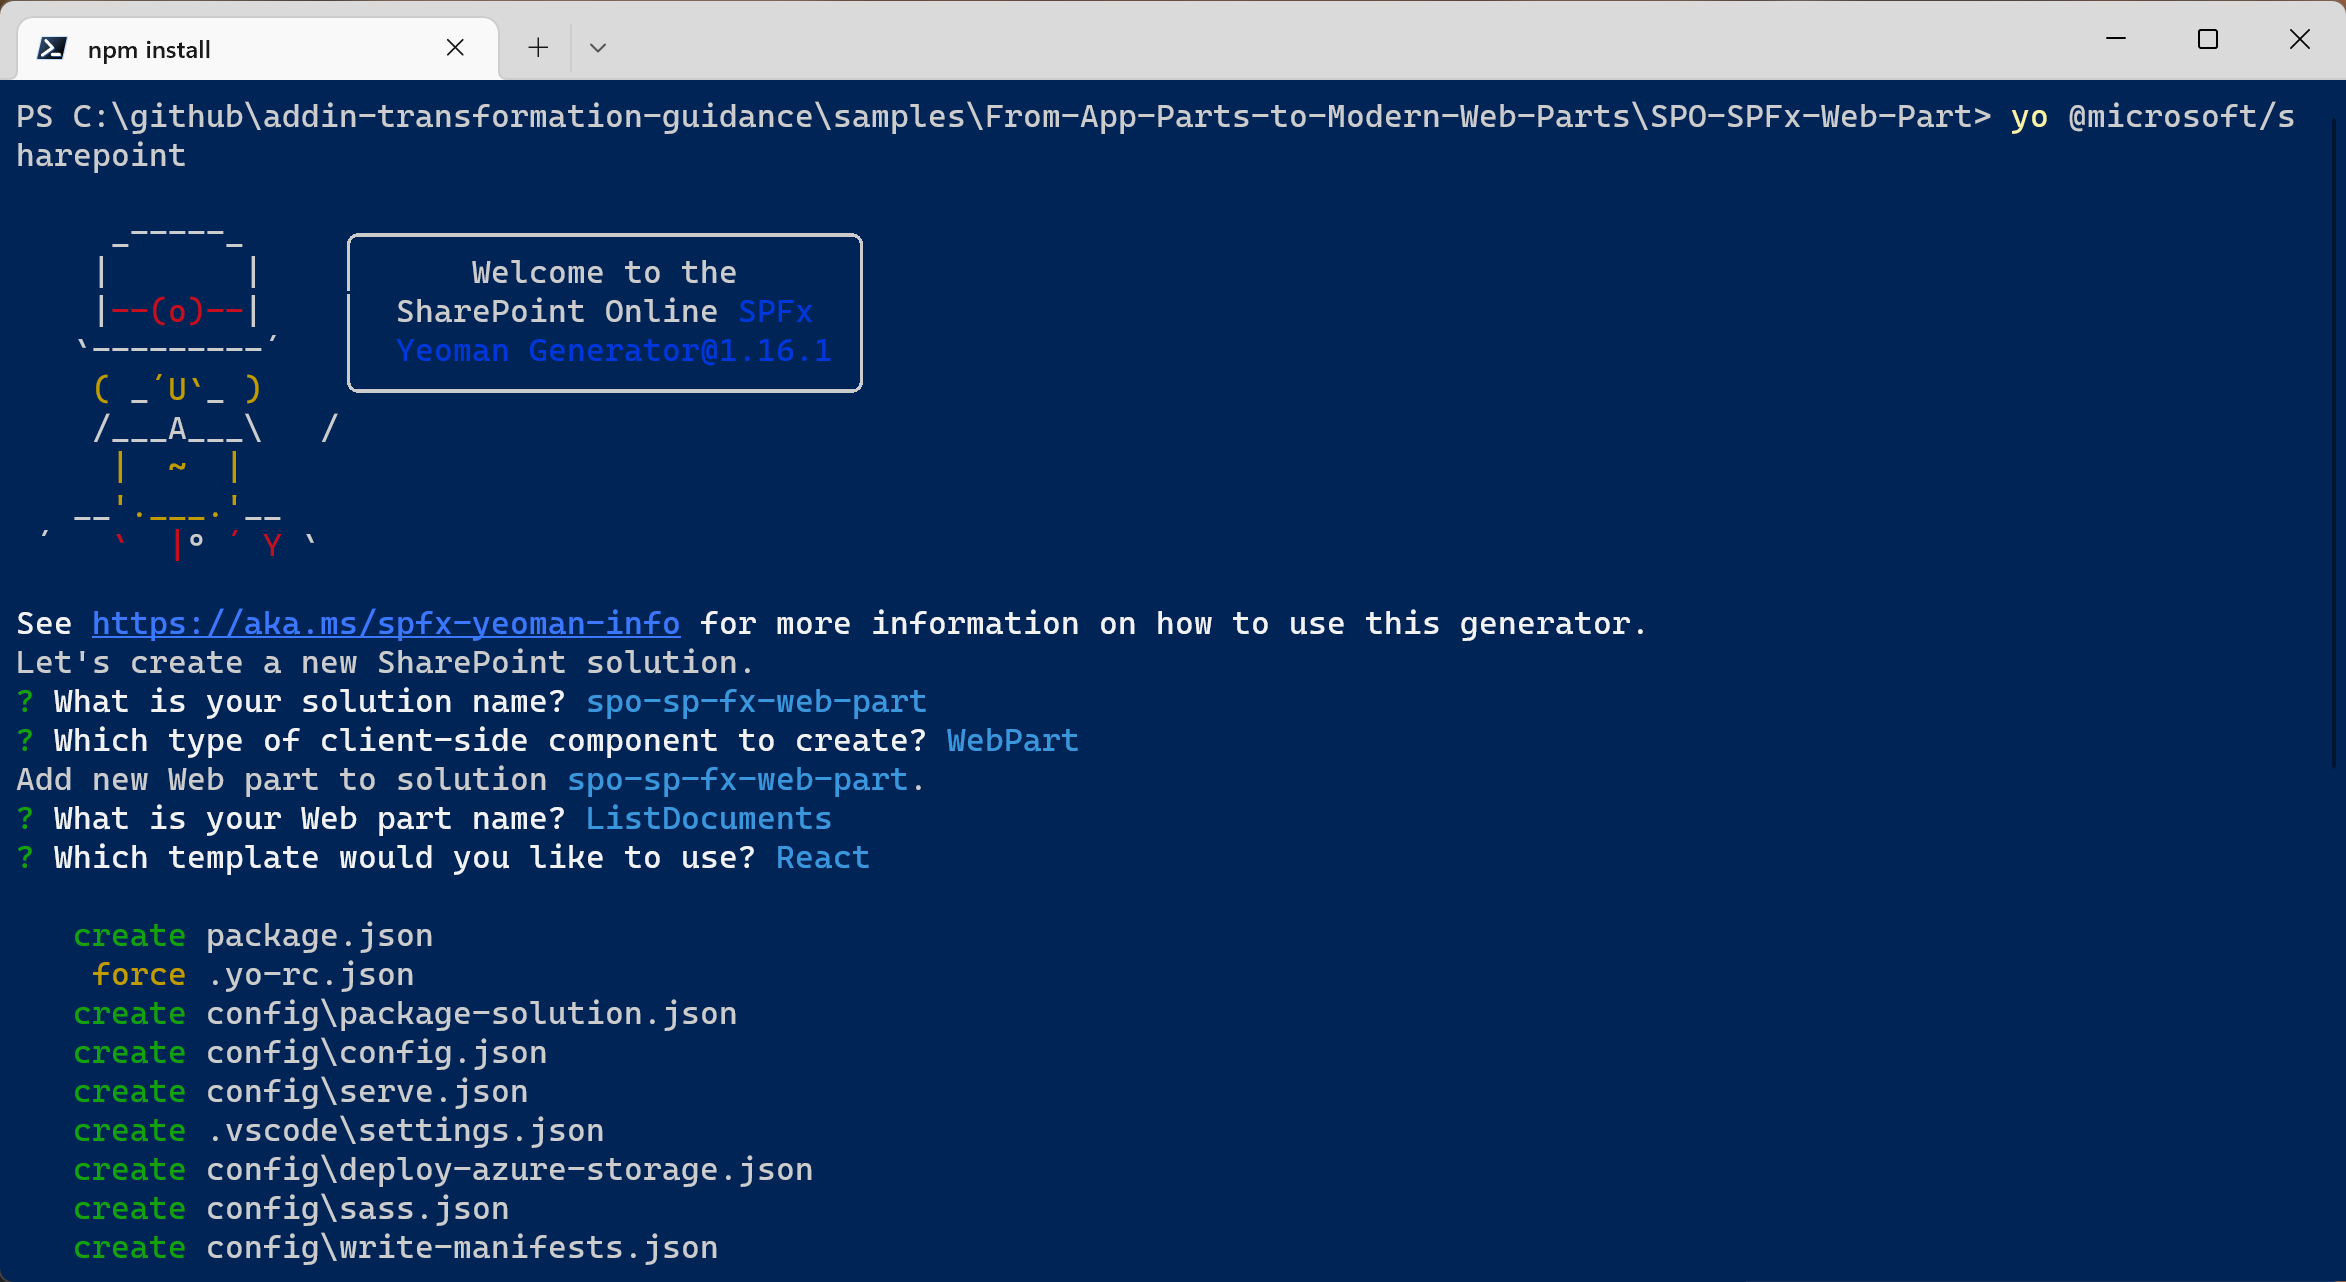
プロンプトに従って、最新の Web パーツのソリューションをスキャフォールディングします。 具体的には、ツールによってプロンプトが表示されたら、次の選択を行います。
- ソリューション名は何ですか? spo-sp-fx-web-part
- どの種類のクライアント側コンポーネントを作成しますか? WebPart
- Web パーツ名は何ですか? ListDocuments
- どのテンプレートを使用しますか? React
上記の回答では、spo-sp-fx-web-part という名前のソリューションを作成することにしました。このソリューションには ListDocuments という名前の Web パーツがあり、これはユーザー エクスペリエンスをレンダリングするためのReactに基づいています。
スキャフォールディング ツールは、新しいSharePoint Framework ソリューションを生成します。 完了したら、お気に入りのコード エディターを使用して現在のフォルダーを開くことができます。 ただし、ソリューションを開く前に、パッケージを追加して、ターゲット ライブラリ内のファイルの一覧を見やすく見やすくする必要があります。 実際には、次のコマンドを実行して、コンポーネントの Microsoft Graph Toolkit (MGT) ライブラリを参照します。
npm install @microsoft/mgt-spfx @microsoft/mgt-react --save
注:
Microsoft Graph Toolkit は、SharePoint Framework ソリューションを含め、クライアント側ソリューションの UI のレンダリングを高速化するための一連のコンポーネントです。 このサンプル ソリューションで使用することは必須ではありませんが、学習と開発プロセスを高速化する簡単な方法です。 MGT の詳細については、Microsoft Graph Toolkit の概要に関するドキュメントを参照してください。また、Microsoft Graph Toolkit のドキュメント SharePoint Framework ライブラリを読むSharePoint Frameworkと MGT を統合する方法について説明します。
これで、お気に入りのコード エディターでソリューションを開くことができます。 お気に入りのコード エディターが Microsoft Visual Studio Code の場合は、次のコマンドを実行します。
code .
次の図では、生成されたSharePoint Framework ソリューションの概要を確認できます。
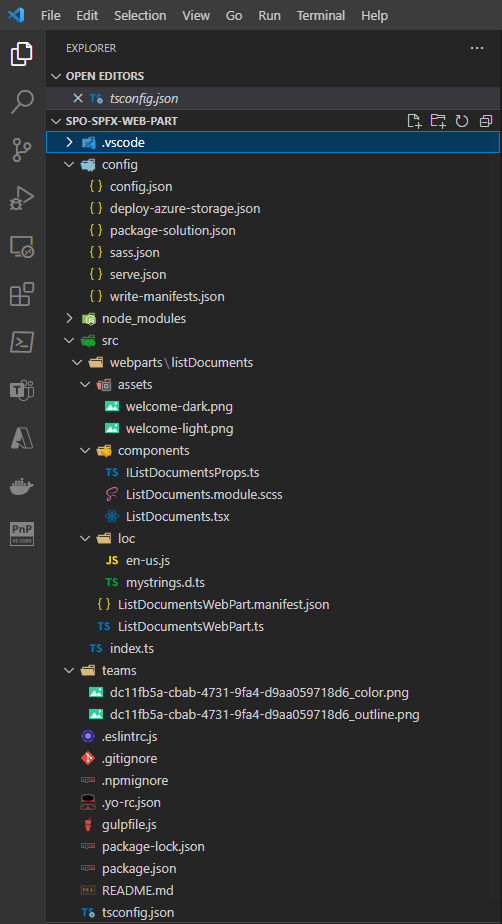
開始するメイン ファイルは、src\webparts\listDocuments フォルダーの下にある ListDocumentsWebPart.ts です。 このファイルは、SharePoint Frameworkで使用される TypeScript 構文に基づいています。
// Here we intentionally removed some of the auto-generated code, for the sake of simplicity ...

export interface IListDocumentsWebPartProps {
  description: string;
}

export default class ListDocumentsWebPart extends BaseClientSideWebPart<IListDocumentsWebPartProps> {

  private _isDarkTheme: boolean = false;
  private _environmentMessage: string = '';

  public render(): void {
    const element: React.ReactElement<IListDocumentsProps> = React.createElement(
      ListDocuments,
      {
        description: this.properties.description,
        isDarkTheme: this._isDarkTheme,
        environmentMessage: this._environmentMessage,
        hasTeamsContext: !!this.context.sdks.microsoftTeams,
        userDisplayName: this.context.pageContext.user.displayName
      }
    );

    ReactDom.render(element, this.domElement);
  }

  protected onInit(): Promise<void> {
    return this._getEnvironmentMessage().then(message => {
      this._environmentMessage = message;
    });
  }

  // Here we intentionally removed some of the auto-generated code, for the sake of simplicity ...

  protected onDispose(): void {
    ReactDom.unmountComponentAtNode(this.domElement);
  }

  protected get dataVersion(): Version {
    return Version.parse('1.0');
  }

  protected getPropertyPaneConfiguration(): IPropertyPaneConfiguration {
    return {
      pages: [
        {
          header: {
            description: strings.PropertyPaneDescription
          },
          groups: [
            {
              groupName: strings.BasicGroupName,
              groupFields: [
                PropertyPaneTextField('description', {
                  label: strings.DescriptionFieldLabel
                })
              ]
            }
          ]
        }
      ]
    };
  }
}
上に示したコードの抜粋は、ListDocumentsWebPart.ts ファイルのメインコードの抜粋を示しています。
まず、Web パーツが ListDocumentsWebPart という名前の TypeScript クラスとして宣言されていることに注目してください。これは、基本型 BaseClientSideWebPart<IListDocumentsWebPartProps>から継承されます。
BaseClientSideWebPart 型は、SharePoint Frameworkの基本ライブラリによって提供されますが、インターフェイス IListDocumentsWebPartProps は Web パーツ クラス宣言の直前に定義され、カスタム Web パーツの構成プロパティが定義されます。
SharePoint アドイン モデル ソリューションの XML マニフェスト ファイル内の <Property /> 要素の一覧として使用されたものが、TypeScript インターフェイスで定義されているプロパティの一覧になりました。
Web パーツのプロパティを構成するためのプロパティ ウィンドウは、各プロパティのフィールドをレンダリングする getPropertyPaneConfiguration メソッドのおかげでレンダリングされます。 フィールドのレンダリングは、src\webparts\listDocuments\loc フォルダーの下にある、SharePoint Framework ソリューション内で宣言された外部ファイルで定義されたリソース文字列にも依存します。 スキャフォールディング ツールによって生成される既定の言語は、米国英語 (en-us) です。
そのため、アプリ パーツのフィルター処理エクスペリエンスと同じドキュメントを提供する場合は、インターフェイス定義を次のものに置き換えることができます。
export interface IListDocumentsWebPartProps {
  searchFilter: string;
}
次のコード抜粋のように、 getPropertyPaneConfiguration メソッドの実装も更新する必要があります。
  protected getPropertyPaneConfiguration(): IPropertyPaneConfiguration {
    return {
      pages: [
        {
          header: {
            description: strings.PropertyPaneDescription
          },
          groups: [
            {
              groupName: strings.BasicGroupName,
              groupFields: [
                PropertyPaneTextField('searchFilter', {
                  label: strings.SearchFilterFieldLabel
                })
              ]
            }
          ]
        }
      ]
    };
  }
groupFields 内のPropertyPaneTextFieldオブジェクトが更新され、新しい searchFilter プロパティが処理されたことに注意してください。 フィールドのラベルの新しいリソース文字列もあります。これは src\webparts\listDocuments\loc\mystrings.d.ts ファイルに作成され、その値は リソース ファイル src\webparts\listDocuments\loc\en-us.jsで構成されています。
Web パーツ コードのもう 1 つの興味深い部分はレンダー メソッドです。スキャフォールディング されたソリューションは、src\webparts\listDocuments\components フォルダーで定義されているReact コンポーネントのインスタンスを作成するだけです。 ご覧のとおり、React コンポーネントは、一連のプロパティを入力引数として受け取り、動作を構成します。
IListDocumentsWebPartProps インターフェイスの description プロパティを置き換えたので、次のコード抜粋に示すように、それに応じて render メソッドを更新する必要もあります。 さらに、Microsoft Graph を使用してファイルの一覧を照会できるようにするために、render メソッドは現在のサイト ID、Web ID、テナント名もReact コンポーネントに提供します。
public render(): void {
const element: React.ReactElement<IListDocumentsProps> = React.createElement(
    ListDocuments,
    {
    searchFilter: this.properties.searchFilter,
    tenantName: this.context.pageContext.site.absoluteUrl.substring(8,
        this.context.pageContext.site.absoluteUrl.indexOf('/', 8)),
    siteId: this.context.pageContext.site.id.toString(),
    webId: this.context.pageContext.web.id.toString(),
    isDarkTheme: this._isDarkTheme,
    environmentMessage: this._environmentMessage,
    hasTeamsContext: !!this.context.sdks.microsoftTeams,
    userDisplayName: this.context.pageContext.user.displayName
    }
);

ReactDom.render(element, this.domElement);
}
Web パーツ コードで行う必要があるもう 1 つの点は、MGT ライブラリを初期化することです。 まず、コード ファイル内の MGT ライブラリを参照し、ファイルの上部セクションに次の行を追加し、すべての import ステートメントの直後に追加する必要があります。
import { Providers, SharePointProvider } from '@microsoft/mgt-spfx';
次に、Web パーツの onInit メソッドを次のコード抜粋に置き換えます。
protected onInit(): Promise<void> {

if (!Providers.globalProvider) {
    Providers.globalProvider = new SharePointProvider(this.context);
}

return this._getEnvironmentMessage().then(message => {
    this._environmentMessage = message;
});
}
ご覧のとおり、新しい onInit メソッドは、前に参照した MGT の インスタンスをSharePointProvider設定するために依存Providers.globalProviderしています。 上記の構文の結果として、MGT は初期化され、Microsoft Graph を使用するためにSharePoint Frameworkセキュリティ コンテキストを使用する準備が整います。
ここで、コードを機能させるには、新しい searchFilter プロパティと tenantName、siteId、および webId プロパティをサポートするように、React コンポーネントを更新する必要があります。 src\webparts\listDocuments\components\IListDocumentsProps.ts ファイルを開き、description プロパティを searchFilter ファイルに置き換えます。 次のコード抜粋に示すように、 tenantName、 siteId、 webId という名前の 3 つの新しいプロパティを追加します。
export interface IListDocumentsProps {
  searchFilter: string;
  tenantName: string;
  siteId: string;
  webId: string;
  isDarkTheme: boolean;
  environmentMessage: string;
  hasTeamsContext: boolean;
  userDisplayName: string;
}
次に、src\webparts\listDocuments\components\ListDocuments.tsx ファイルを開きます。これは、最新の Web パーツのユーザー エクスペリエンスをレンダリングするReact コンポーネントを表します。 説明プロパティを新しい searchFilter に置き換えるために、MGT ライブラリから FileList コンポーネントをインポートし、render メソッドを更新します。
注:
FileList コンポーネントの詳細については、Microsoft Graph Toolkit のファイル リスト コンポーネントに関するドキュメントを参照してください。
最後に、 searchFilter プロパティの値と MgtFileList コンポーネントを使用したファイルの実際のリストを表示するために、render メソッドの戻り値全体を置き換えます。
import * as React from 'react';
import styles from './ListDocuments.module.scss';
import { IListDocumentsProps } from './IListDocumentsProps';
import { escape } from '@microsoft/sp-lodash-subset';
import { FileList } from '@microsoft/mgt-react/dist/es6/spfx';

export default class ListDocuments extends React.Component<IListDocumentsProps, {}> {
  public render(): React.ReactElement<IListDocumentsProps> {
    const {
      searchFilter,
      tenantName,
      siteId,
      webId,
      isDarkTheme,
      environmentMessage,
      hasTeamsContext,
      userDisplayName
    } = this.props;

    // If we have a value for searchFilter, let's use it, otherwise get the whole list of files
    const fileListQuery: string = searchFilter ?
      `/sites/${tenantName},${siteId},${webId}/drive/root/search(q='${escape(searchFilter)}')` :
      `/sites/${tenantName},${siteId},${webId}/drive/root/children`;

    return (
      <section className={`${styles.listDocuments} ${hasTeamsContext ? styles.teams : ''}`}>
        <div className={styles.welcome}>
          <img alt="" src={isDarkTheme ? require('../assets/welcome-dark.png') : require('../assets/welcome-light.png')} className={styles.welcomeImage} />
          <h2>Well done, {escape(userDisplayName)}!</h2>
          <div>{environmentMessage}</div>
          <div>Current search filter: <strong>{escape(searchFilter)}</strong></div>
        </div>
        <div>
          <FileList fileListQuery={fileListQuery} />
        </div>
      </section>
    );
  }
}
ご覧のとおり、コードは Microsoft Graph クエリの URL を動的に構築して、現在のサイトの "共有ドキュメント" フォルダー内のファイルの一覧を取得します。 searchFilter プロパティの値がある場合は、検索クエリに依存します。 searchFilter プロパティの値がない場合は、ファイルのリスト全体を取得するだけです。
次に、render メソッドの return ステートメント内に、MGT の React コンポーネントのFileListインスタンスがあり、ファイルの実際のリストをレンダリングし、fileListQuery プロパティの値として動的クエリを指定します。
アドイン モデルのアプリ パーツと同様に、SharePoint Frameworkでも、Microsoft Graph を使用するために Web パーツに必要なアクセス許可を構成する必要があります。 これを行うには、次のコードの抜粋のように 、/config/package-solution.json ファイルを編集し、 WebApiPermissionRequests セクションを作成します。
{
  "$schema": "https://developer.microsoft.com/json-schemas/spfx-build/package-solution.schema.json",
  "solution": {
    "name": "spo-sp-fx-web-part-client-side-solution",
    "id": "06b2a772-deaa-4b4b-855b-e50bd8e935f0",
    "version": "1.0.0.0",
    "includeClientSideAssets": true,
    "skipFeatureDeployment": true,
    "isDomainIsolated": false,
    "developer": {
      "name": "",
      "websiteUrl": "",
      "privacyUrl": "",
      "termsOfUseUrl": "",
      "mpnId": "Undefined-1.16.1"
    },
    "webApiPermissionRequests": [
      {
        "resource": "Microsoft Graph",
        "scope": "Files.Read"
      }
    ],
変更が完了したら、SharePoint Framework ソリューションをビルドし、デバッグで実行できます。 そのためには、Web パーツをテストする実際の SharePoint オンライン サイトを対象として 、/config/serve.json ファイルの内容を更新する必要があります。
{
  "$schema": "https://developer.microsoft.com/json-schemas/spfx-build/spfx-serve.schema.json",
  "port": 4321,
  "https": true,
  "initialPage": "https://enter-your-SharePoint-site/_layouts/workbench.aspx"
}
initialPage プロパティの値を、ターゲット サイト コレクションの URL に置き換えます。
次に、ターミナル ウィンドウで次のコマンドを実行できます。
gulp serve
ブラウザー ウィンドウが起動し、SharePoint Framework コンポーネントをデバッグするために SharePoint Online によって提供されるページである SharePoint Framework Workbench が表示されます。 [ 追加 ] ボタンを選択し、カスタム ListDocuments Web パーツをページに追加することを選択します。
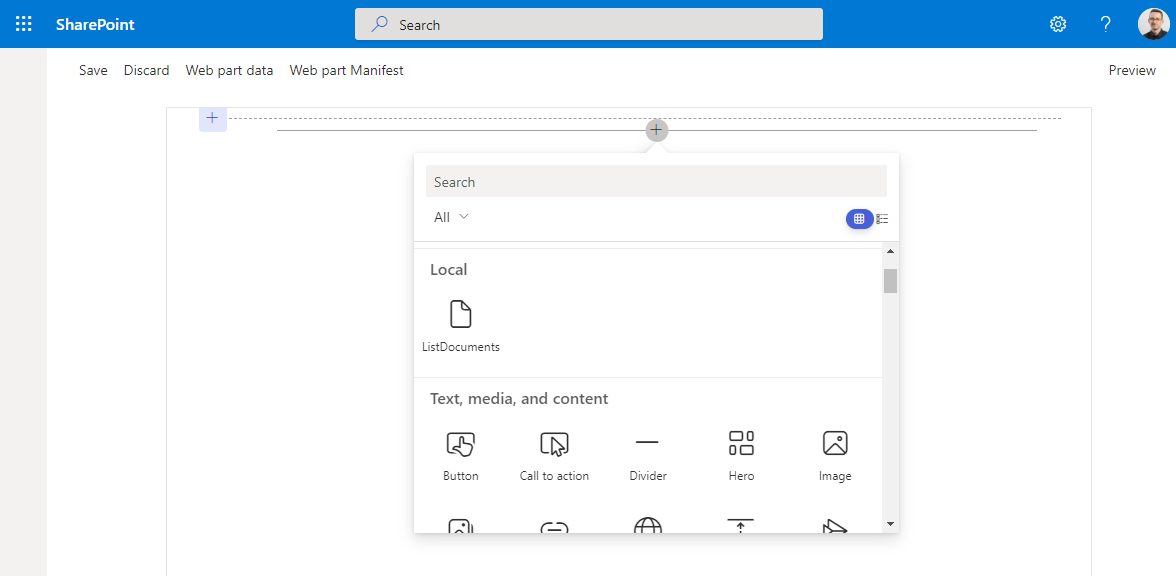
次の出力が表示されます。
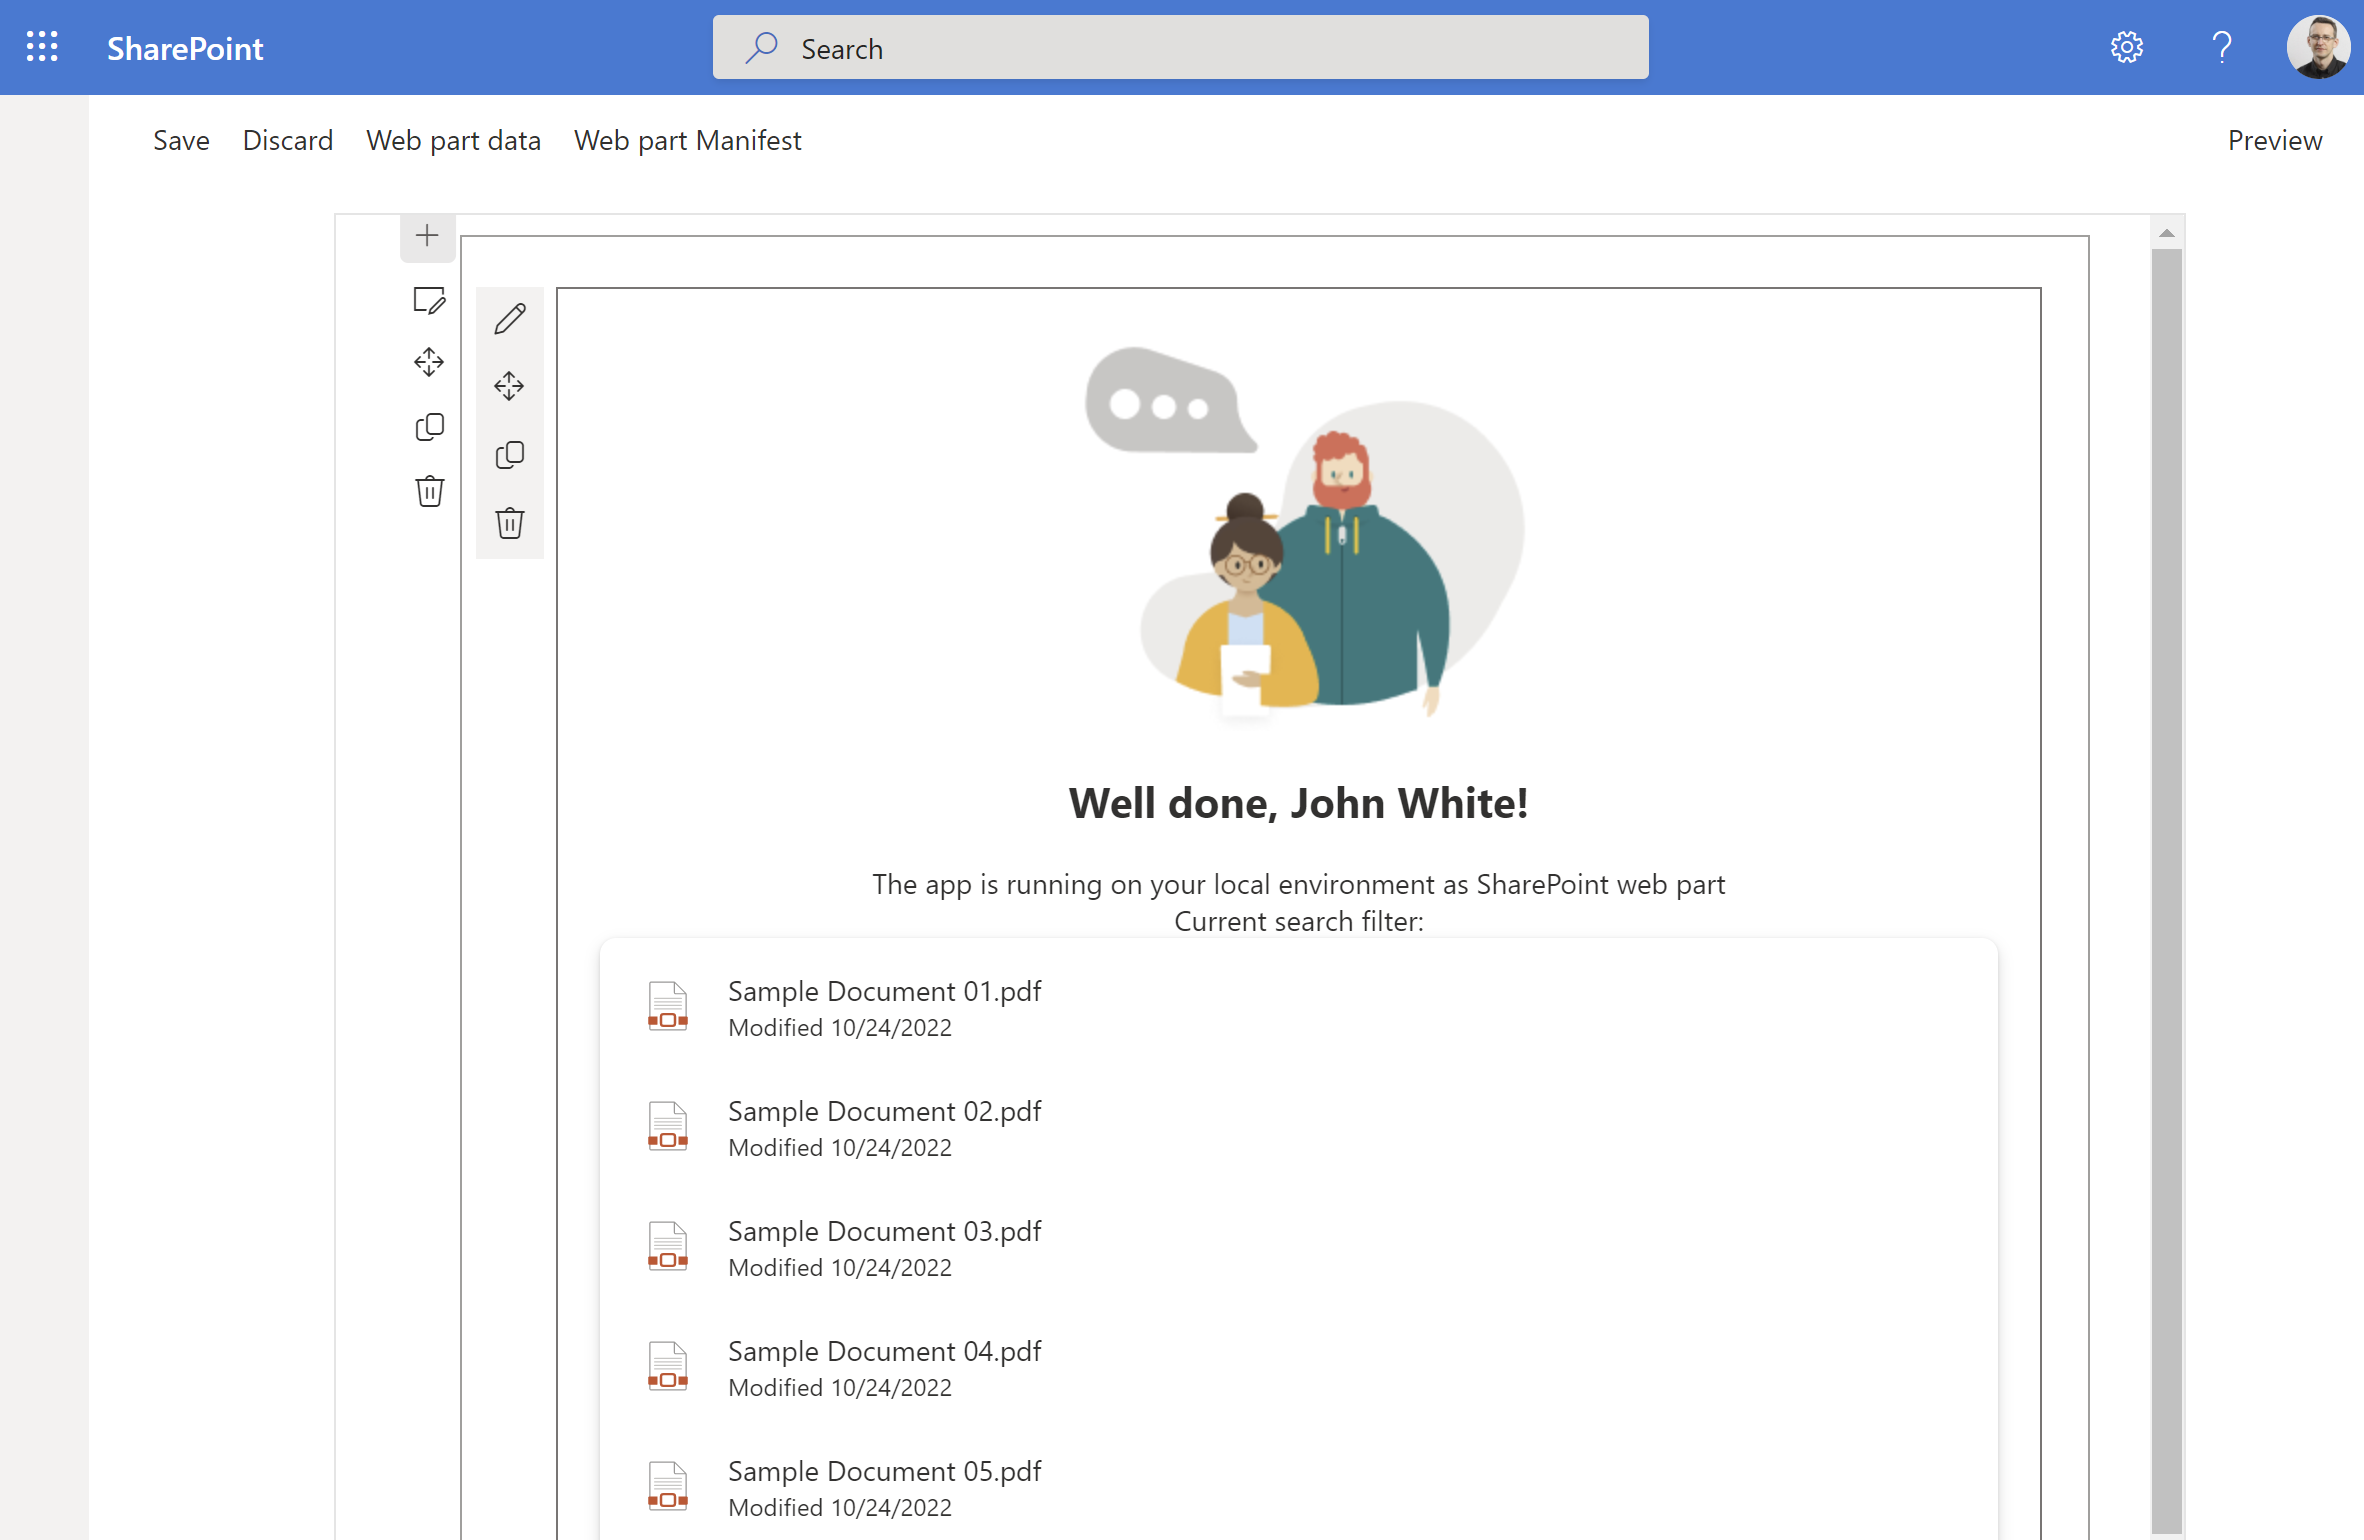
鉛筆を選択した場合は、Web パーツのすぐ横にプロパティ ウィンドウを表示し、 FileList コントロールによってレンダリングされるファイルの一覧に適用される検索フィルターを構成できます。
推奨されるコンテンツ
このトピックに関する追加情報については、次のドキュメントを参照してください。