SharePoint アドイン モデルでは、UI 拡張機能を作成して、リスト ビューとライブラリのリボン バーと ECB (コントロール ブロックの編集) メニューの拡張に使用されます。 新しいSharePoint Frameworkでは、いわゆる ListView コマンド セットを作成することで、同じ結果を得ることができます。
この記事では、既存の UI 拡張機能を ListView コマンド セットに変換する方法の詳細について説明します。
必要に応じて、記事全体を読む代わりに、次のビデオをwatchできます。これは、より詳細なリファレンスと見なすことができます。

注:
SharePoint Framework ListView コマンド セットの作成の詳細については、「最初の ListView コマンド セット拡張機能をビルドする」を参照してください。
UI 拡張機能を ListView コマンド セットに変換する
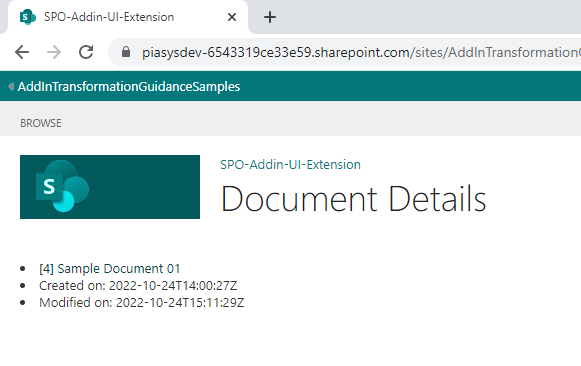
ドキュメント ライブラリのコマンド バーにカスタム ボタンをレンダリングし、同じライブラリの ECB メニューにカスタム メニュー項目を追加するための UI 拡張機能があるとします。 また、ドキュメント ライブラリのためだけにボタンと ECB メニュー項目を表示し、ユーザーが 1 つのドキュメントのみを選択した場合にのみ表示するとします。 UI 拡張機能には、選択したファイルに関する詳細情報が表示されるページが表示されます。 次の説明では、SharePoint クラシック UI で現在選択されているドキュメントの ECB メニューを拡張するときに、SharePoint アドイン モデルで構築された UI 拡張機能の UI を確認できます。

次の説明では、SharePoint クラシック UI でドキュメント ライブラリのリボンを拡張するときに、SharePoint アドイン モデルで構築された UI 拡張機能の UI を確認できます。

最後に、次の説明では、選択したドキュメントの詳細を表示するときに、UI 拡張機能の実際の UI を表示できます。
次に、カスタマイズを、SharePoint Frameworkで構築された最新の ListView コマンド セットに変換します。
移行元の SharePoint アドイン モデル ソリューション
次のコードの抜粋では、JavaScript コードを使用して構築された UI 拡張機能の実際の実装を確認できます。
var hostweburl;
var appweburl;
var clientContext;
var hostweb;
var documentsLibrary;
var libraryId;
var itemId;

// This code runs when the DOM is ready and creates a context object which is
// needed to use the SharePoint object model
$(document).ready(function () {
    hostweburl = decodeURIComponent(getQueryStringParameter("SPHostUrl"));
    appweburl = decodeURIComponent(getQueryStringParameter("SPAppWebUrl"));
    libraryId = decodeURIComponent(getQueryStringParameter("SPListId"));
    itemId = decodeURIComponent(getQueryStringParameter("SPListItemId"));

    if (libraryId !== 'undefined' && itemId !== 'undefined') {
        var scriptbase = hostweburl + "/_layouts/15/";
        $.getScript(scriptbase + "SP.RequestExecutor.js", execCrossDomainRequest);
    }
});

// Make the actual request for the document using the cross-domain Request Executor
function execCrossDomainRequest() {

    var itemUri = appweburl +
        "/_api/SP.AppContextSite(@target)/web/lists/GetById('" + libraryId + "')/Items(" + itemId + ")?$select=ID,Title,Created,Modified,ServerRedirectedEmbedUrl&@target='" + hostweburl + "'";

    console.log(itemUri);

    var executor = new SP.RequestExecutor(appweburl);

    // First request, to retrieve the form digest
    executor.executeAsync({
        url: itemUri,
        method: "GET",
        headers: { "Accept": "application/json; odata=verbose" },
        success: function (data) {
            var jsonObject = JSON.parse(data.body);
            console.log(jsonObject);
            var document = jsonObject.d;
            showDocumentDetails(document);
        },
        error: function (data, errorCode, errorMessage) {
            var errMsg = "Error retrieving the document details: " + errorMessage;
            $("#error").text(errMsg);
            $("#error").show();
        }
    });
}

// In case of successful retrieval of the document
function showDocumentDetails(document) {
    $("#document").empty();

    if (document !== undefined) {

        var docId = document.ID;
        var docTitle = document.Title;
        var docCreated = document.Created;
        var docModified = document.Modified;
        var docUrl = document.ServerRedirectedEmbedUrl;

        $("#document").append('<ul>');
        $("#document").append('<li><a href="' + docUrl + '">[' + docId + '] ' + docTitle + '</a></li>');
        $("#document").append('<li>Created on: ' + docCreated + '</li>');
        $("#document").append('<li>Modified on: ' + docModified + '</li>');
        $("#document").append('</ul>');
    }
}

function getQueryStringParameter(paramToRetrieve) {
    var params =
        document.URL.split("?")[1].split("&");
    var strParams = "";
    for (var i = 0; i < params.length; i = i + 1) {
        var singleParam = params[i].split("=");
        if (singleParam[0] == paramToRetrieve)
            return singleParam[1];
    }
}
ご覧のとおり、コードはクライアント側コード (JavaScript) に完全に基づいており、SharePoint JavaScript オブジェクト モデルに依存して現在のアプリ サイトへの参照を取得します。これは、SP で実行されるアプリ サイトから です。RemoteExecutor は REST API 呼び出しをモデル化して、ホスト サイトからターゲット ドキュメント プロパティを読み取ります。 ファイル プロパティが取得されると、サンプルは動的に生成される HTML 要素のセットを通じて基本的なドキュメントの詳細を示します。
ECB メニュー項目をレンダリングする UI 拡張機能は、次の構文を使用して、SharePoint Feature Framework の CustomAction 要素に依存して XML 要素ファイルで定義されます。
<?xml version="1.0" encoding="utf-8"?>
<Elements xmlns="http://schemas.microsoft.com/sharepoint/">
<CustomAction Id="8d267eab-0cc9-4abf-88fd-25e320f1202f.ShowDocumentDetailsMenuItem"
RegistrationType="List"
RegistrationId="101"
Location="EditControlBlock"
Sequence="10001"
Title="Document Details">
<!--
Update the Url below to the page you want the custom action to use.
Start the URL with the token ~remoteAppUrl if the page is in the
associated web project, use ~appWebUrl if page is in the app project.
-->
<UrlAction Url="~appWebUrl/Pages/Default.aspx?{StandardTokens}&SPListItemId={ItemId}&SPListId={ListId}" />
</CustomAction>
</Elements>
カスタム要素は、 RegistrationType 属性と RegistrationId 属性を使用して、拡張が 101 型 (つまりドキュメント ライブラリ) のリストを対象とすることを宣言していることに注意してください。 また、カスタム アクションの 場所 がターゲット リストまたはライブラリの EditControlBlock であることを宣言します。
同様に、カスタム リボン コマンドは別の XML 要素ファイルで定義され、引き続き SharePoint Feature Framework の CustomAction 要素に依存し、次の構文が使用されます。
<?xml version="1.0" encoding="utf-8"?>
<Elements xmlns="http://schemas.microsoft.com/sharepoint/">
<CustomAction Id="f453c11a-3ee4-4247-b520-107b80c79892.ShowDocumentDetailsCommand"
RegistrationType="List"
RegistrationId="101"
Location="CommandUI.Ribbon"
Sequence="10001"
Title="Invoke 'ShowDocumentDetailsCommand' action">
<CommandUIExtension>
<!--
Update the UI definitions below with the controls and the command actions
that you want to enable for the custom action.
-->
<CommandUIDefinitions>
<CommandUIDefinition Location="Ribbon.Documents.Manage.Controls._children">
<Button Id="Ribbon.Documents.Manage.ShowDocumentDetailsCommandButton"
Alt="Document Details"
Sequence="100"
Command="Invoke_ShowDocumentDetailsCommandButtonRequest"
LabelText="Document Details"
TemplateAlias="o1"
Image32by32="_layouts/15/images/placeholder32x32.png"
Image16by16="_layouts/15/images/placeholder16x16.png" />
</CommandUIDefinition>
</CommandUIDefinitions>
<CommandUIHandlers>
<CommandUIHandler Command="Invoke_ShowDocumentDetailsCommandButtonRequest"
CommandAction="~appWebUrl/Pages/Default.aspx?{StandardTokens}&SPListItemId={SelectedItemId}&SPListId={SelectedListId}"/>
</CommandUIHandlers>
</CommandUIExtension >
</CustomAction>
</Elements>
この最後の要素ファイルは、ドキュメント ライブラリ (RegistrationType = 'List' および RegistrationId = 101) を対象とする別のカスタム アクションを宣言しますが、現在は CommandUI.Ribbon の Location 値と CommandUIExtension 要素を使用したリボン コマンドの定義を使用します。
これを機能させるには、SharePoint アドイン モデル ソリューションの AppManifest.xml ファイルで定義されているライブラリの読み取りアクセス許可 (BaseTemplate=101) が必要です。 次の説明では、AppManifest.xml ファイルの構成を確認できます。

SharePoint Framework ソリューションの作成
次に、前の SharePoint アドイン モデル ソリューションの変換に使用する新しいSharePoint Framework ソリューションを作成しましょう。
まず、SharePoint Framework ソリューションをスキャフォールディングする必要があるため、コマンド プロンプトまたはターミナル ウィンドウを起動し、フォルダーを作成し、新しく作成したフォルダー内から次のコマンドを実行します。
重要
示された手順に従うには、開発環境にSharePoint Frameworkをインストールする必要があります。 環境の設定方法の詳細については、「SharePoint Framework開発環境を設定する」を参照してください。
yo @microsoft/sharepoint
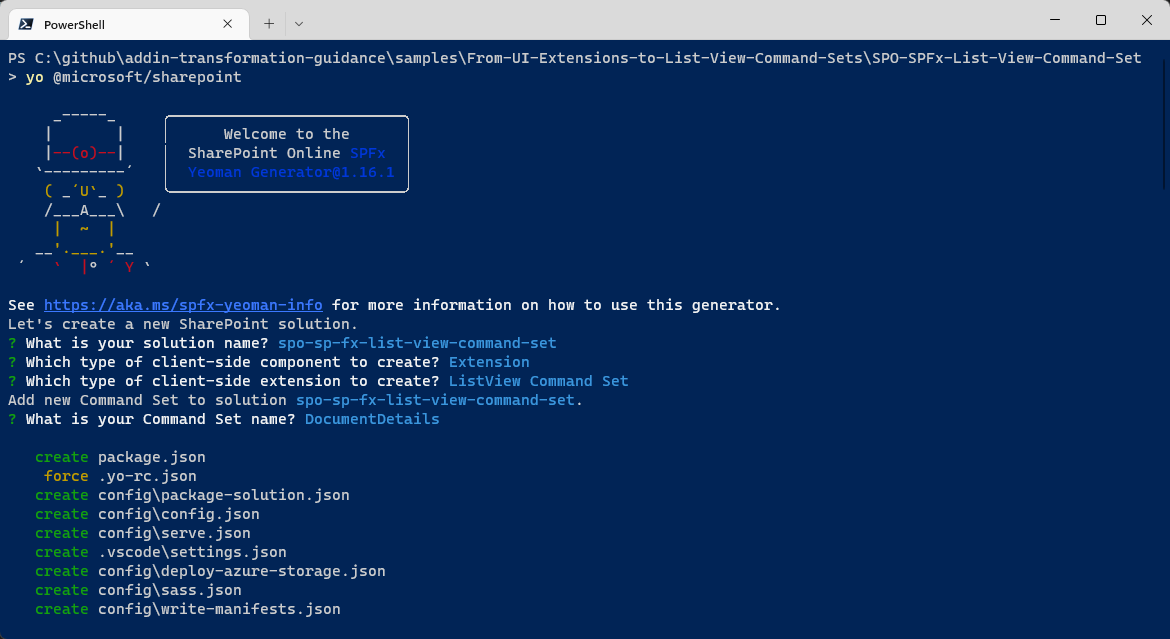
プロンプトに従って、最新の ListView コマンド セットのソリューションをスキャフォールディングします。 具体的には、ツールによってプロンプトが表示されたら、次の選択を行います。
- ソリューション名は何ですか? spo-sp-fx-list-view-command-set
- どの種類のクライアント側コンポーネントを作成しますか? Extension
- どの種類のクライアント側拡張機能を作成しますか? リスト ビュー コマンド セット
- コマンド セット名は何ですか? DocumentDetails
上記の回答では、 spo-sp-fx-list-view-command-set という名前のソリューションを作成することにしました。このソリューションには、 DocumentDetails という名前の ListView コマンド セット型のカスタム拡張機能があります。
スキャフォールディング ツールは、新しいSharePoint Framework ソリューションを生成します。 完了したら、お気に入りのコード エディターを使用して現在のフォルダーを開くだけです。 ただし、ソリューションを開く前に、拡張機能の UI のレンダリングを簡単かつ見やすくするためにパッケージを追加する必要があります。 実際には、次のコマンドを実行して、コンポーネントの MGT (Microsoft Graph Toolkit) ライブラリとReact フレームワークを参照します。
npm install @microsoft/mgt-spfx @microsoft/mgt-react react@17.0.1 react-dom@17.0.1 --save
npm install @types/react@17.0.45 @types/react-dom@17.0.17 --save-dev
実際、既定では、SharePoint Framework ListView コマンド セットのスキャフォールディング されたソリューションには、React パッケージが含まれていないため、ソリューションに追加する必要があります。
注:
Microsoft Graph Toolkit は、SharePoint Framework ソリューションを含め、クライアント側ソリューションの UI のレンダリングを高速化するための一連のコンポーネントです。 このサンプル ソリューションで使用することは必須ではありませんが、学習と開発プロセスを高速化する簡単な方法です。 MGT の詳細については、Microsoft Graph Toolkit の概要に関するドキュメントを参照してください。また、Microsoft Graph Toolkit のドキュメント SharePoint Framework ライブラリを読むSharePoint Frameworkと MGT を統合する方法について説明します。
これで、お気に入りのコード エディターでソリューションを開くことができます。 お気に入りのコード エディターが Microsoft Visual Studio Code の場合は、次のコマンドを実行します。
code .
次の図では、生成されたSharePoint Framework ソリューションの概要を確認できます。

から始めるメイン ファイルは、src\extensions\documentDetails フォルダーの下にある DocumentDetailsCommandSet.ts です。 このファイルは、SharePoint Frameworkで使用される TypeScript 構文に基づいています。
import { Log } from '@microsoft/sp-core-library';
import {
  BaseListViewCommandSet,
  Command,
  IListViewCommandSetExecuteEventParameters,
  ListViewStateChangedEventArgs
} from '@microsoft/sp-listview-extensibility';
import { Dialog } from '@microsoft/sp-dialog';

/**
 * If your command set uses the ClientSideComponentProperties JSON input,
 * it will be deserialized into the BaseExtension.properties object.
 * You can define an interface to describe it.
 */
export interface IDocumentDetailsCommandSetProperties {
  // This is an example; replace with your own properties
  sampleTextOne: string;
  sampleTextTwo: string;
}

const LOG_SOURCE: string = 'DocumentDetailsCommandSet';

export default class DocumentDetailsCommandSet extends BaseListViewCommandSet<IDocumentDetailsCommandSetProperties> {

  public onInit(): Promise<void> {
    Log.info(LOG_SOURCE, 'Initialized DocumentDetailsCommandSet');

    // initial state of the command's visibility
    const compareOneCommand: Command = this.tryGetCommand('COMMAND_1');
    compareOneCommand.visible = false;

    this.context.listView.listViewStateChangedEvent.add(this, this._onListViewStateChanged);

    return Promise.resolve();
  }

  public onExecute(event: IListViewCommandSetExecuteEventParameters): void {
    switch (event.itemId) {
      case 'COMMAND_1':
        Dialog.alert(`${this.properties.sampleTextOne}`).catch(() => {
          /* handle error */
        });
        break;
      case 'COMMAND_2':
        Dialog.alert(`${this.properties.sampleTextTwo}`).catch(() => {
          /* handle error */
        });
        break;
      default:
        throw new Error('Unknown command');
    }
  }

  private _onListViewStateChanged = (args: ListViewStateChangedEventArgs): void => {
    Log.info(LOG_SOURCE, 'List view state changed');

    const compareOneCommand: Command = this.tryGetCommand('COMMAND_1');
    if (compareOneCommand) {
      // This command should be hidden unless exactly one row is selected.
      compareOneCommand.visible = this.context.listView.selectedRows?.length === 1;
    }

    // TODO: Add your logic here

    // You should call this.raiseOnChage() to update the command bar
    this.raiseOnChange();
  }
}
上に示したコードの抜粋は、DocumentDetailsCommandSet.ts ファイルのメインコードの抜粋を示しています。
まず、基本型 BaseListViewCommandSet<IDocumentDetailsCommandSetProperties>から継承する DocumentDetailsCommandSet という名前の TypeScript クラスとして Extension が宣言されていることがわかります。
BaseListViewCommandSet 型は、SharePoint Frameworkの基本ライブラリによって提供されますが、インターフェイス IDocumentDetailsCommandSetProperties は Web パーツ クラス宣言の直前に定義され、カスタム拡張機能の構成プロパティ (存在する場合) が定義されます。
Extension の OnInit メソッドでは、コードは、COMMAND_1の一 意の名前を持つカスタム コマンド拡張機能への参照を取得しようとします。 コマンドが存在する場合、コードはそのコマンドを初期状態として非表示にします。
// initial state of the command's visibility
const compareOneCommand: Command = this.tryGetCommand('COMMAND_1');
compareOneCommand.visible = false;
その直後に、ターゲット リストまたはライブラリ ビューのビューステートの変更を処理するイベント ハンドラーの登録があります。
this.context.listView.listViewStateChangedEvent.add(this, this._onListViewStateChanged);
現在のビューが変更された場合、イベント ハンドラーは、1 つの項目またはドキュメントのみが選択されているかどうかを確認します。 その場合、コードは UI にコマンドを表示します。
private _onListViewStateChanged = (args: ListViewStateChangedEventArgs): void => {
  Log.info(LOG_SOURCE, 'List view state changed');

  const compareOneCommand: Command = this.tryGetCommand('COMMAND_1');
  if (compareOneCommand) {
    // This command should be hidden unless exactly one row is selected.
    compareOneCommand.visible = this.context.listView.selectedRows?.length === 1;
  }

  // TODO: Add your logic here

  // You should call this.raiseOnChage() to update the command bar
  this.raiseOnChange();
}
最後に、ソース コードは、拡張機能の実際の実装を提供する onExecute メソッドを定義します。
  public onExecute(event: IListViewCommandSetExecuteEventParameters): void {
    switch (event.itemId) {
      case 'COMMAND_1':
        Dialog.alert(`${this.properties.sampleTextOne}`).catch(() => {
          /* handle error */
        });
        break;
      case 'COMMAND_2':
        Dialog.alert(`${this.properties.sampleTextTwo}`).catch(() => {
          /* handle error */
        });
        break;
      default:
        throw new Error('Unknown command');
    }
  }
onExecute メソッドが呼び出されると、event.itemId プロパティは、ユーザーによって呼び出されたコマンドの一意の名前を定義し、それに応じて拡張ビジネス ロジックを実装できます。 自動生成されたコードは、ブラウザーにダイアログ アラートを表示するだけです。
拡張コードで COMMAND_1 がどこに宣言されているか疑問に思うかもしれません。 これは、実際には DocumentDetailsCommandSet.manifest.json というマニフェスト ファイルで定義されています。これは、拡張機能の同じフォルダーで使用できます。 次のコードの抜粋では、スキャフォールディングされたマニフェストを確認できます。
{
  "$schema": "https://developer.microsoft.com/json-schemas/spfx/command-set-extension-manifest.schema.json",

  "id": "1602bb8e-cc1d-4417-ba7a-cc1b1d7d7022",
  "alias": "DocumentDetailsCommandSet",
  "componentType": "Extension",
  "extensionType": "ListViewCommandSet",

  // The "*" signifies that the version should be taken from the package.json
  "version": "*",
  "manifestVersion": 2,

  // If true, the component can only be installed on sites where Custom Script is allowed.
  // Components that allow authors to embed arbitrary script code should set this to true.
  // https://support.office.com/en-us/article/Turn-scripting-capabilities-on-or-off-1f2c515f-5d7e-448a-9fd7-835da935584f
  "requiresCustomScript": false,

  "items": {
    "COMMAND_1": {
      "title": { "default": "Command One" },
      "iconImageUrl": "icons/request.png",
      "type": "command"
    },
    "COMMAND_2": {
      "title": { "default": "Command Two" },
      "iconImageUrl": "icons/cancel.png",
      "type": "command"
    }
  }
}
ご覧のように、マニフェストの最初の部分では、拡張機能の種類が ListViewCommandSet の Extension 型のコンポーネントを定義していることを宣言しています。 さらに、マニフェストでは、GUID を使用して、コンポーネントの一意の ID も宣言します。 最も重要なのは、実際のコマンドが定義されている items というセクションがあることです。 スキャフォールディングされたマニフェストには、タイトル、アイコン イメージ URL、および常にコマンドである型の定義を持つ 2 つのコマンド (COMMAND_1とCOMMAND_2) が表示されます。
ソリューションの最後の重要なファイルは、ソリューションの sharepoint\assets フォルダーの下に定義された elements.xml ファイルです。 ここでは、自動生成されたファイルの内容を確認できます。
<?xml version="1.0" encoding="utf-8"?>
<Elements xmlns="http://schemas.microsoft.com/sharepoint/">
<CustomAction
Title="DocumentDetails"
RegistrationId="100"
RegistrationType="List"
Location="ClientSideExtension.ListViewCommandSet.CommandBar"
ClientSideComponentId="1602bb8e-cc1d-4417-ba7a-cc1b1d7d7022"
ClientSideComponentProperties="{"sampleTextOne":"One item is selected in the list.", "sampleTextTwo":"This command is always visible."}">
</CustomAction>
</Elements>
興味深いことに、SharePoint アドイン モデルを使用して構築された UI 拡張機能と同様に、SharePoint Feature Framework に基づくファイルです。 ただし、カスタム アクションの設定が若干異なります。 RegistrationId や RegistrationType などの属性は、拡張機能の targe を定義するために引き続き存在します。 また、ClientSideExtension.ListViewCommandSet.CommandBar をターゲットとする新しい値を持つ Location 属性もあります。これは、拡張機能がターゲット ビューのコマンド バーにレンダリングされることを意味します。
SharePoint Framework ListView コマンド セットで使用できるこの属性のオプションは次のとおりです。
- ClientSideExtension.ListViewCommandSet.CommandBar: コマンド バーに拡張機能を表示します。
- ClientSideExtension.ListViewCommandSet.ContextMenu: ECB メニューに拡張機能を表示します。
- ClientSideExtension.ListViewCommandSet: コマンド バーと ECB メニューの両方に拡張機能を表示します。
ただし、いくつかの新しい属性もあります。
- ClientSideComponentId: レンダリングする拡張機能の一意の ID を定義し、前に説明したマニフェスト ファイルで定義されている id 属性にマップします。
- ClientSideComponentProperties: 拡張機能のカスタム構成プロパティ (存在する場合) を定義します。 これは、拡張機能のカスタム プロパティを宣言するインターフェイスのインスタンスを表す JSON シリアル化されたオブジェクトを含む文字列です (この例では、インターフェイスは IDocumentDetailsCommandSetProperties です)。
実際のSharePoint Framework ListView コマンド セットのビルド
ソリューションの概要を確認したので、実際の ListView コマンド セットをビルドしてドキュメントの詳細機能を提供し、古い SharePoint アドイン モデル UI 拡張機能を変換しましょう。
まず、マニフェスト ファイルを編集し、その内容を次のものに置き換えます。
{
  "$schema": "https://developer.microsoft.com/json-schemas/spfx/command-set-extension-manifest.schema.json",

  "id": "1602bb8e-cc1d-4417-ba7a-cc1b1d7d7022",
  "alias": "DocumentDetailsCommandSet",
  "componentType": "Extension",
  "extensionType": "ListViewCommandSet",

  // The "*" signifies that the version should be taken from the package.json
  "version": "*",
  "manifestVersion": 2,

  // If true, the component can only be installed on sites where Custom Script is allowed.
  // Components that allow authors to embed arbitrary script code should set this to true.
  // https://support.office.com/en-us/article/Turn-scripting-capabilities-on-or-off-1f2c515f-5d7e-448a-9fd7-835da935584f
  "requiresCustomScript": false,

  "items": {
    "DOC_DETAILS": {
      "title": { "default": "Document Details" },
      "iconImageUrl": "data:image/png;base64,iVBORw0KGgoAAAANSUhEUgAAAFwAAABcCAYAAADj79JYAAAAA...AASUVORK5CYII=",
      "type": "command"
    }
  }
}
更新されたマニフェストでは、 DOC_DETAILSの一意の名前を持つ 1 つのコマンドのみを宣言し、タイトル 'Document Details' とカスタム アイコンイメージ URL を使用します。 実際には、外部ファイルへの依存関係を持たないように、イメージは URL ではなく Base64 でエンコードされたイメージです。 わかりやすくするために、コードの抜粋では Base64 イメージが短縮されています。
次に、Location 属性に ClientSideExtension.ListViewCommandSet の値を指定して、コマンド バーと ECB メニューの両方に ListView コマンド セットを表示するように要素ファイルを更新します。 さらに、サンプル拡張機能にはカスタム プロパティが必要ないため、 ClientSideComponentProperties 属性の内容を削除します。 ここでは、新しい要素ファイルを確認できます。
<?xml version="1.0" encoding="utf-8"?>
<Elements xmlns="http://schemas.microsoft.com/sharepoint/">
    <CustomAction
        Title="DocumentDetails"
        RegistrationId="100"
        RegistrationType="List"
        Location="ClientSideExtension.ListViewCommandSet"
        ClientSideComponentId="1602bb8e-cc1d-4417-ba7a-cc1b1d7d7022"
        ClientSideComponentProperties="">
    </CustomAction>
</Elements>
次に、 DocumentDetailsCommandSet.ts ファイルを更新することで、ListView コマンド セットの実際の実装を更新します。 まず、コマンドの一意の名前をマニフェストで定義された新しい名前に置き換えます。 そのため、COMMAND_1 を onInit、onExecute、および _onListViewStateChanged メソッドのDOC_DETAILSに置き換え、COMMAND_2拡張機能に関連するすべてのロジックを削除します。これはもう存在しません。
拡張機能の新しいSharePoint Framework実装では、SharePoint Framework Dialog Framework を使用して、MGT コンポーネントを埋め込んで選択したファイルに関する詳細情報を表示する見栄えの良いダイアログ ウィンドウをレンダリングします。
注:
SharePoint Framework Dialog Framework の活用の詳細については、「SharePoint Framework拡張機能でカスタム ダイアログ ボックスを使用する」を参照してください。
注:
MGT の File コンポーネントの詳細については、 Microsoft Graph Toolkit の File コンポーネントに関するドキュメントを参照してください。
次に、DocumentDetailsDialog.tsx という新しいReact コンポーネント ファイルを格納するために使用する新しいフォルダー構造 src\documentDetails\components\documentDetailsDialog を作成します。 同じ新しいフォルダー内に、ダイアログ ウィンドウの構成プロパティを定義するために使用する IDocumentDetailsDialogProps.ts という別のファイルも作成します。 次のコードの抜粋では、ダイアログのプロパティを定義するインターフェイスの定義を確認できます。
export interface IDocumentDetailsDialogProps {
    tenantName: string;
    siteId: string;
    webId: string;
    driveId: string;
    itemId: string;
    onClose: () => Promise<void>;
}
string 型のプロパティのセットは、tenantName、siteId、webId、driveId、itemId を使用して、Microsoft Graph のドキュメントへのポインターを定義します。 最後のプロパティは、ダイアログ ウィンドウの閉じる処理に使用するメソッドを定義します。 これは、戻り値 (Promise<void>) を持たない非同期メソッドです。
次のコードの抜粋では、ダイアログ コンポーネントの実装を見つけることができます。
import * as React from 'react';
import * as ReactDOM from 'react-dom';
import { IDocumentDetailsDialogProps } from './IDocumentDetailsDialogProps';

import { BaseDialog, IDialogConfiguration } from '@microsoft/sp-dialog';
import {
    DefaultButton,
    DialogFooter,
    DialogContent
} from 'office-ui-fabric-react';

import { File } from '@microsoft/mgt-react/dist/es6/spfx';

class DocumentDetailsDialogContent extends
    React.Component<IDocumentDetailsDialogProps, {}> {

    public render(): JSX.Element {
        return (<div>
            <DialogContent
                title="Document Details"
                onDismiss={this.props.onClose}>

            <div>
                    <File siteId={`${this.props.tenantName},${this.props.siteId},${this.props.webId}`}
                        driveId={this.props.driveId} itemId={this.props.itemId} />
            </div>
            <DialogFooter>
                <DefaultButton text="Close"
                    title="Close" onClick={this.props.onClose} />
            </DialogFooter>
        </DialogContent>
    </div>);
    }
}

export default class DocumentDetailsDialog extends BaseDialog {

    /**
     * Constructor for the dialog window
     */
    constructor(public tenantName: string,
        public siteId: string, public webId: string,
        public driveId: string, public itemId: string) {
        super({isBlocking: true});
    }

    public render(): void {
        ReactDOM.render(<DocumentDetailsDialogContent
                tenantName={this.tenantName}
                siteId={this.siteId}
                webId={this.webId}
                driveId={this.driveId}
                itemId={this.itemId}
                onClose={this._close}
            />,
            this.domElement);
    }

    public getConfig(): IDialogConfiguration {
      return {
        isBlocking: true
      };
    }

    private _close = async (): Promise<void> => {
        ReactDOM.unmountComponentAtNode(this.domElement);
        await this.close();
    }
}
メイン型は DocumentDetailsDialog クラスであり、ファイルの既定のエクスポートでもあります。 を継承しますBaseDialog。これは、SharePoint Framework Dialog Framework (@microsoft/sp-dialog) で定義されている型です。
ダイアログ クラスのパブリック コンストラクターは、Microsoft Graph を使用して選択したファイルをターゲットにするために必要なすべてのプロパティを受け入れます。 render メソッドは、DocumentDetailsDialogContent という名前のReact コンポーネントのインスタンスを作成するだけで、ダイアログ クラスの直前に定義されます。 ダイアログ クラス内では、ダイアログを閉じ、Reactによって割り当てられたリソースのマウントを解除するために使用される、_close メソッドの定義を見つけることもできます。
DocumentDetailsDialogContent コンポーネントは、MGT のコンポーネントをレンダリングFileし、ダイアログを閉じる "閉じる" ボタンを提供する、非常に簡単なReact コンポーネントです。
DocumentDetailsDialog コンポーネントは、ListView コマンド セットの onExecute メソッドでインスタンス化されます。 さらに、MGT ライブラリは、 からインポートされた型に依存して、グローバル プロバイダーを登録することで、 クラスの onInit メソッドで初期化されます @microsoft/mgt-spfx。 次のコードの抜粋では、更新された DocumentDetailsCommandSet.ts ファイルを 確認できます。
import { Providers, SharePointProvider } from '@microsoft/mgt-spfx';
import { Log } from '@microsoft/sp-core-library';
import {
  BaseListViewCommandSet,
  Command,
  IListViewCommandSetExecuteEventParameters,
  ListViewStateChangedEventArgs
} from '@microsoft/sp-listview-extensibility';
import DocumentDetailsDialog from './components/documentDetailsDialog/DocumentDetailsDialog';

const LOG_SOURCE: string = 'DocumentDetailsCommandSet';

export default class DocumentDetailsCommandSet extends BaseListViewCommandSet<{}> {

  public onInit(): Promise<void> {
    Log.info(LOG_SOURCE, 'Initialized DocumentDetailsCommandSet');

    // Initialize MGT
    if (!Providers.globalProvider) {
      Providers.globalProvider = new SharePointProvider(this.context);
    }

    // initial state of the command's visibility
    const compareOneCommand: Command = this.tryGetCommand('DOC_DETAILS');
    compareOneCommand.visible = false;

    this.context.listView.listViewStateChangedEvent.add(this, this._onListViewStateChanged);

    return Promise.resolve();
  }

  public async onExecute(event: IListViewCommandSetExecuteEventParameters): Promise<void> {
    switch (event.itemId) {
      case 'DOC_DETAILS': {
        const tenantName: string = this.context.pageContext.site.absoluteUrl.substring(8,
          this.context.pageContext.site.absoluteUrl.indexOf('/', 8));
        const siteId: string = this.context.pageContext.site.id.toString();
        const webId: string = this.context.pageContext.web.id.toString();

        const spItemUrl: string = event.selectedRows[0].getValueByName(".spItemUrl");
        const driveId: string = spItemUrl.substring(spItemUrl.indexOf('drives/') + 7, spItemUrl.indexOf('items'));
        const itemId: string = spItemUrl.substring(spItemUrl.indexOf('items/') + 6, spItemUrl.indexOf('?'));

        await this._showDocumentDetailsDialog(
          tenantName, siteId, webId,
          driveId, itemId);
        break;
      }
      default:
        throw new Error('Unknown command');
    }
  }

  private _onListViewStateChanged = (args: ListViewStateChangedEventArgs): void => {
    Log.info(LOG_SOURCE, 'List view state changed');

    const compareOneCommand: Command = this.tryGetCommand('DOC_DETAILS');
    if (compareOneCommand) {
      // This command should be hidden unless exactly one row is selected.
      compareOneCommand.visible = this.context.listView.selectedRows?.length === 1;
    }

    // You should call this.raiseOnChage() to update the command bar
    this.raiseOnChange();
  }

  private _showDocumentDetailsDialog = async (tenantName: string,
      siteId: string, webId: string,
      driveId: string, itemId: string): Promise<void> => {
    const documentsDetailsDialog = new DocumentDetailsDialog(tenantName, siteId, webId, driveId, itemId);
    await documentsDetailsDialog.show();
  }
}
また、この改訂された実装では 、onExecute メソッドが非同期メソッドとして定義されていることにも注意してください。 次のスクリーンショットでは、サンプルの SharePoint ドキュメント ライブラリで ListView コマンド セットの出力を確認できます。

推奨されるコンテンツ
このトピックに関する追加情報については、次のドキュメントを参照してください。