プロバイダー ホスト型アドインは、SharePoint アドインの主な 2 つの種類のうちの 1 つです。SharePoint アドインの概要と、その 2 つの種類については、「SharePoint アドイン」を参照してください。
次に、プロバイダー向けのホスト型アドインの概要を示します。
- SharePoint ファームまたは SharePoint Online サブスクリプションの外部でホストされている Web アプリケーション、サービス、またはデータベースが含まれています。 また、SharePoint コンポーネントが含まれていることもあります。 外部コンポーネントは、LAMP (Linux、Apache、MySQL、PHP) スタックなど、任意の Web ホスティング スタックでホストできます。
- アドイン内のカスタム ビジネス ロジックは、外部コンポーネントかカスタム SharePoint ページ上の JavaScript で実行する必要があります。
この記事では、次の手順を実行します。
- 開発環境のセットアップ
- アドイン プロジェクトの作成
- アドインのコーディング
開発環境のセットアップ
SharePoint アドイン用に開発環境をセットアップする方法は多数あります。このセクションでは最も簡単な方法について説明します。 "すべてオンプレミス" 環境に設定するなど、その他の方法については、「ツール」を参照してください。
ツールを取得する
Visual Studio 2013 以降をまだインストールしていない場合は、「Visual Studio のインストール」の指示を使用してインストールします。 Microsoft ダウンロード センターの最新バージョンを使用することをお勧めします。
Visual Studio には、Microsoft Office Developer Tools for Visual Studio が含まれています。 Visual Studio の更新間に、このツールのバージョンがリリースされることがあります。 このツールの最新バージョンを確実に入手するために、Office Developer Tools for Visual Studio 2013 用インストーラー、または Office Developer Tools for Visual Studio 2015 用インストーラーを実行してください。
前のバージョンの Visual Studio または他の Visual Studio ドキュメントを参照してください。
Office 365 Developer サブスクリプションへのサインアップ
注:
既に Office 365 Developer サブスクリプションにアクセスできる可能性があります。
- Visual Studio (MSDN) サブスクライバーになっておられますか? MSDN のサブスクライバーが所有する Visual Studio Ultimate および Visual Studio Premium には、特典として Office 365 Developer サブスクリプションが付いています。 すぐに特典を利用できます。
- 以下のいずれかの Office 365 サブスクリプション プランをお持ちですか? そうであれば、「既存の Office 365 サブスクリプション内で開発者向けサイトを作成する」を参照してください。
Office 365 プランを取得するには、次の手順を実行してください。
Office 365 Developer サブスクリプションに、Office 365 Developer プログラムからサインアップします。
Office 365 Developer プログラムに参加し、サブスクリプションにサインアップして構成する方法についての詳しい手順については、Office 365 Developer プログラムのドキュメントを参照してください。
開発者向けサイトを開く
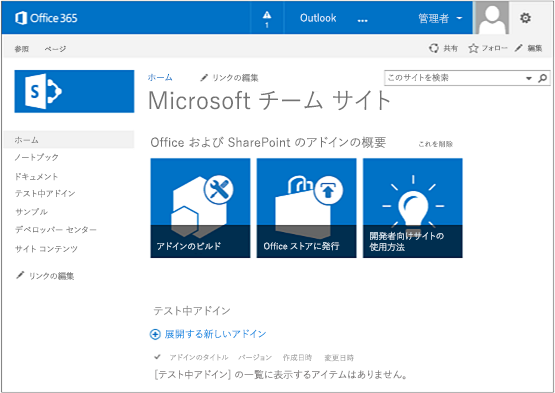
ページの左上にある [アドインのビルド] リンクを選択し、開発者向けサイトを開きます。 次の図に示すようなサイトが表示されます。 このページの [テスト中アドイン] リストでは、SharePoint 開発者向けサイトのテンプレートで作成された Web サイトを確認できます。 通常のチーム サイトが表示される場合は、数分待ってからサイトを再起動してください。
注:
サイトの URL を書き留めておきます。これは、Visual Studio で SharePoint アドイン プロジェクトを作成するときに使用します。
開発者向けサイトのホーム ページと [テスト中アドイン] のリスト
アドイン プロジェクトの作成
[管理者として実行] オプションを使用して Visual Studio を開始します。
Visual Studio で、[ファイル]>[新規作成]>[新しいプロジェクト] を選択します。
[新しいプロジェクト] ダイアログ ボックスで、[Visual C#] ノードを展開し、[Office/SharePoint] ノードを展開して、[アドイン]>[SharePoint アドイン] を選択します。
プロジェクトに「SampleAddIn」という名前を付けて、[OK] を選択します。
[SharePoint アドインの設定を指定する] ダイアログ ボックスで、次の操作を実行します。
アドインのデバッグに使用する SharePoint サイトの完全 URL を入力します。 これは、開発者向けサイトの URL になります。 URL には、HTTP ではなく HTTPS を使用してください。 このプロセスの間またはプロセスの完了直後に、このサイトへのサインインを求めるダイアログが表示されることがあります。 このダイアログが表示されるタイミングはさまざまです。 開発者サイトにサインアップしたときに作成した管理者資格情報 (*.onmicrosoft.com ドメイン内) を使用します。たとえば MyName@contoso.onmicrosoft.com、 です。
[SharePoint アドインをホストする方法] で、[プロバイダー向けのホスト型] を選択します。
[次へ] を選択します。
[ターゲットの SharePoint バージョンを指定します] ページで、[SharePoint Online] を選択してから [次へ] をクリックします。
[作成する Web アプリケーション プロジェクトのタイプ] で、[ ASP.NET Web フォーム アプリケーション] を選択してから [次へ] をクリックします。
[アドインの認証方法] で、[Windows Azure アクセス制御サービスを使用する] を選択します。
ウィザードで、[完了] を選択します。
構成の大半は、ソリューションを開いたときに実行されます。 Visual Studio ソリューション内に 2 つのプロジェクトが作成されます。1 つは SharePoint アドインのプロジェクトで、もう 1 つは ASP.NET Web アプリケーションのプロジェクトです。
アドインのコーディング
AppManifest.xml ファイルを開きます。 [権限] タブで [サイト コレクション] スコープを指定し、[読み取り] 権限レベルを指定します。
Web アプリケーションの Pages/Default.aspx ファイルの
<body>タグ内にあるすべてのマークアップを削除してから、次に示す HTML と ASP.NET コントロールを<body>の内側に追加します。 このサンプルでは、UpdatePanel コントロールを使用して、部分ページ レンダリングを可能にしています。<form id="form1" runat="server"> <div> <asp:ScriptManager ID="ScriptManager1" runat="server" EnablePartialRendering="true" /> <asp:UpdatePanel ID="PopulateData" runat="server" UpdateMode="Conditional"> <ContentTemplate> <table border="1" cellpadding="10"> <tr><th><asp:LinkButton ID="CSOM" runat="server" Text="Populate Data" OnClick="CSOM_Click" /></th></tr> <tr><td> <h2>SharePoint Site</h2> <asp:Label runat="server" ID="WebTitleLabel"/> <h2>Current User:</h2> <asp:Label runat="server" ID="CurrentUserLabel" /> <h2>Site Users</h2> <asp:ListView ID="UserList" runat="server"> <ItemTemplate > <asp:Label ID="UserItem" runat="server" Text="<%# Container.DataItem.ToString() %>"> </asp:Label><br /> </ItemTemplate> </asp:ListView> <h2>Site Lists</h2> <asp:ListView ID="ListList" runat="server"> <ItemTemplate > <asp:Label ID="ListItem" runat="server" Text="<%# Container.DataItem.ToString() %>"> </asp:Label><br /> </ItemTemplate> </asp:ListView> </td> </tr> </table> </ContentTemplate> </asp:UpdatePanel> </div> </form>次の宣言を Web アプリの Default.aspx.cs ファイルに追加します。
   using Microsoft.SharePoint.Client;
   using Microsoft.IdentityModel.S2S.Tokens;
   using System.Net;
   using System.IO;
   using System.Xml;
Web アプリケーションの Default.aspx.cs ファイルで、Page クラス内に次の変数を追加します。
  SharePointContextToken contextToken;
  string accessToken;
  Uri sharepointUrl;
  string siteName;
  string currentUser;
  List<string> listOfUsers = new List<string>();
  List<string> listOfLists = new List<string>();
Page クラス内に
RetrieveWithCSOMメソッドを追加します。 このメソッドは、SharePoint CSOM を使用してサイトに関する情報を取得して、ページ上に表示します。// This method retrieves information about the host web by using the CSOM. private void RetrieveWithCSOM(string accessToken) { if (IsPostBack) { sharepointUrl = new Uri(Request.QueryString["SPHostUrl"]); } ClientContext clientContext = TokenHelper.GetClientContextWithAccessToken( sharepointUrl.ToString(), accessToken); // Load the properties for the web object. Web web = clientContext.Web; clientContext.Load(web); clientContext.ExecuteQuery(); // Get the site name. siteName = web.Title; // Get the current user. clientContext.Load(web.CurrentUser); clientContext.ExecuteQuery(); currentUser = clientContext.Web.CurrentUser.LoginName; // Load the lists from the Web object. ListCollection lists = web.Lists; clientContext.Load<ListCollection>(lists); clientContext.ExecuteQuery(); // Load the current users from the Web object. UserCollection users = web.SiteUsers; clientContext.Load<UserCollection>(users); clientContext.ExecuteQuery(); foreach (User siteUser in users) { listOfUsers.Add(siteUser.LoginName); } foreach (List list in lists) { listOfLists.Add(list.Title); } }Page クラス内に
CSOM_Clickメソッドを追加します。 このメソッドは、ユーザーが [Populate Data (データの読み込み)] リンクをクリックしたときに発生するイベントをトリガーします。protected void CSOM_Click(object sender, EventArgs e) { string commandAccessToken = ((LinkButton)sender).CommandArgument; RetrieveWithCSOM(commandAccessToken); WebTitleLabel.Text = siteName; CurrentUserLabel.Text = currentUser; UserList.DataSource = listOfUsers; UserList.DataBind(); ListList.DataSource = listOfLists; ListList.DataBind(); }既存の
Page_Loadメソッドを次のメソッドに置き換えます。 このPage_Loadメソッドは、TokenHelper.cs ファイル内のメソッドを使用して、Requestオブジェクトからコンテキストを取得し、Microsoft Azure Access Control Service (ACS) からアクセストークンを取得します。// The Page_load method fetches the context token and the access token. // The access token is used by all of the data retrieval methods. protected void Page_Load(object sender, EventArgs e) { string contextTokenString = TokenHelper.GetContextTokenFromRequest(Request); if (contextTokenString != null) { contextToken = TokenHelper.ReadAndValidateContextToken(contextTokenString, Request.Url.Authority); sharepointUrl = new Uri(Request.QueryString["SPHostUrl"]); accessToken = TokenHelper.GetAccessToken(contextToken, sharepointUrl.Authority) .AccessToken; // For simplicity, this sample assigns the access token to the button's CommandArgument property. // In a production add-in, this would not be secure. The access token should be cached on the server-side. CSOM.CommandArgument = accessToken; } else if (!IsPostBack) { Response.Write("Could not find a context token."); return; } }作業が完了すると、Default.aspx.cs ファイルは次のようになります。
  using System;
  using System.Collections.Generic;
  using System.Linq;
  using System.Web;
  using System.Web.UI;
  using System.Web.UI.WebControls;

  using Microsoft.SharePoint.Client;
  using Microsoft.IdentityModel.S2S.Tokens;
  using System.Net;
  using System.IO;
  using System.Xml;

  namespace SampleAddInWeb
  {
      public partial class Default : System.Web.UI.Page
      {
          SharePointContextToken contextToken;
          string accessToken;
          Uri sharepointUrl;
          string siteName;
          string currentUser;
          List<string> listOfUsers = new List<string>();
          List<string> listOfLists = new List<string>();

          protected void Page_PreInit(object sender, EventArgs e)
          {
              Uri redirectUrl;
              switch (SharePointContextProvider.CheckRedirectionStatus(Context, out redirectUrl))
              {
                  case RedirectionStatus.Ok:
                      return;
                  case RedirectionStatus.ShouldRedirect:
                      Response.Redirect(redirectUrl.AbsoluteUri, endResponse: true);
                      break;
                  case RedirectionStatus.CanNotRedirect:
                      Response.Write("An error occurred while processing your request.");
                      Response.End();
                      break;
              }
          }

          protected void CSOM_Click(object sender, EventArgs e)
          {
              string commandAccessToken = ((LinkButton)sender).CommandArgument;
              RetrieveWithCSOM(commandAccessToken);
              WebTitleLabel.Text = siteName;
              CurrentUserLabel.Text = currentUser;
              UserList.DataSource = listOfUsers;
              UserList.DataBind();
              ListList.DataSource = listOfLists;
              ListList.DataBind();
          }

          // This method retrieves information about the host web by using the CSOM.
          private void RetrieveWithCSOM(string accessToken)
          {

              if (IsPostBack)
              {
                  sharepointUrl = new Uri(Request.QueryString["SPHostUrl"]);
              }

              ClientContext clientContext =
                      TokenHelper.GetClientContextWithAccessToken(
                          sharepointUrl.ToString(), accessToken);

              // Load the properties for the web object.
              Web web = clientContext.Web;
              clientContext.Load(web);
              clientContext.ExecuteQuery();

              // Get the site name.
              siteName = web.Title;

              // Get the current user.
              clientContext.Load(web.CurrentUser);
              clientContext.ExecuteQuery();
              currentUser = clientContext.Web.CurrentUser.LoginName;

              // Load the lists from the Web object.
              ListCollection lists = web.Lists;
              clientContext.Load<ListCollection>(lists);
              clientContext.ExecuteQuery();

              // Load the current users from the Web object.
              UserCollection users = web.SiteUsers;
              clientContext.Load<UserCollection>(users);
              clientContext.ExecuteQuery();

              foreach (User siteUser in users)
              {
                  listOfUsers.Add(siteUser.LoginName);
              }

              foreach (List list in lists)
              {
                  listOfLists.Add(list.Title);
              }
          }

          protected void Page_Load(object sender, EventArgs e)
          {
              string contextTokenString =
                   TokenHelper.GetContextTokenFromRequest(Request);

              if (contextTokenString != null)
              {
                  contextToken =
                      TokenHelper.ReadAndValidateContextToken(contextTokenString, Request.Url.Authority);

                  sharepointUrl = new Uri(Request.QueryString["SPHostUrl"]);
                  accessToken =
                      TokenHelper.GetAccessToken(contextToken, sharepointUrl.Authority)
                                 .AccessToken;
                  CSOM.CommandArgument = accessToken;
              }
              else if (!IsPostBack)
              {
                  Response.Write("Could not find a context token.");
                  return;
              }
          }
      }
  }
F5 キーを使用して、アドインを展開して実行します。 自己署名 Localhost 証明書を信頼するかどうかを尋ねる [セキュリティの警告] ウィンドウが表示されたら、[はい] を選択します。
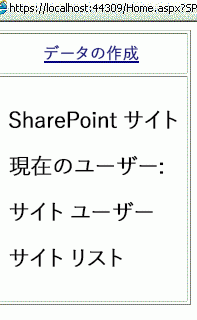
同意ページで [信頼する] を選択して、アドインにアクセス許可を付与します。 Visual Studio は、IIS Express に Web アプリケーションをインストールしてから、テスト用 SharePoint サイトにアドインをインストールして起動します。 次のスクリーンショットに示す表を含むページが表示されます。 SharePoint サイトの要約情報を確認するには、[Populate Data (データの読み込み)] をクリックします。
次の手順
アドインを作成するには、次の手順を順序どおりに行ってください。
- プロバイダー向けのホスト型アドインに SharePoint の外観を付ける
- プロバイダー ホスト型アドインにカスタム ボタンを含める
- SharePoint オブジェクト モデルの概要を簡単に説明する
- プロバイダー ホスト型アドインに SharePoint の書き込み操作を追加する
- プロバイダー ホスト型アドインにアドインの一部を含める
- プロバイダー ホスト型アドインでアドイン イベントを処理する
- プロバイダー向けのホスト型アドインに最初の実行ロジックを追加する
- プログラムを使用してプロバイダー向けのホスト型アドインにカスタム ボタンを展開する
- プロバイダー向けのホスト型アドインでリスト アイテム イベントを処理する