This article lists the PDF-based features supported for the mobile application of OneDrive and for the Web-based application of OneDrive.
Categories
The features introduced for PDFs in OneDrive are categorized into:
Freemium
The following table lists the PDF-based features in OneDrive that are available free of cost:
| Feature | Description | OneDrive for home | OneDrive for work/school |
|---|---|---|---|
| Annotation and markup tools | Easily collaborate and share feedback by using digital ink, highlighting text, drawing shapes, and inserting sticky notes directly onto your PDF files. | Yes | Yes |
| Bookmark PDF pages | Navigate effortlessly through lengthy documents by adding bookmarks to important sections, just like using tabs in a physical book. | Yes (OneDrive for iOS/iPadOS and Android only.) | Yes (OneDrive for iOS/iPadOS and Android only.) |
| Change the appearance of your PDF | Enhance your reading experience by adjusting the background color of your PDFs to dark mode, sepia mode, or light mode. Ideal for reading in different lighting conditions. | Yes (OneDrive for Android only.) | Yes (OneDrive for Android only.) |
| Rotate PDF pages | Correct the orientation of scanned documents by rotating individual or multiple pages 90° clockwise. Perfect for fixing upside-down or sideways pages. | Yes | Yes |
| Jump to specific PDF page using Table of Contents | Quickly access specific sections by jumping directly to any page in your PDF documents using a clickable table of contents. | Yes | Yes |
Annotation and markup tools for enhancing collaboration
The “Annotation and Markup Tools” feature facilitates an optimized collaboration for a team that uses a PDF as a medium of communication in the project. This feature helps the team members to allow annotations, editing tools in the PDF to represent their suggestions/ideas/views about the project within their team. This feature enables the team members avoid using collaboration sessions to convey each suggestion/idea/view. This feature enables reduction in the count of sessions of collaboration about the project for each member to share (if they have any) suggestion/idea/view about any specific facet in the project.
To annotate a PDF in OneDrive using markup tools, perform the following steps:
Find the PDF you want to annotate in your OneDrive and select it for the PDF to launch.
Select Annotation to enter “editing” mode at the bottom of the PDF screen:

Select an annotation tool from the bottom of the screen or a drawing markup tool from the top of the screen.
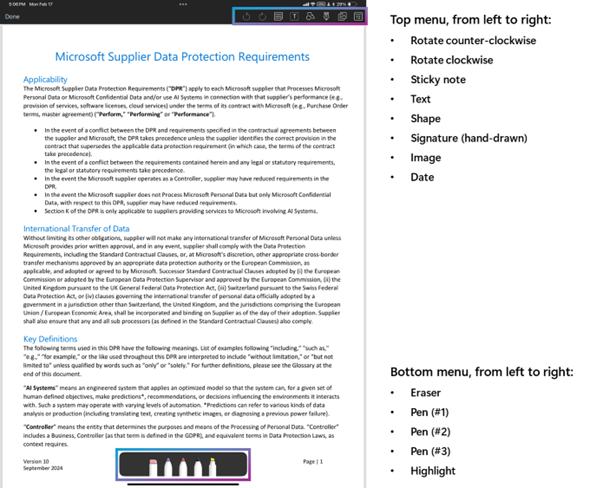
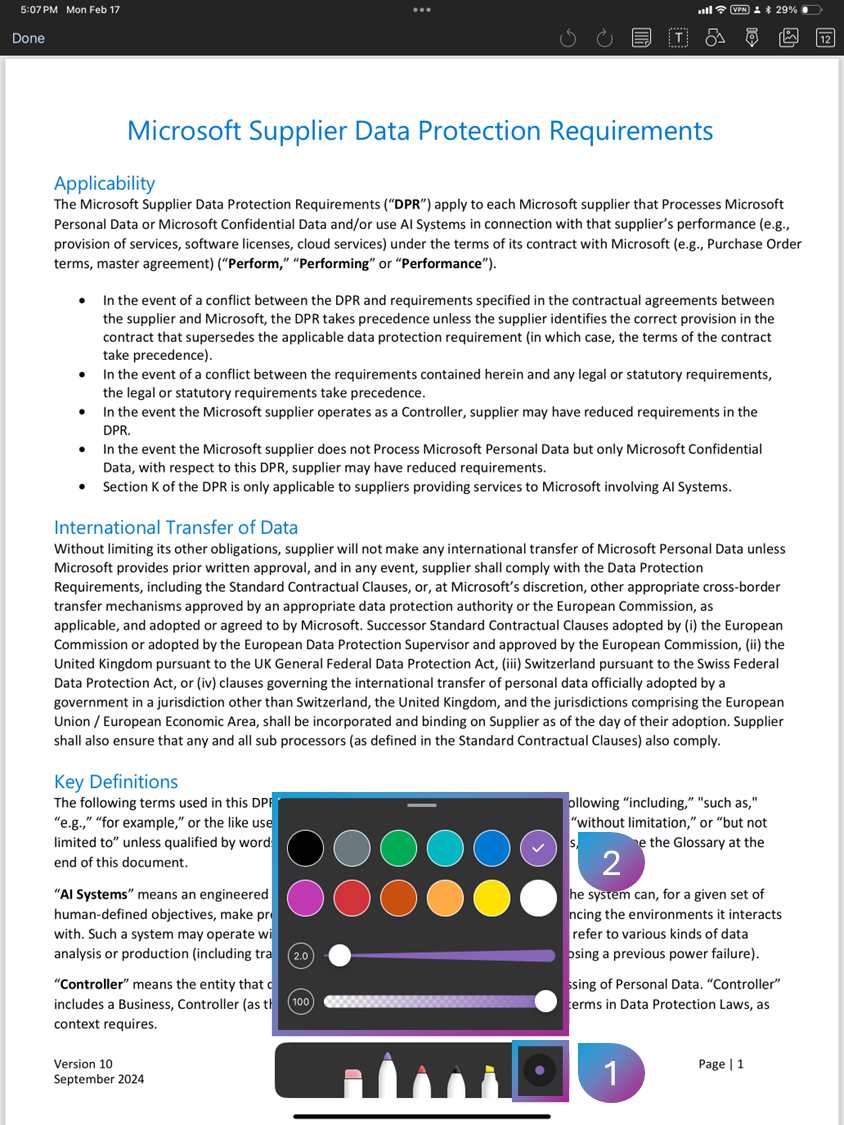
Change the pen color. You can do this by performing the following steps:
Select the color picker at the bottom of the screen (the pane in the following screenshot that is marked as 1).
Choose from any of the preset colors in the color picker.
Note
You can also adjust the thickness and transparency of the ink from the bottom pane in the following screenshot (pane marked as 2):
Select Done at the top–left of the PDF screen, and then select Save at the top–right of the PDF screen to save your changes back to OneDrive.
The following screenshot displays the process of annotating the PDF:


Bookmark PDF pages
The "Bookmarks" feature for the PDFs in OneDrive enables easier and faster navigation to the specific sections in the PDF. This feature enhances the reading experience for the PDF users.
To add a bookmark in a PDF, perform the following steps:
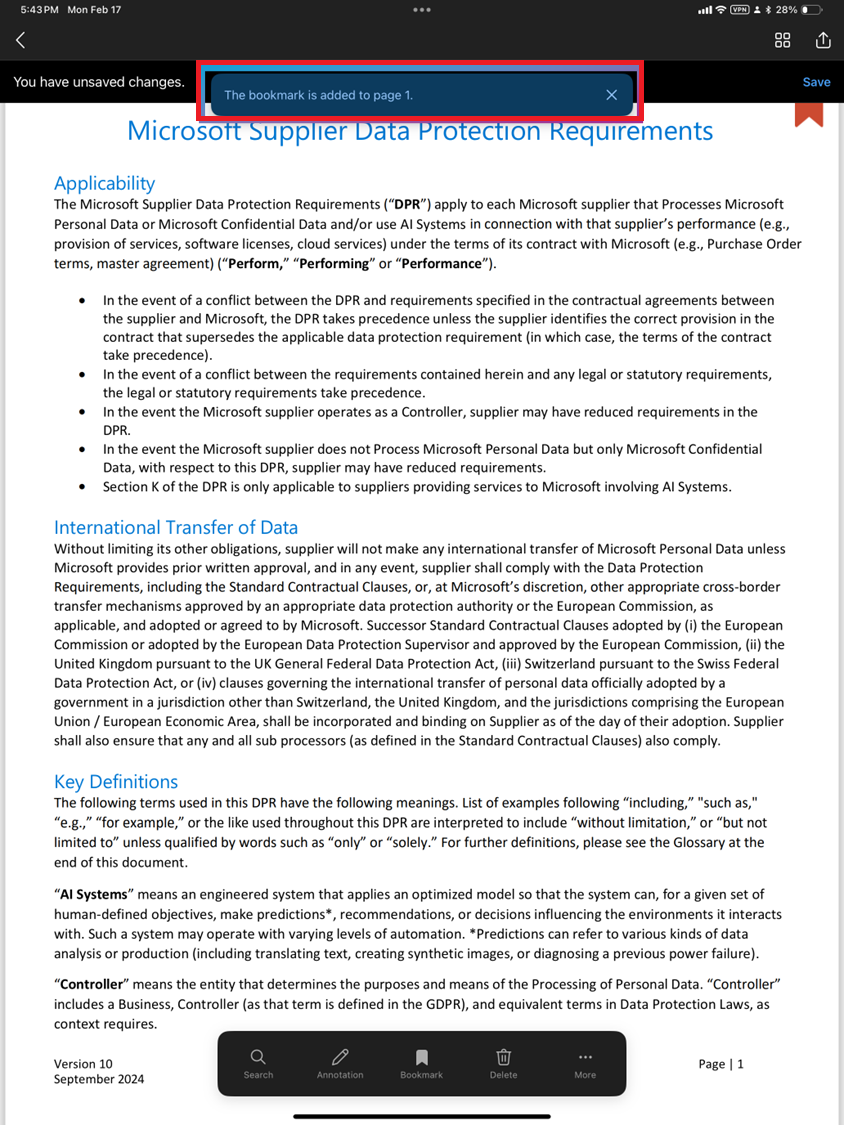
Select Bookmark at the bottom of the PDF screen to add a bookmark to the current page you’re viewing.

Once you’ve added the bookmark, you'll see a dialog box displaying a confirmation message at the top of the screen as shown in the following screenshot:
You can add bookmark to any page and any number of pages of choice by implementing the preceding step.


Viewing bookmarks added to multiple pages
If you’ve added bookmarks to multiple pages and want to view those bookmarks, perform the following steps:
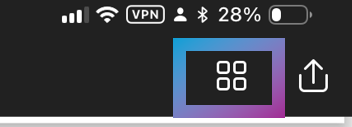
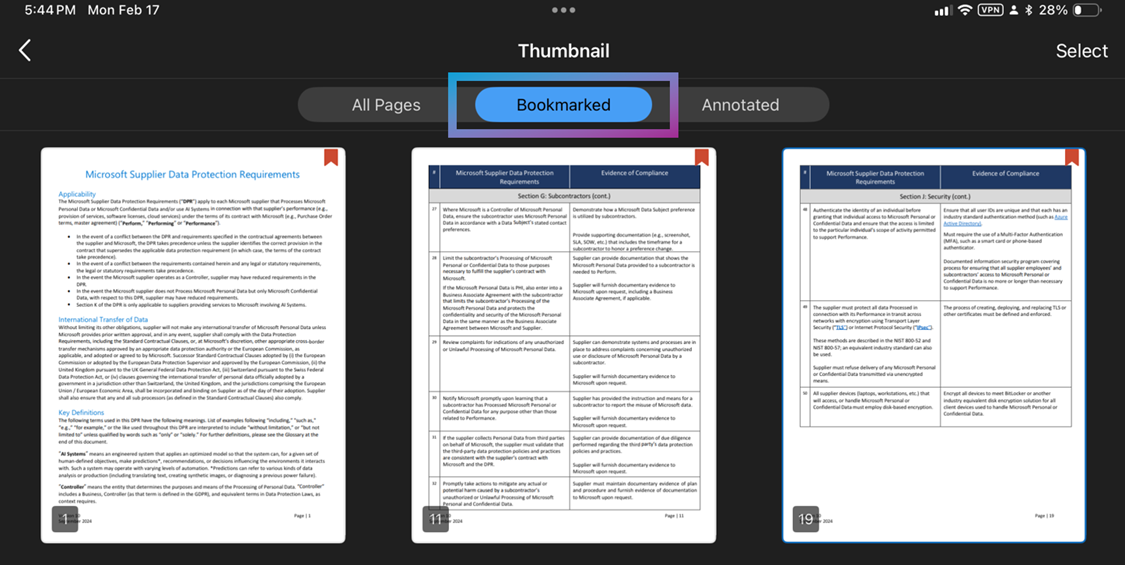
Select the Thumbnail icon at the top–right of the screen.
The page shows the All Pages, Bookmarked, and Annotated options in "thumbnail" view.
Select the Bookmarked option from the page shown in "thumbnail" view.

Adding bookmarks to multiple pages or deleting bookmarks from multiple pages
You can also add bookmarks to multiple pages or delete existing bookmarks from pages.
To add bookmarks to multiple pages, perform the following steps:
- Select the All Pages option from the page shown in "thumbnail" view.
- Select a page (or multiple pages) from the All Pages screen to which you want to add a bookmark.
- Select Bookmark at the bottom of the screen on the page to which you want to add a bookmark.
To delete existing bookmarks from the pages, perform the following steps:
- Select the Bookmarked option from the page shown in "thumbnail view". This page displays the pages that have been bookmarked.
- Select the page (or pages) for which you want to delete the bookmark, and then select Delete. The bookmarks for the selected pages are deleted.
The whole process of managing bookmarks in PDFs on OneDrive is depicted in the following screenshot:

Change the appearance of your PDF - Optimize PDF viewing by using various reading modes
The “Optimized PDF Viewing with Reading Mode” feature can be applied when the default view of the PDF isn’t conducive to be read in the current environment/surroundings the user is in. This feature enables the user to customize the PDF’s background to sync with the environment in which you’re going to read the PDF.
Customizing PDFs' background refers to changing the PDF’s default mode for reading (the mode as is on your PC or mobile when you open the PDF) to “dark” mode, “sepia” mode, or “light” mode.
To change a PDF’s background, perform the following steps:
- Open a PDF in OneDrive for Android and click anywhere to expand the bottom sheet of the screen.
- Select Appearance.
- Select a colored circle that corresponds to the reading mode that you want to set for the PDF.
Rotating PDF pages to adjust a PDF pages' orientation
The ”Page Rotation” feature enables the user to adjust a PDF page’s orientation wherein a page that has been saved upside down or sideways is rotated to bring it to the “straight” position. This feature is especially useful when there are multiple pages that have been saved upside down or sideways.
The process of applying the "rotate" feature is depicted in the following screenshot:

Rotating a single page that has a sideways' or upside-down orientation
To rotate a single page, perform the following steps:
- Open the OneDrive app on your iOS or Android mobile; then open the PDF containing the page you want to rotate.
- Scroll to the page that you want to rotate and click on an area where no text is there. A dialog box pops up.
- Select Rotate to rotate the page 90 degrees clockwise. Keep selecting Rotate for more 90-degree turns until the page reaches the straight orientation.
Rotating multiple pages with a sideways' or upside-down orientation
To rotate multiple pages, perform the following steps:
Open the OneDrive app on your iOS or Android mobile; then open the PDF containing the pages you want to rotate.
Select the Thumbnail icon at the top of the screen to show a thumbnail view of the PDF’s pages.

Select Select. The screen containing all the pages of the PDF (opened in Step-1) appears.
Click on the pages you want to rotate (pages get selected for rotation on being clicked) OR select Select all if you want to rotate all the pages.
Click the Rotate icon on the toolbar at the bottom of your screen to rotate the pages you have selected 90 degrees clockwise.
Jump to specific PDF page using Table of Contents
The “Quick page-navigation using Table of Contents (TOC)” feature enables smooth/easy navigation in a lengthy/large PDF. This feature displays each chapter’s/section’s title along with their page numbers. This provision enables the user to navigate quickly to the desired chapter section on account of they knowing the page number.
To view a PDF’s TOC to use its clickable chapter's/section's page numbers, perform the following steps:
Select the TOC icon at the top–right of the PDF screen.

Note
This icon is displayed if the PDF includes TOC-related data irrespective of which location in the PDF hosts the TOC-related data. If the TOC-related data isn't found anywhere in a PDF, then such a PDF won't display the TOC icon on the UI.
The TOC—with clickable chapters and sections—is displayed on the left side of the screen.

Premium
The following table lists the PDF-based features in OneDrive that are available on the payment of a premium:
| Feature | Description | OneDrive for home1 | OneDrive for work/school2 |
|---|---|---|---|
| Extract PDF pages | Easily extract specific pages from your PDF documents to create new, smaller files. Ideal for sharing only the most relevant sections. | Yes | Yes |
| Merge PDFs | Seamlessly combine multiple PDFs into a single, organized document. Perfect for consolidating reports, presentations, and more. | Yes | Yes |
1 Premium features are available to OneDrive users with Microsoft 365 Basic, Microsoft 365 Personal, and Family subscriptions.
2 Premium features are accessible to all OneDrive commercial users with SharePoint in their subscription plan.
Extract PDF pages
The “Extract PDF pages” feature enables the Microsoft 365 paid customers to extract specific pages from the main PDF and create a smaller PDF from the extracted pages. You can apply the “Extract PDF pages” feature using the following methods:
Extract PDF pages using Web browser
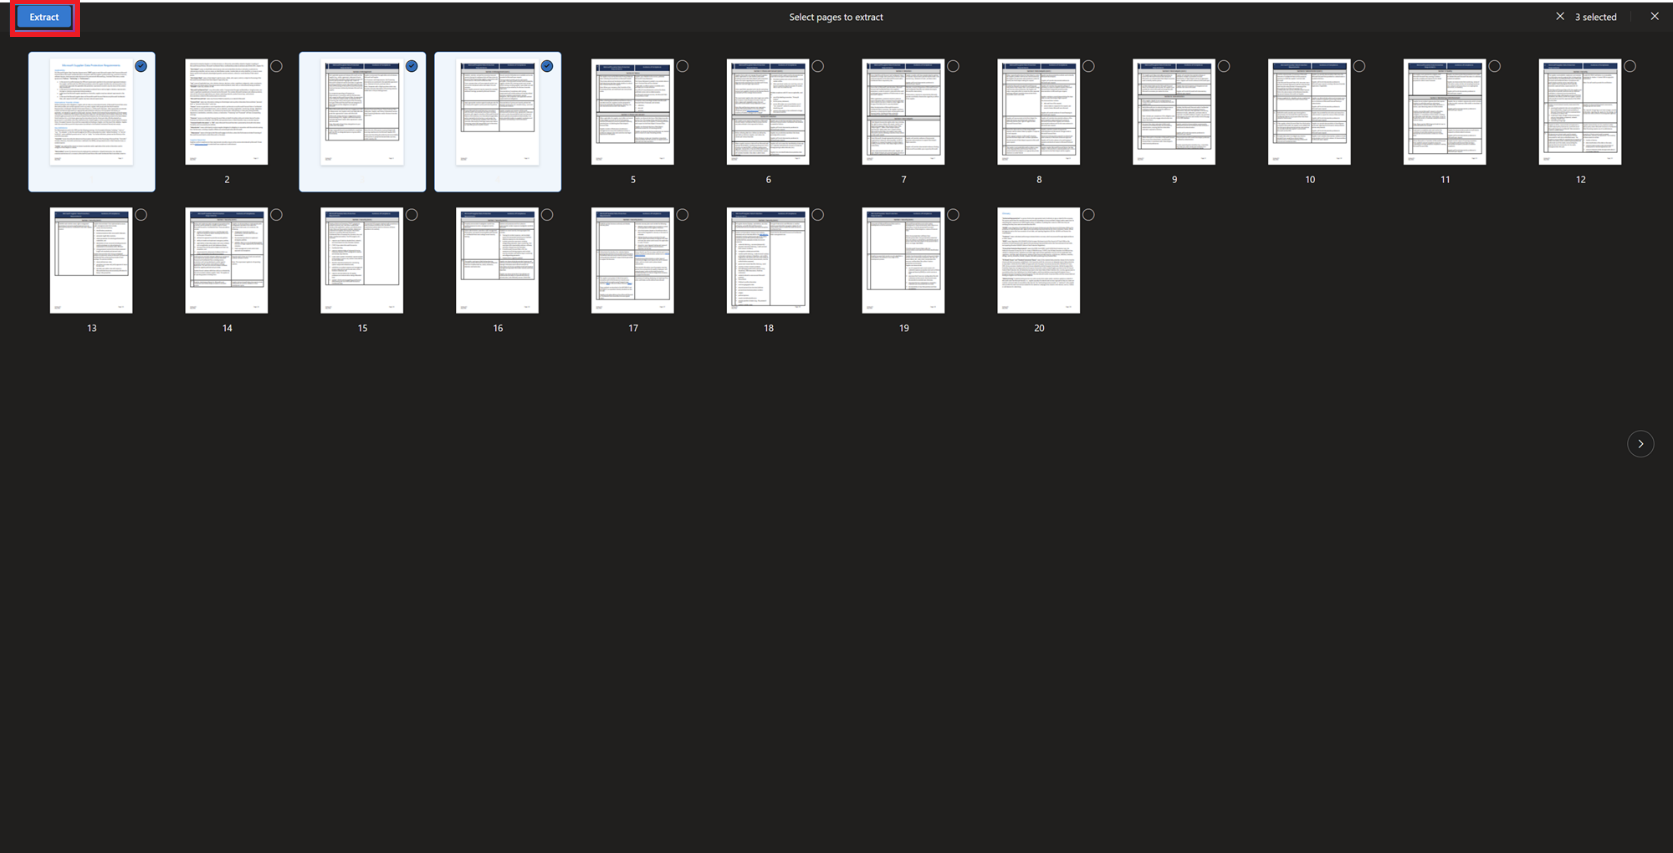
To extract pages from a PDF file on a Web browser, perform the following steps:
Open the PDF file from which you want to extract pages.
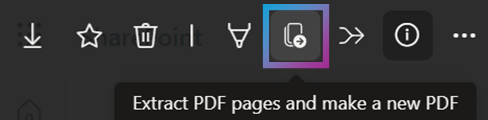
Select the Extract icon from the top portion of the screen.
The pages are displayed in “thumbnail” view.
Select the pages that you want to extract, and then select Extract on the top–left of the screen.
Note
Once you extract pages (even a single page) from the PDF, a new PDF file is generated containing these extracted pages.
Choose the location where you’d want to save the generated PDF file from the dialog box that pops up.
Provide a name to the file (if you want to rename it and not use the system-generated name) in the text box at the bottom of the Save dialog box.
Select Save. A dialog box with a confirmation message appears at the bottom of the screen, stating that the extracted pages have been successfully saved as another PDF file with the name you provided (in the earlier step).

Extract PDF pages using iOS/Android mobile phones and/or iPads
To extract pages from a PDF from the OneDrive app on a mobile phone/iPad (with iOS/Android operating systems), perform the following steps:
- Open the PDF file from which you want to extract pages.
- Select the … icon at the top–left of the screen to view the new menu.
- Select Extract from the new menu.
- Choose the location where you’d want to save the generated PDF file from the dialog box that pops up.
- Provide a name to the file (if you want to rename it and not use the system-generated name) in the text box at the bottom of the Save dialog box.
- Select Save. A dialog box with a confirmation message appears at the bottom of the screen, stating that the extracted pages have been successfully saved as another PDF file with the name you provided (in the earlier step).
The following screenshot depicts the process of "page extraction from PDFs" on mobile/iPad:
![]()
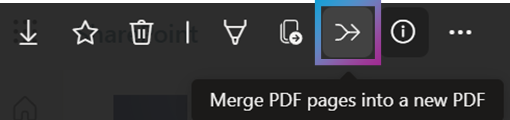
Merge multiple PDFs
The “Merge multiple PDFs” feature enables the Microsoft 365 paid customers to merge multiple PDFs into a single PDF. You can apply the “Merge multiple PDFs” feature using the following methods:
- Web browser
- Mobile phones and iPads (having iOS and Android operating systems)
Merge multiple PDF files into a single PDF using Web browser
To merge multiple PDFs into a single PDF on a Web browser, perform the following steps:
Open one of the PDF files you want to combine in OneDrive for Web.
Note
This PDF file that is opened is the file into which you'll merge other PDFs that you'll choose in the subsequent steps.
Select the Merge icon.
A dialog box pops up, displaying other PDFs in "thumbnail" view.
Select two or more PDF files by clicking on those files, which you want to merge with the PDF file that was chosen in Step 1.
Note
You can drag and drop the files to rearrange the order.
Select Next.
Choose the location where you’d want to save the generated PDF file from the dialog box that pops up.
Provide a name to the file (if you want to rename it and not use the system-generated name) in the text box at the bottom of the Save dialog box.
Select Save. A dialog box with a confirmation message appears at the bottom of the screen, stating that merged PDF files have been successfully saved as another PDF file with the name you provided (in the earlier step).
The following screenshot displays the process of implementing the steps in this section:

Merge multiple PDF files into a single PDF using mobile phones/iPads
To merge multiple PDFs into a single PDF from the OneDrive app on a mobile phone/iPad (with iOS/Android operating systems), perform the following steps:
Open one of the PDF files you want to combine from the OneDrive app on your mobile/iPad.
Note
This PDF file is the file into which you'll merge other PDFs that you'll choose in the subsequent steps.
Select the ... icon from the top–left of the screen to view the new menu.
Select Merge from the new menu's options.
A dialog box pops up, displaying other PDFs in "thumbnail" view.
Select two or more PDF files by clicking on those files, which you want to merge with the PDF file that was chosen in Step 1.
Note
You can drag and drop the files to rearrange the order.
Select Next.
Choose the location where you’d want to save the generated PDF file from the dialog box that pops up.
Provide a name to the file (if you want to rename it and not use the system-generated name) in the text box at the bottom of the Save dialog box.
Select Save. A dialog box with a confirmation message appears at the bottom of the screen, stating that merged PDF files have been successfully saved as another PDF file with the name you provided (in the earlier step).