演習 - API プラグインを使用して宣言型エージェントを作成する
アクションを使用して宣言型エージェントを拡張すると、外部システムに格納されているデータをリアルタイムで取得および更新できます。 API プラグインを使用すると、API を介して外部システムに接続して、情報を取得および更新できます。
スターター プロジェクトをダウンロードする
まず、サンプル プロジェクトをダウンロードします。 Web ブラウザーでは、次の手順を実行します。
- https://github.com/microsoft/learn-declarative-agent-api-plugin-typescriptに移動します。
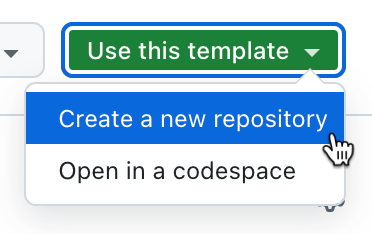
- GitHub アカウントをお持ちの場合:
[ このテンプレートを使用 する] ドロップダウンを選択し、メニューから [ 新しいリポジトリの作成] を選択します。
使用可能な所有者の一覧から、アカウントを選択します。
リポジトリに da-ristorante-api という名前を付けます。
[リポジトリの作成] ボタンを使用して 、リポジトリの作成を 確認します。
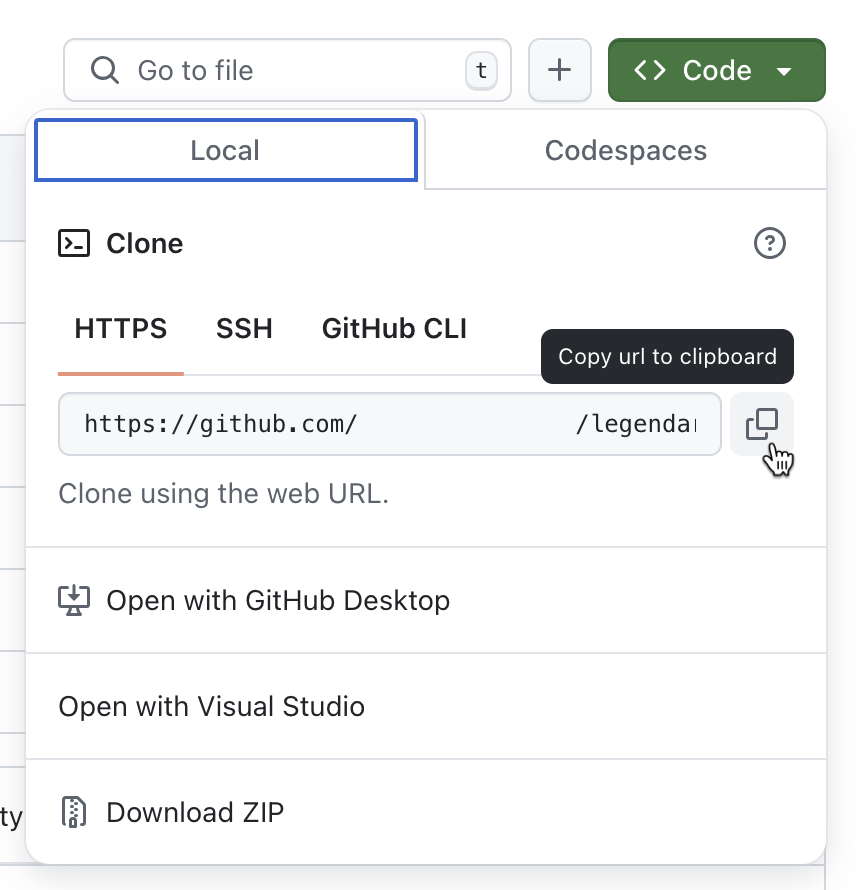
GitHub がリポジトリを作成するまで待ちます。 次に、リポジトリ URL をコピーします。
コマンド ラインを開きます。
コマンド ラインで、作業ディレクトリを、プロジェクトをディスクに格納する場所に変更します。
次のコマンドを使用してリポジトリを複製します:
git clone https://github.com/your-user/your-repo。Visual Studio Code で複製されたフォルダーを開きます。
- GitHub アカウントをお持ちでない場合:
リポジトリの内容を ZIP としてダウンロードします。
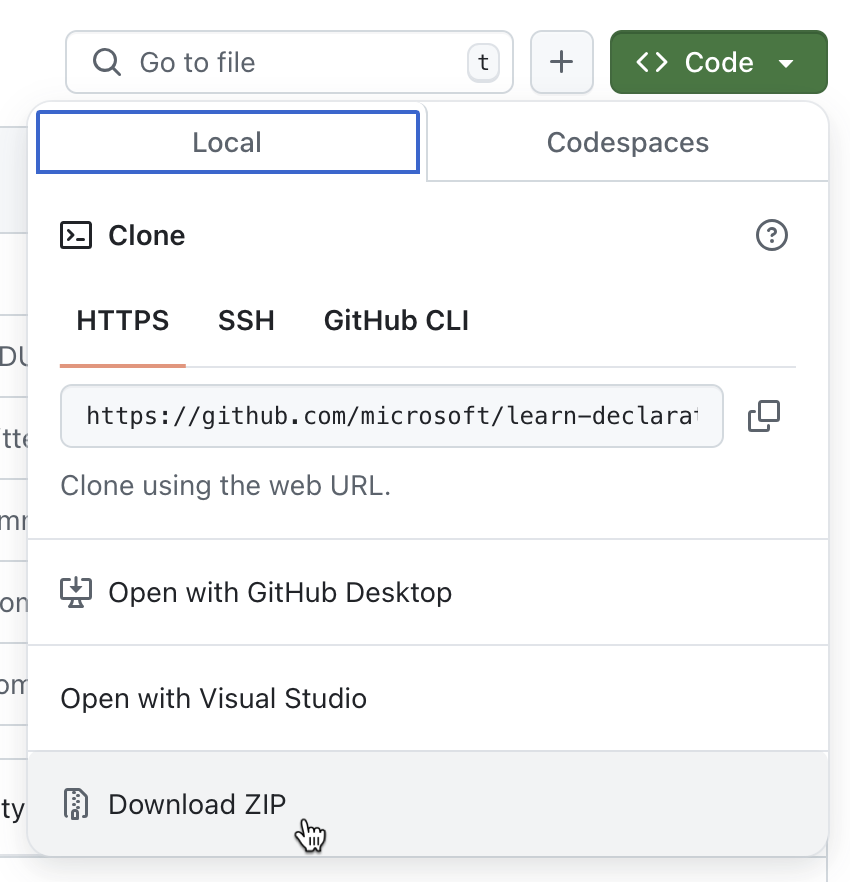
ディスク上の ZIP の内容を抽出します。
Visual Studio Code でフォルダーを開きます。


サンプル プロジェクトは、宣言型エージェントと、Azure Functionsで実行されている匿名 API を含む Microsoft 365 Agents Toolkit プロジェクトです。 宣言型エージェントは、Microsoft 365 Agents Toolkit を使用して新しく作成された宣言型エージェントと同じです。 API は架空のイタリア料理店に属しており、今日のメニューを閲覧して注文することができます。
API 定義を調べる
まず、イタリア料理店の API の API 定義を見てください。
Visual Studio Code で次の手順を実行します。
エクスプローラー ビューで、appPackage/apiSpecificationFile/ristorante.yml ファイルを開きます。 このファイルは、イタリア料理店の API を記述した OpenAPI 仕様です。
servers.url プロパティを見つける
servers:
  - url: http://localhost:7071/api
    description: Il Ristorante API server
ローカルでAzure Functionsを実行するときに、標準 URL と一致するローカル URL を指していることに注意してください。
paths プロパティを見つけます。このプロパティには、今日のメニューを取得するための /dishe と、注文を行う /orders という 2 つの操作が含まれています。
重要
各操作には、API 仕様の操作を一意に識別する operationId プロパティが含まれていることに注意してください。 Copilot では、特定のユーザー プロンプトに対して呼び出す API を認識できるように、各操作に一意の ID が必要です。
API の実装を調べる
次に、この演習で使用するサンプル API を確認します。
Visual Studio Code で次の手順を実行します。
エクスプローラー ビューで、src/data.json ファイルを開きます。 ファイルには、私たちのイタリア料理レストランのための架空のメニュー項目が含まれています。 各料理は、次のもので構成されます。
- 名前
- 形容
- 画像へのリンク、
- 価格
- どのコースでサービスが提供されるか、
- 種類 (料理または飲み物)
- 必要に応じて、アレルゲンの一覧
この演習では、API はこのファイルをデータ ソースとして使用します。
次に、 src/functions フォルダーを展開します。 dishes.ts と placeOrder.ts という名前の 2 つのファイルに注目してください。 これらのファイルには、API 仕様で定義されている 2 つの操作の実装が含まれています。
src/functions/dishes.ts ファイルを開きます。 少し時間を取って、API の動作を確認してください。 まず 、src/functions/data.json ファイルからサンプル データを読み込みます。
import data from "../data.json";次に、API を呼び出すクライアントが渡す可能性のあるフィルターについて、さまざまなクエリ文字列パラメーターを調べます。
const course = req.query.get('course');
const allergensString = req.query.get('allergens');
const allergens: string[] = allergensString ? allergensString.split(",") : [];
const type = req.query.get('type');
const name = req.query.get('name');
要求で指定されたフィルターに基づいて、API はデータ セットをフィルター処理し、応答を返します。
次に、 src/functions/placeOrder.ts ファイルで定義された注文を行う API を調べます。 API は、サンプル データの参照から始まります。 次に、クライアントが要求本文で送信する順序の形状を定義します。
interface OrderedDish {
  name?: string;
  quantity?: number;
}

interface Order {
  dishes: OrderedDish[];
}
API は、要求を処理するときに、最初に要求に本文が含まれているかどうかと、正しい図形があるかどうかを確認します。 そうでない場合は、400 の無効な要求エラーで要求を拒否します。
let order: Order | undefined;
try {
  order = await req.json() as Order | undefined;
}
catch (error) {
  return {
    status: 400,
    jsonBody: { message: "Invalid JSON format" },
  } as HttpResponseInit;
}

if (!order.dishes || !Array.isArray(order.dishes)) {
  return {
    status: 400,
    jsonBody: { message: "Invalid order format" }
  } as HttpResponseInit;
}
次に、API は、要求をメニューの料理に解決し、合計価格を計算します。
let totalPrice = 0;
const orderDetails = order.dishes.map(orderedDish => {
  const dish = data.find(d => d.name.toLowerCase().includes(orderedDish.name.toLowerCase()));
  if (dish) {
    totalPrice += dish.price * orderedDish.quantity;
    return {
      name: dish.name,
      quantity: orderedDish.quantity,
      price: dish.price,
    };
  }
  else {
    context.error(`Invalid dish: ${orderedDish.name}`);
    return null;
  }
});
重要
API では、クライアントが ID ではなく名前の一部で皿を指定することを想定していることがわかります。 これは、大きな言語モデルが数値よりも単語で機能するため、意図的です。 さらに、API を呼び出して注文を行う前に、Copilot には、ユーザーのプロンプトの一部としてすぐに使用できる皿の名前があります。 Copilot が ID で料理を参照する必要がある場合は、最初に追加の API 要求を必要とし、Copilot が今実行できない料理を取得する必要があります。
API の準備ができたら、合計価格と、構成済みの注文 ID と状態を含む応答が返されます。
const orderId = Math.floor(Math.random() * 10000);

return {
  status: 201,
  jsonBody: {
    order_id: orderId,
    status: "confirmed",
    total_price: totalPrice,
  }
} as HttpResponseInit;
プラグイン定義をビルドする
次の手順では、プラグイン定義をプロジェクトに追加します。 プラグイン定義には、次の情報が含まれています。
- プラグインが実行できるアクション。
- 予期して返されるデータの形状は何ですか。
- 宣言型エージェントが基になる API を呼び出す方法。
基本的なプラグイン定義構造を追加する
Visual Studio Code で次の手順を実行します。
appPackage フォルダーに、ai-plugin.json という名前の新しいファイルを追加します。
次の内容を貼り付けます。
{
  "$schema": "https://developer.microsoft.com/json-schemas/copilot/plugin/v2.1/schema.json",
  "schema_version": "v2.1",
  "namespace": "ilristorante",
  "name_for_human": "Il Ristorante",
  "description_for_human": "See the today's menu and place orders",
  "description_for_model": "Plugin for getting the today's menu, optionally filtered by course and allergens, and placing orders",
  "functions": [
  ],
  "runtimes": [
  ],
  "capabilities": {
    "localization": {},
    "conversation_starters": []
  }
}
ファイルには、人間とモデルの説明を含む API プラグインの基本的な構造が含まれています。 description_for_modelには、エージェントが呼び出しを検討するタイミングを理解するのに役立つプラグインの実行に関する詳細情報が含まれています。
変更内容を保存します。
関数を定義する
API プラグインは、API 仕様で定義されている API 操作にマップする 1 つ以上の関数を定義します。 各関数は、ユーザーにデータを表示する方法をエージェントに指示する名前と説明と応答定義で構成されます。
メニューを取得する関数を定義する
まず、関数を定義して、今日のメニューに関する情報を取得します。
Visual Studio Code で次の手順を実行します。
appPackage/ai-plugin.json ファイルを開きます。
functions 配列に、次のスニペットを追加します。
{
  "name": "getDishes",
  "description": "Returns information about the dishes on the menu. Can filter by course (breakfast, lunch or dinner), name, allergens, or type (dish, drink).",
  "capabilities": {
    "response_semantics": {
      "data_path": "$.dishes",
      "properties": {
        "title": "$.name",
        "subtitle": "$.description"
      }
    }
  }
}
まず、API 仕様から getDishes 操作を呼び出す関数を定義します。 次に、関数の説明を指定します。 この説明は重要です。Copilot はそれを使用して、ユーザーのプロンプトに対して呼び出す関数を決定するためです。
response_semantics プロパティで、Api から受信したデータを Copilot で表示する方法を指定します。 API は、 dishes プロパティのメニューの料理に関する情報を返すので、 data_path プロパティを
$.dishesJSONPath 式に設定します。次に、 properties セクションで、API 応答からタイトル、説明、URL を表すプロパティをマップします。 この場合、料理には URL がないため、 タイトル と 説明のみをマップします。
完全なコード スニペットは次のようになります。
{
  "$schema": "https://developer.microsoft.com/json-schemas/copilot/plugin/v2.1/schema.json",
  "schema_version": "v2.1",
  "namespace": "ilristorante",
  "name_for_human": "Il Ristorante",
  "description_for_human": "See the today's menu and place orders",
  "description_for_model": "Plugin for getting the today's menu, optionally filtered by course and allergens, and placing orders",
  "functions": [
    {
      "name": "getDishes",
      "description": "Returns information about the dishes on the menu. Can filter by course (breakfast, lunch or dinner), name, allergens, or type (dish, drink).",
      "capabilities": {
        "response_semantics": {
          "data_path": "$.dishes",
          "properties": {
            "title": "$.name",
            "subtitle": "$.description"
          }
        }
      }
    }
  ],
  "runtimes": [
  ],
  "capabilities": {
    "localization": {},
    "conversation_starters": []
  }
}
変更内容を保存します。
順序を設定する関数を定義する
次に、注文する関数を定義します。
Visual Studio Code で次の手順を実行します。
appPackage/ai-plugin.json ファイルを開きます。
関数配列の末尾に、次のスニペットを追加します。
{
  "name": "placeOrder",
  "description": "Places an order and returns the order details",
  "capabilities": {
    "response_semantics": {
      "data_path": "$",
      "properties": {
        "title": "$.order_id",
        "subtitle": "$.total_price"
      }
    }
  }
}
まず、ID placeOrder を使用して API 操作を参照します。 次に、Copilot がこの関数をユーザーのプロンプトと照合するために使用する説明を提供します。 次に、Copilot にデータを返す方法を指示します。 注文後に API から返されるデータを次に示します。
{
  "order_id": 6532,
  "status": "confirmed",
  "total_price": 21.97
}
表示するデータは応答オブジェクトのルートに直接配置されるため、json オブジェクトの最上位ノードを示す$にdata_pathを設定します。 注文の番号とサブタイトルの価格を表示するタイトルを定義します。
完全なファイルは次のようになります。
{
  "$schema": "https://developer.microsoft.com/json-schemas/copilot/plugin/v2.1/schema.json",
  "schema_version": "v2.1",
  "namespace": "ilristorante",
  "name_for_human": "Il Ristorante",
  "description_for_human": "See the today's menu and place orders",
  "description_for_model": "Plugin for getting the today's menu, optionally filtered by course and allergens, and placing orders",
  "functions": [
    {
      "name": "getDishes",
      "description": "Returns information about the dishes on the menu. Can filter by course (breakfast, lunch or dinner), name, allergens, or type (dish, drink).",
      ...trimmed for brevity
    },
    {
      "name": "placeOrder",
      "description": "Places an order and returns the order details",
      "capabilities": {
        "response_semantics": {
          "data_path": "$",
          "properties": {
            "title": "$.order_id",
            "subtitle": "$.total_price"
          }
        }
      }
    }
  ],
  "runtimes": [
  ],
  "capabilities": {
    "localization": {},
    "conversation_starters": []
  }
}
変更内容を保存します。
ランタイムを定義する
Copilot が呼び出す関数を定義した後、次の手順では、呼び出し方法を指示します。 これは、プラグイン定義の runtimes セクションで行います。
Visual Studio Code で次の手順を実行します。
appPackage/ai-plugin.json ファイルを開きます。
runtimes 配列に、次のコードを追加します。
{
  "type": "OpenApi",
  "auth": {
    "type": "None"
  },
  "spec": {
    "url": "apiSpecificationFile/ristorante.yml"
  },
  "run_for_functions": [
    "getDishes",
    "placeOrder"
  ]
}
まず、呼び出す API (型: OpenApi) に関する OpenAPI 情報を提供し、匿名 (auth.type: None) であることを Copilot に指示します。 次に、 spec セクションで、プロジェクトにある API 仕様への相対パスを指定します。 最後に、 run_for_functions プロパティで、この API に属するすべての関数を一覧表示します。
完全なファイルは次のようになります。
{
  "$schema": "https://developer.microsoft.com/json-schemas/copilot/plugin/v2.1/schema.json",
  "schema_version": "v2.1",
  "namespace": "ilristorante",
  "name_for_human": "Il Ristorante",
  "description_for_human": "See the today's menu and place orders",
  "description_for_model": "Plugin for getting the today's menu, optionally filtered by course and allergens, and placing orders",
  "functions": [
    {
      "name": "getDishes",
      ...trimmed for brevity
    },
    {
      "name": "placeOrder",
      ...trimmed for brevity
    }
  ],
  "runtimes": [
    {
      "type": "OpenApi",
      "auth": {
        "type": "None"
      },
      "spec": {
        "url": "apiSpecificationFile/ristorante.yml"
      },
      "run_for_functions": [
        "getDishes",
        "placeOrder"
      ]
    }
  ],
  "capabilities": {
    "localization": {},
    "conversation_starters": []
  }
}
変更内容を保存します。
プラグイン定義を宣言型エージェントに接続する
API プラグイン定義のビルドが完了したら、次の手順は宣言型エージェントに登録することです。 ユーザーが宣言型エージェントと対話すると、定義された API プラグインに対するユーザーのプロンプトと一致し、関連する関数が呼び出されます。
Visual Studio Code で次の手順を実行します。
appPackage/declarativeAgent.json ファイルを開きます。
instructions プロパティの後に、次のコード スニペットを追加します。
"actions": [
  {
    "id": "menuPlugin",
    "file": "ai-plugin.json"
  }
]
このスニペットを使用して、宣言型エージェントを API プラグインに接続します。 プラグインの一意の ID を指定し、プラグインの定義を見つけることができる場所をエージェントに指示します。
完全なファイルは次のようになります。
{
  "$schema": "https://developer.microsoft.com/json-schemas/copilot/declarative-agent/v1.0/schema.json",
  "version": "v1.0",
  "name": "Declarative agent",
  "description": "Declarative agent created with Microsoft 365 Agents Toolkit",
  "instructions": "$[file('instruction.txt')]",
  "actions": [
    {
      "id": "menuPlugin",
      "file": "ai-plugin.json"
    }
  ]
}
変更内容を保存します。
宣言型エージェントの情報と命令を更新する
この演習で構築する宣言型エージェントは、ユーザーが地元のイタリア料理店のメニューを参照して注文するのに役立ちます。 このシナリオに合わせてエージェントを最適化するには、その名前、説明、手順を更新します。
Visual Studio Code で次の手順を実行します。
- 宣言型エージェント情報を更新します。
- appPackage/declarativeAgent.json ファイルを開きます。
- name プロパティの値を Il Ristorante に更新します。
- 説明プロパティの値を、デスクの快適さから最も美味しいイタリア料理とドリンクを注文するように更新します。
- 変更を保存します。
- 宣言型エージェントの手順を更新します。
appPackage/instruction.txtファイルを開きます。
その内容を次のように置き換えます。
You are an assistant specialized in helping users explore the menu of an Italian restaurant and place orders. You interact with the restaurant's menu API and guide users through the ordering process, ensuring a smooth and delightful experience. Follow the steps below to assist users in selecting their desired dishes and completing their orders:

### General Behavior:
- Always greet the user warmly and offer assistance in exploring the menu or placing an order.
- Use clear, concise language with a friendly tone that aligns with the atmosphere of a high-quality local Italian restaurant.
- If the user is browsing the menu, offer suggestions based on the course they are interested in (breakfast, lunch, or dinner).
- Ensure the conversation remains focused on helping the user find the information they need and completing the order.
- Be proactive but never pushy. Offer suggestions and be informative, especially if the user seems uncertain.

### Menu Exploration:
- When a user requests to see the menu, use the `GET /dishes` API to retrieve the list of available dishes, optionally filtered by course (breakfast, lunch, or dinner).
  - Example: If a user asks for breakfast options, use the `GET /dishes?course=breakfast` to return only breakfast dishes.
- Present the dishes to the user with the following details:
  - Name of the dish
  - A tasty description of the dish
  - Price in € (Euro) formatted as a decimal number with two decimal places
  - Allergen information (if relevant)
  - Don't include the URL.

### Beverage Suggestion:
- If the order does not already include a beverage, suggest a suitable beverage option based on the course.
- Use the `GET /dishes?course={course}&type=drink` API to retrieve available drinks for that course.
- Politely offer the suggestion: *"Would you like to add a beverage to your order? I recommend [beverage] for [course]."*

### Placing the Order:
- Once the user has finalized their order, use the `POST /order` API to submit the order.
  - Ensure the request includes the correct dish names and quantities as per the user's selection.
  - Example API payload:

    ```json
    {
      "dishes": [
        {
          "name": "frittata",
          "quantity": 2
        },
        {
          "name": "cappuccino",
          "quantity": 1
        }
      ]
    }
    ```

### Error Handling:
- If the user selects a dish that is unavailable or provides an invalid dish name, respond gracefully and suggest alternative options.
  - Example: *"It seems that dish is currently unavailable. How about trying [alternative dish]?"*
- Ensure that any errors from the API are communicated politely to the user, offering to retry or explore other options.
手順では、エージェントの一般的な動作を定義し、それが何ができるかを指示します。 また、API が期待するデータの形状など、注文の配置に関する特定の動作に関する手順も含まれています。 この情報は、エージェントが意図したとおりに動作することを確認するために含まれます。
変更を保存します。
- ユーザーを支援するには、エージェントを何に使用できるかを理解し、会話スターターを追加します。
appPackage/declarativeAgent.json ファイルを開きます。
instructions プロパティの後に、conversation_starters という名前の新しいプロパティを追加します。
"conversation_starters": [
  {
    "text": "What's for lunch today?"
  },
  {
    "text": "What can I order for dinner that is gluten-free?"
  }
]
完全なファイルは次のようになります。
{
  "$schema": "https://developer.microsoft.com/json-schemas/copilot/declarative-agent/v1.0/schema.json",
  "version": "v1.0",
  "name": "Il Ristorante",
  "description": "Order the most delicious Italian dishes and drinks from the comfort of your desk.",
  "instructions": "$[file('instruction.txt')]",
  "conversation_starters": [
    {
      "text": "What's for lunch today?"
    },
    {
      "text": "What can I order for dinner that is gluten-free?"
    }
  ],
  "actions": [
    {
      "id": "menuPlugin",
      "file": "ai-plugin.json"
    }
  ]
}
変更内容を保存します。
API URL を更新する
宣言型エージェントをテストする前に、API 仕様ファイルの API の URL を更新する必要があります。 現在、URL は http://localhost:7071/api に設定されています。これは、ローカルで実行するときに使用Azure Functions URL です。 ただし、Copilot がクラウドから API を呼び出す必要があるため、API をインターネットに公開する必要があります。 Microsoft 365 Agents Toolkit では、開発トンネルを作成することで、ローカル API がインターネット経由で自動的に公開されます。 プロジェクトのデバッグを開始するたびに、Microsoft 365 Agents Toolkit によって新しい開発トンネルが開始され、その URL が OPENAPI_SERVER_URL 変数に格納されます。 Microsoft 365 Agents Toolkit がトンネルを開始し、その URL を .vscode/tasks.json ファイルの [ローカル トンネルの開始] タスクで格納する方法を確認できます。
{
  // Start the local tunnel service to forward public URL to local port and inspect traffic.
  // See https://aka.ms/teamsfx-tasks/local-tunnel for the detailed args definitions.
  "label": "Start local tunnel",
  "type": "teamsfx",
  "command": "debug-start-local-tunnel",
  "args": {
    "type": "dev-tunnel",
    "ports": [
      {
        "portNumber": 7071,
        "protocol": "http",
        "access": "public",
        "writeToEnvironmentFile": {
          "endpoint": "OPENAPI_SERVER_URL", // output tunnel endpoint as OPENAPI_SERVER_URL
        }
      }
    ],
    "env": "local"
  },
  "isBackground": true,
  "problemMatcher": "$teamsfx-local-tunnel-watch"
}
このトンネルを使用するには、 OPENAPI_SERVER_URL 変数を使用するように API 仕様を更新する必要があります。
Visual Studio Code で次の手順を実行します。
appPackage/apiSpecificationFile/ristorante.yml ファイルを開きます。
servers.url プロパティの値を ${{OPENAPI_SERVER_URL}}/api に変更します。
変更されたファイルは次のようになります。
openapi: 3.0.0
info:
  title: Il Ristorante menu API
  version: 1.0.0
  description: API to retrieve dishes and place orders for Il Ristorante.
servers:
  - url: ${{OPENAPI_SERVER_URL}}/api
    description: Il Ristorante API server
paths:
  ...trimmed for brevity
変更内容を保存します。
API プラグインが完成し、宣言型エージェントと統合されます。 Microsoft 365 Copilotでエージェントのテストに進みます。
Microsoft 365 Copilotで API プラグインを使用して宣言型エージェントをテストする
最後の手順では、Microsoft 365 Copilotで API プラグインを使用して宣言型エージェントをテストします。
Visual Studio Code で次の手順を実行します。
アクティビティ バーで、[Microsoft 365 Agents Toolkit] を選択します。
[アカウント] セクションで、Microsoft 365 Copilotを使用して Microsoft 365 テナントにサインインしていることを確認します。
![Visual Studio Code の [Microsoft 365 エージェント ツールキット アカウント] セクションのスクリーンショット。](../../m365-developer/copilot-declarative-agent-action-api-plugin-vsc/media/3-m365-agents-toolkit-accounts.png)
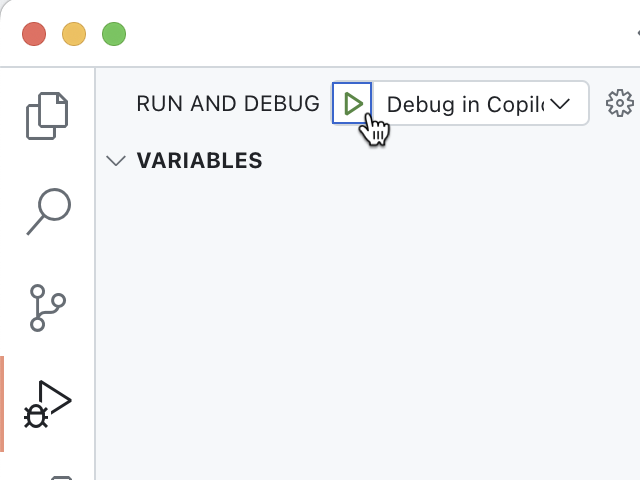
アクティビティ バーで、[実行とデバッグ] を選択します。
Copilot 構成で [デバッグ] を選択し、[デバッグの開始] ボタンを使用してデバッグを開始します。
Visual Studio Code は、Microsoft 365 テナントにプロジェクトをビルドしてデプロイし、新しい Web ブラウザー ウィンドウを開きます。
![Visual Studio Code の [Microsoft 365 エージェント ツールキット アカウント] セクションのスクリーンショット。](../../m365-developer/copilot-declarative-agent-action-api-plugin-vsc/media/3-m365-agents-toolkit-accounts.png#lightbox)

Web ブラウザーで次の手順を実行します。
メッセージが表示されたら、Microsoft 365 Copilotを使用して Microsoft 365 テナントに属するアカウントでサインインします。
サイド バーから [ Il Ristorante] を選択します。

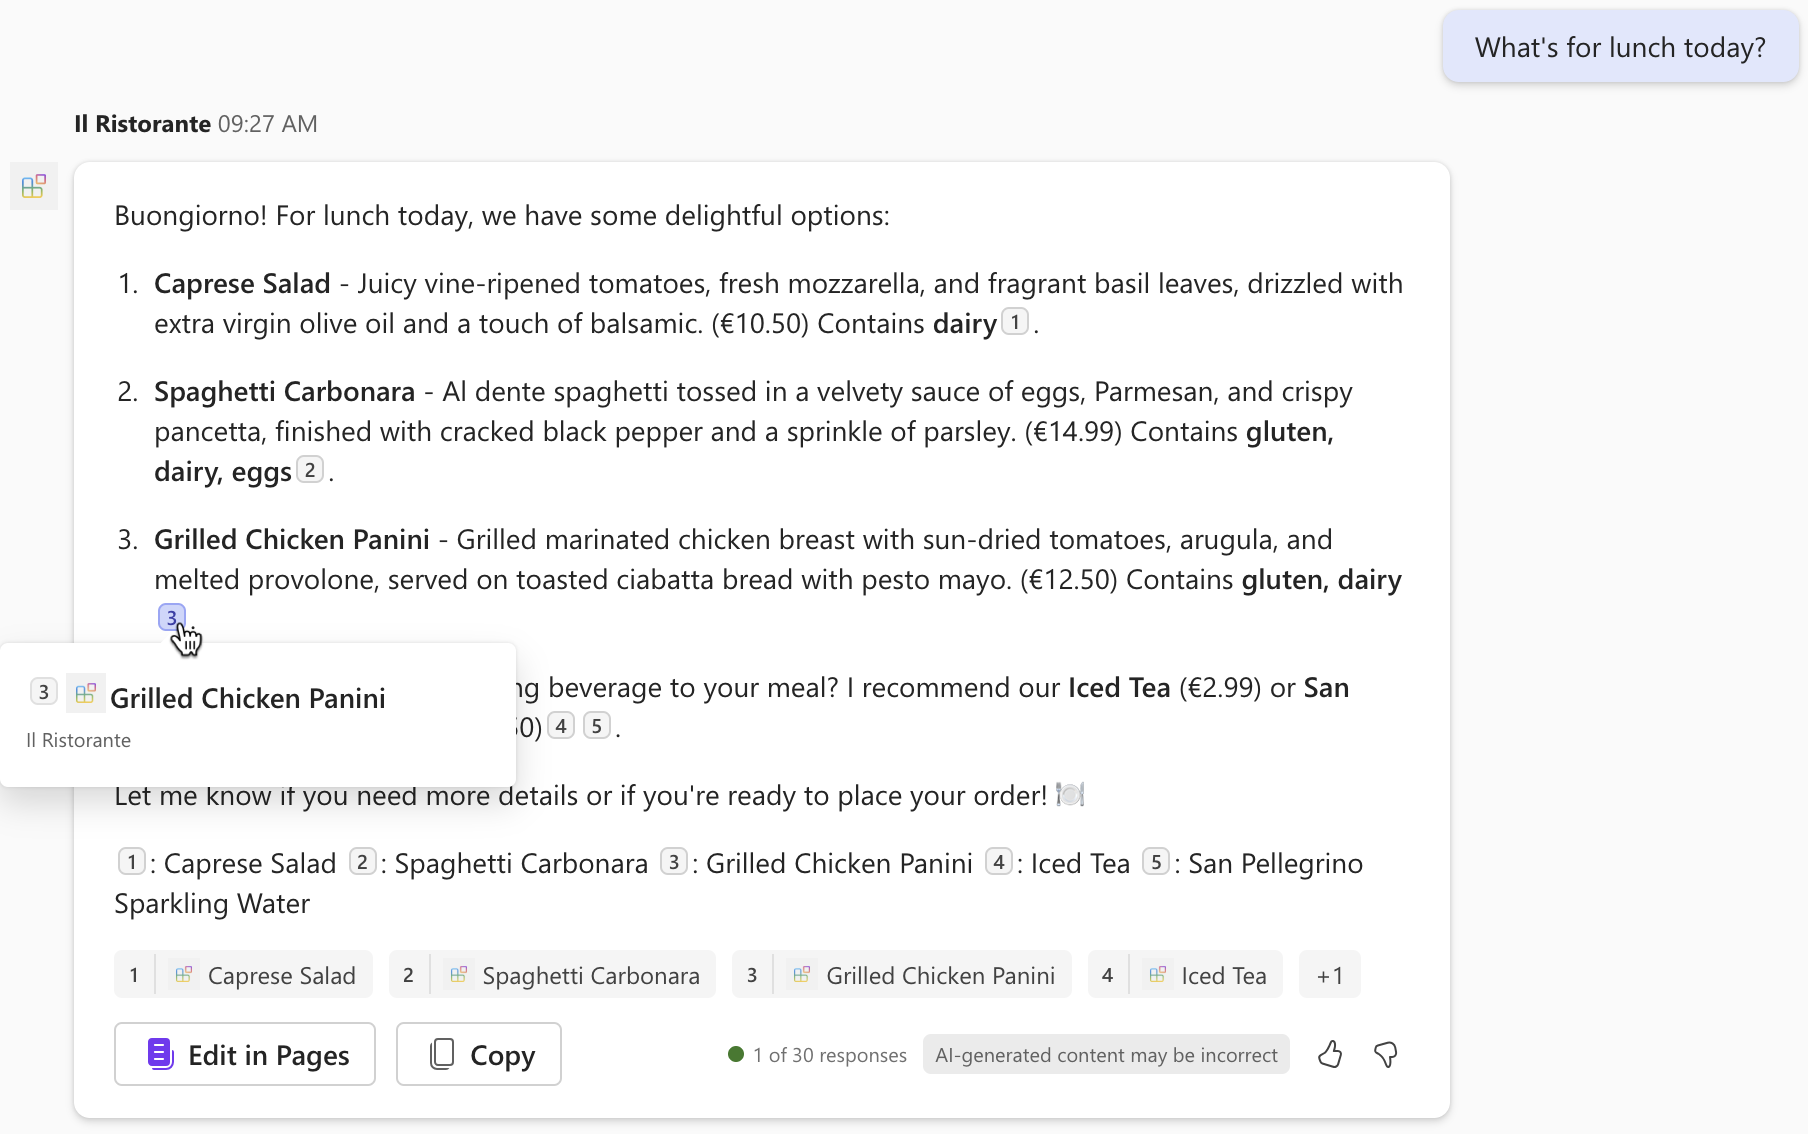
[ 今日のランチの内容 ] の会話スターターを選択し、プロンプトを送信します。

メッセージが表示されたら、エージェントが API に送信するデータを調べ、[ 1 回許可 ] ボタンを使用して確認します。

エージェントが応答するまで待ちます。 API から取得した情報の引用文献は表示されますが、ポップアップにはディッシュのタイトルのみが表示されることに注意してください。 API プラグインではアダプティブ カード テンプレートが定義されていないため、追加情報は表示されません。
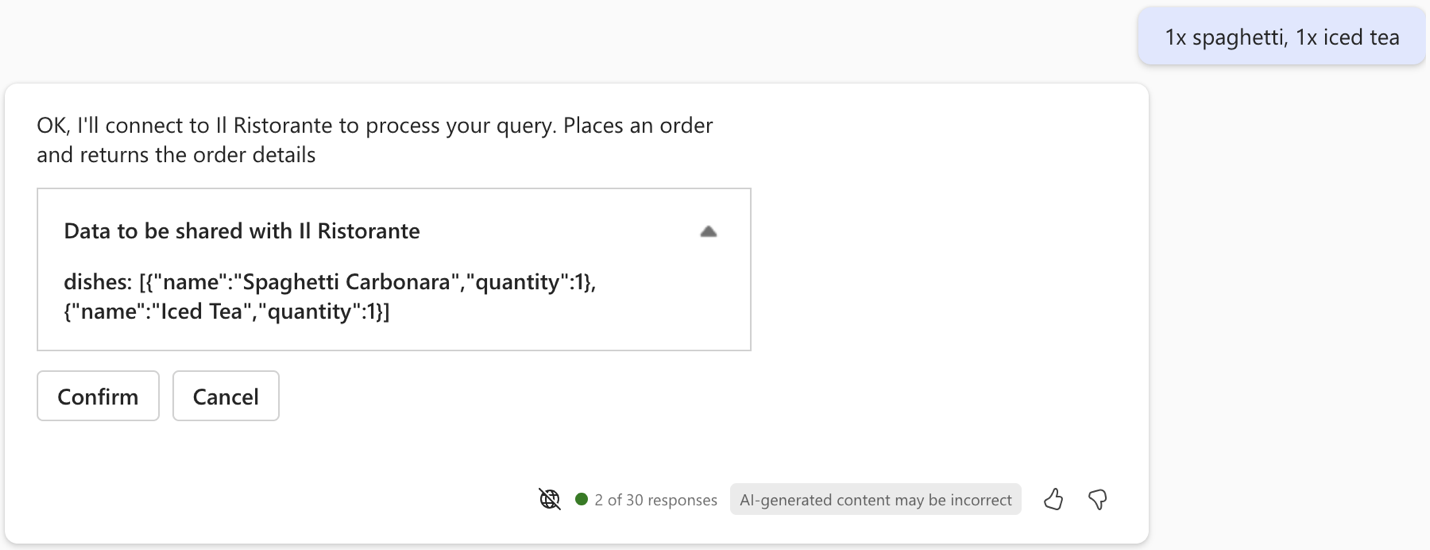
プロンプトテキストボックスに「 1xスパゲッティ、1xアイスティー 」と入力して注文し、プロンプトを送信します。
エージェントが API に送信するデータを調べ、[ 確認 ] ボタンを引き続き使用します。
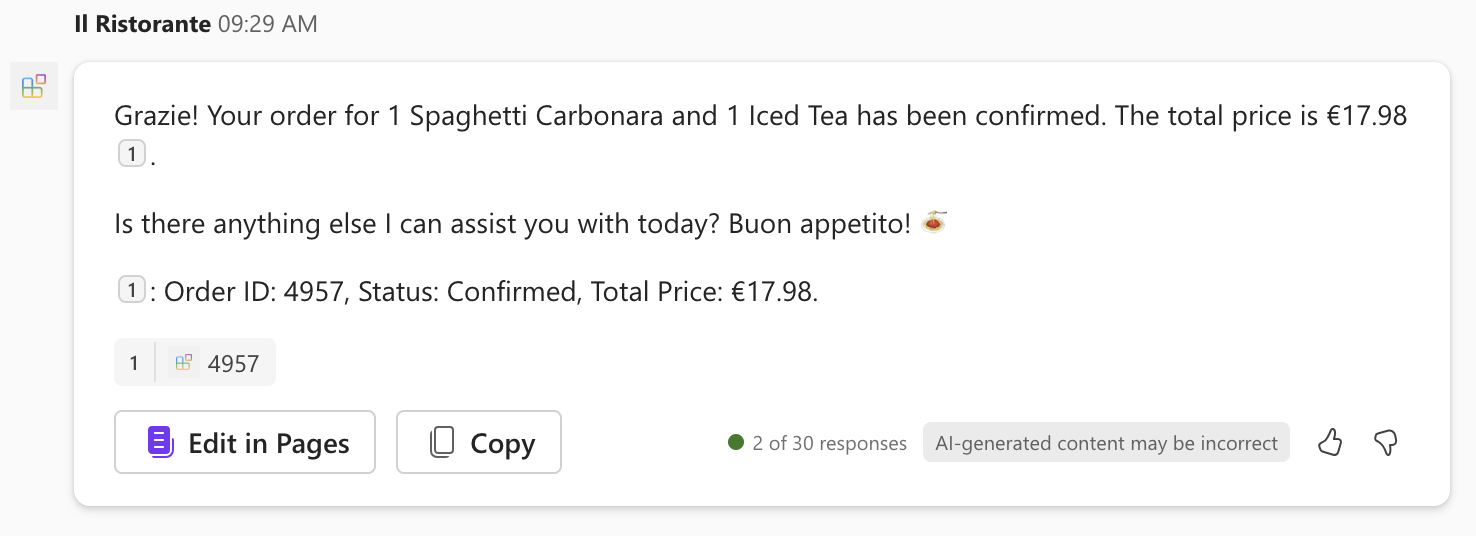
エージェントが注文を行い、注文の概要を返すのを待ちます。 もう一度、エージェントにはアダプティブ カード テンプレートがないため、注文の概要がプレーン テキストで表示されていることに注意してください。
Visual Studio Code に戻るし、デバッグを停止します。
[ ターミナル ] タブに切り替え、すべてのアクティブなターミナルを閉じます。
![[Visual Studio Code ターミナル] タブのスクリーンショット。すべてのターミナルを閉じるオプションが表示されています。](../../m365-developer/copilot-declarative-agent-action-api-plugin-vsc/media/3-visual-studio-code-close-terminal.png)


![[Visual Studio Code ターミナル] タブのスクリーンショット。すべてのターミナルを閉じるオプションが表示されています。](../../m365-developer/copilot-declarative-agent-action-api-plugin-vsc/media/3-visual-studio-code-close-terminal.png#lightbox)