SharePoint Embedded 環境と Web アプリ プロジェクトをセットアップして構成する
- 14 分
この演習では、サーバー側とクライアント側のコンポーネントを含むプロジェクトを作成します。 サーバー側コンポーネントは、Microsoft Entra IDで認証され、Microsoft Graph APIを使用して SharePoint Embedded Containers にアクセスする REST API です。 クライアント側コンポーネントは、SharePoint 埋め込みコンテナーの内容を公開する REST API を呼び出す 1 ページのReact アプリです。
この演習の最後には、次のセクションでさらに機能を追加するために使用するテンプレート プロジェクトがあります。
Microsoft 365 SharePoint Online テナントで SharePoint Embedded を有効にする
SharePoint Embedded を使用してコンテナーの種類を作成および登録するには、まず SharePoint Online テナントで有効にする必要があります。 このプロセスは、アプリケーションを定義するプロバイダーと使用するテナントの両方と、SharePoint Embedded アプリを使用するすべての使用テナントで行う必要があります。
注:
プロバイダー/開発者と使用しているテナントの両方と同じ SharePoint Online テナントを使用できます。
SharePoint Online テナントで SharePoint Embedded を有効にすることは、一方向の操作です。無効にすることはできません。 これは、使用しているテナントで作成したすべてのアプリが引き続き機能するようにするためです。
SharePoint Online テナントで SharePoint Embedded を有効にすると、プロバイダー テナントにコンテナーの種類を作成し、使用しているテナントにコンテナーの種類を登録できるようになります。
SharePoint Embedded を有効にするには、Microsoft 365 管理センター (https://portal.microsoft.com) に移動し、Microsoft 365 テナントの管理者アカウントの職場と学校でサインインします。
左側のナビゲーションの下部にある [すべて表示] を選択し、[管理センター] > SharePoint を選択します。

次に、SharePoint 管理センターで、左側のナビゲーションで [設定] を選択します。 SharePoint Embedded を見つけて選択します。 サービス条件を確認し、[ 有効にする ] を選択して SharePoint Online テナントで有効にします。
![SharePoint 管理センターの [設定] ページのスクリーンショット。](../../m365-developer/sharepoint-embedded-create-app/media/03-enable-repository-services-finished.png)
アプリケーションの作成Microsoft Entra ID
まず、Microsoft Entra ID アプリケーションを作成します。 これは、Microsoft Graph API と Microsoft SharePoint API を呼び出すために必要なアクセス許可を認証および取得するために使用されます。
ブラウザーを開き、Microsoft Entra 管理センター (https://entra.microsoft.com)に移動します。 テナントに対するグローバル管理者権限が付与されている職場または学校のアカウントを使用してサインインします。
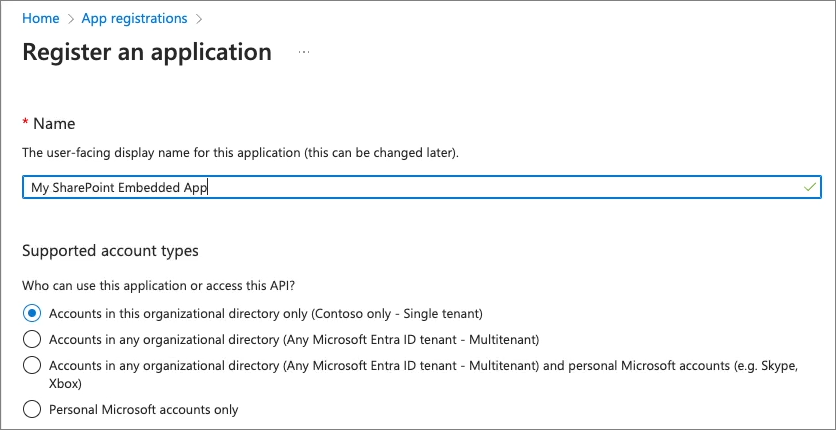
左側のナビゲーションで [管理] >[アプリの登録] を選択し、[新規登録] を選択します。
[アプリケーションを登録] ページで次のように値を設定し、[登録] を選択します。
- 名前: 自分の SharePoint Embedded
- サポートされているアカウントの種類: この組織のディレクトリ内のアカウントのみ (Andrew Connell Inc. のみ - シングル テナント)
Microsoft Entra IDすると、新しいアプリの詳細が表示されます。 このモジュールの後半で必要になる複数の値を追跡するテキスト ファイルを作成します。 アプリケーション (クライアント) ID & ディレクトリ (テナント) ID をアプリの概要ページからテキスト ファイルにコピーします。
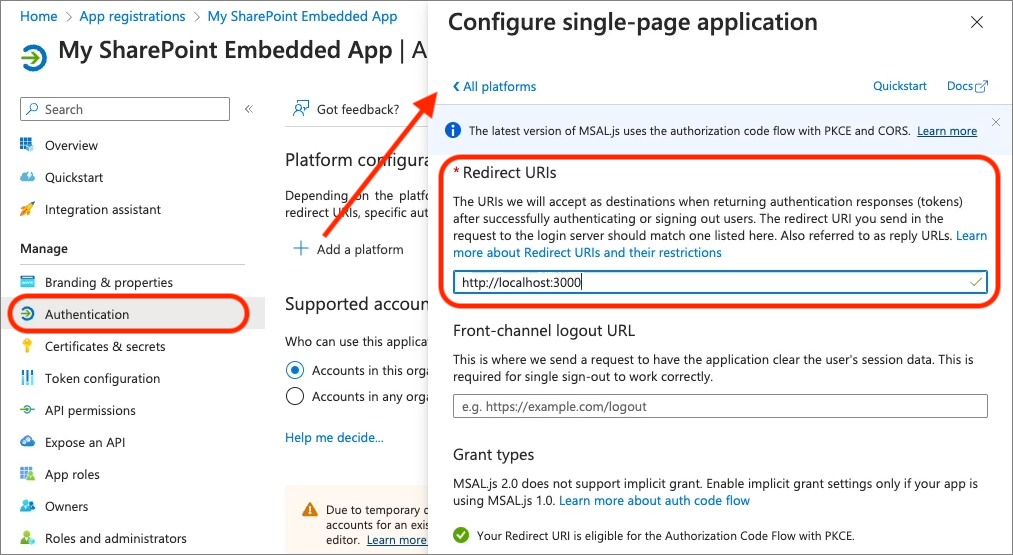
認証を構成する
次に、アプリの認証設定を行います。 左側のナビゲーションで、[管理] > [認証] を選択します。
[ プラットフォームの追加] を選択し、[ シングルページ アプリケーション] を選択します。
[ 単一ページ アプリケーションの構成 ] ウィンドウで、[ リダイレクト URI] を [ http://localhost:3000 ] に設定し、[構成] を選択 します。
API のアクセス許可を構成する
次に、コンテナーの種類とコンテナーを作成してアクセスできるように、アプリに必要なアクセス許可を設定します。
注:
このモジュールを公開する時点で、SharePoint Embedded パブリック プレビュー中に、アプリに必要な 2 つのアクセス許可は、選択するMicrosoft Entra ID Web インターフェイスのアクセス許可の一覧にまだ表示されません。 この制限を回避するには、アプリのマニフェストに手動で追加します。
[> マニフェストの管理] ページで、プロパティ requiredResourceAccessを見つけます。
resourceAppIdが に設定されている既存のリソースは00000003-0000-0000-c000-000000000000 Microsoft Graph です。
FileStorageContainer.Selected スコープの委任されたアクセス許可 & 次のアプリケーションを追加します。 既に存在する既存のアクセス許可は、 User.Read スコープ用です。
{
  "resourceAppId": "00000003-0000-0000-c000-000000000000",
  "resourceAccess": [
    {
      "id": "085ca537-6565-41c2-aca7-db852babc212",
      "type": "Scope"
    },
    {
      "id": "40dc41bc-0f7e-42ff-89bd-d9516947e474",
      "type": "Role"
    }
  ]
}
次に、ID が00000003-0000-0ff1-ce00-000000000000されている SharePoint 用の新しいresourceAppIdを追加し、Container.Selected スコープの委任されたアクセス許可 & 次のアプリケーションを追加します。
{
  "resourceAppId": "00000003-0000-0ff1-ce00-000000000000",
  "resourceAccess": [
    {
      "id": "4d114b1a-3649-4764-9dfb-be1e236ff371",
      "type": "Scope"
    },
    {
      "id": "19766c1b-905b-43af-8756-06526ab42875",
      "type": "Role"
    }
  ]
},
Microsoft Entra ID アプリにカスタム アクセス許可を追加する
次に、カスタムアクセス許可をアプリケーションに追加して、管理者がアプリでコンテナーの管理を許可するようにユーザーに求めることができます。
[管理> API を公開する] ページで、アプリケーション ID URI の横にある [設定] リンクを選択します。 これにより、アプリの ID は既定で api://<app-id> になります。
次に、[範囲を追加] を選択して、アプリの新しいアクセス許可を追加します。 次の設定で新しい範囲を作成し、[範囲の追加] を選択します。
- スコープ名: Container.Manage
- 誰が同意可能ですか? 管理者のみ
- 管理 (& ユーザー) 同意タイトル: SharePoint 埋め込みコンテナーを管理します。
- 管理 (& ユーザー) 同意の説明: アプリケーションは、このアプリの API を呼び出して SharePoint Embedded Storage Containers を管理できます。
- [状態]: 有効
Web API で、このアクセス許可がアプリケーションに付与されていることを確認するコードを追加します。
新しいアクセス許可に管理者の同意を付与する
一部のアクセス許可には管理者の同意が必要です。 [ API のアクセス許可] ページで、ページの下部までスクロールし、リンク [ エンタープライズ アプリケーション] を選択します。
[ アクセス許可 ] ページで、[ Contoso の管理者の同意を付与 する] を選択し、[同意する] を選択し、2 つのアクセス許可のペアに対して管理者の同意を付与するプロンプトを 受け入れます 。 FileStorageContainer.Selected for Microsoft Graph と Container.Selected for SharePoint。 2 つのペアは、2 つのアクセス許可ごとに委任されたオプション & アプリケーションを表します。
クライアント シークレットを作成する
Microsoft Entra IDを使用して OAuth2 クライアント資格情報フローを使用してアプリを認証するには、クライアント ID とクライアント シークレットの両方が必要です。
左側のナビゲーションで、[> 証明書とシークレットの管理] を選択します。
[ 証明書 & シークレット ] ページで、[ クライアント シークレット ] タブを選択し、[ 新しいクライアント シークレット] を選択します。 説明を設定し、有効期限を選択し、[ 追加] を選択します。
シークレットが作成されると 1 回表示されるので、このモジュールの後半で使用するために、ローカル テキスト ファイルのクライアント シークレットとしてコピーしてください。 この値をコピーしない場合、以前に作成したシークレットを表示することができないため、新たにシークレットを作成する必要があります。
コンテナーの種類を作成する
最後の手順では、新しいコンテナーの種類を作成します。 これは、SharePoint Online PowerShell モジュールを使用して行うことができます。 最新バージョンがインストールされていることを確認します。...
Install-Module "Microsoft.Online.SharePoint.PowerShell"
...または、以前にインストールしたバージョンをアップグレードして、最新バージョンがインストールされていることを確認します。..
Update-Module "Microsoft.Online.SharePoint.PowerShell"
最新バージョンになったら、SharePoint Online サイトに接続し、新しいコンテナーの種類を作成します。
次の PowerShell スクリプトで次の値を更新し、スクリプトを実行します。
-
{{SPO_ADMIN_URL}}: これは SharePoint Online 管理センターの URL です。 これを取得するには、Microsoft 365 ポータルにサインインします (テナントの管理者アカウントの職場と学校でhttps://portal.microsoft.com)し、左側のナビゲーションの下部にある [すべて表示] を選択し、[管理センター] > SharePoint を選択します。 SharePoint 管理センターの URL をコピーし、この値を使用します。 たとえば、テナント ID が Contoso123 の場合、管理者 URL はhttps://contoso123-admin.sharepoint.comされます。 -
{{CONTAINER_TYPE_NAME}}: 新しいコンテナーの種類の名前を選択します。 たとえば、MyFirstSpeContainerTypeを使用します。 -
{{AZURE_ENTRA_APP_ID}}: これを、前に作成した "クライアント ID" とも呼ばれるMicrosoft Entra ID アプリ ID の値に設定します。 この値は、ローカル テキスト ファイル内にある必要があります。
Import-Module "Microsoft.Online.SharePoint.PowerShell"
Connect-SPOService -Url "https://{{SPO_ADMIN_URL}}"
New-SPOContainerType -TrialContainerType
                     -ContainerTypeName "{{CONTAINER_TYPE_NAME}}"
                     -OwningApplicationId "{{AZURE_ENTRA_APP_ID}}"
PowerShell スクリプトには、次のように、新しいコンテナーの種類の詳細が表示されます。
Container Type ID:
===============================================================================
ContainerTypeId     : 1e59a44b-b77e-051e-3cba-dbf83007b520
ContainerTypeName   : MyFirstSpeContainerType
OwningApplicationId : 520e6e65-1143-4c87-a7d3-baf242915dbb
Classification      : Trial
AzureSubscriptionId : 00000000-0000-0000-0000-000000000000
ResourceGroup       :
Region              :
後で使用するために、ローカル テキスト ファイル ContainerTypeId をコピーします。
テナントの使用にコンテナーの種類を登録する
最後に、最後の手順の一環として、コンテナーの種類 (プロバイダー テナントで現在定義されている) をコンシューマー テナントに登録する必要があります。 これは、シングル テナントアプリケーションとマルチテナント アプリケーションの両方に当てはまります。これにより、指定されたアプリケーションのみがテナント内のコンテナーにアクセスできるようになります。
この手順が完了しない場合、SharePoint Embedded アプリケーションは、コンテナーを使用して操作を試みると 、アクセス拒否 エラーを受け取ります。
コンテナーの種類を SharePoint Online REST API に登録します。 SharePoint Online REST API では、クライアント シークレットだけでなく、証明書を使用して認証するアプリケーションが必要です。
自己署名証明書を作成する
まず、PowerShell の New-SelfSignedCertificate コマンドレットを使用して、新しい自己署名証明書を作成します。 次の PowerShell スクリプトで次の値を更新し、スクリプトを実行します。
-
{{CERT NAME}}: 証明書の名前。 これは好きなことができます。 -
{{CERT_PATH}}: c:\mycert.cer など、*.cer ファイルの場所への完全修飾パス。
$cert = New-SelfSignedCertificate -Subject "CN={{CERT_NAME}}" -CertStoreLocation "Cert:\CurrentUser\My" -KeyExportPolicy Exportable -KeySpec Signature -KeyLength 2048 -KeyAlgorithm RSA -HashAlgorithm SHA256
Export-Certificate -Cert $cert -FilePath "{{CERT_PATH}}" -Force

# Private key to Base64
$privateKey = [System.Security.Cryptography.X509Certificates.RSACertificateExtensions]::GetRSAPrivateKey($cert)
$privateKeyBytes = $privateKey.Key.Export([System.Security.Cryptography.CngKeyBlobFormat]::Pkcs8PrivateBlob)
$privateKeyBase64 = [System.Convert]::ToBase64String($privateKeyBytes, [System.Base64FormattingOptions]::InsertLineBreaks)
$privateKeyString = @"
-----BEGIN PRIVATE KEY-----
$privateKeyBase64
-----END PRIVATE KEY-----
"@

# Print private key to output
Write-Host $privateKeyString
秘密キーの値を Base64 形式 (PEM 形式とも呼ばれます) で、生成された *.cer ファイルと同じ名前の新しい *.key ファイルに 保存します。
重要
ファイルの内容には、 -----BEGIN PRIVATE KEY----- と -----END PRIVATE KEY----- 文字列を含める必要があります。
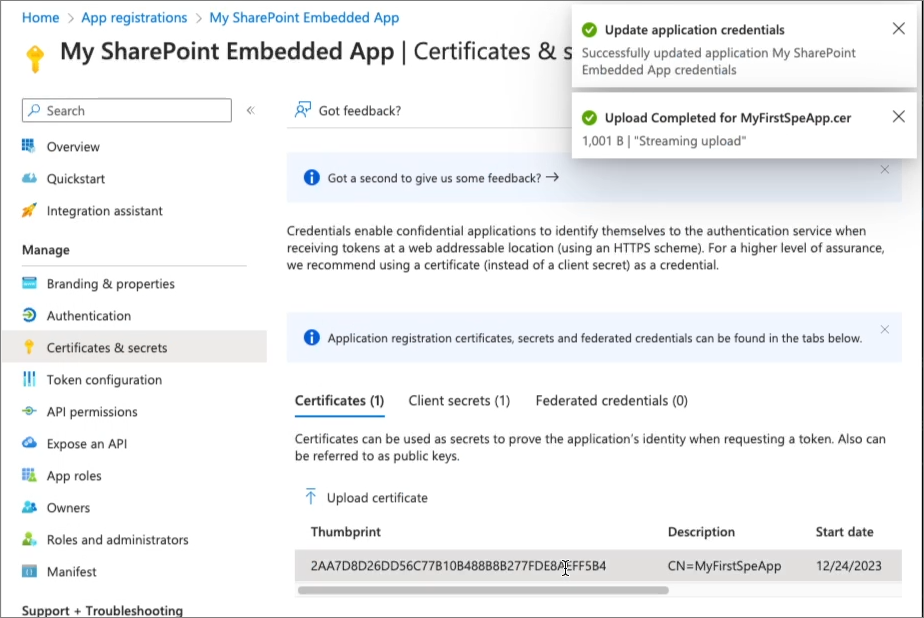
[>証明書 & シークレットの管理] ページで、[証明書] を選択し、[証明書のアップロード] を選択します。 *.cer ファイルを選択し、[追加] を選択します。
証明書をアップロードしたら、Microsoft Entra ID ポータルの [証明書 & シークレット] ページに表示される拇印をコピーします。
コンシューマー テナントにコンテナーの種類を登録する
次に、SharePoint REST /_api/v2.1/storageContainerTypes/{{ContainerTypeId}}/applicationPermissions エンドポイントを使用して、コンテナーの種類をコンシューマーのテナントに登録します。 SharePoint Embedded チームは、さまざまな SharePoint Online & Microsoft Graph エンドポイントを呼び出す際の多くの例を含む Postman コレクションを提供することで、これを簡単にしました。
SharePoint Embedded Samples リポジトリで、Postman コレクションを見つけ、その未加工の URL を取得し、新しいコレクションとして Postman にインポートします。
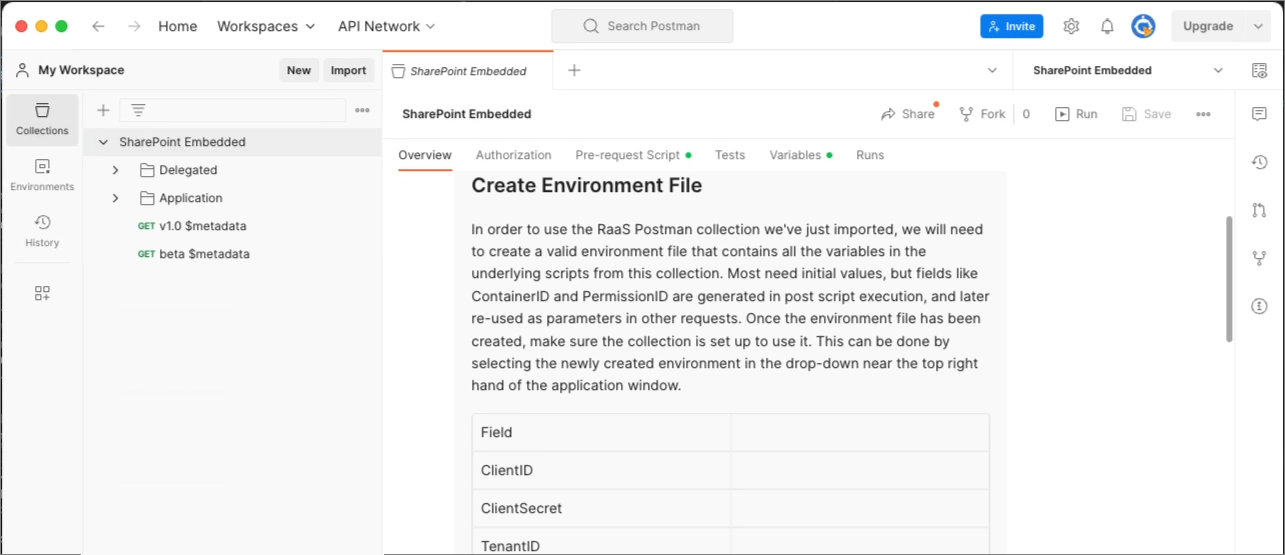
コレクションの概要には、多数のドキュメントが含まれていることに注意してください。 重要なセクションの 1 つは、必要な値の設定を簡略化するための Postman 環境ファイルの作成について説明します。 私はすでに1つを作成しており、値を設定する必要があります:
- ClientID: Microsoft Entra ID アプリケーションのアプリケーションまたはクライアント ID。
- ClientSecret: Microsoft Entra ID アプリケーションのクライアント シークレット。
- ConsumingTenantId: 対象とするコンシューマー テナントの Microsoft 365 テナントの ID。
- TenantName: テナントの名前。 これは SharePoint Online サイトのサブドメイン部分です。
- RootSiteUrl: テナントのルート URL。
- ContainerTypeID: プロバイダー テナントで作成されたコンテナーの種類の GUID。
- CertThumbprint: 証明書をMicrosoft Entra ID アプリケーションに正常にアップロードした後に表示Microsoft Entra ID証明書の拇印。
- CertPrivateKey: 証明書の秘密キー。 これは PEM 形式のキーです。
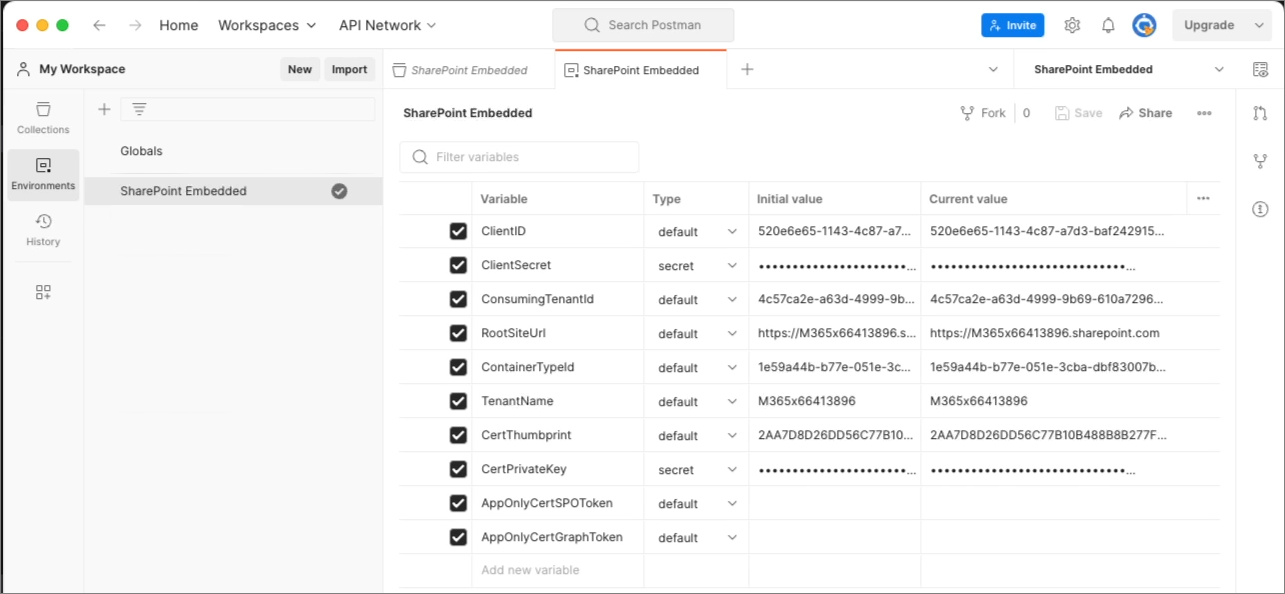
Postman コレクションと環境を設定したら、Application > Containers フォルダーで ContainerType の登録要求を実行します。 要求が完了すると、このモジュールの残りの部分で作成するアプリは、Microsoft 365 テナント内のストレージ コンテナーを管理およびアクセスできるようになります。
SharePoint 埋め込みコンテナーにアクセスする Web アプリを作成する
コンテナーの種類の作成と登録など、プロバイダーテナントとコンシューマー テナントで SharePoint Embedded を設定する場合、次の手順はアプリケーションを作成することです。 このアプリケーションは、次の 2 つのプロジェクトで構成されます。
- フロントエンド React SPA アプリをビルドしてレンダリングする Web プロジェクト
- クライアント アプリから実行できない操作を実行する機密クライアントを必要とするメソッドをホストするサーバー側 API。
まず、プロジェクトのフロントエンド 部分を作成します。
フロントエンド アプリケーションを作成する
コマンド ラインから、アプリケーションを作成するフォルダーに移動し、次のコマンドを実行します。
npx create-react-app my-first-spe-app --template typescript
次に、SPA ユーザー インターフェイスとMicrosoft Entra IDによる認証を容易にする npm パッケージをインストールします。 コマンド ラインから、前のコマンドによって作成された フォルダー my-first-spe-app に移動し、次のコマンドを実行します。
npm install @azure/msal-browser @fluentui/react-components @fluentui/react-icons @microsoft/mgt-react @microsoft/mgt-element @microsoft/mgt-msal2-provider -SE
このコマンドは、次の npm パッケージをインストールします。
- @azure/msal-browser: Microsoft Entra IDで認証するために使用されます。
- @microsoft/mgt-element、@microsoft/mgt-react、& @microsoft/mgt-msal2-provider: Reactの UI コンポーネントを含む Microsoft Graph Toolkit。
- @fluentui/react-components & @fluentui/react-icons: Fluent UI v9 ライブラリの UI コンポーネント。
バックエンド アプリケーションを作成する
次に、API サーバーに必要なスキャフォールディングを作成して追加します。 まず、次のコマンドを実行して、より多くの npm パッケージをインストールします。
npm install restify @azure/msal-node @microsoft/microsoft-graph-client isomorphic-fetch jsonwebtoken jwks-rsa -SE

npm install @types/restify @types/jsonwebtoken @types/isomorphic-fetch -DE
このコマンドを実行すると、npm パッケージがインストールされます。
- restify & @types/restify: TypeScript の Node.js ベース API サーバーと関連する型宣言。
- @azure/msal-node: Microsoft Entra IDで認証するために使用されます。
- @microsoft/microsoft-graph-client: Microsoft Graph JavaScript SDK。
-
等形フェッチ: ブラウザー
fetchAPI をグローバルとして追加し、その API がクライアント & サーバー間で一貫性を持つポリフィル。 - jsonwebtoken: JSON Web トークンの実装。
- jwks-rsa: JSON Web Key Set (JWKS) エンドポイントから署名キーを取得するためのライブラリ。
サーバー側プロジェクトの TypeScript コンパイラ構成を追加します。
新しい ファイル ./server/tsconfig.json プロジェクトを作成し、次のコードを追加します。 これにより、このプロジェクトのサーバー側 API 部分の TypeScript コンパイラが構成されます。
{
  "$schema": "http://json.schemastore.org/tsconfig",
  "compilerOptions": {
    "target": "ES2015",
    "module": "commonjs",
    "lib": [
      "es5",
      "es6",
      "dom",
      "es2015.collection"
    ],
    "esModuleInterop": true,
    "moduleResolution": "node",
    "strict": true
  }
}
次に、サーバー側 API のプレースホルダーをこのプロジェクトに追加します。
新しい ファイル ./server/index.ts を作成し、次のコードを追加します。
import * as restify from "restify";

const server = restify.createServer();
server.use(restify.plugins.bodyParser());

server.listen(process.env.port || process.env.PORT || 3001, () => {
  console.log(`\nAPI server started, ${server.name} listening to ${server.url}`);
});

// add CORS support
server.pre((req, res, next) => {
  res.header('Access-Control-Allow-Origin', req.header('origin'));
  res.header('Access-Control-Allow-Headers', req.header('Access-Control-Request-Headers'));
  res.header('Access-Control-Allow-Credentials', 'true');

  if (req.method === 'OPTIONS') {
    return res.send(204);
  }

  next();
});
これにより、新しい Restify サーバーが作成され、ポート 3001 で要求をリッスンするように構成され、サーバーで CORS が有効になります。
プロジェクトのグローバル設定と定数を追加する
次に、デプロイ設定を格納するための定数をいくつか追加します
API サーバーの設定を格納する新しいファイル ./.env を作成します。 次をファイルに追加します。
API_ENTRA_APP_CLIENT_ID=
API_ENTRA_APP_CLIENT_SECRET=
API_ENTRA_APP_AUTHORITY=

CONTAINER_TYPE_ID=
クライアント側アプリの設定を格納する新しいファイル ./src/common/constants.ts を作成します。 次をファイルに追加します。
export const CLIENT_ENTRA_APP_CLIENT_ID = '';
export const CLIENT_ENTRA_APP_AUTHORITY = '';

export const API_SERVER_URL = '';

export const CONTAINER_TYPE_ID = '';
次のガイダンスを使用して、これら 2 つのファイルの値を更新します。
- API_ENTRA_APP_CLIENT_ID: これは、前に作成したMicrosoft Entra ID アプリケーションのアプリケーション (クライアント) ID です。
- API_ENTRA_APP_CLIENT_SECRET: これは、前に作成したMicrosoft Entra ID アプリケーションのアプリケーション (クライアント) シークレットです。
-
API_ENTRA_APP_AUTHORITY: これは、Microsoft Entra ID アプリケーションの権限です。
https://login.microsoftonline.com/{{MS-ENTRA-TENANT-ID}}/を使用します。 テナント ID は、アプリケーションが以前に作成されたMicrosoft Entra ID テナントの ID です。 -
API_SERVER_URL: これはサーバー側 API サーバーの URL です。
http://localhost:3001を使用します。 - CLIENT_ENTRA_APP_CLIENT_ID: これは、前に作成したMicrosoft Entra ID アプリケーションのアプリケーション (クライアント) ID です。
最後に、新しいファイル ./src/common/scopes.ts を追加して、クライアント側アプリケーションで使用する OAuth2 スコープ (アクセス許可) の一覧を格納します。
// microsoft graph scopes
export const GRAPH_USER_READ = 'User.Read';
export const GRAPH_USER_READ_ALL = 'User.Read.All';
export const GRAPH_FILES_READ_WRITE_ALL = 'Files.ReadWrite.All';
export const GRAPH_SITES_READ_ALL = 'Sites.Read.All';
export const GRAPH_OPENID_CONNECT_BASIC = ["openid", "profile", "offline_access"];

// SharePoint Embedded scopes
export const SPEMBEDDED_CONTAINER_MANAGE= 'Container.Manage';
export const SPEMBEDDED_FILESTORAGECONTAINER_SELECTED= 'FileStorageContainer.Selected';
API サーバー用にこのファイルの cop を作成します。 コピーしたファイルをプロジェクト内の次の場所に保存します: ./server/common/scopes.ts。
プロジェクト ビルドを構成する
次に、ビルドとテストを簡略化するために、プロジェクトにいくつかの変更を加えてみましょう。
スクリプトを更新して、プロジェクトのビルドを簡略化します。
コマンド プロンプトを開き、現在のフォルダーをプロジェクトのルートに設定し、次のコマンドを実行して、開発中に使用するいくつかの npm パッケージをインストールします。
npm install env-cmd npm-run-all -DE./package.json ファイルを見つけて開き、
scriptsセクションを次のように更新します。"scripts": { "build:backend": "tsc -p ./server/tsconfig.json", "start": "run-s build:backend start:apps", "start:apps": "run-p start:frontend start:backend", "start:frontend": "npm run start-cre", "start:backend": "env-cmd --silent -f .env node ./server/index.js", "start-cre": "react-scripts start", "build-cre": "react-scripts build", "test-cre": "react-scripts test", "eject-cre": "react-scripts eject" },
次の一覧では、スクリプトの実行内容について説明します。
- すべての既定の create-react-app (CRE) スクリプトが更新され、名前に -cre サフィックスが含まれて、create-react-app に関連付けられていることを示します。
-
開始スクリプトでは、npm-run-all npm パッケージの run-s メソッドを使用して、2 つのスクリプトを順番に実行します。
- 最初に ビルド スクリプトを実行して、プロジェクト全体を TypeScript から JavaScript にトランスパイルします。
- 次に、スクリプト start:apps を実行します。
- start:apps スクリプトは、npm-run-all npm パッケージの run-p メソッドを使用して、start:frontend & start:backend スクリプトを並列で実行します。
- start:backend スクリプトでは、env-cmd npm パッケージを使用して、./.env ファイル内の環境変数を API サーバー プロセスに挿入します。
この時点で、次のセクションでさらに機能を追加するために使用するテンプレート プロジェクトがあります。
概要
この演習では、サーバー側とクライアント側のコンポーネントを含むプロジェクトを作成しました。 サーバー側コンポーネントは、Microsoft Entra IDで認証され、Microsoft Graph APIを使用して SharePoint Embedded Containers にアクセスする REST API です。 クライアント側コンポーネントは、SharePoint 埋め込みコンテナーの内容を公開する REST API を呼び出す 1 ページのReact アプリです。