シリーズの前のチュートリアルでは、カメラとライトを使用して Babylon.js シーンを含む Web ページを設定しました。 このチュートリアルでは、ピアノ モデルを構築してシーンに追加します。
このチュートリアルでは、以下を実行する方法について説明します。
- メッシュの作成、配置、マージ
- ボックス メッシュからピアノ キーボードを構築する
- ピアノ フレームの 3D モデルをインポートする
開始する前に
シリーズの前のチュートリアルを完了し、コードへの追加を続行する準備ができていることを確認します。
index.html
<html>
    <head>
        <title>Piano in BabylonJS</title>
        <script src="https://cdn.babylonjs.com/babylon.js"></script>
        <script src="scene.js"></script>
        <style>
            body,#renderCanvas { width: 100%; height: 100%;}
        </style>
    </head>
    <body>
        <canvas id="renderCanvas"></canvas>
        <script type="text/javascript">
            const canvas = document.getElementById("renderCanvas");
            const engine = new BABYLON.Engine(canvas, true);

            createScene(engine).then(sceneToRender => {
                engine.runRenderLoop(() => sceneToRender.render());
            });

            // Watch for browser/canvas resize events
            window.addEventListener("resize", function () {
                engine.resize();
            });
        </script>
    </body>
</html>
scene.js
const createScene = async function(engine) {
    const scene = new BABYLON.Scene(engine);

    const alpha =  3*Math.PI/2;
    const beta = Math.PI/50;
    const radius = 220;
    const target = new BABYLON.Vector3(0, 0, 0);

    const camera = new BABYLON.ArcRotateCamera("Camera", alpha, beta, radius, target, scene);
    camera.attachControl(canvas, true);

    const light = new BABYLON.HemisphericLight("light", new BABYLON.Vector3(0, 1, 0), scene);
    light.intensity = 0.6;

    const xrHelper = await scene.createDefaultXRExperienceAsync();

    return scene;
}
はじめに
この構造でシンプルなピアノキーボードを作ることから始めましょう。
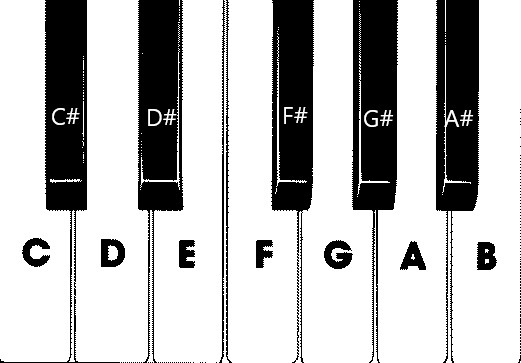
この画像には、7 つの白いキーと 5 つの黒いキーがあり、それぞれノートの名前でラベルが付けられます。 フル88キーピアノキーボードは、キー(レジスタとも呼ばれます)と4つの余分なキーのこの選択の7つの完全な繰り返しが含まれています。 すべてのレジスタには、以前のレジスタの 2 倍の頻度があります。 たとえば、C5 のピッチ周波数 (つまり、5 番目のレジスタの C ノート) は C4 の 2 倍、D5 のピッチ周波数は D4 の 2 倍です。
視覚的には、各レジスタは別のレジスタとまったく同じように見えるので、この選択したキーを使用して単純なピアノ キーボードを作成する方法の調査から始めることができます。 後で、スコープを 88 キーのフル ピアノ キーボードに拡張する方法を見つけることができます。
シンプルなピアノキーボードを構築する
注:
オンライン ソースからピアノ キーボードの事前に作成された 3D モデルを見つけて Web ページにインポートすることは可能ですが、このチュートリアルではキーボードをゼロから構築して、最大限のカスタマイズ性を実現し、Babylon.js を通じて 3D モデルを作成する方法を紹介します。
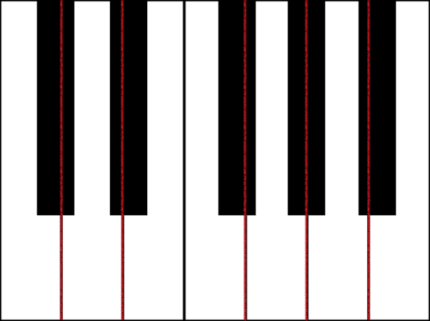
キーボードを構築するためのメッシュを作成する前に、各黒いキーがその周りの 2 つの白いキーの中央に完全に揃っていないので、すべてのキーの幅が同じではないことに注意してください。 つまり、各キーのメッシュを個別に作成して配置する必要があります。
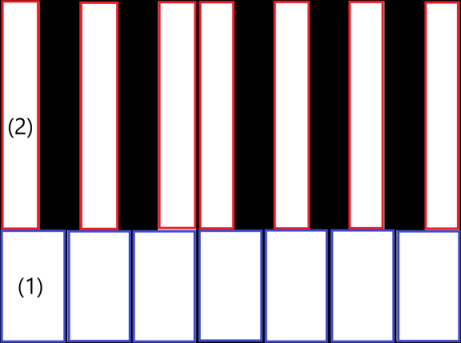
白いキーの場合、各白いキーは、(1) 黒いキーの下の下部と (2) 黒いキーの隣にある上部の 2 つの部分で構成されていることを確認できます。 2 つの部分の寸法は異なりますが、完全な白いキーを作成するために積み重ねています。
メモ C の 1 つの白いキーを作成するためのコードを次に示します ( scene.js に追加する心配はありません)。
const whiteKeyBottom = BABYLON.MeshBuilder.CreateBox("whiteKeyBottom", {width: 2.3, height: 1.5, depth: 4.5}, scene);
const whiteKeyTop = BABYLON.MeshBuilder.CreateBox("whiteKeyTop", {width: 1.4, height: 1.5, depth: 5}, scene);
whiteKeyTop.position.z += 4.75;
whiteKeyTop.position.x -= 0.45;

// Parameters of BABYLON.Mesh.MergeMeshes:
// (arrayOfMeshes, disposeSource, allow32BitsIndices, meshSubclass, subdivideWithSubMeshes, multiMultiMaterials)
const whiteKeyV1 = BABYLON.Mesh.MergeMeshes([whiteKeyBottom, whiteKeyTop], true, false, null, false, false);
whiteKeyV1.material = whiteMat;
whiteKeyV1.name = "C4";
ここでは、2 つの Box メッシュを作成しました。1 つは下の部分用、もう 1 つは白いキーの上部です。 次に、上部の位置を変更して、下部の上に積み重ね、隣接する黒いキー (C#) の領域を残すために左に移動します。
最後に、これら 2 つの部分が MergeMeshes 関数を使用してマージされ、1 つの完全な白いキーになりました。 これは、このコードで生成される結果のメッシュです。

黒いキーを作成する方が簡単です。 黒いキーはすべてボックスの形であるため、黒い色の StandardMaterial を使用してボックス メッシュを作成するだけで黒いキーを作成できます。
注:
既定のメッシュカラーは白に似た淡い灰色であるため、このチュートリアルには白い色の素材を白いキーに追加する手順は含まれていません。 ただし、白いキーに真の明るい白い色が必要な場合は、素材を自分で自由に追加してください。
黒いキー C# を作成するコードを次に示します ( これをscene.js に追加する心配はありません)。
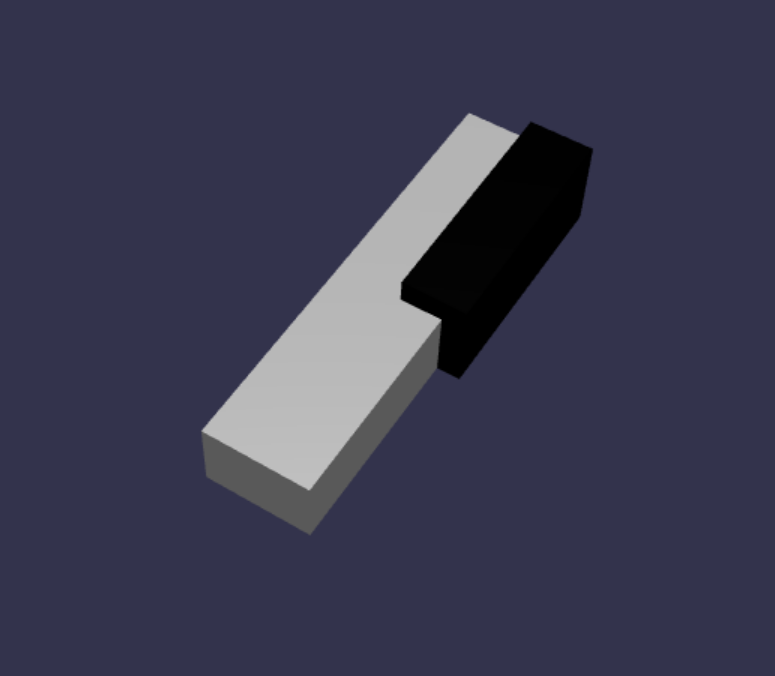
const blackMat = new BABYLON.StandardMaterial("black");
blackMat.diffuseColor = new BABYLON.Color3(0, 0, 0);

const blackKey = BABYLON.MeshBuilder.CreateBox("C#4", {width: 1.4, height: 2, depth: 5}, scene);
blackKey.position.z += 4.75;
blackKey.position.y += 0.25;
blackKey.position.x += 0.95;
blackKey.material = blackMat;
このコードによって生成された黒いキー (前の白いキーと共に) は次のようになります。
ご覧のとおり、各キーを作成すると、それぞれのディメンションと位置を指定する必要があるため、類似するコードが多数発生する可能性があります。 次のセクションで作成プロセスの効率を高めましょう。
シンプルなピアノキーボードを効率的に構築する
各白いキーは互いに少し異なる形状を持ちますが、それらはすべて上部と下部を組み合わせることによって作成できます。 任意の白いキーを作成して配置するジェネリック関数を実装しましょう。
createScene()関数の外部のscene.jsに次の関数を追加します。const buildKey = function (scene, parent, props) { if (props.type === "white") { /* Props for building a white key should contain: note, topWidth, bottomWidth, topPositionX, wholePositionX, register, referencePositionX As an example, the props for building the middle C white key would be {type: "white", note: "C", topWidth: 1.4, bottomWidth: 2.3, topPositionX: -0.45, wholePositionX: -14.4, register: 4, referencePositionX: 0} */ // Create bottom part const bottom = BABYLON.MeshBuilder.CreateBox("whiteKeyBottom", {width: props.bottomWidth, height: 1.5, depth: 4.5}, scene); // Create top part const top = BABYLON.MeshBuilder.CreateBox("whiteKeyTop", {width: props.topWidth, height: 1.5, depth: 5}, scene); top.position.z = 4.75; top.position.x += props.topPositionX; // Merge bottom and top parts // Parameters of BABYLON.Mesh.MergeMeshes: (arrayOfMeshes, disposeSource, allow32BitsIndices, meshSubclass, subdivideWithSubMeshes, multiMultiMaterials) const key = BABYLON.Mesh.MergeMeshes([bottom, top], true, false, null, false, false); key.position.x = props.referencePositionX + props.wholePositionX; key.name = props.note + props.register; key.parent = parent; return key; } }このコード ブロックでは、
buildKey()という名前の関数を作成しました。この関数は、props.typeが"white"された場合にホワイト キーをビルドして返します。 パラメーターpropsでキーの種類を識別することで、if ステートメントを使用して分岐することで、同じ関数内に黒いキーと白いキーの両方を作成できます。buildKey()のパラメーターは次のとおりです。- scene: キーが入っているシーン
- parent: メッシュの親 (これにより、すべてのキーを 1 つの親にグループ化できます)
- props: ビルドされるキーのプロパティ
白いキーの
propsには、次の項目が含まれます。- type: "white"
- name: キーが表すノートの名前
- topWidth: 上部の幅
- bottomWidth: 下部パーツの幅
- topPositionX: 下のパーツを基準とした上部の x 位置
- wholePositionX: レジスタの終点 (キー B の右端) を基準としたキー全体の x 位置。
- register: キーが属していることを登録します (0 から 8 までの数値)
- referencePositionX: レジスタの終点の x 座標 (参照ポイントとして使用されます)。
wholePositionXとreferencePositionXを分離することで、任意のレジスタ内に特定の種類のキー (C など) を作成するために必要なpropsパラメーターを初期化し、そのキーを特定のレジスタ (C4、C5 など) に作成するときにregisterとreferencePositionXをpropsに追加できます。同様に、黒いキーを作成するジェネリック関数を記述することもできます。
buildKey()関数を展開して、そのロジックを含めましょう。const buildKey = function (scene, parent, props) { if (props.type === "white") { /* Props for building a white key should contain: note, topWidth, bottomWidth, topPositionX, wholePositionX, register, referencePositionX As an example, the props for building the middle C white key would be {type: "white", note: "C", topWidth: 1.4, bottomWidth: 2.3, topPositionX: -0.45, wholePositionX: -14.4, register: 4, referencePositionX: 0} */ // Create bottom part const bottom = BABYLON.MeshBuilder.CreateBox("whiteKeyBottom", {width: props.bottomWidth, height: 1.5, depth: 4.5}, scene); // Create top part const top = BABYLON.MeshBuilder.CreateBox("whiteKeyTop", {width: props.topWidth, height: 1.5, depth: 5}, scene); top.position.z = 4.75; top.position.x += props.topPositionX; // Merge bottom and top parts // Parameters of BABYLON.Mesh.MergeMeshes: (arrayOfMeshes, disposeSource, allow32BitsIndices, meshSubclass, subdivideWithSubMeshes, multiMultiMaterials) const key = BABYLON.Mesh.MergeMeshes([bottom, top], true, false, null, false, false); key.position.x = props.referencePositionX + props.wholePositionX; key.name = props.note + props.register; key.parent = parent; return key; } else if (props.type === "black") { /* Props for building a black key should contain: note, wholePositionX, register, referencePositionX As an example, the props for building the C#4 black key would be {type: "black", note: "C#", wholePositionX: -13.45, register: 4, referencePositionX: 0} */ // Create black color material const blackMat = new BABYLON.StandardMaterial("black"); blackMat.diffuseColor = new BABYLON.Color3(0, 0, 0); // Create black key const key = BABYLON.MeshBuilder.CreateBox(props.note + props.register, {width: 1.4, height: 2, depth: 5}, scene); key.position.z += 4.75; key.position.y += 0.25; key.position.x = props.referencePositionX + props.wholePositionX; key.material = blackMat; key.parent = parent; return key; } }黒いキーの
propsには、次のものが含まれています。- type: "black"
- name: キーが表すノートの名前
- wholePositionX: レジスタの終点 (キー B の右端) を基準としたキー全体の x 位置
- register: キーが属していることを登録します (0 から 8 までの数値)
- referencePositionX: レジスタの終点の x 座標 (参照ポイントとして使用されます)。
黒いキーを作成する場合の
propsは、ボックスの作成のみが必要であり、黒いキーの幅と z 位置はすべて同じであるため、かなり簡単です。キーの作成方法が効率的になったので、ノートに対応する各キーの
propsをレジスタに格納する配列を初期化し、それぞれのbuildKey()関数を呼び出して、4 番目のレジスタに単純なキーボードを作成しましょう。また、
keyboardという名前の TransformNode を作成して、すべてのピアノ キーの親として機能します。 親に適用される位置やスケーリングの変更は子にも適用されるため、この方法でキーをグループ化すると、全体としてスケーリングまたは移動できます。createScene()関数に次のコード行を追加します。const keyParams = [ {type: "white", note: "C", topWidth: 1.4, bottomWidth: 2.3, topPositionX: -0.45, wholePositionX: -14.4}, {type: "black", note: "C#", wholePositionX: -13.45}, {type: "white", note: "D", topWidth: 1.4, bottomWidth: 2.4, topPositionX: 0, wholePositionX: -12}, {type: "black", note: "D#", wholePositionX: -10.6}, {type: "white", note: "E", topWidth: 1.4, bottomWidth: 2.3, topPositionX: 0.45, wholePositionX: -9.6}, {type: "white", note: "F", topWidth: 1.3, bottomWidth: 2.4, topPositionX: -0.55, wholePositionX: -7.2}, {type: "black", note: "F#", wholePositionX: -6.35}, {type: "white", note: "G", topWidth: 1.3, bottomWidth: 2.3, topPositionX: -0.2, wholePositionX: -4.8}, {type: "black", note: "G#", wholePositionX: -3.6}, {type: "white", note: "A", topWidth: 1.3, bottomWidth: 2.3, topPositionX: 0.2, wholePositionX: -2.4}, {type: "black", note: "A#", wholePositionX: -0.85}, {type: "white", note: "B", topWidth: 1.3, bottomWidth: 2.4, topPositionX: 0.55, wholePositionX: 0}, ] // Transform Node that acts as the parent of all piano keys const keyboard = new BABYLON.TransformNode("keyboard"); keyParams.forEach(key => { buildKey(scene, keyboard, Object.assign({register: 4, referencePositionX: 0}, key)); })ご存知のように、このコード ブロックでは、スペースの原点を基準としてすべてのキーを配置しています。
これまでに scene.js に含まれているコードを次に示します。
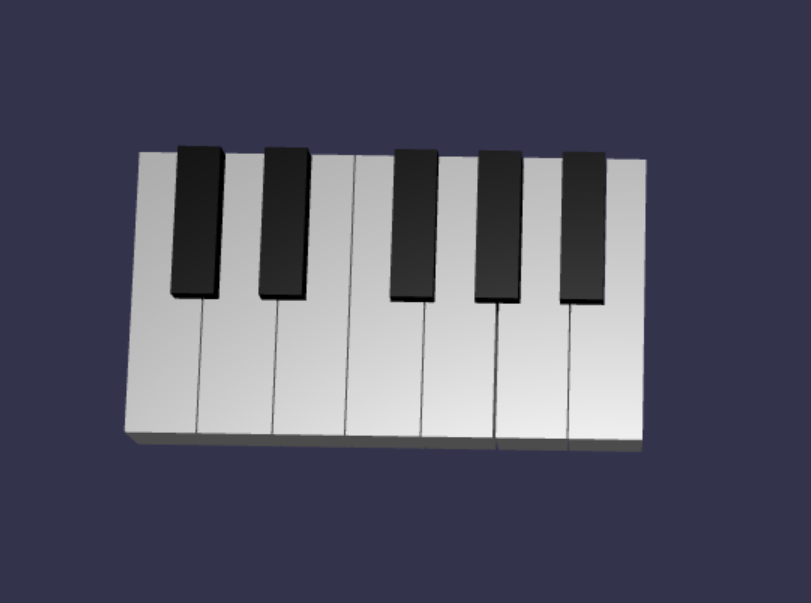
const buildKey = function (scene, parent, props) { if (props.type === "white") { /* Props for building a white key should contain: note, topWidth, bottomWidth, topPositionX, wholePositionX, register, referencePositionX As an example, the props for building the middle C white key would be {type: "white", note: "C", topWidth: 1.4, bottomWidth: 2.3, topPositionX: -0.45, wholePositionX: -14.4, register: 4, referencePositionX: 0} */ // Create bottom part const bottom = BABYLON.MeshBuilder.CreateBox("whiteKeyBottom", {width: props.bottomWidth, height: 1.5, depth: 4.5}, scene); // Create top part const top = BABYLON.MeshBuilder.CreateBox("whiteKeyTop", {width: props.topWidth, height: 1.5, depth: 5}, scene); top.position.z = 4.75; top.position.x += props.topPositionX; // Merge bottom and top parts // Parameters of BABYLON.Mesh.MergeMeshes: (arrayOfMeshes, disposeSource, allow32BitsIndices, meshSubclass, subdivideWithSubMeshes, multiMultiMaterials) const key = BABYLON.Mesh.MergeMeshes([bottom, top], true, false, null, false, false); key.position.x = props.referencePositionX + props.wholePositionX; key.name = props.note + props.register; key.parent = parent; return key; } else if (props.type === "black") { /* Props for building a black key should contain: note, wholePositionX, register, referencePositionX As an example, the props for building the C#4 black key would be {type: "black", note: "C#", wholePositionX: -13.45, register: 4, referencePositionX: 0} */ // Create black color material const blackMat = new BABYLON.StandardMaterial("black"); blackMat.diffuseColor = new BABYLON.Color3(0, 0, 0); // Create black key const key = BABYLON.MeshBuilder.CreateBox(props.note + props.register, {width: 1.4, height: 2, depth: 5}, scene); key.position.z += 4.75; key.position.y += 0.25; key.position.x = props.referencePositionX + props.wholePositionX; key.material = blackMat; key.parent = parent; return key; } } const createScene = async function(engine) { const scene = new BABYLON.Scene(engine); const alpha = 3*Math.PI/2; const beta = Math.PI/50; const radius = 220; const target = new BABYLON.Vector3(0, 0, 0); const camera = new BABYLON.ArcRotateCamera("Camera", alpha, beta, radius, target, scene); camera.attachControl(canvas, true); const light = new BABYLON.HemisphericLight("light", new BABYLON.Vector3(0, 1, 0), scene); light.intensity = 0.6; const keyParams = [ {type: "white", note: "C", topWidth: 1.4, bottomWidth: 2.3, topPositionX: -0.45, wholePositionX: -14.4}, {type: "black", note: "C#", wholePositionX: -13.45}, {type: "white", note: "D", topWidth: 1.4, bottomWidth: 2.4, topPositionX: 0, wholePositionX: -12}, {type: "black", note: "D#", wholePositionX: -10.6}, {type: "white", note: "E", topWidth: 1.4, bottomWidth: 2.3, topPositionX: 0.45, wholePositionX: -9.6}, {type: "white", note: "F", topWidth: 1.3, bottomWidth: 2.4, topPositionX: -0.55, wholePositionX: -7.2}, {type: "black", note: "F#", wholePositionX: -6.35}, {type: "white", note: "G", topWidth: 1.3, bottomWidth: 2.3, topPositionX: -0.2, wholePositionX: -4.8}, {type: "black", note: "G#", wholePositionX: -3.6}, {type: "white", note: "A", topWidth: 1.3, bottomWidth: 2.3, topPositionX: 0.2, wholePositionX: -2.4}, {type: "black", note: "A#", wholePositionX: -0.85}, {type: "white", note: "B", topWidth: 1.3, bottomWidth: 2.4, topPositionX: 0.55, wholePositionX: 0}, ] // Transform Node that acts as the parent of all piano keys const keyboard = new BABYLON.TransformNode("keyboard"); keyParams.forEach(key => { buildKey(scene, keyboard, Object.assign({register: 4, referencePositionX: 0}, key)); }) const xrHelper = await scene.createDefaultXRExperienceAsync(); return scene; }結果として得られるキーボードは次のようになります。
88鍵ピアノへの展開
このセクションでは、キー作成関数の使用法を拡張して、88 キーの完全なピアノ キーボードを生成します。
前述のように、フル88キーのピアノキーボードには、7つの繰り返しレジスタと4つの他のノートが含まれています。 これらの余分なノートのうち 3 つはレジスタ 0 (キーボードの左端) にあり、1 はレジスタ 8 (キーボードの右端) にあります。

最初に、前に記述したループの周りに追加のループを追加することで、7 つの完全な繰り返しを構築します。
buildKey()関数の前のループを次のコードに置き換えます。// Register 1 through 7 var referencePositionX = -2.4*14; for (let register = 1; register <= 7; register++) { keyParams.forEach(key => { buildKey(scene, keyboard, Object.assign({register: register, referencePositionX: referencePositionX}, key)); }) referencePositionX += 2.4*7; }このループでは、レジスタ 1 から 7 のキーを構築し、次のレジスタに進むたびに参照位置をインクリメントします。
次に、残りのキーを作成しましょう。
createScene()関数に次のスニペットを追加します。// Register 0 buildKey(scene, keyboard, {type: "white", note: "A", topWidth: 1.9, bottomWidth: 2.3, topPositionX: -0.20, wholePositionX: -2.4, register: 0, referencePositionX: -2.4*21}); keyParams.slice(10, 12).forEach(key => { buildKey(scene, keyboard, Object.assign({register: 0, referencePositionX: -2.4*21}, key)); }) // Register 8 buildKey(scene, keyboard, {type: "white", note: "C", topWidth: 2.3, bottomWidth: 2.3, topPositionX: 0, wholePositionX: -2.4*6, register: 8, referencePositionX: 84});ピアノ キーボードの左端のキーと右端のキーは、
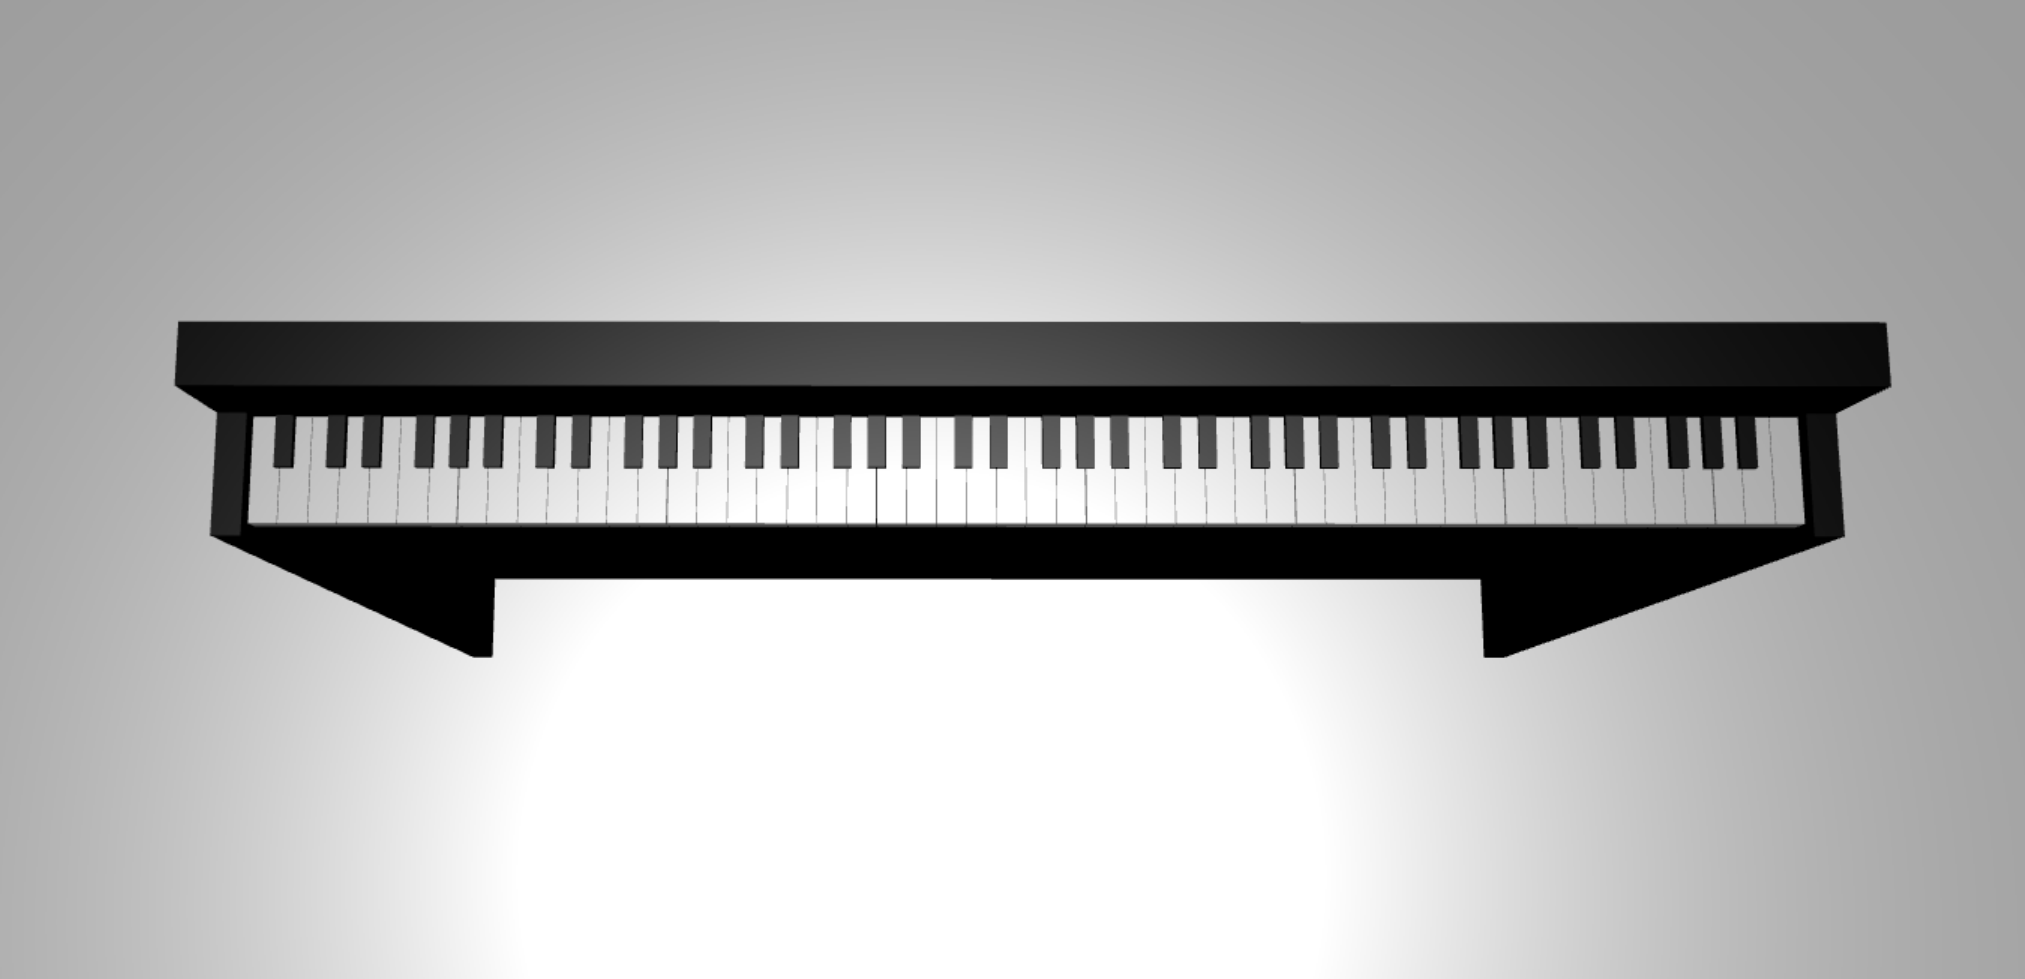
keyParamsで定義されている小道具の寸法に収まらないことに注意してください (端の黒いキーの隣にないため)。そのため、特殊な形状を指定するには、それぞれに新しいpropsオブジェクトを定義する必要があります。変更が行われた後、生成されるキーボードは次のようになります。

ピアノ フレームの追加
シーンは、スペースに浮かぶキーボードだけで少し奇妙に見えます。 キーボードの周りにピアノフレームを追加して、スタンドアップピアノの外観を作成しましょう。
キーの作成方法と同様に、ボックス メッシュのグループを配置して組み合わせてフレームを作成することもできます。
しかし、私たちはあなた自身で試してみて、BABYLONを使用するために、その課題を残します 。SceneLoader.ImportMesh を使用して、スタンドアップ ピアノ フレームの事前に作成されたメッシュをインポートします。 次のコードを
createScene()に追加します。// Transform node that acts as the parent of all piano components const piano = new BABYLON.TransformNode("piano"); keyboard.parent = piano; // Import and scale piano frame BABYLON.SceneLoader.ImportMesh("frame", "https://raw.githubusercontent.com/MicrosoftDocs/mixed-reality/docs/mixed-reality-docs/mr-dev-docs/develop/javascript/tutorials/babylonjs-webxr-piano/files/", "pianoFrame.babylon", scene, function(meshes) { const frame = meshes[0]; frame.parent = piano; });もう一度、
pianoという名前の親TransformNodeを作成して、キーボードとフレーム全体をグループ化することに注意してください。 そうする必要がある場合は、ピアノ全体の移動やスケーリングがはるかに簡単になります。フレームがインポートされると、キーボードがフレームの下部に配置されていることに注意してください (キーの y 座標は既定では 0 であるため)。 スタンドアップピアノフレームに収まるようにキーボードを持ち上げてみましょう。
// Lift piano keys keyboard.position.y += 80;keyboardはすべてのピアノキーの親であるため、keyboardのy位置を変更するだけで、すべてのピアノキーを持ち上げることができます。scene.js の最終的なコードは次のようになります。
const buildKey = function (scene, parent, props) {
    if (props.type === "white") {
        /*
        Props for building a white key should contain:
        note, topWidth, bottomWidth, topPositionX, wholePositionX, register, referencePositionX

        As an example, the props for building the middle C white key would be
        {type: "white", note: "C", topWidth: 1.4, bottomWidth: 2.3, topPositionX: -0.45, wholePositionX: -14.4, register: 4, referencePositionX: 0}
        */

        // Create bottom part
        const bottom = BABYLON.MeshBuilder.CreateBox("whiteKeyBottom", {width: props.bottomWidth, height: 1.5, depth: 4.5}, scene);

        // Create top part
        const top = BABYLON.MeshBuilder.CreateBox("whiteKeyTop", {width: props.topWidth, height: 1.5, depth: 5}, scene);
        top.position.z =  4.75;
        top.position.x += props.topPositionX;

        // Merge bottom and top parts
        // Parameters of BABYLON.Mesh.MergeMeshes: (arrayOfMeshes, disposeSource, allow32BitsIndices, meshSubclass, subdivideWithSubMeshes, multiMultiMaterials)
        const key = BABYLON.Mesh.MergeMeshes([bottom, top], true, false, null, false, false);
        key.position.x = props.referencePositionX + props.wholePositionX;
        key.name = props.note + props.register;
        key.parent = parent;

        return key;
    }
    else if (props.type === "black") {
        /*
        Props for building a black key should contain:
        note, wholePositionX, register, referencePositionX

        As an example, the props for building the C#4 black key would be
        {type: "black", note: "C#", wholePositionX: -13.45, register: 4, referencePositionX: 0}
        */

        // Create black color material
        const blackMat = new BABYLON.StandardMaterial("black");
        blackMat.diffuseColor = new BABYLON.Color3(0, 0, 0);

        // Create black key
        const key = BABYLON.MeshBuilder.CreateBox(props.note + props.register, {width: 1.4, height: 2, depth: 5}, scene);
        key.position.z += 4.75;
        key.position.y += 0.25;
        key.position.x = props.referencePositionX + props.wholePositionX;
        key.material = blackMat;
        key.parent = parent;

        return key;
    }
}

const createScene = async function(engine) {
    const scene = new BABYLON.Scene(engine);

    const alpha =  3*Math.PI/2;
    const beta = Math.PI/50;
    const radius = 220;
    const target = new BABYLON.Vector3(0, 0, 0);

    const camera = new BABYLON.ArcRotateCamera("Camera", alpha, beta, radius, target, scene);
    camera.attachControl(canvas, true);

    const light = new BABYLON.HemisphericLight("light", new BABYLON.Vector3(0, 1, 0), scene);
    light.intensity = 0.6;

    const keyParams = [
        {type: "white", note: "C", topWidth: 1.4, bottomWidth: 2.3, topPositionX: -0.45, wholePositionX: -14.4},
        {type: "black", note: "C#", wholePositionX: -13.45},
        {type: "white", note: "D", topWidth: 1.4, bottomWidth: 2.4, topPositionX: 0, wholePositionX: -12},
        {type: "black", note: "D#", wholePositionX: -10.6},
        {type: "white", note: "E", topWidth: 1.4, bottomWidth: 2.3, topPositionX: 0.45, wholePositionX: -9.6},
        {type: "white", note: "F", topWidth: 1.3, bottomWidth: 2.4, topPositionX: -0.55, wholePositionX: -7.2},
        {type: "black", note: "F#", wholePositionX: -6.35},
        {type: "white", note: "G", topWidth: 1.3, bottomWidth: 2.3, topPositionX: -0.2, wholePositionX: -4.8},
        {type: "black", note: "G#", wholePositionX: -3.6},
        {type: "white", note: "A", topWidth: 1.3, bottomWidth: 2.3, topPositionX: 0.2, wholePositionX: -2.4},
        {type: "black", note: "A#", wholePositionX: -0.85},
        {type: "white", note: "B", topWidth: 1.3, bottomWidth: 2.4, topPositionX: 0.55, wholePositionX: 0},
    ]

    // Transform Node that acts as the parent of all piano keys
    const keyboard = new BABYLON.TransformNode("keyboard");

    // Register 1 through 7
    var referencePositionX = -2.4*14;
    for (let register = 1; register <= 7; register++) {
        keyParams.forEach(key => {
            buildKey(scene, keyboard, Object.assign({register: register, referencePositionX: referencePositionX}, key));
        })
        referencePositionX += 2.4*7;
    }

    // Register 0
    buildKey(scene, keyboard, {type: "white", note: "A", topWidth: 1.9, bottomWidth: 2.3, topPositionX: -0.20, wholePositionX: -2.4, register: 0, referencePositionX: -2.4*21});
    keyParams.slice(10, 12).forEach(key => {
        buildKey(scene, keyboard, Object.assign({register: 0, referencePositionX: -2.4*21}, key));
    })

    // Register 8
    buildKey(scene, keyboard, {type: "white", note: "C", topWidth: 2.3, bottomWidth: 2.3, topPositionX: 0, wholePositionX: -2.4*6, register: 8, referencePositionX: 84});

    // Transform node that acts as the parent of all piano components
    const piano = new BABYLON.TransformNode("piano");
    keyboard.parent = piano;

    // Import and scale piano frame
    BABYLON.SceneLoader.ImportMesh("frame", "https://raw.githubusercontent.com/MicrosoftDocs/mixed-reality/docs/mixed-reality-docs/mr-dev-docs/develop/javascript/tutorials/babylonjs-webxr-piano/files/", "pianoFrame.babylon", scene, function(meshes) {
        const frame = meshes[0];
        frame.parent = piano;
    });

    // Lift the piano keyboard
    keyboard.position.y += 80;

    const xrHelper = await scene.createDefaultXRExperienceAsync();

    return scene;
}
今、私たちは、次のようなスタンドアップピアノを持っている必要があります: