DirectX と XAML の相互運用機能
注意
このトピックは、ユニバーサル Windows プラットフォーム (UWP) のゲームとアプリ、および (Microsoft.UI.Xaml.Xxx ではなく) Windows.UI.Xaml.Xxx 名前空間の型に適用されます。
ユニバーサル Windows プラットフォーム (UWP) ゲームまたはアプリでは、Extensible Application Markup Language (XAML) と Microsoft DirectX を組み合わせて使用することができます。 XAML と DirectX を組み合わせることにより、DirectX でレンダリングしたコンテンツと相互運用できる柔軟なユーザー インターフェイス フレームワークを構築できます。これは、グラフィックスを多用するアプリで特に役立ちます。 このトピックでは、DirectX を使用する UWP アプリの構造について説明し、DirectX と連携する UWP アプリを構築するときに使用する重要な型を示します。
アプリで主に 2D レンダリングに重点を置いている場合は、Win2D Windows ランタイム ライブラリを使用することが必要な場合があります。 このライブラリは Microsoft によって管理されており、コア Direct2D のテクノロジを基盤として構築されています。 Win2D により、2D グラフィックスを実装する使用パターンが大幅に簡略化されます。これには、このドキュメントで説明する手法の一部の便利な抽象化が含まれています。 詳しくは、プロジェクトのページをご覧ください。 このドキュメントでは、Win2D を使用しないことを選択したアプリ開発者向けのガイダンスを示します。
注意
DirectX API は Windows ランタイム型として定義されていませんが、C++/WinRT を使用して、DirectX と相互運用する XAML UWP アプリを開発できます。 DirectX を呼び出すコードを独自の C++/WinRT Windows ランタイム コンポーネント (WRC) に組み込む場合は、XAML と DirectX を組み合わせた UWP アプリ (C# でも) でその WRC を使用できます。
XAML と DirectX
DirectX には、2D と 3D のグラフィックス用に、それぞれ Direct2D と Microsoft Direct3D という 2 つの強力なライブラリが用意されています。 XAML でも基本的な 2D のプリミティブと効果はサポートされますが、多くのモデリングおよびゲーム アプリでは、より複雑なグラフィックス サポートが必要になります。 このためには、Direct2D および Direct3D を使用して、より複雑なグラフィックスをレンダリングし、従来のユーザー インターフェイス (UI) 要素に XAML を使用できます。
カスタム XAML と DirectX の相互運用を実装する場合は、次の 2 つの概念を理解する必要があります。
- 共有サーフェス。サイズが指定されたディスプレイの領域であり、XAML で定義されます。Windows::UI::Xaml::Media::ImageSource 型を使用することにより、DirectX を使用して間接的に描画を行うことができます。 共有サーフェスについては、新しいコンテンツが画面に表示される正確なタイミングを制御する必要はありません。 共有サーフェスの更新は XAML フレームワークの更新に同期されます。
- スワップ チェーンは、最小限の待機時間でグラフィックスを表示するために使用されるバッファーのコレクションを表します。 通常、スワップ チェーンは、UI スレッドとは別に、1 秒あたり 60 フレームで更新されます。 ただし、スワップ チェーンは高速な更新をサポートするために、より多くのメモリと CPU リソースを使用します。また、複数のスレッドを管理する必要があるために使用することが難しくなります。
次に、DirectX を使う目的を確認します。 表示ウィンドウのサイズに収まる 1 つのコントロールを作ったりアニメーション化したりするために使うのか、 ゲームなどのようにリアルタイムでレンダリングして制御する必要がある出力をサーフェイスに表示するのかを確認します。 このような場合は、おそらくスワップ チェーンを実装する必要があります。 それ以外の場合は、共有サーフェスを使用する方法で問題はありません。
DirectX をどのように使うかを決めたら、目的に応じて次のいずれかの Windows ランタイム型を使って、DirectX のレンダリングを UWP アプリに組み込みます。
- 静的な画像を構成する場合やイベント駆動型の複雑な画像を描画する場合は、Windows::UI::Xaml::Media::Imaging::SurfaceImageSource を使って共有サーフェスに描画します。 これは、サイズが指定された DirectX の描画サーフェスを処理する型です。 通常は、ドキュメントや UI 要素でビットマップとして表示する画像やテクスチャを構成する場合に使います。 この型は、高パフォーマンスのゲームのようなリアルタイムのインタラクティビティには適しません。 これは、SurfaceImageSource オブジェクトの更新が XAML ユーザー インターフェイスの更新に同期されるため、フレーム レートが安定しない、リアルタイムの入力に対する応答が遅いなど、ユーザーへの視覚的フィードバックに待ち時間が生じるためです。 ただし、動的なコントロールやデータ シミュレーションであれば、更新に時間はかからず問題ありません。
- 画像が画面上のスペースよりも大きく、ユーザーがパンまたはズームできる場合は、Windows::UI::Xaml::Media::Imaging::VirtualSurfaceImageSource を使用します。 これは、画面よりも大きいサイズが指定された DirectX の描画サーフェスを処理する型です。 SurfaceImageSource と同様に、複雑な画像やコントロールを動的に構成する場合に使います。 また、SurfaceImageSource と同様に、高パフォーマンスのゲームには適しません。 VirtualSurfaceImageSource を使うことができる XAML 要素には、マップ コントロールや、画像が多い大きなドキュメント ビューアーなどがあります。
- リアルタイムで更新されるグラフィックスを DirectX を使って表示する場合や、短い待ち時間で定期的に更新を行う必要がある場合は、SwapChainPanel クラスを使用します。これにより、XAML フレームワークの更新タイマーに同期せずにグラフィックスを更新することができます。 SwapChainPanel を使用すると、グラフィックス デバイスのスワップ チェーン (IDXGISwapChain1) に直接アクセスし、レンダリング ターゲットの上に XAML をレイヤー化できます。 SwapChainPanel は、ゲームなどの全画面の DirectX アプリで XAML ベースのユーザー インターフェイスが必要な場合に便利です。 Microsoft DirectX Graphic Infrastructure (DXGI)、Direct2D、Direct3D テクノロジを含めて、この手法を使用するには、DirectX に関する十分な知識が必要です。 詳しくは、「Direct3D 11 用プログラミング ガイド」をご覧ください。
SurfaceImageSource
SurfaceImageSource は、DirectX で描画を行うための共有サーフェスを提供し、ビットからアプリのコンテンツを構成します。
ヒント
行間 (DirectWrite) とダウンロード可能なフォント (DirectWrite) サンプル アプリケーションでは、SurfaceImageSource が示されています。
SurfaceImageSource を作成および更新するプロセスの概要を次に示します。
- Direct 3D デバイス、Direct 2D デバイス、Direct 2D デバイス コンテキストを作成します。
- SurfaceImageSource を作成し、それに Direct 2D (または Direct 3D) デバイスを設定します。
- DXGI サーフェスを取得するために SurfaceImageSource での描画を開始します。
- Direct2D (または Direct3D) を使用して DXGI サーフェスに描画します。
- 完了したら、SurfaceImageSource での描画を終了します。
- XAML UI に表示するために、XAML Image または ImageBrush に SurfaceImageSource を設定します。
ソース コードの例を使用して、これらの手順の詳細を次に示します。
Microsoft Visual Studio で新しいプロジェクトを作成することにより、以下に示して説明するコードに従うことができます。 空のアプリ (C++/WinRT) プロジェクトを作成します。 Windows SDK の最新の一般公開された (プレビュー以外の) バージョンを対象とします。
を開
pch.hき、次のインクルードを既にそこに 追加 します。// pch.h ... #include <d3d11_4.h> #include <d2d1_1.h> #include <windows.ui.xaml.media.dxinterop.h> #include <winrt/Windows.UI.Xaml.Media.Imaging.h>既に存在するインクルードの下で、
MainPage.cppの上に、次に示すusingディレクティブを追加します。 また、MainPage.cppでは、MainPage::ClickHandler の既存の実装を、次に示す一覧に置き換えます。 このコードは、Direct 3D デバイス、Direct 2D デバイス、Direct 2D デバイス コンテキストを作成します。 これを行うには、D3D11CreateDevice、D2D1CreateDevice、ID2D1Device::CreateDeviceContext を呼び出します。// MainPage.cpp | paste this below the existing using directives using namespace Windows::UI::Xaml::Media::Imaging;// MainPage.cpp | paste this to replace the existing MainPage::ClickHandler void MainPage::ClickHandler(IInspectable const&, RoutedEventArgs const&) { myButton().Content(box_value(L"Clicked")); uint32_t creationFlags = D3D11_CREATE_DEVICE_BGRA_SUPPORT; D3D_FEATURE_LEVEL featureLevels[] = { D3D_FEATURE_LEVEL_11_1, D3D_FEATURE_LEVEL_11_0, D3D_FEATURE_LEVEL_10_1, D3D_FEATURE_LEVEL_10_0, D3D_FEATURE_LEVEL_9_3, D3D_FEATURE_LEVEL_9_2, D3D_FEATURE_LEVEL_9_1 }; // Create the Direct3D device. winrt::com_ptr<::ID3D11Device> d3dDevice; D3D_FEATURE_LEVEL supportedFeatureLevel; winrt::check_hresult(::D3D11CreateDevice( nullptr, D3D_DRIVER_TYPE_HARDWARE, 0, creationFlags, featureLevels, ARRAYSIZE(featureLevels), D3D11_SDK_VERSION, d3dDevice.put(), &supportedFeatureLevel, nullptr) ); // Get the DXGI device. winrt::com_ptr<::IDXGIDevice> dxgiDevice{ d3dDevice.as<::IDXGIDevice>() }; // Create the Direct2D device and a corresponding context. winrt::com_ptr<::ID2D1Device> d2dDevice; ::D2D1CreateDevice(dxgiDevice.get(), nullptr, d2dDevice.put()); winrt::com_ptr<::ID2D1DeviceContext> d2dDeviceContext; winrt::check_hresult( d2dDevice->CreateDeviceContext( D2D1_DEVICE_CONTEXT_OPTIONS_NONE, d2dDeviceContext.put() ) ); }次に、SurfaceImageSource を作成するコードを追加し、ISurfaceImageSourceNativeWithD2D::SetDevice を呼び出して、それに Direct 2D (または Direct 3D) デバイスを設定します。
注意
バックグラウンド スレッドから SurfaceImageSource に描画する場合は、DXGI デバイスでマルチスレッド アクセスも有効になっている必要があります (次のコードを参照)。 パフォーマンス上の理由から、バックグラウンド スレッドから描画する場合に "のみ" 実行する必要があります。
SurfaceImageSource コンストラクターに高さと幅の値を渡して、共有サーフェイスのサイズを定義します。 アルファ (不透明度) のサポートが必要かどうかも指定できます。
デバイスを設定し、描画操作を実行するには、ISurfaceImageSourceNativeWithD2D へのポインターが必要です。 取得するには、SurfaceImageSource オブジェクトに基になる ISurfaceImageSourceNativeWithD2D インターフェイスを照会します。
// MainPage.cpp | paste this at the end of MainPage::ClickHandler
SurfaceImageSource surfaceImageSource(500, 500);

winrt::com_ptr<::ISurfaceImageSourceNativeWithD2D> sisNativeWithD2D{
    surfaceImageSource.as<::ISurfaceImageSourceNativeWithD2D>() };

// Associate the Direct2D device with the SurfaceImageSource.
sisNativeWithD2D->SetDevice(d2dDevice.get());

// To enable multi-threaded access (optional)
winrt::com_ptr<::ID3D11Multithread> d3dMultiThread{
    d3dDevice.as<::ID3D11Multithread>() };
d3dMultiThread->SetMultithreadProtected(true);
ISurfaceImageSourceNativeWithD2D::BeginDraw を呼び出して、DXGI サーフェス (IDXGISurface インターフェイス) を取得します。 マルチスレッド アクセスを有効にしている場合は、バックグラウンド スレッドから ISurfaceImageSourceNativeWithD2D::BeginDraw (および以降の描画コマンド) を呼び出します。 この手順ではさらに、DXGI サーフェスからビットマップを作成し、それを Direct 2D デバイス コンテキストに設定します。
offset パラメーターの ISurfaceImageSourceNativeWithD2D::BeginDraw は、更新されたターゲット四角形のポイント オフセット (x,y 値) を返します。 このオフセットを使って、更新されたコンテンツを ID2D1DeviceContext で描画する位置を特定できます。
// MainPage.cpp | paste this at the end of MainPage::ClickHandler
winrt::com_ptr<::IDXGISurface> dxgiSurface;

RECT updateRect{ 0, 0, 500, 500 };
POINT offset{ 0, 0 };
HRESULT beginDrawHR = sisNativeWithD2D->BeginDraw(
    updateRect,
    __uuidof(::IDXGISurface),
    dxgiSurface.put_void(),
    &offset);

// Create render target.
winrt::com_ptr<::ID2D1Bitmap1> bitmap;
winrt::check_hresult(
    d2dDeviceContext->CreateBitmapFromDxgiSurface(
        dxgiSurface.get(),
        nullptr,
        bitmap.put()
    )
);

// Set context's render target.
d2dDeviceContext->SetTarget(bitmap.get());
Direct 2D デバイス コンテキストを使用して、SurfaceImageSource の内容を描画します。 前の手順で updateRect パラメーターに更新対象として指定した領域だけが描画されます。
// MainPage.cpp | paste this at the end of MainPage::ClickHandler
if (beginDrawHR == DXGI_ERROR_DEVICE_REMOVED ||
    beginDrawHR == DXGI_ERROR_DEVICE_RESET ||
    beginDrawHR == D2DERR_RECREATE_TARGET)
{
    // The Direct3D and Direct2D devices were lost and need to be re-created.
    // Recovery steps are:
    // 1) Re-create the Direct3D and Direct2D devices
    // 2) Call ISurfaceImageSourceNativeWithD2D::SetDevice with the new Direct2D
    //    device
    // 3) Redraw the contents of the SurfaceImageSource
}
else if (beginDrawHR == E_SURFACE_CONTENTS_LOST)
{
    // The devices were not lost but the entire contents of the surface
    // were. Recovery steps are:
    // 1) Call ISurfaceImageSourceNativeWithD2D::SetDevice with the Direct2D
    //    device again
    // 2) Redraw the entire contents of the SurfaceImageSource
}
else
{
    // Draw using Direct2D context.
    d2dDeviceContext->BeginDraw();

    d2dDeviceContext->Clear(D2D1::ColorF(D2D1::ColorF::Orange));

    winrt::com_ptr<::ID2D1SolidColorBrush> brush;
    winrt::check_hresult(d2dDeviceContext->CreateSolidColorBrush(
        D2D1::ColorF(D2D1::ColorF::Chocolate),
        D2D1::BrushProperties(0.8f),
        brush.put()));

    D2D1_SIZE_F const size{ 500, 500 };
    D2D1_RECT_F const rect{ 100.0f, 100.0f, size.width - 100.0f, size.height - 100.0f };
    d2dDeviceContext->DrawRectangle(rect, brush.get(), 100.0f);

    d2dDeviceContext->EndDraw();
}
ISurfaceImageSourceNativeWithD2D::EndDraw を呼び出してビットマップを完成します (ISurfaceImageSourceNativeWithD2D::EndDraw は UI スレッドからのみ呼び出す必要があります)。 次に、XAML UI に表示するために、XAML Image (または ImageBrush) に SurfaceImageSource を設定します。
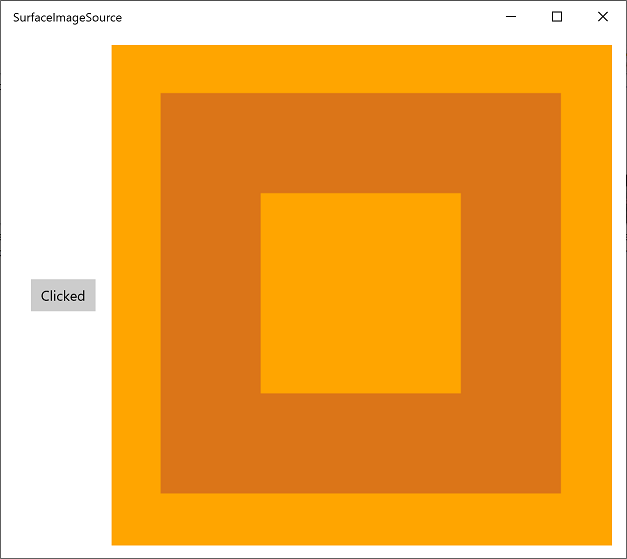
// MainPage.cpp | paste this at the end of MainPage::ClickHandler
sisNativeWithD2D->EndDraw();

// The SurfaceImageSource object's underlying
// ISurfaceImageSourceNativeWithD2D object will contain the completed bitmap.

theImage().Source(surfaceImageSource);
注意
現在、SurfaceImageSource::SetSource (IBitmapSource::SetSource から継承) を呼び出すと例外がスローされます。 SurfaceImageSource オブジェクトから呼び出さないでください。
注意
Window が非表示または非アクティブになっている間は SurfaceImageSource に描画しないようにする必要があります。描画すると、ISurfaceImageSourceNativeWithD2D API が失敗します。 ウィンドウの可視性とアプリケーションの中断に関するイベントを処理して、これを実現します。
最後に、
MainPage.xaml内にある既存の XAML マークアップ内の Image 要素を追加します。<!-- MainPage.xaml --> ... <Image x:Name="theImage" Width="500" Height="500" /> ...アプリをビルドして実行できる状態になりました。 ボタンをクリックすると、Image に表示される SurfaceImageSource の内容が表示されます。
VirtualSurfaceImageSource
VirtualSurfaceImageSource は、SurfaceImageSource を拡張します。これは、コンテンツが大きすぎて一度にすべてが画面に収まらない (大きすぎて 1 つのテクスチャとしてビデオ メモリに収まらない) 可能性があり、最適にレンダリングするためにコンテンツを仮想化する必要があるシナリオに適しています。 たとえば、マッピング アプリや大きなドキュメント キャンバスなどです。
ヒント
Complex Inking サンプル アプリケーションでは、VirtualSurfaceImageSource を例示しています。
VirtualSurfaceImageSource が SurfaceImageSource と異なる点は、 IVirtualSurfaceImageSourceCallbacksNative::UpdatesNeeded コールバックを使用することです。このコールバックを実装することで、サーフェスの領域が画面に表示できるようになったときに領域が更新されます。 非表示の領域をクリアする必要はありません。この処理は XAML フレームワークで行われます。
VirtualSurfaceImageSource に取り組む前に、SurfaceImageSource (上記の「SurfaceImageSource」セクションを参照) について理解を深めておくことをお勧めします。 ここでは、VirtualSurfaceImageSource を作成および更新するプロセスの概要を示します。
- IVirtualSurfaceImageSourceCallbackNative インターフェイスを実装します。
- Direct 3D デバイス、Direct 2D デバイス、Direct 2D デバイス コンテキストを作成します。
- VirtualSurfaceImageSource を作成し、それに Direct 2D (または Direct 3D) デバイスを設定します。
- VirtualSurfaceImageSource で RegisterForUpdatesNeeded を呼び出します。
- UpdatesNeeded コールバックで、GetUpdateRectCount と GetUpdateRects を呼び出します。
- 更新四角形をレンダリングします (SurfaceImageSource の場合と同様に BeginDraw/EndDraw を使用します)。
- XAML UI に表示するために、XAML Image または ImageBrush に SurfaceImageSource を設定します。
ソース コードの例を使用して、これらの手順の詳細を次に示します。
Microsoft Visual Studio で新しいプロジェクトを作成することにより、以下に示して説明するコードに従うことができます。 空のアプリ (C++/WinRT) プロジェクトを作成し、VSISDemo という名前を付けます (以下のコード リストをコピーして貼り付ける場合は、プロジェクトにこの名前を付けることが重要です)。 Windows SDK の最新の一般公開された (プレビュー以外の) バージョンを対象とします。
を開
pch.hき、次のインクルードを既にそこに 追加 します。// pch.h ... #include <d3d11_4.h> #include <d2d1_1.h> #include <windows.ui.xaml.media.dxinterop.h> #include <winrt/Windows.UI.Xaml.Media.Imaging.h>この手順では、IVirtualSurfaceUpdatesCallbackNative インターフェイスの実装を提供します。 新しいヘッダー ファイル (.h) 項目をプロジェクトに追加し、CallbackImplementation.h という名前を付けます。 このファイルの内容を以下のリストに置き換えます。 コードについては、以下の一覧の後で説明します。
#include "pch.h"

namespace winrt::VSISDemo::implementation
{
    struct CallbackImplementation : winrt::implements<CallbackImplementation, ::IVirtualSurfaceUpdatesCallbackNative>
    {
        CallbackImplementation(
            winrt::com_ptr<::ISurfaceImageSourceNativeWithD2D> sisNativeWithD2D,
            winrt::com_ptr<::IVirtualSurfaceImageSourceNative> const& vsisNative,
            winrt::com_ptr<::ID2D1DeviceContext> const& d2dDeviceContext) :
            m_sisNativeWithD2D(sisNativeWithD2D),
            m_vsisNative(vsisNative),
            m_d2dDeviceContext(d2dDeviceContext)
        {}

        IFACEMETHOD(UpdatesNeeded)()
        {
            HRESULT hr = S_OK;

            ULONG drawingBoundsCount = 0;
            m_vsisNative->GetUpdateRectCount(&drawingBoundsCount);

            std::unique_ptr<RECT[]> drawingBounds(
                new RECT[drawingBoundsCount]);

            m_vsisNative->GetUpdateRects(
                drawingBounds.get(),
                drawingBoundsCount);

            for (ULONG i = 0; i < drawingBoundsCount; ++i)
            {
                winrt::com_ptr<::IDXGISurface> dxgiSurface;

                POINT offset{ 0, 0 };
                HRESULT beginDrawHR = m_sisNativeWithD2D->BeginDraw(
                    drawingBounds[i],
                    __uuidof(::IDXGISurface),
                    dxgiSurface.put_void(),
                    &offset);

                // Create render target.
                winrt::com_ptr<::ID2D1Bitmap1> bitmap;
                winrt::check_hresult(
                    m_d2dDeviceContext->CreateBitmapFromDxgiSurface(
                        dxgiSurface.get(),
                        nullptr,
                        bitmap.put()
                    )
                );

                // Set context's render target.
                m_d2dDeviceContext->SetTarget(bitmap.get());

                if (beginDrawHR == DXGI_ERROR_DEVICE_REMOVED ||
                    beginDrawHR == DXGI_ERROR_DEVICE_RESET ||
                    beginDrawHR == D2DERR_RECREATE_TARGET)
                {
                    // The Direct3D and Direct2D devices were lost and need to be re-created.
                    // Recovery steps are:
                    // 1) Re-create the Direct3D and Direct2D devices
                    // 2) Call ISurfaceImageSourceNativeWithD2D::SetDevice with the new Direct2D
                    //    device
                    // 3) Redraw the contents of the SurfaceImageSource
                }
                else if (beginDrawHR == E_SURFACE_CONTENTS_LOST)
                {
                    // The devices were not lost but the entire contents of the surface
                    // were. Recovery steps are:
                    // 1) Call ISurfaceImageSourceNativeWithD2D::SetDevice with the Direct2D
                    //    device again
                    // 2) Redraw the entire contents of the SurfaceImageSource
                }
                else
                {
                    // Draw using Direct2D context.
                    m_d2dDeviceContext->BeginDraw();

                    m_d2dDeviceContext->Clear(D2D1::ColorF(D2D1::ColorF::Orange));

                    winrt::com_ptr<::ID2D1SolidColorBrush> brush;
                    winrt::check_hresult(m_d2dDeviceContext->CreateSolidColorBrush(
                        D2D1::ColorF(D2D1::ColorF::Chocolate),
                        D2D1::BrushProperties(0.8f),
                        brush.put()));

                    D2D1_SIZE_F const size{ drawingBounds[i].right - drawingBounds[i].left, drawingBounds[i].bottom - drawingBounds[i].top };
                    D2D1_RECT_F const rect{ 100.0f, 100.0f, size.width - 100.0f, size.height - 100.0f };
                    m_d2dDeviceContext->DrawRectangle(rect, brush.get(), 100.0f);

                    m_d2dDeviceContext->EndDraw();
                }

                m_sisNativeWithD2D->EndDraw();
            }

            return hr;
        }

    private:
        winrt::com_ptr<::ISurfaceImageSourceNativeWithD2D> m_sisNativeWithD2D{ nullptr };
        winrt::com_ptr<::IVirtualSurfaceImageSourceNative> m_vsisNative{ nullptr };
        winrt::com_ptr<::ID2D1DeviceContext> m_d2dDeviceContext{ nullptr };
    };
}
VirtualSurfaceImageSource の領域を更新する必要がある場合、フレームワークで、IVirtualSurfaceUpdatesCallbackNative::UpdatesNeeded の実装が呼び出されます (上記を参照)。
これが発生するのは、領域を描画する必要があるとフレームワークで判断されたとき (たとえば、ユーザーがサーフェスのビューをパンまたはズームしたときなど)、およびその領域に対する IVirtualSurfaceImageSourceNative::Invalidate がアプリで呼び出されたときです。
IVirtualSurfaceImageSourceNative::UpdatesNeeded の実装で、IVirtualSurfaceImageSourceNative::GetUpdateRectCount メソッドと IVirtualSurfaceImageSourceNative::GetUpdateRects メソッドを使って、描画する必要があるサーフェスの領域を特定します。
更新する必要がある領域ごとに、具体的なコンテンツをその領域に描画します。ただし、パフォーマンスを高めるために、描画は、境界のある領域に制限されます。 ISurfaceImageSourceNativeWithD2D メソッドの呼び出しの詳細は、SurfaceImageSource の場合と同じです (上の 「SurfaceImageSource」セクションを参照してください)。
注意
Window が非表示または非アクティブになっている間は VirtualSurfaceImageSource に描画しないようにする必要があります。描画すると、ISurfaceImageSourceNativeWithD2D API が失敗します。 ウィンドウの可視性とアプリケーションの中断に関するイベントを処理して、これを実現します。
MainPage クラスで、CallbackImplementation 型のメンバーを追加します。 また、Direct 3D デバイス、Direct 2D デバイス、Direct 2D デバイス コンテキストも作成します。 これを行うには、D3D11CreateDevice、D2D1CreateDevice、ID2D1Device::CreateDeviceContext を呼び出します。
MainPage.idl、MainPage.h、MainPage.cppの内容を次の一覧の内容に置き換えます。// MainPage.idl namespace VSISDemo { [default_interface] runtimeclass MainPage : Windows.UI.Xaml.Controls.Page { MainPage(); } }// MainPage.h #pragma once #include "MainPage.g.h" #include "CallbackImplementation.h" namespace winrt::VSISDemo::implementation { struct MainPage : MainPageT<MainPage> { MainPage(); void ClickHandler(Windows::Foundation::IInspectable const& sender, Windows::UI::Xaml::RoutedEventArgs const& args); private: winrt::com_ptr<::IVirtualSurfaceUpdatesCallbackNative> m_cbi{ nullptr }; }; } namespace winrt::VSISDemo::factory_implementation { struct MainPage : MainPageT<MainPage, implementation::MainPage> { }; }// MainPage.cpp #include "pch.h" #include "MainPage.h" #include "MainPage.g.cpp" using namespace winrt; using namespace Windows::UI::Xaml; using namespace Windows::UI::Xaml::Media::Imaging; namespace winrt::VSISDemo::implementation { MainPage::MainPage() { InitializeComponent(); } void MainPage::ClickHandler(IInspectable const&, RoutedEventArgs const&) { myButton().Content(box_value(L"Clicked")); uint32_t creationFlags = D3D11_CREATE_DEVICE_BGRA_SUPPORT; D3D_FEATURE_LEVEL featureLevels[] = { D3D_FEATURE_LEVEL_11_1, D3D_FEATURE_LEVEL_11_0, D3D_FEATURE_LEVEL_10_1, D3D_FEATURE_LEVEL_10_0, D3D_FEATURE_LEVEL_9_3, D3D_FEATURE_LEVEL_9_2, D3D_FEATURE_LEVEL_9_1 }; // Create the Direct3D device. winrt::com_ptr<::ID3D11Device> d3dDevice; D3D_FEATURE_LEVEL supportedFeatureLevel; winrt::check_hresult(::D3D11CreateDevice( nullptr, D3D_DRIVER_TYPE_HARDWARE, 0, creationFlags, featureLevels, ARRAYSIZE(featureLevels), D3D11_SDK_VERSION, d3dDevice.put(), &supportedFeatureLevel, nullptr) ); // Get the Direct3D device. winrt::com_ptr<::IDXGIDevice> dxgiDevice{ d3dDevice.as<::IDXGIDevice>() }; // Create the Direct2D device and a corresponding context. winrt::com_ptr<::ID2D1Device> d2dDevice; ::D2D1CreateDevice(dxgiDevice.get(), nullptr, d2dDevice.put()); winrt::com_ptr<::ID2D1DeviceContext> d2dDeviceContext; winrt::check_hresult( d2dDevice->CreateDeviceContext( D2D1_DEVICE_CONTEXT_OPTIONS_NONE, d2dDeviceContext.put() ) ); } }次に、必要なサイズで VirtualSurfaceImageSource を作成するコードを追加し、ISurfaceImageSourceNativeWithD2D::SetDevice を呼び出して、それに Direct 2D (または Direct 3D) デバイスを設定します。
注意
バックグラウンド スレッドから VirtualSurfaceImageSource に描画する場合は、DXGI デバイスでマルチスレッド アクセスも有効になっている必要があります (次のコードを参照)。 パフォーマンス上の理由から、バックグラウンド スレッドから描画する場合に "のみ" 実行する必要があります。
デバイスを設定し、描画操作を実行するには、ISurfaceImageSourceNativeWithD2D へのポインターが必要です。 取得するには、VirtualSurfaceImageSource オブジェクトに基になる ISurfaceImageSourceNativeWithD2D インターフェイスを照会します。
また、IVirtualSurfaceImageSourceNative を照会し、IVirtualSurfaceImageSourceNative::RegisterForUpdatesNeeded を呼び出して、IVirtualSurfaceUpdatesCallbackNative の実装を提供します。
次に、XAML UI に表示するために、XAML Image (または ImageBrush) に SurfaceImageSource を設定します。
// MainPage.cpp | paste this at the end of MainPage::ClickHandler
VirtualSurfaceImageSource virtualSurfaceImageSource(2000, 2000);

winrt::com_ptr<::ISurfaceImageSourceNativeWithD2D> sisNativeWithD2D{
    virtualSurfaceImageSource.as<::ISurfaceImageSourceNativeWithD2D>() };

// Associate the Direct2D device with the SurfaceImageSource.
sisNativeWithD2D->SetDevice(d2dDevice.get());

// To enable multi-threaded access (optional)
winrt::com_ptr<::ID3D11Multithread> d3dMultiThread{
    d3dDevice.as<::ID3D11Multithread>() };
d3dMultiThread->SetMultithreadProtected(true);

winrt::com_ptr<::IVirtualSurfaceImageSourceNative> vsisNative{
    virtualSurfaceImageSource.as<::IVirtualSurfaceImageSourceNative>() };

m_cbi = winrt::make<CallbackImplementation>(sisNativeWithD2D, vsisNative, d2dDeviceContext);
vsisNative->RegisterForUpdatesNeeded(m_cbi.as<::IVirtualSurfaceUpdatesCallbackNative>().get());

// The SurfaceImageSource object's underlying
// ISurfaceImageSourceNativeWithD2D object will contain the completed bitmap.

theImage().Source(virtualSurfaceImageSource);
最後に、
MainPage.xaml内にある既存の XAML マークアップ内の Image 要素を追加します。<!-- MainPage.xaml --> ... <Image x:Name="theImage" Width="500" Height="500" /> ...アプリをビルドして実行できる状態になりました。 ボタンをクリックすると、Image に表示される VirtualSurfaceImageSource の内容が表示されます。
SwapChainPanel とゲーム
SwapChainPanel は、高パフォーマンスのグラフィックスやゲームをサポートするために設計された Windows ランタイム型です。この型でスワップ チェーンを直接管理します。 この例では、独自の DirectX スワップ チェーンを作成し、レンダリングされるコンテンツの表示を管理します。 SwapChainPanel のもう 1 つの機能は、これの前に他の XAML 要素を重ねて表示できることです。
ヒント
次のサンプル アプリケーションは、SurfaceImageSource: Direct2D の高度なカラー イメージレンダリング、Direct2D 写真の調整、Direct2D SVG イメージ レンダリング、低待機時間入力、DirectX および XAML ゲーム、XAML SwapChainPanel DirectX 相互運用機能 (Windows 8.1) を示しています。
適切なパフォーマンスを確保するために、SwapChainPanel 型には次のような制限があります。
- アプリあたりの SwapChainPanel インスタンス数は 4 つ以下にする必要があります。
- DirectX スワップ チェーンの高さと幅 (DXGI\_SWAP\_CHAIN\_DESC1 で設定) は、スワップ チェーン要素の現在のサイズに設定する必要があります。 このように設定しないと、表示されるコンテンツのサイズは収まるように調整されます (DXGI_SCALING_STRETCH を使用)。
- DirectX スワップ チェーンのスケーリング モード (DXGI_SWAP_CHAIN_DESC1 で設定) は、DXGI_SCALING_STRETCH に設定する必要があります。
- DirectX スワップ チェーンを作成するときは、IDXGIFactory2::CreateSwapChainForComposition を呼び出す必要があります。
SwapChainPanel は、XAML フレームワークの更新と同期させるのではなく、アプリのニーズに基づいて更新します。 SwapChainPanel の更新を XAML フレームワークの更新に同期する必要がある場合は、Windows::UI::Xaml::Media::CompositionTarget::Rendering イベントに登録します。 このイベントに登録しないと、SwapChainPanel を更新するスレッドと異なるスレッドから XAML 要素を更新する場合に、クロス スレッドの問題についての検討が必要になります。
SwapChainPanel に対する待機時間の短いポインター入力を受信する必要がある場合は、SwapChainPanel::CreateCoreIndependentInputSource を使用します。 このメソッドは、バックグラウンド スレッドで最小限の待機時間で入力イベントを受信するために使用できる CoreIndependentInputSource オブジェクトを返します。 このメソッドが呼び出されると、すべての入力がバックグラウンド スレッドにリダイレクトされるため、SwapChainPanel について通常の XAML ポインター入力イベントは発生しません。
SwapChainPanel オブジェクトを作成および更新するためのプロセスを次に示します。
Microsoft Visual Studio で新しいプロジェクトを作成することにより、以下に示して説明するコードに従うことができます。 空のアプリ (C++/WinRT) プロジェクトを作成し、SCPDemo という名前を付けます (以下のコード リストをコピーして貼り付ける場合は、プロジェクトにこの名前を付けることが重要です)。 Windows SDK の最新の一般公開された (プレビュー以外の) バージョンを対象とします。
を開
pch.hき、次のインクルードを既にそこに 追加 します。// pch.h ... #include <d3d11_4.h> #include <d2d1_1.h> #include <windows.ui.xaml.media.dxinterop.h>MainPage クラスでは、最初に Direct 3D デバイス、Direct 2D デバイス、Direct 2D デバイス コンテキストを作成します。 これを行うには、D3D11CreateDevice、D2D1CreateDevice、ID2D1Device::CreateDeviceContext を呼び出します。
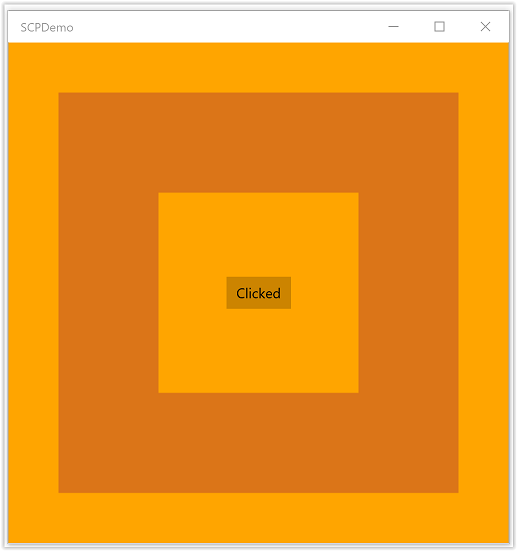
MainPage.idl、MainPage.h、MainPage.cppの内容を次の一覧の内容に置き換えます。// MainPage.idl namespace SCPDemo { [default_interface] runtimeclass MainPage : Windows.UI.Xaml.Controls.Page { MainPage(); } }// MainPage.h #pragma once #include "MainPage.g.h" namespace winrt::SCPDemo::implementation { struct MainPage : MainPageT<MainPage> { MainPage(); void ClickHandler(Windows::Foundation::IInspectable const& sender, Windows::UI::Xaml::RoutedEventArgs const& args); }; } namespace winrt::SCPDemo::factory_implementation { struct MainPage : MainPageT<MainPage, implementation::MainPage> { }; }// MainPage.cpp #include "pch.h" #include "MainPage.h" #include "MainPage.g.cpp" using namespace winrt; using namespace Windows::UI::Xaml; namespace winrt::SCPDemo::implementation { MainPage::MainPage() { InitializeComponent(); } void MainPage::ClickHandler(IInspectable const&, RoutedEventArgs const&) { myButton().Content(box_value(L"Clicked")); uint32_t creationFlags = D3D11_CREATE_DEVICE_BGRA_SUPPORT; D3D_FEATURE_LEVEL featureLevels[] = { D3D_FEATURE_LEVEL_11_1, D3D_FEATURE_LEVEL_11_0, D3D_FEATURE_LEVEL_10_1, D3D_FEATURE_LEVEL_10_0, D3D_FEATURE_LEVEL_9_3, D3D_FEATURE_LEVEL_9_2, D3D_FEATURE_LEVEL_9_1 }; // Create the Direct3D device. winrt::com_ptr<::ID3D11Device> d3dDevice; D3D_FEATURE_LEVEL supportedFeatureLevel; winrt::check_hresult(::D3D11CreateDevice( nullptr, D3D_DRIVER_TYPE_HARDWARE, 0, creationFlags, featureLevels, ARRAYSIZE(featureLevels), D3D11_SDK_VERSION, d3dDevice.put(), &supportedFeatureLevel, nullptr) ); // Get the Direct3D device. winrt::com_ptr<::IDXGIDevice> dxgiDevice{ d3dDevice.as<::IDXGIDevice>() }; // Create the Direct2D device and a corresponding context. winrt::com_ptr<::ID2D1Device> d2dDevice; ::D2D1CreateDevice(dxgiDevice.get(), nullptr, d2dDevice.put()); winrt::com_ptr<::ID2D1DeviceContext> d2dDeviceContext; winrt::check_hresult( d2dDevice->CreateDeviceContext( D2D1_DEVICE_CONTEXT_OPTIONS_NONE, d2dDeviceContext.put() ) ); } }x:Nameを使用して、XAML マークアップを SwapChainPanel 要素にラップします。 ラップされた XAML 要素は、SwapChainPanel の前にレンダリングされます。<!-- MainPage.xaml --> <SwapChainPanel x:Name="swapChainPanel"> <StackPanel Orientation="Horizontal" HorizontalAlignment="Center" VerticalAlignment="Center"> <Button x:Name="myButton" Click="ClickHandler">Click Me</Button> </StackPanel> </SwapChainPanel>この後、次に示すように、同じ名前のアクセサー関数を使用して、その SwapChainPanel オブジェクトにアクセスできます。
次に、IDXGIFactory2::CreateSwapChainForComposition を呼び出して、スワップ チェーンを作成します。
// MainPage.cpp | paste this at the end of MainPage::ClickHandler
// Get the DXGI adapter.
winrt::com_ptr< ::IDXGIAdapter > dxgiAdapter;
dxgiDevice->GetAdapter(dxgiAdapter.put());

// Get the DXGI factory.
winrt::com_ptr< ::IDXGIFactory2 > dxgiFactory;
dxgiFactory.capture(dxgiAdapter, &IDXGIAdapter::GetParent);

DXGI_SWAP_CHAIN_DESC1 swapChainDesc { 0 };
swapChainDesc.Width = 500;
swapChainDesc.Height = 500;
swapChainDesc.Format = DXGI_FORMAT_B8G8R8A8_UNORM; // This is the most common swapchain format.
swapChainDesc.Stereo = false;
swapChainDesc.SampleDesc.Count = 1; // Don't use multi-sampling.
swapChainDesc.SampleDesc.Quality = 0;
swapChainDesc.BufferUsage = DXGI_USAGE_RENDER_TARGET_OUTPUT;
swapChainDesc.BufferCount = 2;
swapChainDesc.Scaling = DXGI_SCALING_STRETCH;
swapChainDesc.SwapEffect = DXGI_SWAP_EFFECT_FLIP_SEQUENTIAL; // We recommend using this swap effect for all applications.
swapChainDesc.Flags = 0;

// Create a swap chain by calling IDXGIFactory2::CreateSwapChainForComposition.
winrt::com_ptr< ::IDXGISwapChain1 > swapChain;
dxgiFactory->CreateSwapChainForComposition(
    d3dDevice.get(),
    &swapChainDesc,
    nullptr,
    swapChain.put());
swapChainPanel という名前の SwapChainPanel から ISwapChainPanelNative を取得します。 ISwapChainPanelNative::SetSwapChain を呼び出して、SwapChainPanel にスワップ チェーンを設定します。
// MainPage.cpp | paste this at the end of MainPage::ClickHandler
// Get native interface for SwapChainPanel
auto panelNative{ swapChainPanel().as<ISwapChainPanelNative>() };

winrt::check_hresult(
    panelNative->SetSwapChain(swapChain.get())
);
最後に、DirectX スワップ チェーンに描画し、それを渡してコンテンツを表示します。
// Create a Direct2D target bitmap associated with the
// swap chain back buffer, and set it as the current target.
D2D1_BITMAP_PROPERTIES1 bitmapProperties =
    D2D1::BitmapProperties1(
        D2D1_BITMAP_OPTIONS_TARGET | D2D1_BITMAP_OPTIONS_CANNOT_DRAW,
        D2D1::PixelFormat(DXGI_FORMAT_B8G8R8A8_UNORM, D2D1_ALPHA_MODE_PREMULTIPLIED),
        96.f,
        96.f
    );

winrt::com_ptr<::IDXGISurface> dxgiBackBuffer;
swapChain->GetBuffer(0, __uuidof(dxgiBackBuffer), dxgiBackBuffer.put_void());

winrt::com_ptr< ::ID2D1Bitmap1 > targetBitmap;
winrt::check_hresult(
    d2dDeviceContext->CreateBitmapFromDxgiSurface(
        dxgiBackBuffer.get(),
        &bitmapProperties,
        targetBitmap.put()
    )
);

d2dDeviceContext->SetTarget(targetBitmap.get());

// Draw using Direct2D context.
d2dDeviceContext->BeginDraw();

d2dDeviceContext->Clear(D2D1::ColorF(D2D1::ColorF::Orange));

winrt::com_ptr<::ID2D1SolidColorBrush> brush;
winrt::check_hresult(d2dDeviceContext->CreateSolidColorBrush(
    D2D1::ColorF(D2D1::ColorF::Chocolate),
    D2D1::BrushProperties(0.8f),
    brush.put()));

D2D1_SIZE_F const size{ 500, 500 };
D2D1_RECT_F const rect{ 100.0f, 100.0f, size.width - 100.0f, size.height - 100.0f };
d2dDeviceContext->DrawRectangle(rect, brush.get(), 100.0f);

d2dDeviceContext->EndDraw();

swapChain->Present(1, 0);
XAML 要素は、Windows ランタイムのレイアウトやレンダリング ロジックから更新が通知されると更新されます。
アプリをビルドして実行できる状態になりました。 ボタンをクリックすると、表示される SwapChainPanel の内容が他の XAML 要素の背後に表示されます。
注意
一般に、DirectX アプリでは、サイズが表示ウィンドウのサイズ (通常は、ほとんどの Microsoft Store ゲームのネイティブの画面解像度) と同じである横方向のスワップ チェーンを作る必要があります。 これにより、表示される XAML オーバーレイがない場合は、アプリで最適なスワップ チェーンの実装が使用されます。 縦モードに回転した場合、アプリは既にあるスワップ チェーンで IDXGISwapChain1::SetRotation を呼び出し、必要に応じてコンテンツに変換を適用して、同じスワップ チェーンで SetSwapChain をもう一度呼び出す必要があります。 同様に、アプリは、IDXGISwapChain::ResizeBuffers 呼び出しによってスワップ チェーンのサイズが変更されるたびに、同じスワップ チェーンで SetSwapChain をもう一度呼び出す必要があります。
関連トピック
フィードバック
以下は間もなく提供いたします。2024 年を通じて、コンテンツのフィードバック メカニズムとして GitHub の issue を段階的に廃止し、新しいフィードバック システムに置き換えます。 詳細については、「https://aka.ms/ContentUserFeedback」を参照してください。
フィードバックの送信と表示