Direct2D デバイス コンテキストを使用してレンダリングする方法
このトピックでは、Windows 8 で Direct2D デバイス コンテキストを作成する方法について説明します。 この情報は、Direct2D を使用して Windows ストア アプリまたはデスクトップ アプリを開発する場合に適用されます。 このトピックでは、Direct2D デバイス コンテキスト オブジェクトの目的、そのオブジェクトの作成方法、および Direct2D プリミティブとイメージのレンダリングと表示に関するステップ バイ ステップ ガイドについて説明します。 また、レンダー ターゲットの切り替えと、アプリへの効果の追加についても説明します。
- Direct2D デバイスとは
- Direct2D デバイス コンテキストとは
- Windows 8 での Direct2D を使用したレンダリング
- デバイス コンテキストを使用してレンダリングする理由
- Direct2D デバイス コンテキストをレンダリング用に作成する方法
- ターゲットの選択
- レンダリングと表示の方法
Direct2D デバイスとは
Direct2D デバイス コンテキストを作成するには、Direct2D デバイスと Direct3D デバイスが必要です。 Direct2D デバイス (ID2D1Device インターフェイス ポインターを公開) は、ディスプレイ アダプターを表します。 Direct3D デバイス (ID3D11Device インターフェイス ポインターを公開) は、Direct2D デバイスに関連付けられています。 各アプリには 1 つの Direct2D デバイスが必要ですが、複数のデバイスがあってもかまいません。
Direct2D デバイス コンテキストとは
Direct2D デバイス コンテキスト (ID2D1DeviceContext インターフェイス ポインターを公開) は、ターゲットにレンダリングするために使用する状態バッファーとコマンド バッファーのセットを表します。 デバイス コンテキストでメソッドを呼び出してパイプラインの状態を設定し、デバイスが所有するリソースを使用してレンダリング コマンドを生成できます。
Windows 8 での Direct2D を使用したレンダリング
Windows 7 以前では、ID2D1HwndRenderTarget または別のレンダー ターゲット インターフェイスを使用して、ウィンドウまたはサーフェスにレンダリングします。 Windows 8 以降では windows ストア アプリでは動作しないため、ID2D1HwndRenderTarget などのインターフェイスに依存するメソッドを使用してレンダリングすることはお勧めしません。 デバイス コンテキストを使用してデスクトップ アプリを作成し、デバイス コンテキストの追加機能を引き続き利用する場合は、Hwnd にレンダリングできます。 ただし、デバイス コンテキストは、 Direct2D を使用して Windows ストア アプリにコンテンツをレンダリングするために必要となります。
デバイス コンテキストを使用してレンダリングする理由
- Windows ストア アプリ用にレンダリングできます。
- レンダー ターゲットは、レンダリングの前後でいつでも変更できます。 デバイス コンテキストは、描画メソッドの呼び出しが順番に実行されることを保証し、レンダリング ターゲットを切り替えるときにそれらを適用します。
- デバイス コンテキストで複数の種類のウィンドウを使用できます。 デバイス コンテキストとDXGI スワップ チェーンを使用して、Windows::UI::Core::CoreWindow または Windows::UI::XAML::SwapChainBackgroundPanel に直接レンダリングできます。
- Direct2D デバイス コンテキストを使用して Direct2D 効果を作成しイメージ効果または効果グラフの出力をレンダー ターゲットにレンダリングできます。
- 複数のデバイス コンテキストを持つことができます。スレッド アプリのパフォーマンスを向上させるのに役立ちます。 詳細については、「マルチスレッド Direct2D アプリ」を参照してください。
- デバイス コンテキストは Direct3D と密接に相互運用され、Direct3D オプションへのアクセスが増えます。
Direct2D デバイス コンテキストをレンダリング用に作成する方法
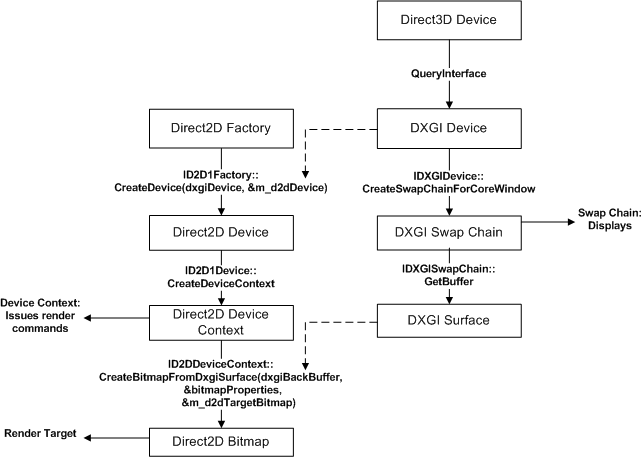
このコードは、Direct3D11 デバイスの作成、関連付けられている DXGI デバイスの取得、Direct2D デバイスの作成、最後にレンダリング用の Direct2D デバイス コンテキスト を作成する方法を示します。
このコードで使用されるメソッド呼び出しとインターフェイスの図を次に示します。

Note
このコードでは、既に ID2D1Factory1 オブジェクトがあることを前提としています。詳細については、「ID2D1Factory リファレンス ページ」を参照してください。
    // This flag adds support for surfaces with a different color channel ordering than the API default.
    // You need it for compatibility with Direct2D.
    UINT creationFlags = D3D11_CREATE_DEVICE_BGRA_SUPPORT;

    // This array defines the set of DirectX hardware feature levels this app  supports.
    // The ordering is important and you should  preserve it.
    // Don't forget to declare your app's minimum required feature level in its
    // description.  All apps are assumed to support 9.1 unless otherwise stated.
    D3D_FEATURE_LEVEL featureLevels[] =
    {
        D3D_FEATURE_LEVEL_11_1,
        D3D_FEATURE_LEVEL_11_0,
        D3D_FEATURE_LEVEL_10_1,
        D3D_FEATURE_LEVEL_10_0,
        D3D_FEATURE_LEVEL_9_3,
        D3D_FEATURE_LEVEL_9_2,
        D3D_FEATURE_LEVEL_9_1
    };

    // Create the DX11 API device object, and get a corresponding context.
    ComPtr<ID3D11Device> device;
    ComPtr<ID3D11DeviceContext> context;

    DX::ThrowIfFailed(
        D3D11CreateDevice(
            nullptr,                    // specify null to use the default adapter
            D3D_DRIVER_TYPE_HARDWARE,
            0,
            creationFlags,              // optionally set debug and Direct2D compatibility flags
            featureLevels,              // list of feature levels this app can support
            ARRAYSIZE(featureLevels),   // number of possible feature levels
            D3D11_SDK_VERSION,
            &device,                    // returns the Direct3D device created
            &m_featureLevel,            // returns feature level of device created
            &context                    // returns the device immediate context
            )
        );

    ComPtr<IDXGIDevice> dxgiDevice;
    // Obtain the underlying DXGI device of the Direct3D11 device.
    DX::ThrowIfFailed(
        device.As(&dxgiDevice)
        );

    // Obtain the Direct2D device for 2-D rendering.
    DX::ThrowIfFailed(
        m_d2dFactory->CreateDevice(dxgiDevice.Get(), &m_d2dDevice)
        );

    // Get Direct2D device's corresponding device context object.
    DX::ThrowIfFailed(
        m_d2dDevice->CreateDeviceContext(
            D2D1_DEVICE_CONTEXT_OPTIONS_NONE,
            &m_d2dContext
            )
        );
前のコード サンプルの手順を見てみましょう。
デバイス コンテキストを作成するために必要な ID3D11Device インターフェイス ポインターを取得します。
作成フラグを宣言して、BGRA サポート用に Direct3D デバイスを設定します。 Direct2D には BGRA の色順が必要です。
アプリでサポートされる機能レベルのセットを表す D3D_FEATURE_LEVEL エントリの配列を宣言します。
Note
Direct3D は、ホスト システムでサポートされている機能レベルが見つかるまで、リストを検索します。
D3D11CreateDevice 関数を使用して ID3D11Device オブジェクトを作成します。この関数は ID3D11DeviceContext オブジェクトも返しますが、この例ではそのオブジェクトは必要ありません。
DXGI デバイス インターフェイスについて、Direct3D 11 デバイスに対してクエリを実行します。
ID2D1Device オブジェクトを作成するには、ID2D1Factory::CreateDevice メソッドを呼び出し、IDXGIDevice オブジェクトを渡します。
ID2D1Device::CreateDeviceContext メソッドを使用して、ID2D1DeviceContext ポインターを作成します。
ターゲットの選択
次のコードは、ウィンドウ バック バッファーの 2 次元 Direct3D テクスチャを取得し、Direct2D デバイス コンテキストがレンダリングされるこのテクスチャにリンクするビットマップ ターゲットを作成する方法を示します。
        // Allocate a descriptor.
        DXGI_SWAP_CHAIN_DESC1 swapChainDesc = {0};
        swapChainDesc.Width = 0;                           // use automatic sizing
        swapChainDesc.Height = 0;
        swapChainDesc.Format = DXGI_FORMAT_B8G8R8A8_UNORM; // this is the most common swapchain format
        swapChainDesc.Stereo = false;
        swapChainDesc.SampleDesc.Count = 1;                // don't use multi-sampling
        swapChainDesc.SampleDesc.Quality = 0;
        swapChainDesc.BufferUsage = DXGI_USAGE_RENDER_TARGET_OUTPUT;
        swapChainDesc.BufferCount = 2;                     // use double buffering to enable flip
        swapChainDesc.Scaling = DXGI_SCALING_NONE;
        swapChainDesc.SwapEffect = DXGI_SWAP_EFFECT_FLIP_SEQUENTIAL; // all apps must use this SwapEffect
        swapChainDesc.Flags = 0;

        // Identify the physical adapter (GPU or card) this device is runs on.
        ComPtr<IDXGIAdapter> dxgiAdapter;
        DX::ThrowIfFailed(
            dxgiDevice->GetAdapter(&dxgiAdapter)
            );

        // Get the factory object that created the DXGI device.
        ComPtr<IDXGIFactory2> dxgiFactory;
        DX::ThrowIfFailed(
            dxgiAdapter->GetParent(IID_PPV_ARGS(&dxgiFactory))
            );

        // Get the final swap chain for this window from the DXGI factory.
        DX::ThrowIfFailed(
            dxgiFactory->CreateSwapChainForCoreWindow(
                device.Get(),
                reinterpret_cast<IUnknown*>(m_window),
                &swapChainDesc,
                nullptr,    // allow on all displays
                &m_swapChain
                )
            );

        // Ensure that DXGI doesn't queue more than one frame at a time.
        DX::ThrowIfFailed(
            dxgiDevice->SetMaximumFrameLatency(1)
            );

    // Get the backbuffer for this window which is be the final 3D render target.
    ComPtr<ID3D11Texture2D> backBuffer;
    DX::ThrowIfFailed(
        m_swapChain->GetBuffer(0, IID_PPV_ARGS(&backBuffer))
        );

    // Now we set up the Direct2D render target bitmap linked to the swapchain.
    // Whenever we render to this bitmap, it is directly rendered to the
    // swap chain associated with the window.
    D2D1_BITMAP_PROPERTIES1 bitmapProperties =
        BitmapProperties1(
            D2D1_BITMAP_OPTIONS_TARGET | D2D1_BITMAP_OPTIONS_CANNOT_DRAW,
            PixelFormat(DXGI_FORMAT_B8G8R8A8_UNORM, D2D1_ALPHA_MODE_IGNORE),
            m_dpi,
            m_dpi
            );

    // Direct2D needs the dxgi version of the backbuffer surface pointer.
    ComPtr<IDXGISurface> dxgiBackBuffer;
    DX::ThrowIfFailed(
        m_swapChain->GetBuffer(0, IID_PPV_ARGS(&dxgiBackBuffer))
        );

    // Get a D2D surface from the DXGI back buffer to use as the D2D render target.
    DX::ThrowIfFailed(
        m_d2dContext->CreateBitmapFromDxgiSurface(
            dxgiBackBuffer.Get(),
            &bitmapProperties,
            &m_d2dTargetBitmap
            )
        );

    // Now we can set the Direct2D render target.
    m_d2dContext->SetTarget(m_d2dTargetBitmap.Get());
前のコード サンプルの手順を見てみましょう。
DXGI_SWAP_CHAIN_DESC1 構造体を割り当て、スワップ チェーンの設定を定義します。
これらの設定は、Windows ストア アプリが使用できるスワップ チェーンを作成する方法の例を示しています。
Direct3D デバイスおよび DXGI デバイスが実行されているアダプターを取得し、それらに関連付けられている IDXGIFactory オブジェクトを取得します。 この DXGI ファクトリを使用して、スワップ チェーンが同じアダプターに作成されるようにする必要があります。
IDXGIFactory2::CreateSwapChainForCoreWindow メソッドを呼び出して、スワップ チェーンを作成します。 Windows ストア アプリのメイン ウィンドウには、Windows::UI::CoreWindow クラスを使用します。
電力消費量を最小限に抑えるには、フレームの最大待機時間を 1 に設定します。
Windows ストア アプリで Direct2D コンテンツをレンダリングする場合は、CreateSwapChainForComposition メソッドを参照してください。
スワップ チェーンからバック バッファーを取得します。 バック バッファーは、スワップ チェーンによって割り当てられた ID3D11Texture2D インターフェイスを公開します
D2D1_BITMAP_PROPERTIES1 構造体を宣言し、プロパティ値を設定します。 ピクセル形式を BGRA に設定します。これは、Direct3D デバイス および DXGI デバイス を使用する形式であるためです。
Direct2D に渡す IDXGISurface としてバック バッファーを取得します。 Direct2D では、ID3D11Texture2D を直接受け入れられません。
ID2D1DeviceContext::CreateBitmapFromDxgiSurface メソッドを使用して、バック バッファーから ID2D1Bitmap オブジェクトを作成します。
これで、Direct2D ビットマップがバック バッファーにリンクされます。 Direct2D デバイス コンテキストのターゲットを bitmap に設定します。
レンダリングと表示の方法
これでターゲット ビットマップが作成されたので、Direct2D デバイス コンテキストを使用してプリミティブ、イメージ、画像効果、テキストを描画できます。 次のコードは、四角形を描画する方法を示しています。
ComPtr<ID2D1SolidColorBrush> pBlackBrush;
DX::ThrowIfFailed(
m_d2dContext->CreateSolidColorBrush(
D2D1::ColorF(D2D1::ColorF::Black),
&pBlackBrush
)
);
m_d2dContext->BeginDraw();
m_d2dContext->DrawRectangle(
D2D1::RectF(
rc.left + 100.0f,
rc.top + 100.0f,
rc.right - 100.0f,
rc.bottom - 100.0f),
pBlackBrush);
DX::ThrowIfFailed(
m_d2dContext->EndDraw()
);
DX::ThrowIfFailed(
m_swapChain->Present1(1, 0, ¶meters);
);
前のコード サンプルの手順を見てみましょう。
- CreateSolidColorBrush を呼び出して、四角形を塗りつぶすブラシを作成します。
- 描画コマンドを発行する前に、BeginDraw メソッドを呼び出します。
- DrawRectangle メソッドを呼び出して、描画する四角形とブラシを指定します。
- 描画コマンドの発行が完了したら、EndDraw メソッドを呼び出します。
- IDXGISwapChain::P resent メソッドを呼び出して結果を表示します。
これで、Direct2D デバイス コンテキストを使用してプリミティブ、画像、画像効果、テキストを画面に描画できます。