შენიშვნა
ამ გვერდზე წვდომა მოითხოვს ავტორიზაციას. შეგიძლიათ სცადოთ შესვლა ან შეცვალოთ დირექტორიები.
ამ გვერდზე წვდომა მოითხოვს ავტორიზაციას. შეგიძლიათ სცადოთ დირექტორიების შეცვლა.
This article explains how you can configure continuous deployment (CD) to Azure App Service by pulling in updates from GitHub, Bitbucket, Azure Repos, or other repositories.
Prerequisites
Write permissions on an Azure App Service app in a source-control repository.
Prepare your repository
To get automated builds from the App Service build server, make sure that your repository root has the correct files in your project.
| Runtime | Root directory files |
|---|---|
| ASP.NET (Windows only) | *.sln, *.csproj, or default.aspx. |
| ASP.NET Core | *.sln or *.csproj. |
| PHP | index.php. |
| Ruby (Linux only) | Gemfile. |
| Node.js | server.js, app.js, or package.json with a start script. |
| Python | *.py, requirements.txt, or runtime.txt. |
| HTML | default.htm, default.html, default.asp, index.htm, index.html, or iisstart.htm. |
| WebJobs | <job_name>/run.<extension> under App_Data/jobs/continuous for continuous WebJobs, or App_Data/jobs/triggered for triggered WebJobs. For more information, see Kudu WebJobs documentation. |
| Functions | See Continuous deployment for Azure Functions. |
To customize your deployment, include a .deployment file in the repository root. For more information, see Customize deployments and Custom deployment script.
Tip
Visual Studio can create a repository for you. With this method, your project is immediately ready for deployment via Git.
Enable continuous deployment
In the Azure portal, go to the page for your App Service app and select Deployment Center from the left navigation menu.
On the Settings tab under Source, select your source control repository type.
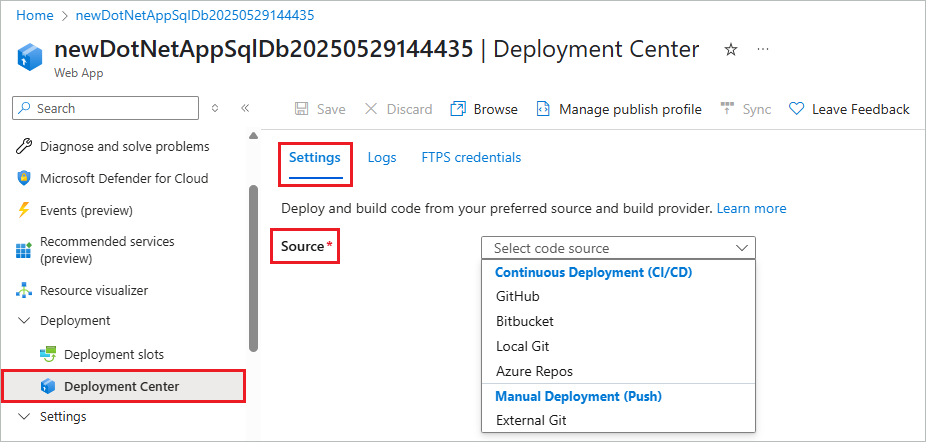
Follow the instructions for your source type to configure the deployment.
All listed sources can build with App Service Build Service. Some sources can also build with GitHub Actions or Azure Pipelines. For more information, see Build providers.
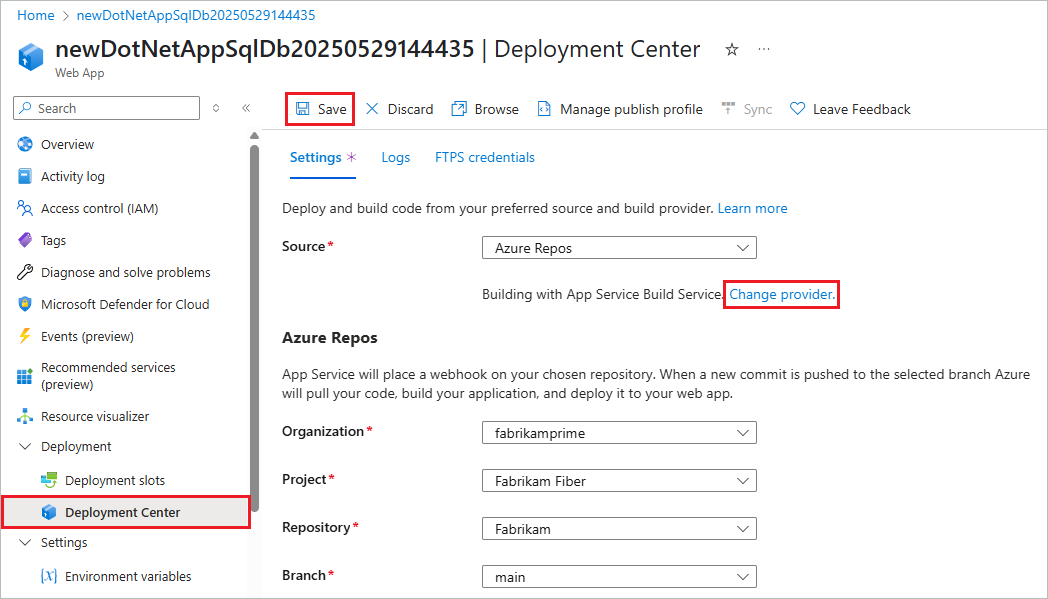
GitHub Actions is the default GitHub build provider. To change the provider, select Change provider, select App Service Build Service or Azure Pipelines, and then select OK.
If necessary, select Authorize and follow the authorization prompts for GitHub. To deploy from another user's repository, select Change Account.
Select the appropriate GitHub Organization, Repository, and Branch.
If you can't find an organization or repository, you might need to enable more permissions on GitHub. For more information, see Managing access to your organization's repositories.
Under Authentication type, select User-assigned identity for better security.
If your Azure account has the required permissions, App Service creates a user-assigned managed identity for you, or you can choose an existing managed identity. If you don't have the required permissions, work with your Azure administrator to create an identity with the required role on your app, and then select it in the dropdown.
App Service selects a workflow template based on your app's language stack setting and commits it into your selected GitHub repository. You can optionally select Preview file to see the workflow file before saving your changes.
Select Save.
New commits in the selected repository and branch now deploy continuously into your App Service app. You can track the commits and deployments on the Logs tab.
Disable continuous deployment
To disable continuous deployment for a connected source:
In the Azure portal, go to the page for your App Service app and select Deployment Center from the left navigation menu.
On the Settings tab, select Disconnect.
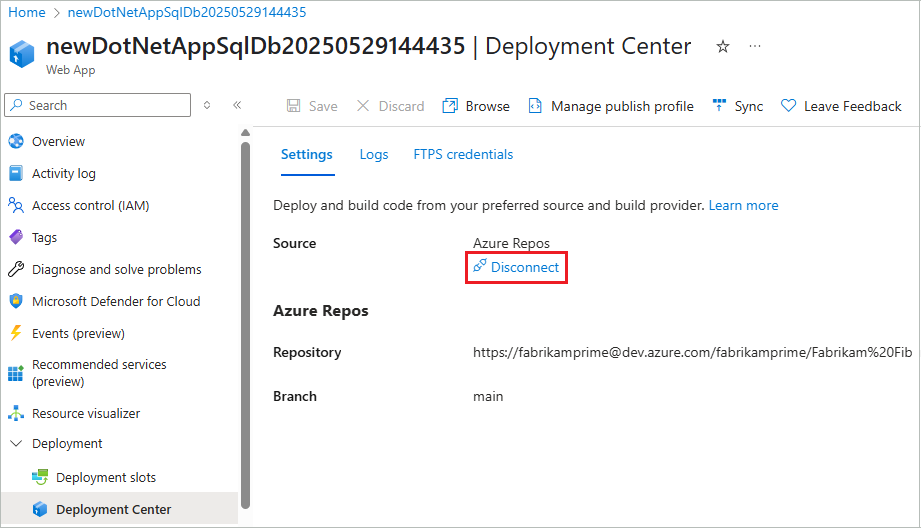
Select OK.
For GitHub, the workflow file remains in the repository by default, but you no longer see the integrated progress on the Logs tab of the Deployment Center.
What are the build providers?
Build providers help you build a continuous integration and continuous delivery (CI/CD) solution with Azure App Service by automating build, test, and deployment. Some deployment sources offer several build provider options. All listed sources can build with App Service Build Service.
You're not limited to the listed build provider options, but App Service helps you quickly set up the listed options and start getting integrated deployment logging.
GitHub Actions
The GitHub Actions build provider is available only for GitHub source and is the default for GitHub deployments. The build provider sets up CI/CD by depositing a GitHub Actions workflow file into your GitHub repository that handles App Service build and deployment tasks.
For basic authentication, the GitHub Actions build provider adds the publish profile for your app as a GitHub secret. The workflow file uses this secret to authenticate with App Service.
For user-assigned identity, App Service enables the recommended Microsoft OpenID Connect authentication and configures the necessary resources in Azure and GitHub. For more information, see What does the user-assigned identity option do for GitHub Actions?
The GitHub Actions build provider captures information from the workflow run logs and displays it on the Logs tab in the app's Deployment Center.
You can customize the GitHub Actions build provider in several ways:
- Customize the workflow file after it generates in your GitHub repository. For more information, see Workflow syntax for GitHub Actions. Deploy the customized workflow to App Service with the
azure/webapps-deployaction. - If the selected branch is protected, preview the workflow file without saving the configuration. Customize the file, and then manually add it to your repository. This method doesn't give you log integration with the Azure portal.
- Deploy by using a Microsoft Entra ID service principal instead of using basic authentication or a user-assigned identity. You can't configure this method in the portal.
App Service build service
The App Service build service is the native App Service deployment and build engine. When you select this option, App Service adds a webhook into the repository you authorized. Any code push to the repository triggers the webhook, and App Service pulls in the changes and does any deployment tasks. For more information, see Deploying from GitHub (Kudu).
The App Service build service requires Source Control Manager (SCM) basic authentication for the webhook to work. Basic authentication is less secure than other authentication methods. For more information, see:
- Project Kudu
- Investigate common problems with continuous deployment
- Deploy without basic authentication
Azure Pipelines
Azure Pipelines is the build component of Azure DevOps. You can configure a pipeline to build, test, and deploy your app to App Service from any supported source repository.
To use Azure Pipelines as the build provider, select the Azure Pipelines option in App Service Deployment Center, then go directly to Azure DevOps to configure the pipeline. For more information, see Deploy to App Service using Azure Pipelines.
Frequently asked questions
- How does the GitHub Actions build provider work if basic authentication is disabled?
- What happens to my app during deployment that can cause failure or unpredictable behavior?
- What does the user-assigned identity option do for GitHub Actions?
- Why do I see the error "You do not have sufficient permissions on this app to assign role-based access to a managed identity and configure federated credentials"?
- Why do I see the error "This identity does not have write permissions on this app. Please select a different identity, or work with your admin to grant the Website Contributor role to your identity on this app"?
How does the GitHub Actions build provider work if basic authentication is disabled?
The GitHub Actions build provider doesn't work with basic authentication if basic authentication is disabled. Try using GitHub Actions with the user-assigned identity option instead. For more information, see Deploy without basic authentication.
What happens to my app during deployment that can cause failure or unpredictable behavior?
Officially supported deployment methods make changes to files in the /home/site/wwwroot folder that are used to run your app. The deployment can fail because of locked files. The app might also behave unpredictably during deployment if the files aren't all updated at the same time, which is undesirable for a customer-facing app.
There are a few ways to avoid these problems.
- Run your app directly from the ZIP package without unpacking it.
- Stop your app or enable offline mode during deployment. For more information, see Deal with locked files during deployment.
- Deploy to a staging slot with auto swap turned on.
What does the user-assigned identity option do for GitHub Actions?
When you select User-assigned identity for GitHub source, App Service configures all the necessary resources in Azure and GitHub. App Service enables the recommended Microsoft OpenID Connect authentication with GitHub Actions.
Specifically, App Service does the following operations:
- Creates a federated credential between a user-assigned managed identity in Azure and your selected repository and branch in GitHub.
- Creates the secrets
AZURE_CLIENT_ID,AZURE_TENANT_ID, andAZURE_SUBSCRIPTION_IDfrom the federated credential in your selected GitHub repository. - Assigns the identity to your app.
You can then use the Azure/login action in a GitHub Actions workflow in your GitHub repository to authenticate with your app by using OpenID Connect. For examples, see Add the workflow file to your GitHub repository.
If your Azure account has the required permissions, App Service creates a user-assigned managed identity and configures it for you. This identity isn't shown on the Identity page of your app. If your Azure account doesn't have the required permissions, you must select an existing identity with the required role.
Why do I see the error "You do not have sufficient permissions on this app to assign role-based access to a managed identity and configure federated credentials"?
The message indicates that your Azure account doesn't have the required permissions to create a user-assigned managed identity for GitHub Actions. You need the following permissions, scoped to your app:
Microsoft.Authorization/roleAssignments/writeMicrosoft.ManagedIdentity/userAssignedIdentities/write
By default, the Azure User Access Administrator and Owner roles have these permissions, but the Contributor role doesn't. If you don't have the required permissions, work with your Azure administrator to create a user-assigned managed identity that has the Websites Contributor role. You can then select that identity in the Identity dropdown list for GitHub source in the App Service Deployment Center.
For more information on using alternative steps, see Deploy to App Service using GitHub Actions.
Why do I see the error "This identity does not have write permissions on this app. Please select a different identity, or work with your admin to grant the Website Contributor role to your identity on this app"?
The message indicates that the selected user-assigned managed identity doesn't have the required role to [enable OpenID Connect]((#what-does-the-user-assigned-identity-option-do-for-github-actions) between the GitHub repository and the App Service app. The identity must have Owner, Contributor, or Websites Contributor role on the app. The least privileged role that the identity needs is Websites Contributor.