작성자: 스콧 미첼
GridView 컨트롤은 새 데이터 레코드 삽입에 대한 기본 제공 지원을 제공하지 않지만, 이 자습서에서는 삽입 인터페이스를 포함하도록 GridView를 보강하는 방법을 보여줍니다.
소개
데이터 삽입, 업데이트 및 삭제 개요 자습서에서 설명한 대로 GridView, DetailsView 및 FormView 웹 컨트롤에는 각각 기본 제공 데이터 수정 기능이 포함됩니다. 선언적 데이터 소스 컨트롤과 함께 사용할 경우 이러한 세 가지 웹 컨트롤을 빠르고 쉽게 구성하여 데이터를 수정할 수 있으며, 시나리오에서는 한 줄의 코드를 작성할 필요 없이 사용할 수 있습니다. 그러나 DetailsView 및 FormView 컨트롤만 기본 제공 삽입, 편집 및 삭제 기능을 제공합니다. GridView는 편집 및 삭제 지원만 제공합니다. 그러나 약간의 노력을 기울이면 삽입 인터페이스를 포함하도록 GridView를 확장할 수 있습니다.
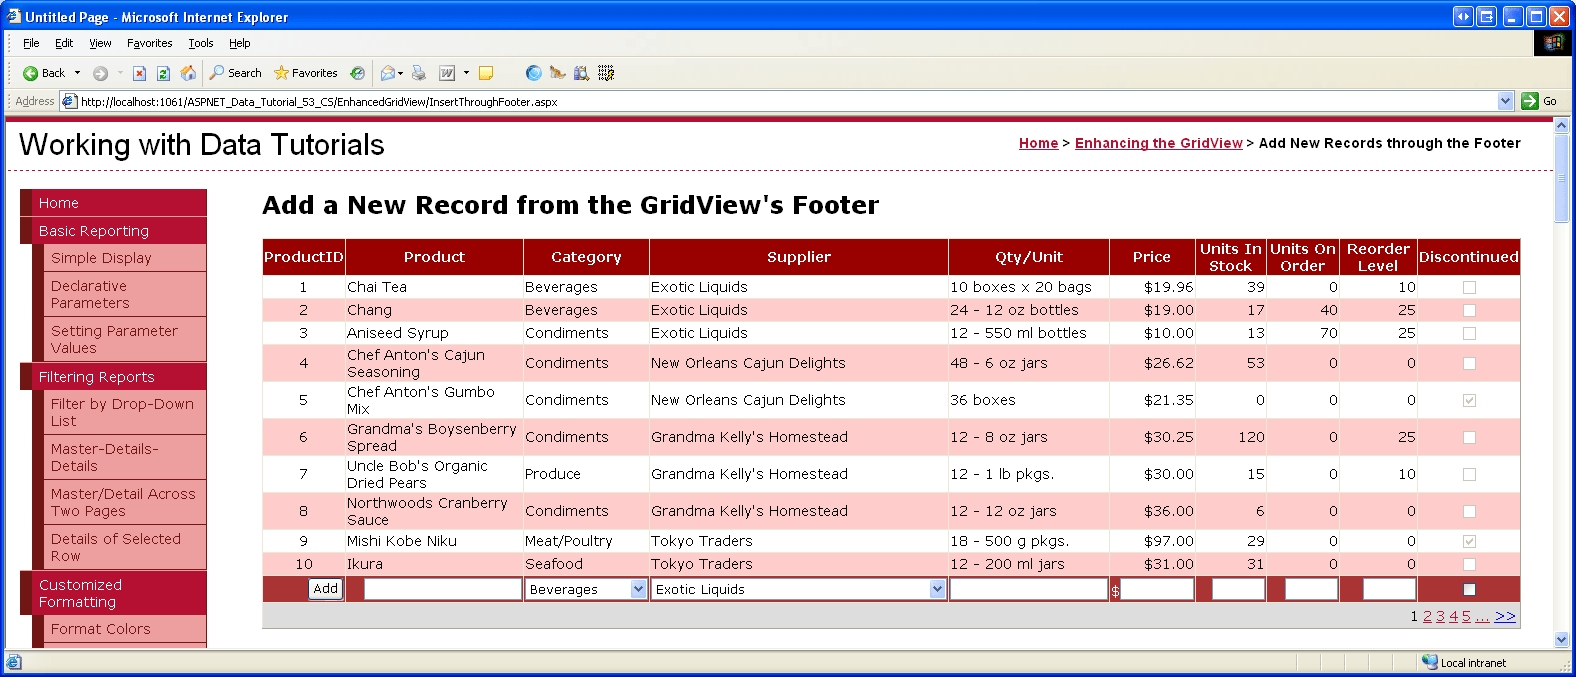
GridView에 삽입 기능을 추가할 때 새 레코드를 추가하는 방법을 결정하고, 삽입 인터페이스를 만들고, 새 레코드를 삽입하는 코드를 작성해야 합니다. 이 자습서에서는 GridView의 바닥글 행에 삽입 인터페이스를 추가하는 방법을 살펴봅니다(그림 1 참조). 각 열의 바닥글 셀에는 적절한 데이터 컬렉션 사용자 인터페이스 요소(제품 이름에 대한 TextBox, 공급업체의 DropDownList 등)가 포함됩니다. 추가 버튼에 대한 열도 필요합니다. 이 버튼을 클릭하면 포스트백이 발생하여 바닥글 행에서 제공된 값을 사용해 Products 테이블에 새 레코드를 삽입합니다.

그림 1: 바닥글 행은 새 제품을 추가하기 위한 인터페이스를 제공합니다(전체 크기 이미지를 보려면 클릭).
1단계: GridView에 제품 정보 표시
GridView의 바닥글에 삽입 인터페이스를 만드는 것을 고려하기 전에 먼저 데이터베이스의 제품을 나열하는 페이지에 GridView를 추가하는 데 집중해 보겠습니다. 먼저 InsertThroughFooter.aspx 폴더에서 EnhancedGridView 페이지를 열고 도구 상자에서 GridView를 디자이너에 끌어 GridView의 ID 속성을 Products로 설정합니다. 다음으로 GridView의 스마트 태그를 사용하여 새 ObjectDataSource에 ProductsDataSource바인딩합니다.

그림 2: 명명된 ProductsDataSource 새 ObjectDataSource 만들기(전체 크기 이미지를 보려면 클릭)
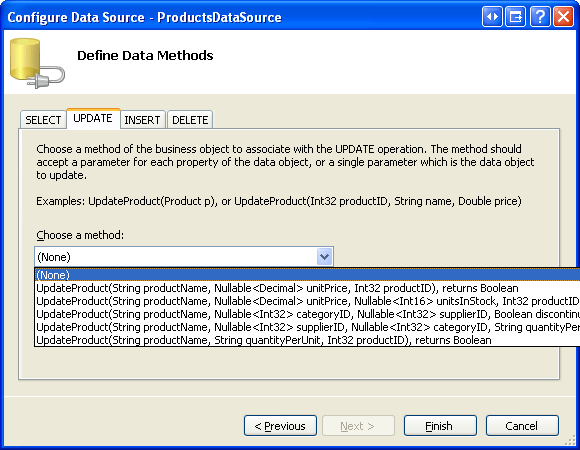
ProductsBLL 클래스를 사용하여 GetProducts() 메서드로 제품 정보를 검색하도록 ObjectDataSource를 구성합니다. 이 자습서에서는 삽입 기능을 추가하는 데 중점을 두고 편집 및 삭제에 대해 걱정하지 않도록 하겠습니다. 따라서 INSERT 탭의 드롭다운 목록이 설정 AddProduct() 되고 UPDATE 및 DELETE 탭의 드롭다운 목록이 (없음)으로 설정되어 있는지 확인합니다.

그림 3: ObjectDataSource 메서드 AddProduct 에 메서드 매핑Insert()(전체 크기 이미지를 보려면 클릭)

그림 4: UPDATE 및 DELETE 탭 Drop-Down 목록을 (없음)으로 설정(전체 크기 이미지를 보려면 클릭)
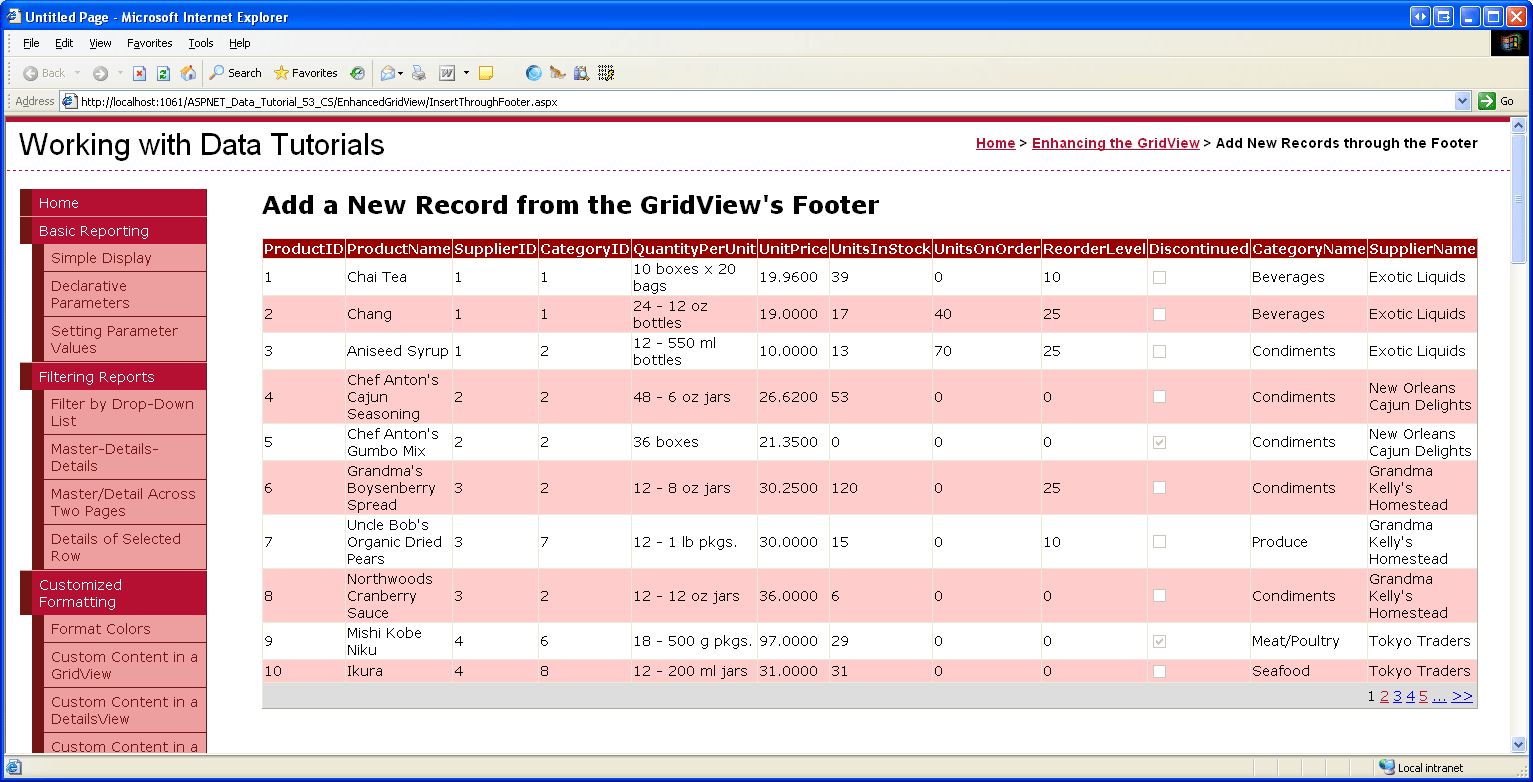
ObjectDataSource의 데이터 원본 구성 마법사를 완료한 후 Visual Studio는 해당 데이터 필드 각각에 대한 필드를 GridView에 자동으로 추가합니다. 지금은 Visual Studio에서 추가한 모든 필드를 그대로 둡니다. 이 자습서의 뒷부분에서 새 레코드를 추가할 때 값을 지정할 필요가 없는 필드 중 일부를 제거합니다.
데이터베이스에 80개에 가까운 제품이 있으므로 사용자는 새 레코드를 추가하기 위해 웹 페이지 맨 아래로 스크롤해야 합니다. 따라서 페이징을 사용하도록 설정하여 삽입 인터페이스를 더 잘 표시하고 액세스할 수 있도록 하겠습니다. 페이징을 켜려면 GridView의 스마트 태그에서 페이징 사용 확인란을 선택하기만 하면됩니다.
이 시점에서 GridView 및 ObjectDataSource의 선언적 태그는 다음과 유사하게 표시됩니다.
<asp:GridView ID="Products" runat="server" AutoGenerateColumns="False"
    DataKeyNames="ProductID" DataSourceID="ProductsDataSource"
    AllowPaging="True" EnableViewState="False">
    <Columns>
        <asp:BoundField DataField="ProductID" HeaderText="ProductID"
            InsertVisible="False" ReadOnly="True"
            SortExpression="ProductID" />
        <asp:BoundField DataField="ProductName" HeaderText="ProductName"
            SortExpression="ProductName" />
        <asp:BoundField DataField="SupplierID" HeaderText="SupplierID"
            SortExpression="SupplierID" />
        <asp:BoundField DataField="CategoryID" HeaderText="CategoryID"
            SortExpression="CategoryID" />
        <asp:BoundField DataField="QuantityPerUnit" HeaderText="QuantityPerUnit"
            SortExpression="QuantityPerUnit" />
        <asp:BoundField DataField="UnitPrice" HeaderText="UnitPrice"
            SortExpression="UnitPrice" />
        <asp:BoundField DataField="UnitsInStock" HeaderText="UnitsInStock"
            SortExpression="UnitsInStock" />
        <asp:BoundField DataField="UnitsOnOrder" HeaderText="UnitsOnOrder"
            SortExpression="UnitsOnOrder" />
        <asp:BoundField DataField="ReorderLevel" HeaderText="ReorderLevel"
            SortExpression="ReorderLevel" />
        <asp:CheckBoxField DataField="Discontinued" HeaderText="Discontinued"
            SortExpression="Discontinued" />
        <asp:BoundField DataField="CategoryName" HeaderText="CategoryName"
            ReadOnly="True" SortExpression="CategoryName" />
        <asp:BoundField DataField="SupplierName" HeaderText="SupplierName"
            ReadOnly="True" SortExpression="SupplierName" />
    </Columns>
</asp:GridView>
<asp:ObjectDataSource ID="ProductsDataSource" runat="server"
    InsertMethod="AddProduct" OldValuesParameterFormatString="original_{0}"
    SelectMethod="GetProducts" TypeName="ProductsBLL">
    <InsertParameters>
        <asp:Parameter Name="productName" Type="String" />
        <asp:Parameter Name="supplierID" Type="Int32" />
        <asp:Parameter Name="categoryID" Type="Int32" />
        <asp:Parameter Name="quantityPerUnit" Type="String" />
        <asp:Parameter Name="unitPrice" Type="Decimal" />
        <asp:Parameter Name="unitsInStock" Type="Int16" />
        <asp:Parameter Name="unitsOnOrder" Type="Int16" />
        <asp:Parameter Name="reorderLevel" Type="Int16" />
        <asp:Parameter Name="discontinued" Type="Boolean" />
    </InsertParameters>
</asp:ObjectDataSource>

그림 5: 모든 제품 데이터 필드가 Paged GridView에 표시됩니다(전체 크기 이미지를 보려면 클릭).
2단계: 바닥글 행 추가
GridView에는 머리글 및 데이터 행과 함께 바닥글 행이 포함됩니다. 머리글 및 바닥글 행은 GridView ShowHeader 및 ShowFooter 속성의 값에 따라 표시됩니다. 바닥글 행을 표시하려면 ShowFooter 속성을 true으로 설정하기만 하면 됩니다. 그림 6에서 알 수 있듯이 표에 ShowFooter 바닥글 행을 추가하도록 true 속성을 설정합니다.
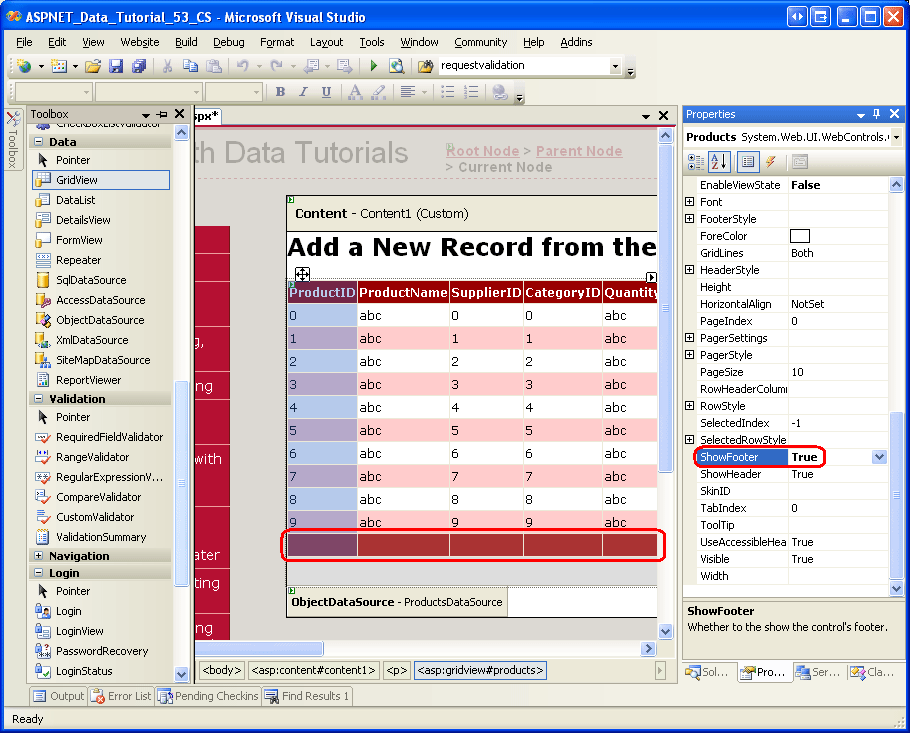
그림 6: 바닥글 행을 표시하려면 ShowFooter을 True로 설정하십시오 (전체 크기 이미지 보기 클릭).
바닥글 행의 배경색은 진한 빨간색입니다. 이는 ObjectDataSource를 사용하여 데이터 표시 자습서에서 만든 DataWebControls 테마를 다시 모든 페이지에 적용했기 때문입니다. 특히 GridView.skin 파일은 FooterStyle 속성을 FooterStyle CSS 클래스를 사용하는 것으로 구성합니다.
FooterStyle 클래스는 Styles.css에서 다음과 같이 정의됩니다.
.FooterStyle
{
    background-color: #a33;
    color: White;
    text-align: right;
}
비고
이전 자습서에서는 GridView의 바닥글 행을 사용하여 살펴보았습니다. 필요한 경우 GridView의 바닥글에 요약 정보를 표시하는 자습서를 다시 참조하여 복습하세요.
속성을 ShowFooter에 true로 설정한 후에 잠깐 동안 브라우저에서 출력을 확인하십시오. 현재 바닥글 행에는 텍스트 또는 웹 컨트롤이 없습니다. 3단계에서는 적절한 삽입 인터페이스를 포함할 수 있도록 각 GridView 필드의 바닥글을 수정합니다.
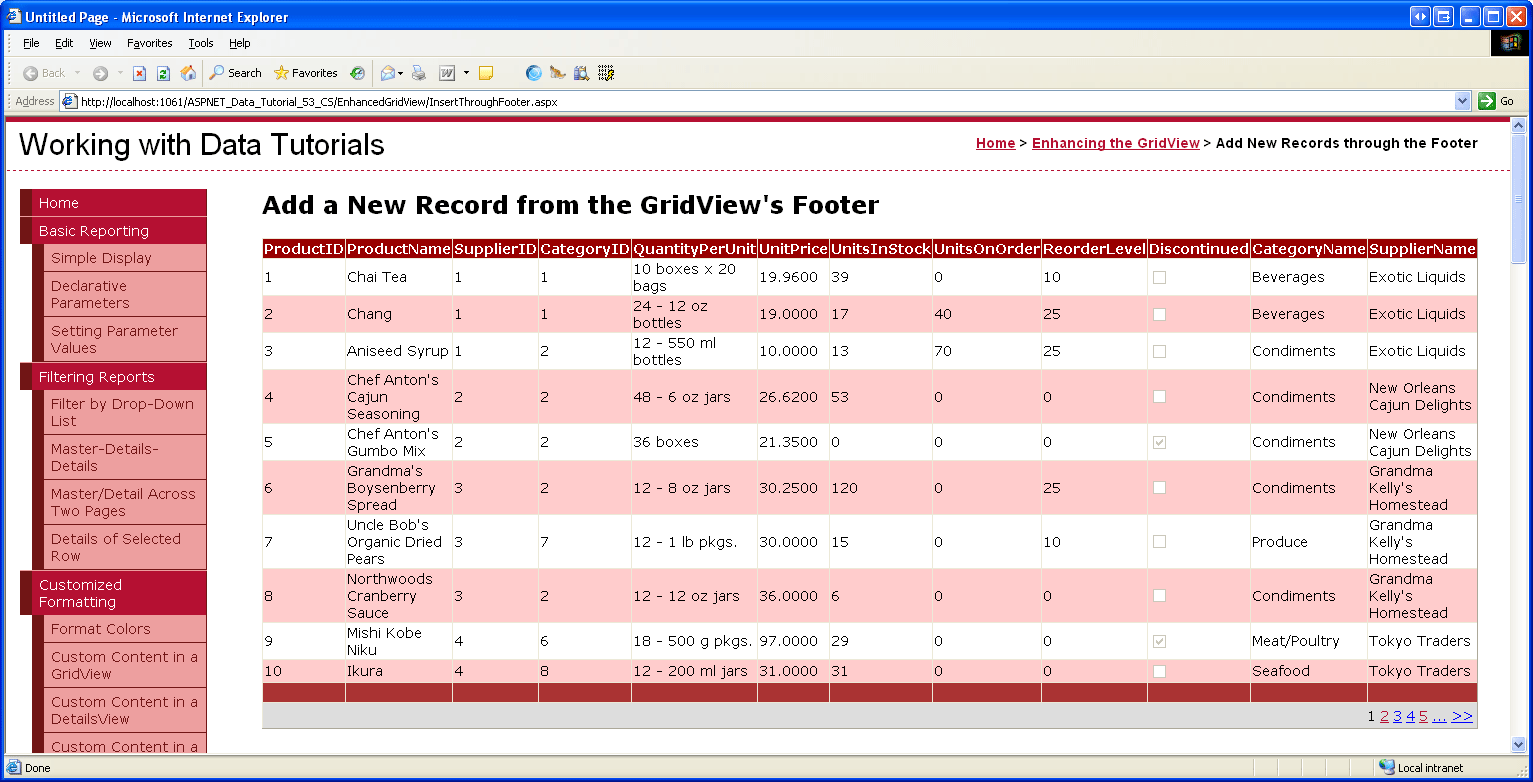
그림 7: 빈 바닥글 행이 페이징 인터페이스 컨트롤 위에 표시됩니다(전체 크기 이미지를 보려면 클릭).
3단계: 바닥글 행 사용자 지정
GridView 컨트롤 자습서의 TemplateFields 사용 자습서에서는 TemplateFields를 사용하여 특정 GridView 열의 표시를 크게 사용자 지정하는 방법을 알아보았습니다(BoundFields 또는 CheckBoxFields와 반대). 데이터 수정 인터페이스 사용자 지정에서 TemplateFields를 사용하여 GridView에서 편집 인터페이스를 사용자 지정하는 방법을 살펴보았습니다. TemplateField는 특정 유형의 행에 사용되는 태그, 웹 컨트롤 및 데이터 바인딩 구문의 혼합을 정의하는 여러 템플릿으로 구성됩니다.
ItemTemplate예를 들어 읽기 전용 행에 사용되는 템플릿을 지정하고 EditItemTemplate 편집 가능한 행에 대한 템플릿을 정의합니다.
ItemTemplate 및 EditItemTemplate과 함께 TemplateField에는 바닥글 행의 콘텐츠를 지정하는 FooterTemplate도 포함됩니다. 따라서 각 필드의 삽입 인터페이스에 필요한 웹 컨트롤을 FooterTemplate에 추가할 수 있습니다. 시작하려면 GridView의 모든 필드를 TemplateFields로 변환합니다. 이 작업은 GridView의 스마트 태그에서 열 편집 링크를 클릭하고, 왼쪽 아래 모서리에 있는 각 필드를 선택하고, 이 필드를 TemplateField 링크로 변환을 클릭하여 수행할 수 있습니다.
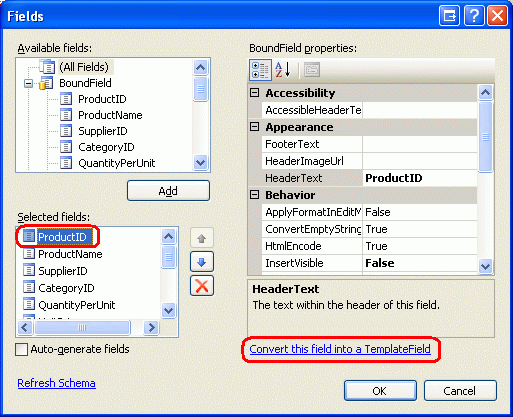
그림 8: 각 필드를 TemplateField로 변환
이 필드를 TemplateField로 변환을 클릭하면 현재 필드 형식이 해당하는 TemplateField로 바뀝니다. 예를 들어 각 BoundField는 해당 데이터 필드를 표시하는 Label이 포함된 ItemTemplate와 데이터를 TextBox에 표시하는 EditItemTemplate을 포함한 TemplateField로 대체됩니다.
ProductName BoundField는 다음 TemplateField 태그로 변환되었습니다.
<asp:TemplateField HeaderText="ProductName" SortExpression="ProductName">
    <EditItemTemplate>
        <asp:TextBox ID="TextBox1" runat="server"
            Text='<%# Bind("ProductName") %>'></asp:TextBox>
    </EditItemTemplate>
    <ItemTemplate>
        <asp:Label ID="Label2" runat="server"
            Text='<%# Bind("ProductName") %>'></asp:Label>
    </ItemTemplate>
</asp:TemplateField>
마찬가지로, Discontinued CheckBoxField는 ItemTemplate 및 EditItemTemplate에 CheckBox 웹 컨트롤이 포함되어 있는 TemplateField로 변환되었으며, ItemTemplate의 CheckBox는 비활성화되어 있습니다. 읽기 전용 ProductID BoundField는 ItemTemplate 및 EditItemTemplate에 레이블 컨트롤이 포함된 TemplateField로 변환되었습니다. 즉, 기존 GridView 필드를 TemplateField로 변환하는 것은 기존 필드의 기능을 잃지 않고 더 사용자 지정 가능한 TemplateField로 전환하는 빠르고 쉬운 방법입니다.
작업 중인 GridView는 편집을 지원하지 않으므로 각 TemplateField에서 EditItemTemplate 태그를 제거하고 ItemTemplate 태그만 남기면 됩니다. 이렇게 하면 GridView의 선언적 태그는 다음과 같이 표시됩니다.
<asp:GridView ID="Products" runat="server" AutoGenerateColumns="False"
    DataKeyNames="ProductID" DataSourceID="ProductsDataSource"
    AllowPaging="True" EnableViewState="False" ShowFooter="True">
    <Columns>
        <asp:TemplateField HeaderText="ProductID" InsertVisible="False"
            SortExpression="ProductID">
            <ItemTemplate>
                <asp:Label ID="Label1" runat="server"
                    Text='<%# Bind("ProductID") %>'></asp:Label>
            </ItemTemplate>
        </asp:TemplateField>
        <asp:TemplateField HeaderText="ProductName" SortExpression="ProductName">
            <ItemTemplate>
                <asp:Label ID="Label2" runat="server"
                    Text='<%# Bind("ProductName") %>'></asp:Label>
            </ItemTemplate>
        </asp:TemplateField>
        <asp:TemplateField HeaderText="SupplierID" SortExpression="SupplierID">
            <ItemTemplate>
                <asp:Label ID="Label3" runat="server"
                    Text='<%# Bind("SupplierID") %>'></asp:Label>
            </ItemTemplate>
        </asp:TemplateField>
        <asp:TemplateField HeaderText="CategoryID" SortExpression="CategoryID">
            <ItemTemplate>
                <asp:Label ID="Label4" runat="server"
                    Text='<%# Bind("CategoryID") %>'></asp:Label>
            </ItemTemplate>
        </asp:TemplateField>
        <asp:TemplateField HeaderText="QuantityPerUnit"
            SortExpression="QuantityPerUnit">
            <ItemTemplate>
                <asp:Label ID="Label5" runat="server"
                    Text='<%# Bind("QuantityPerUnit") %>'></asp:Label>
            </ItemTemplate>
        </asp:TemplateField>
        <asp:TemplateField HeaderText="UnitPrice" SortExpression="UnitPrice">
            <ItemTemplate>
                <asp:Label ID="Label6" runat="server"
                    Text='<%# Bind("UnitPrice") %>'></asp:Label>
            </ItemTemplate>
        </asp:TemplateField>
        <asp:TemplateField HeaderText="UnitsInStock"
            SortExpression="UnitsInStock">
            <ItemTemplate>
                <asp:Label ID="Label7" runat="server"
                    Text='<%# Bind("UnitsInStock") %>'></asp:Label>
            </ItemTemplate>
        </asp:TemplateField>
        <asp:TemplateField HeaderText="UnitsOnOrder"
            SortExpression="UnitsOnOrder">
            <ItemTemplate>
                <asp:Label ID="Label8" runat="server"
                    Text='<%# Bind("UnitsOnOrder") %>'></asp:Label>
            </ItemTemplate>
        </asp:TemplateField>
        <asp:TemplateField HeaderText="ReorderLevel"
            SortExpression="ReorderLevel">
            <ItemTemplate>
                <asp:Label ID="Label9" runat="server"
                    Text='<%# Bind("ReorderLevel") %>'></asp:Label>
            </ItemTemplate>
        </asp:TemplateField>
        <asp:TemplateField HeaderText="Discontinued"
            SortExpression="Discontinued">
            <ItemTemplate>
                <asp:CheckBox ID="CheckBox1" runat="server"
                    Checked='<%# Bind("Discontinued") %>' Enabled="false" />
            </ItemTemplate>
        </asp:TemplateField>
        <asp:TemplateField HeaderText="CategoryName"
            SortExpression="CategoryName">
            <ItemTemplate>
                <asp:Label ID="Label10" runat="server"
                    Text='<%# Bind("CategoryName") %>'></asp:Label>
            </ItemTemplate>
        </asp:TemplateField>
        <asp:TemplateField HeaderText="SupplierName"
            SortExpression="SupplierName">
            <ItemTemplate>
                <asp:Label ID="Label11" runat="server"
                    Text='<%# Bind("SupplierName") %>'></asp:Label>
            </ItemTemplate>
        </asp:TemplateField>
    </Columns>
</asp:GridView>
이제 각 GridView 필드가 TemplateField로 변환되었으므로 각 필드의 FooterTemplate적절한 삽입 인터페이스를 입력할 수 있습니다. 일부 필드에는 삽입 인터페이스(ProductID예: )가 없습니다. 다른 필드에는 새 제품 정보를 수집하는 데 사용되는 웹 컨트롤이 달라집니다.
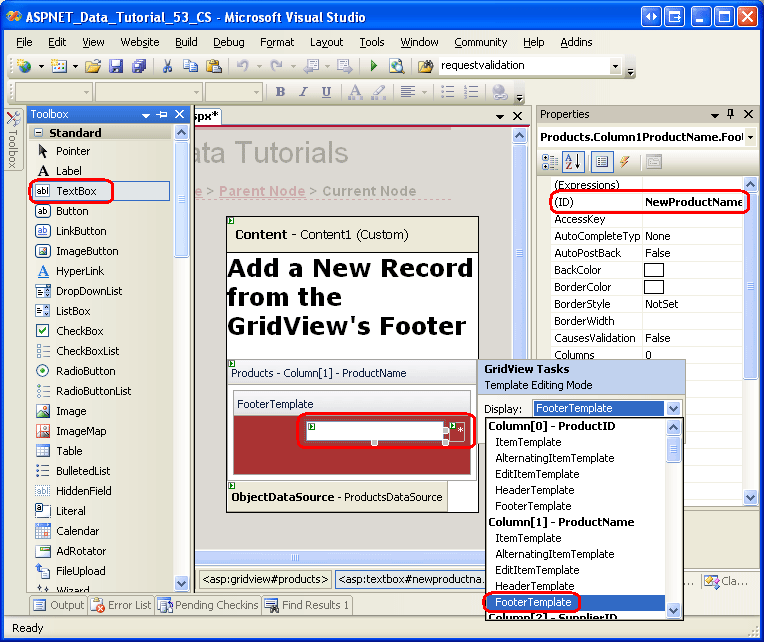
편집 인터페이스를 만들려면 GridView의 스마트 태그에서 템플릿 편집 링크를 선택합니다. 그런 다음 드롭다운 목록에서 적절한 필드를 FooterTemplate 선택하고 도구 상자에서 디자이너로 적절한 컨트롤을 끕니다.

그림 9: 각 필드에 FooterTemplate 적절한 삽입 인터페이스 추가(전체 크기 이미지를 보려면 클릭)
다음 글머리 기호 목록은 추가할 삽입 인터페이스를 지정하여 GridView 필드를 열거합니다.
-
ProductID없음. -
ProductNameTextBox를 추가하고ID을/를NewProductName로 설정합니다. RequiredFieldValidator 컨트롤을 추가하여 사용자가 새 제품 이름의 값을 입력하도록 합니다. -
SupplierID없음. -
CategoryID없음. -
QuantityPerUnitTextBox를 추가하고ID을NewQuantityPerUnit로 설정합니다. -
UnitPrice입력한 값이 0보다 크거나 같은 통화 값인지 확인하는 CompareValidator라는NewUnitPriceTextBox를 추가합니다. -
UnitsInStock으로 설정된 TextBoxID를NewUnitsInStock사용합니다. 입력한 값이 0보다 크거나 같은 정수 값인지 확인하는 CompareValidator를 포함합니다. -
UnitsOnOrder으로 설정된 TextBoxID를NewUnitsOnOrder사용합니다. 입력한 값이 0보다 크거나 같은 정수 값인지 확인하는 CompareValidator를 포함합니다. -
ReorderLevel으로 설정된 TextBoxID를NewReorderLevel사용합니다. 입력한 값이 0보다 크거나 같은 정수 값인지 확인하는 CompareValidator를 포함합니다. -
DiscontinuedCheckBox를 추가하고, 그것의ID을NewDiscontinued로 설정합니다. -
CategoryNameDropDownList를 추가하고ID을NewCategoryID로 설정합니다. 새 ObjectDataSource에CategoriesDataSource라는 이름을 붙이고CategoriesBLL클래스의GetCategories()메서드를 사용하도록 구성합니다. DropDownList에서ListItem데이터 필드를 표시하고,CategoryName데이터 필드를 값으로 사용합니다. -
SupplierNameDropDownList를 추가하고ID을NewSupplierID로 설정합니다. 새 ObjectDataSource에SuppliersDataSource라는 이름을 붙이고SuppliersBLL클래스의GetSuppliers()메서드를 사용하도록 구성합니다. DropDownList에서ListItem데이터 필드를 표시하고,CompanyName데이터 필드를 값으로 사용합니다.
각 유효성 검사 컨트롤의 ForeColor 속성을 지워 FooterStyle CSS 클래스의 흰색 전경색이 기본 빨간색 대신 사용되도록 합니다. 자세한 설명을 위해 ErrorMessage 속성을 사용하고, Text 속성은 별표로 설정하십시오. 삽입 인터페이스가 두 줄로 줄 바꿈되지 않도록 유효성 검사 컨트롤의 텍스트를 방지하려면 유효성 검사 컨트롤을 사용하는 각 FooterStyle s에 대해 s Wrap 속성을 false로 설정합니다FooterTemplate. 마지막으로 GridView 아래에 ValidationSummary 컨트롤을 추가하고 해당 속성과 해당 ShowMessageBoxtrue 속성을 ShowSummaryfalse.로 설정합니다.
새 제품을 추가할 때는 CategoryID와 SupplierID를 제공해야 합니다. 이 정보는 CategoryName 및 SupplierName 필드의 바닥글 셀에 있는 DropDownLists를 통해 캡처됩니다. 범주 및 CategoryID 공급자 이름이 아닌 ID 값을 보여주는 TemplateFields가 아니라 SupplierID 필드를 사용하도록 선택했습니다. 그리드의 데이터 행에서 사용자는 ID 값보다는 범주 및 공급자 이름을 보는 데 더 관심이 있기 때문입니다.
CategoryID 및 SupplierID 값이 이제 CategoryName 및 SupplierName 필드 삽입 인터페이스에서 캡처되므로 GridView에서 CategoryID 및 SupplierID 템플릿 필드를 제거할 수 있습니다.
마찬가지로 새 ProductID 제품을 추가할 때는 사용되지 않으므로 ProductID TemplateField도 제거할 수 있습니다. 그러나 필드를 그리드에 그대로 ProductID 유지합시다. 삽입 인터페이스를 구성하는 TextBoxes, DropDownLists, CheckBox 및 유효성 검사 컨트롤 외에도 새 제품을 데이터베이스에 추가하는 논리를 수행하는 추가 단추도 필요합니다. 4단계에서는 TemplateFieldProductID의 삽입 인터페이스에 FooterTemplate 추가 단추를 포함합니다.
다양한 GridView 필드의 모양을 자유롭게 개선할 수 있습니다. 예를 들어, UnitPrice 값을 통화로 형식 지정하고 UnitsInStock, UnitsOnOrder, ReorderLevel 필드를 오른쪽으로 정렬하며 TemplateFields의 HeaderText 값을 업데이트할 수 있습니다.
FooterTemplate s에서 삽입 인터페이스를 대량 생성하고, SupplierID 및 TemplateFields를 제거한 후, CategoryID TemplateFields의 서식 지정 및 정렬을 통해 그리드의 미학을 개선하면 GridView의 선언적 태그는 다음과 유사하게 표시됩니다.
<asp:GridView ID="Products" runat="server" AutoGenerateColumns="False"
    DataKeyNames="ProductID" DataSourceID="ProductsDataSource"
    AllowPaging="True" EnableViewState="False" ShowFooter="True">
    <Columns>
        <asp:TemplateField HeaderText="ProductID" InsertVisible="False"
            SortExpression="ProductID">
            <ItemTemplate>
                <asp:Label ID="Label1" runat="server"
                    Text='<%# Bind("ProductID") %>'></asp:Label>
            </ItemTemplate>
            <ItemStyle HorizontalAlign="Center" />
        </asp:TemplateField>
        <asp:TemplateField HeaderText="Product" SortExpression="ProductName">
            <ItemTemplate>
                <asp:Label ID="Label2" runat="server"
                    Text='<%# Bind("ProductName") %>'></asp:Label>
            </ItemTemplate>
            <FooterTemplate>
                <asp:TextBox ID="NewProductName" runat="server"></asp:TextBox>
                <asp:RequiredFieldValidator ID="RequiredFieldValidator1"
                    runat="server" ControlToValidate="NewProductName"
                    Display="Dynamic"  ForeColor="
                    ErrorMessage="You must enter a name for the new product.">
                    * </asp:RequiredFieldValidator>
            </FooterTemplate>
            <FooterStyle Wrap="False" />
        </asp:TemplateField>
        <asp:TemplateField HeaderText="Category" SortExpression="CategoryName">
            <ItemTemplate>
                <asp:Label ID="Label10" runat="server"
                    Text='<%# Bind("CategoryName") %>'></asp:Label>
            </ItemTemplate>
            <FooterTemplate>
                <asp:DropDownList ID="NewCategoryID" runat="server"
                    DataSourceID="CategoriesDataSource"
                    DataTextField="CategoryName" DataValueField="CategoryID">
                </asp:DropDownList>
                <asp:ObjectDataSource ID="CategoriesDataSource" runat="server"
                    OldValuesParameterFormatString="original_{0}"
                    SelectMethod="GetCategories" TypeName="CategoriesBLL">
                </asp:ObjectDataSource>
            </FooterTemplate>
        </asp:TemplateField>
        <asp:TemplateField HeaderText="Supplier" SortExpression="SupplierName">
            <ItemTemplate>
                <asp:Label ID="Label11" runat="server"
                    Text='<%# Bind("SupplierName") %>'></asp:Label>
            </ItemTemplate>
            <FooterTemplate>
                <asp:DropDownList ID="NewSupplierID" runat="server"
                    DataSourceID="SuppliersDataSource"
                    DataTextField="CompanyName" DataValueField="SupplierID">
                </asp:DropDownList><asp:ObjectDataSource ID="SuppliersDataSource"
                    runat="server" OldValuesParameterFormatString="original_{0}"
                    SelectMethod="GetSuppliers" TypeName="SuppliersBLL">
                </asp:ObjectDataSource>
            </FooterTemplate>
        </asp:TemplateField>
        <asp:TemplateField HeaderText="Qty/Unit" SortExpression="QuantityPerUnit">
            <ItemTemplate>
                <asp:Label ID="Label5" runat="server"
                    Text='<%# Bind("QuantityPerUnit") %>'></asp:Label>
            </ItemTemplate>
            <FooterTemplate>
                <asp:TextBox ID="NewQuantityPerUnit" runat="server"></asp:TextBox>
            </FooterTemplate>
        </asp:TemplateField>
        <asp:TemplateField HeaderText="Price" SortExpression="UnitPrice">
            <ItemTemplate>
                <asp:Label ID="Label6" runat="server"
                    Text='<%# Bind("UnitPrice", "{0:c}") %>'></asp:Label>
            </ItemTemplate>
            <FooterTemplate>
                $<asp:TextBox ID="NewUnitPrice" runat="server" Columns="8" />
                <asp:CompareValidator ID="CompareValidator1" runat="server"
                    ControlToValidate="NewUnitPrice"
                    ErrorMessage="You must enter a valid currency value greater than
                        or equal to 0.00. Do not include the currency symbol."
                    ForeColor="" Operator="GreaterThanEqual" Type="Currency"
                    ValueToCompare="0" Display="Dynamic">
                    * </asp:CompareValidator>
            </FooterTemplate>
            <ItemStyle HorizontalAlign="Right" />
            <FooterStyle Wrap="False" />
        </asp:TemplateField>
        <asp:TemplateField HeaderText="Units In Stock"
            SortExpression="Units In Stock">
            <ItemTemplate>
                <asp:Label ID="Label7" runat="server"
                    Text='<%# Bind("UnitsInStock") %>'></asp:Label>
            </ItemTemplate>
            <FooterTemplate>
                <asp:TextBox ID="NewUnitsInStock" runat="server" Columns="5" />
                <asp:CompareValidator ID="CompareValidator2" runat="server"
                    ControlToValidate="NewUnitsInStock" Display="Dynamic"
                    ErrorMessage="You must enter a valid numeric value for units
                        in stock that's greater than or equal to zero."
                    ForeColor="" Operator="GreaterThanEqual" Type="Integer"
                        ValueToCompare="0">*</asp:CompareValidator>
            </FooterTemplate>
            <ItemStyle HorizontalAlign="Right" />
            <FooterStyle Wrap="False" />
        </asp:TemplateField>
        <asp:TemplateField HeaderText="Units On Order" SortExpression="UnitsOnOrder">
            <ItemTemplate>
                <asp:Label ID="Label8" runat="server"
                    Text='<%# Bind("UnitsOnOrder") %>'></asp:Label>
            </ItemTemplate>
            <FooterTemplate>
                <asp:TextBox ID="NewUnitsOnOrder" runat="server" Columns="5" />
                <asp:CompareValidator ID="CompareValidator3" runat="server"
                    ControlToValidate="NewUnitsOnOrder" Display="Dynamic"
                    ErrorMessage="You must enter a valid numeric value for units on
                        order that's greater than or equal to zero."
                    ForeColor="" Operator="GreaterThanEqual" Type="Integer"
                    ValueToCompare="0">*</asp:CompareValidator>
            </FooterTemplate>
            <ItemStyle HorizontalAlign="Right" />
            <FooterStyle Wrap="False" />
        </asp:TemplateField>
        <asp:TemplateField HeaderText="Reorder Level" SortExpression="ReorderLevel">
            <ItemTemplate>
                <asp:Label ID="Label9" runat="server"
                    Text='<%# Bind("ReorderLevel") %>'></asp:Label>
            </ItemTemplate>
            <FooterTemplate>
                <asp:TextBox ID="NewReorderLevel" runat="server" Columns="5" />
                <asp:CompareValidator ID="CompareValidator4" runat="server"
                    ControlToValidate="NewReorderLevel" Display="Dynamic"
                    ErrorMessage="You must enter a valid numeric value for reorder
                        level that's greater than or equal to zero."
                    ForeColor="" Operator="GreaterThanEqual" Type="Integer"
                    ValueToCompare="0">*</asp:CompareValidator>
            </FooterTemplate>
            <ItemStyle HorizontalAlign="Right" />
            <FooterStyle Wrap="False" />
        </asp:TemplateField>
        <asp:TemplateField HeaderText="Discontinued" SortExpression="Discontinued">
            <ItemTemplate>
                <asp:CheckBox ID="CheckBox1" runat="server"
                    Checked='<%# Bind("Discontinued") %>' Enabled="false" />
            </ItemTemplate>
            <FooterTemplate>
                <asp:CheckBox ID="NewDiscontinued" runat="server" />
            </FooterTemplate>
            <ItemStyle HorizontalAlign="Center" />
            <FooterStyle HorizontalAlign="Center" />
        </asp:TemplateField>
    </Columns>
</asp:GridView>
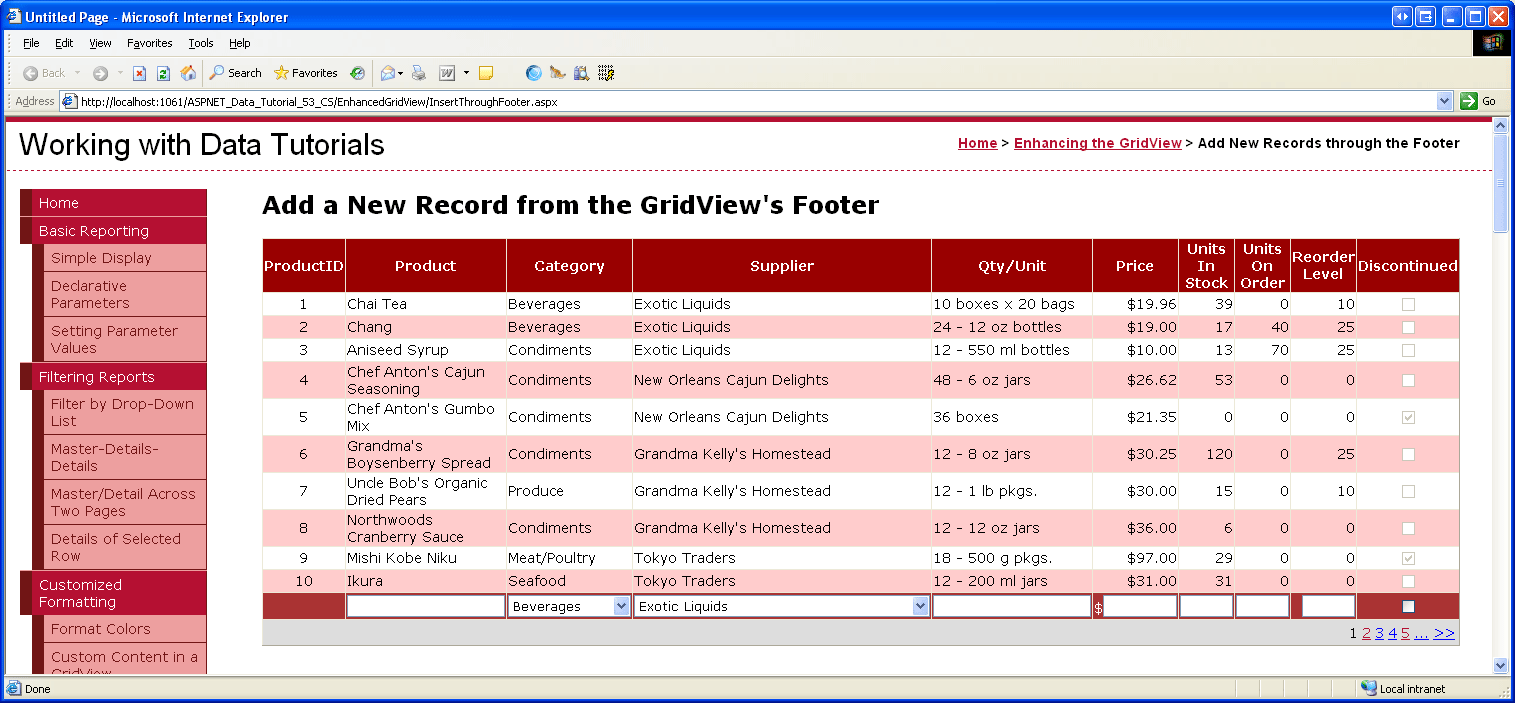
브라우저를 통해 볼 때 이제 GridView의 바닥글 행에 완료된 삽입 인터페이스가 포함됩니다(그림 10 참조). 이 시점에서 삽입 인터페이스에는 사용자가 새 제품에 대한 데이터를 입력하고 데이터베이스에 새 레코드를 삽입하려고 함을 나타내는 수단이 포함되어 있지 않습니다. 또한 바닥글에 입력된 데이터가 데이터베이스의 새 레코드 Products 로 변환되는 방식을 아직 다루지 않았습니다. 4단계에서는 삽입 인터페이스에 추가 단추를 포함하는 방법과 클릭할 때 포스트백에서 코드를 실행하는 방법을 살펴보겠습니다. 5단계는 바닥글의 데이터를 사용하여 새 레코드를 삽입하는 방법을 보여줍니다.

그림 10: GridView 바닥글은 새 레코드를 추가하기 위한 인터페이스를 제공합니다(전체 크기 이미지를 보려면 클릭).
4단계: 삽입 인터페이스에 추가 단추 포함
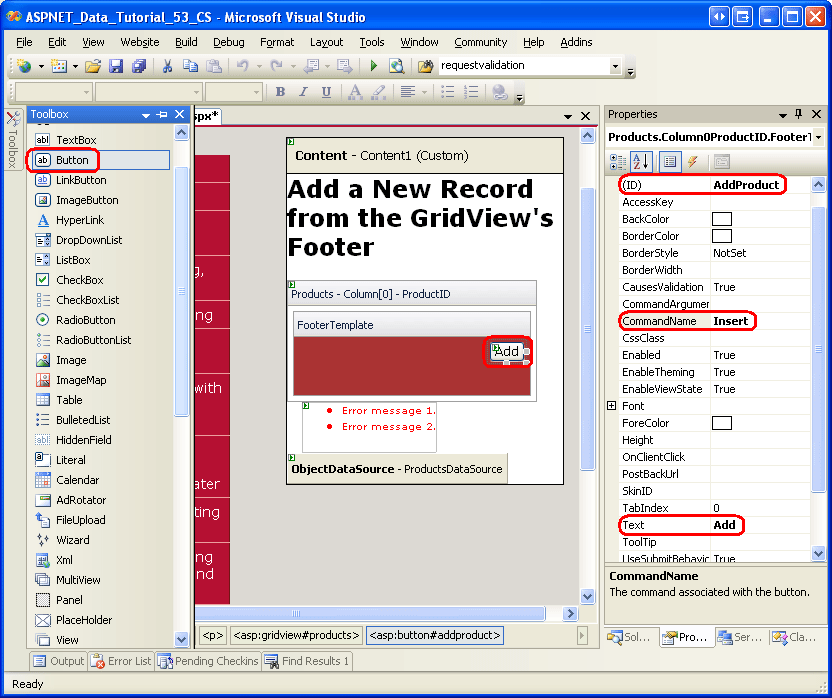
바닥글 행의 삽입 인터페이스에 현재 사용자가 새 제품 정보 입력을 완료했음을 나타내는 수단이 없기 때문에 삽입 인터페이스의 어딘가에 추가 단추를 포함해야 합니다. 기존 FooterTemplate 열 중 하나에 배치하거나 이를 위해 표에 새 열을 추가할 수 있습니다. 이 자습서에서는 TemplateFieldProductID에 추가 단추를 FooterTemplate 배치해 보겠습니다.
디자이너에서 GridView의 스마트 태그에서 템플릿 편집 링크를 클릭한 다음 드롭다운 목록에서 필드 ProductID의 FooterTemplate를 선택합니다. 서식 파일에 단추 웹 컨트롤(또는 원하는 경우 LinkButton 또는 ImageButton)을 추가하고, ID를 AddProduct으로 설정하고, CommandName을 'Insert'로, Text 속성을 'Add'로 설정합니다. 이는 그림 11에 표시된 대로입니다.

그림 11: TemplateField ProductID 에 FooterTemplate 추가 단추 배치(전체 크기 이미지를 보려면 클릭)
추가 단추를 포함했으면 브라우저에서 페이지를 테스트합니다. 삽입 인터페이스에서 잘못된 데이터가 있는 추가 단추를 클릭하면 포스트백이 단락되고 ValidationSummary 컨트롤이 잘못된 데이터를 나타냅니다(그림 12 참조). 적절한 데이터를 입력한 후 추가 버튼을 클릭하면 포스트백이 발생합니다. 그러나 데이터베이스에 레코드가 추가되지 않습니다. 실제로 삽입을 수행하려면 약간의 코드를 작성해야 합니다.
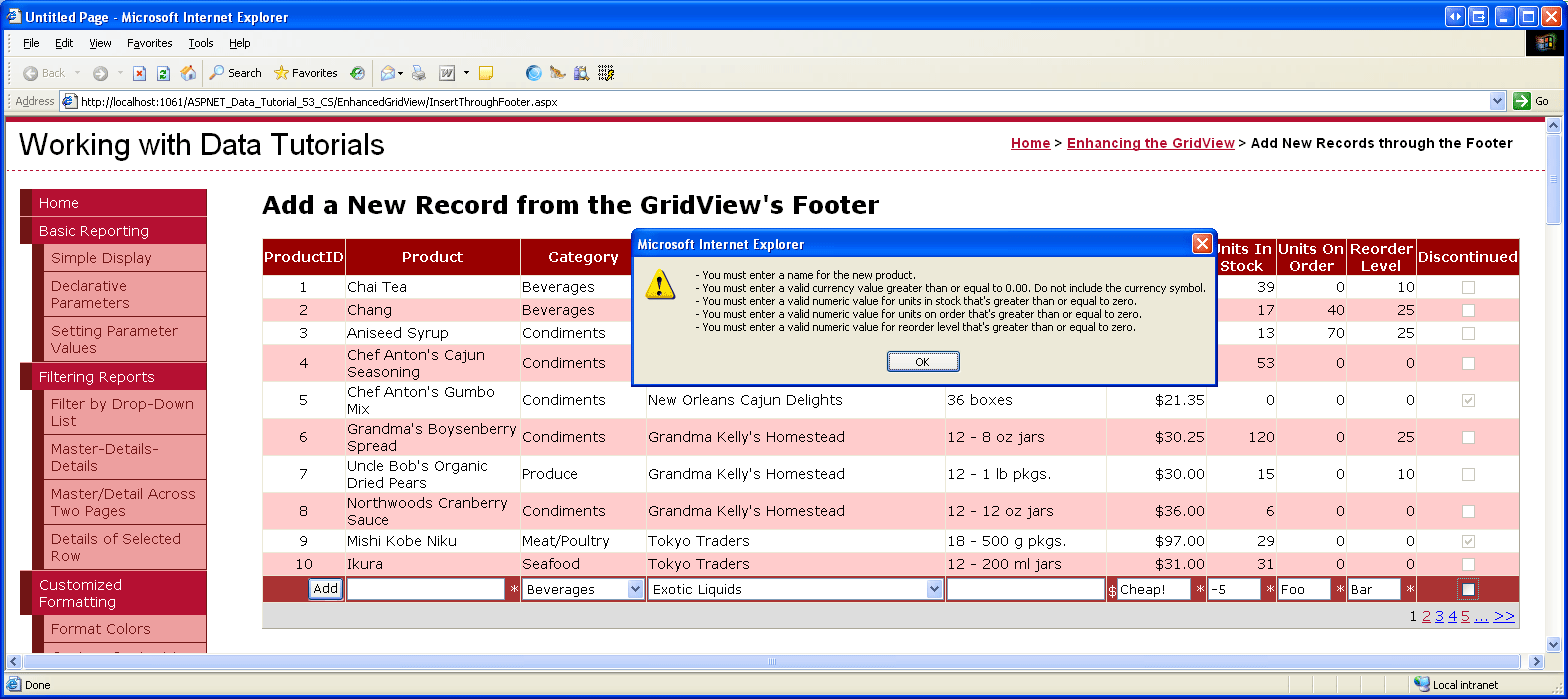
그림 12: 삽입 인터페이스에 잘못된 데이터가 있는 경우 추가 단추의 포스트백이 단락됩니다(전체 크기 이미지를 보려면 클릭).
비고
삽입 인터페이스의 유효성 검사 컨트롤이 유효성 검사 그룹에 할당되지 않았습니다. 삽입 인터페이스가 페이지에서 유일한 유효성 검사 컨트롤 집합인 한 이 작업은 정상적으로 작동합니다. 그러나 페이지에 다른 유효성 검사 컨트롤(예: 그리드 편집 인터페이스의 유효성 검사 컨트롤)이 있는 경우 삽입 인터페이스 및 추가 단추 속성의 유효성 검사 컨트롤에 ValidationGroup 동일한 값을 할당하여 이러한 컨트롤을 특정 유효성 검사 그룹과 연결해야 합니다. 페이지의 유효성 검사 컨트롤 및 단추를 유효성 검사 그룹으로 분할하는 방법에 대한 자세한 내용은 ASP.NET 2.0의 유효성 검사 컨트롤 해부를 참조하세요.
5단계: 테이블에 새 레코드Products삽입
GridView의 기본 제공 편집 기능을 활용하는 경우 GridView는 업데이트를 수행하는 데 필요한 모든 작업을 자동으로 처리합니다. 특히 업데이트 단추를 클릭하면 편집 인터페이스에서 입력한 값을 ObjectDataSource 컬렉션의 UpdateParameters 매개 변수로 복사하고 ObjectDataSource 메서드 Update() 를 호출하여 업데이트를 시작합니다. GridView는 삽입에 대한 이러한 기본 제공 기능을 제공하지 않으므로 ObjectDataSource 메서드를 호출하고 삽입 인터페이스의 Insert() 값을 ObjectDataSource 컬렉션 InsertParameters 으로 복사하는 코드를 구현해야 합니다.
이 삽입 논리는 추가 단추를 클릭한 후에 실행해야 합니다. 이 이벤트는 버튼, 링크 버튼 또는 이미지 버튼이 바닥글 행에 있는 추가 버튼처럼 명시적으로 추가되었거나, GridView에 의해 자동으로 추가되었을 때(예를 들어, 정렬 기능이 사용될 때 각 열 맨 위의 링크 버튼이나 페이징 기능이 사용될 때 페이징 인터페이스에 있는 링크 버튼) 발생합니다.
따라서 추가 단추를 클릭하는 사용자에게 응답하려면 GridView 이벤트에 RowCommand 대한 이벤트 처리기를 만들어야 합니다. 이 이벤트는 GridView의 버튼, LinkButton 또는 ImageButton을 클릭할 때마다 발생하므로, event handler에 전달된 CommandName 속성이 추가 버튼(CommandName 삽입)의 값에 매핑되는 경우에만 삽입 논리를 진행해야 합니다. 또한 유효성 검사 컨트롤이 유효한 데이터를 보고하는 경우에만 진행해야 합니다. 이를 수용하려면 다음 코드를 사용하여 이벤트에 대한 RowCommand 이벤트 처리기를 만듭니다.
protected void Products_RowCommand(object sender, GridViewCommandEventArgs e)
{
    // Insert data if the CommandName == "Insert"
    // and the validation controls indicate valid data...
    if (e.CommandName == "Insert" && Page.IsValid)
    {
        // TODO: Insert new record...
    }
}
비고
이벤트 처리기가 속성 확인을 귀찮게 하는 Page.IsValid 이유가 궁금할 수 있습니다. 삽입 인터페이스에 잘못된 데이터가 제공되면 결국 포스트백이 억제되지 않나요? 사용자가 JavaScript를 사용하지 않도록 설정하지 않았거나 클라이언트 쪽 유효성 검사 논리를 우회하는 단계를 수행한 경우 이 가정은 정확합니다. 즉, 클라이언트 쪽 유효성 검사에 엄격하게 의존해서는 안 됩니다. 데이터로 작업하기 전에 유효성에 대한 서버 쪽 검사를 항상 수행해야 합니다.
1단계에서는 ObjectDataSource를 생성하여, 그 메서드 ProductsDataSource에서 Insert() 클래스의 ProductsBLL 메서드에 매핑되도록 했습니다. 테이블에 새 레코드를 Products 삽입하려면 ObjectDataSource 메서드 Insert() 를 호출하기만 하면 됩니다.
protected void Products_RowCommand(object sender, GridViewCommandEventArgs e)
{
    // Insert data if the CommandName == "Insert"
    // and the validation controls indicate valid data...
    if (e.CommandName == "Insert" && Page.IsValid)
    {
        // Insert new record
        ProductsDataSource.Insert();
    }
}
이제 메서드가 Insert() 호출되었으므로 남은 것은 삽입 인터페이스의 값을 클래스의 ProductsBLL 메서드에 전달된 매개 변수로 복사하는 것입니다AddProduct.
삽입, 업데이트 및 삭제 자습서와 관련된 이벤트 검사에서 살펴본 것처럼 ObjectDataSource 이벤트를 Inserting 통해 이 작업을 수행할 수 있습니다.
Inserting 이 경우 GridView의 바닥글 행에서 컨트롤을 Products 프로그래밍 방식으로 참조하고 해당 값을 컬렉션에 e.InputParameters 할당해야 합니다. 사용자가 ReorderLevel TextBox를 비워 두거나 값을 생략하는 경우, 데이터베이스에 삽입할 값을 NULL로 지정해야 합니다.
AddProducts 메서드는 nullable 데이터베이스 필드에 nullable 형식을 허용하므로 사용자 입력이 생략된 경우 nullable 형식을 사용하여 해당 값을 null로 설정합니다.
protected void ProductsDataSource_Inserting
    (object sender, ObjectDataSourceMethodEventArgs e)
{
    // Programmatically reference Web controls in the inserting interface...
    TextBox NewProductName =
        (TextBox)Products.FooterRow.FindControl("NewProductName");
    DropDownList NewCategoryID =
        (DropDownList)Products.FooterRow.FindControl("NewCategoryID");
    DropDownList NewSupplierID =
        (DropDownList)Products.FooterRow.FindControl("NewSupplierID");
    TextBox NewQuantityPerUnit =
        (TextBox)Products.FooterRow.FindControl("NewQuantityPerUnit");
    TextBox NewUnitPrice =
        (TextBox)Products.FooterRow.FindControl("NewUnitPrice");
    TextBox NewUnitsInStock =
        (TextBox)Products.FooterRow.FindControl("NewUnitsInStock");
    TextBox NewUnitsOnOrder =
        (TextBox)Products.FooterRow.FindControl("NewUnitsOnOrder");
    TextBox NewReorderLevel =
        (TextBox)Products.FooterRow.FindControl("NewReorderLevel");
    CheckBox NewDiscontinued =
        (CheckBox)Products.FooterRow.FindControl("NewDiscontinued");
    // Set the ObjectDataSource's InsertParameters values...
    e.InputParameters["productName"] = NewProductName.Text;

    e.InputParameters["supplierID"] =
        Convert.ToInt32(NewSupplierID.SelectedValue);
    e.InputParameters["categoryID"] =
        Convert.ToInt32(NewCategoryID.SelectedValue);

    string quantityPerUnit = null;
    if (!string.IsNullOrEmpty(NewQuantityPerUnit.Text))
        quantityPerUnit = NewQuantityPerUnit.Text;
    e.InputParameters["quantityPerUnit"] = quantityPerUnit;
    decimal? unitPrice = null;
    if (!string.IsNullOrEmpty(NewUnitPrice.Text))
        unitPrice = Convert.ToDecimal(NewUnitPrice.Text);
    e.InputParameters["unitPrice"] = unitPrice;
    short? unitsInStock = null;
    if (!string.IsNullOrEmpty(NewUnitsInStock.Text))
        unitsInStock = Convert.ToInt16(NewUnitsInStock.Text);
    e.InputParameters["unitsInStock"] = unitsInStock;
    short? unitsOnOrder = null;
    if (!string.IsNullOrEmpty(NewUnitsOnOrder.Text))
        unitsOnOrder = Convert.ToInt16(NewUnitsOnOrder.Text);
    e.InputParameters["unitsOnOrder"] = unitsOnOrder;
    short? reorderLevel = null;
    if (!string.IsNullOrEmpty(NewReorderLevel.Text))
        reorderLevel = Convert.ToInt16(NewReorderLevel.Text);
    e.InputParameters["reorderLevel"] = reorderLevel;

    e.InputParameters["discontinued"] = NewDiscontinued.Checked;
}
Inserting 이벤트 처리기가 완료되면 GridView의 바닥글 행을 Products 통해 데이터베이스 테이블에 새 레코드를 추가할 수 있습니다. 계속해서 몇 가지 새로운 제품을 추가해 보세요.
추가 작업 향상 및 사용자 지정
현재 추가 단추를 클릭하면 데이터베이스 테이블에 새 레코드가 추가되지만 레코드가 성공적으로 추가되었다는 시각적 피드백은 제공하지 않습니다. 레이블 웹 컨트롤 또는 클라이언트 쪽 경고 상자는 삽입이 성공적으로 완료되었음을 사용자에게 알리는 것이 이상적입니다. 이것을 독자가 풀어볼 연습문제로 남기겠습니다.
이 자습서에 사용된 GridView는 나열된 제품에 정렬 순서를 적용하지 않으며 최종 사용자가 데이터를 정렬하도록 허용하지도 않습니다. 따라서 레코드는 기본 키 필드에 따라 데이터베이스에 있는 대로 정렬됩니다. 각 새 레코드의 값이 마지막 레코드보다 크기 때문에 새 제품이 추가될 때마다 그리드의 끝에 추가됩니다. 따라서 새 레코드를 추가한 후 사용자를 GridView의 마지막 페이지로 자동으로 보낼 수 있습니다. 이 작업은 사용자가 GridView에 데이터를 바인딩한 후 마지막 페이지로 ProductsDataSource.Insert() 전송되어야 함을 나타내기 위해 이벤트 처리기에서 RowCommand 호출한 후 다음 코드 줄을 추가하여 수행할 수 있습니다.
// Indicate that the user needs to be sent to the last page
SendUserToLastPage = true;
SendUserToLastPage 는 처음에 값 false이 할당된 페이지 수준 부울 변수입니다. GridView의 DataBound 이벤트 처리기에서 SendUserToLastPage가 false이면 PageIndex 속성을 업데이트해서 사용자를 마지막 페이지로 보냅니다.
protected void Products_DataBound(object sender, EventArgs e)
{
    // Send user to last page of data, if needed
    if (SendUserToLastPage)
        Products.PageIndex = Products.PageCount - 1;
}
이벤트 처리기가 아니라 PageIndex 이벤트 처리기에서 DataBound 속성이 설정되는 이유는 RowCommand 이벤트 처리기가 실행될 때 RowCommand 데이터베이스 테이블에 새 레코드 Products 를 아직 추가하지 않았기 때문입니다. 따라서 이벤트 처리기에서 RowCommand 마지막 페이지 인덱스(PageCount - 1)는 새 제품이 추가되기 전 의 마지막 페이지 인덱스를 나타냅니다. 추가되는 대부분의 제품의 경우 새 제품을 추가한 후 마지막 페이지 인덱스가 동일합니다. 그러나 추가된 제품으로 새 마지막 페이지 인덱스가 생성될 때, PageIndex 이벤트 처리기에서 RowCommand를 잘못 업데이트하면, 새 마지막 페이지 인덱스를 가리키는 대신에 두 번째 마지막 페이지(새 제품을 추가하기 전의 마지막 페이지 인덱스)로 이동하게 됩니다. 이벤트 처리기는 DataBound 새 제품이 추가되고 데이터가 그리드로 반영된 후 실행됩니다. 따라서 PageIndex 속성을 설정하면 우리는 올바른 마지막 페이지 인덱스를 얻고 있음을 알 수 있습니다.
마지막으로, 이 자습서에서 사용되는 GridView는 새 제품을 추가하기 위해 수집해야 하는 필드의 수로 인해 매우 넓습니다. 이 너비로 인해 DetailsView의 세로 레이아웃이 선호될 수 있습니다. 더 적은 수의 입력을 수집하여 GridView의 전체 너비를 줄일 수 있습니다. 새 제품을 추가할 때, UnitsOnOrder, UnitsInStock, 및 ReorderLevel 필드를 수집할 필요가 없을 수도 있으며, 이 경우 이러한 필드를 GridView에서 제거할 수 있습니다.
수집된 데이터를 조정하기 위해 다음 두 가지 방법 중 하나를 사용할 수 있습니다.
-
AddProduct메서드를 계속 사용하여UnitsOnOrder,UnitsInStock, 및ReorderLevel필드에 대한 값을 기대하십시오.Inserting이벤트 처리기에서 삽입 인터페이스에서 제거된 이러한 입력에 사용할 하드 코딩된 기본값을 제공합니다. -
AddProduct메서드의 새로운 오버로드를ProductsBLL클래스에서 생성하여UnitsOnOrder,UnitsInStock, 및ReorderLevel필드에 대한 입력을 받지 않도록 하십시오. 그런 다음 ASP.NET 페이지에서 이 새 오버로드를 사용하도록 ObjectDataSource를 구성합니다.
두 옵션 모두 동일하게 작동합니다. 이전 자습서에서는 클래스 ProductsBLL의 메서드 UpdateProduct에 대해 여러 오버로드를 생성했습니다.
요약
GridView에는 DetailsView 및 FormView에 있는 기본 제공 삽입 기능이 없지만 약간의 노력으로 삽입 인터페이스를 바닥글 행에 추가할 수 있습니다. GridView에 바닥글 행을 표시하려면 해당 ShowFooter 속성을 .로 설정하기만 하면됩니다 true. 필드를 TemplateField로 변환하고 삽입 인터페이스 FooterTemplate를 추가하여 각 필드에 대해 바닥글 행 콘텐츠를 사용자 지정할 수 있습니다. 이 자습서에서 살본 것처럼 단추, FooterTemplate TextBoxes, DropDownLists, CheckBox, 데이터 기반 웹 컨트롤을 채우기 위한 데이터 원본 컨트롤(예: DropDownLists) 및 유효성 검사 컨트롤을 포함할 수 있습니다. 사용자 입력을 수집하기 위한 컨트롤과 함께 추가 단추, LinkButton 또는 ImageButton이 필요합니다.
추가 단추를 클릭하면 ObjectDataSource의 Insert() 메서드가 호출되어 삽입 워크플로를 시작합니다. 그런 다음 ObjectDataSource는 구성된 insert 메서드(이 자습서의 ProductsBLL 클래스 AddProduct 메서드)를 호출합니다. Insert 메서드를 호출하기 전에 GridView의 삽입 인터페이스에서 ObjectDataSource 컬렉션 InsertParameters 으로 값을 복사해야 합니다. 이 작업은 ObjectDataSource의 Inserting 이벤트 처리기에서 삽입 인터페이스 웹 컨트롤을 프로그래밍 방식으로 참조하여 수행할 수 있습니다.
이 자습서에서는 GridView의 모양을 향상시키기 위한 기술을 살펴봅니다. 다음 자습서 집합에서는 이미지, PDF, Word 문서 등과 같은 이진 데이터 및 데이터 웹 컨트롤을 사용하는 방법을 살펴봅니다.
행복한 프로그래밍!
작성자 정보
7개의 ASP/ASP.NET 책의 저자이자 4GuysFromRolla.com 창립자인 Scott Mitchell은 1998년부터 Microsoft 웹 기술을 연구해 왔습니다. Scott은 독립 컨설턴트, 트레이너 및 작가로 일합니다. 그의 최신 책은 Sams Teach Yourself ASP.NET 2.0 in 24 Hours입니다. 그에게 mitchell@4GuysFromRolla.com으로 연락할 수 있습니다.
특별히 감사드립니다.
이 자습서 시리즈는 많은 유용한 검토자가 검토했습니다. 이 자습서의 수석 검토자는 버나데트 리였습니다. 예정된 MSDN 문서를 검토하는 데 관심이 있으신가요? 그렇다면 mitchell@4GuysFromRolla.com으로 메시지를 보내 주세요.