빠른 시작: 앱에 채팅 추가
Communication Services Chat SDK를 사용하여 애플리케이션에 실시간 채팅을 추가하여 Azure Communication Services를 시작합니다. 이 빠른 시작에서는 채팅 SDK를 사용하여 사용자가 서로 대화할 수 있는 채팅 스레드를 만듭니다. 채팅 개념에 대해 자세히 알아보려면 채팅 개념 설명서를 참조하세요.
필수 조건
활성 구독이 있는 Azure 계정. 체험 계정을 만듭니다.
활성 Communication Services 리소스 및 연결 문자열 Communication Services 리소스 만들기
Azure CLI를 설치합니다.
Communication Services 리소스 엔드포인트를 기록해 둡니다. Azure Portal에서 엔드포인트를 가져올 수 있습니다. 또는 연결 문자열에서 엔드포인트 URL을 찾을 수 있습니다.
endpoint=뒤에 오는 URL이며https://로 시작합니다.사용자 액세스 토큰. 범위를 채팅으로 설정하고 토큰 문자열과 user_id 문자열을 기록해 둡니다. 또한 Azure CLI를 사용하고 연결 문자열과 함께 아래 명령을 실행하여 사용자 및 액세스 토큰을 만들 수 있습니다.
az communication identity token issue --scope chat --connection-string "yourConnectionString"자세한 내용은 Azure CLI를 사용하여 액세스 토큰 만들기 및 관리를 참조하세요.
설정
확장 추가
az extension 명령을 사용하여 Azure CLI에 대한 Azure Communication Services 확장을 추가합니다.
az extension add --name communication
Azure CLI에 로그인
Azure CLI에 로그인해야 합니다. 터미널에서 az login 명령을 실행하고 자격 증명을 제공하여 로그인할 수 있습니다.
(선택 사항) 엔드포인트 또는 액세스 토큰을 전달하지 않고 Azure CLI ID 작업 사용
엔드포인트를 환경 변수에 저장
--endpoint를 사용하여 엔드포인트를 전달하지 않고도 Azure CLI 채팅 작업을 사용하도록 AZURE_COMMUNICATION_ENDPOINT 환경 변수를 구성할 수 있습니다. 환경 변수를 구성하려면 콘솔 창을 열고 아래 탭에서 운영 체제를 선택합니다. <yourEndpoint>를 실제 엔드포인트로 바꿉니다.
콘솔 창을 열고 다음 명령을 입력합니다.
setx AZURE_COMMUNICATION_ENDPOINT "<yourEndpoint>"
환경 변수를 추가한 후에는 콘솔 창을 포함하여 실행 중인 프로그램 중에서 환경 변수를 읽어야 하는 프로그램을 다시 시작해야 할 수도 있습니다. 예를 들어 편집기로 Visual Studio를 사용하는 경우 Visual Studio를 다시 시작한 후 예제를 실행합니다.
환경 변수에 액세스 토큰 저장
--access-token을 사용하여 액세스 토큰을 전달하지 않고도 Azure CLI 채팅 작업을 사용하도록 AZURE_COMMUNICATION_ACCESS_TOKEN 환경 변수를 구성할 수 있습니다. 환경 변수를 구성하려면 콘솔 창을 열고 아래 탭에서 운영 체제를 선택합니다. <yourAccessToken>을 실제 액세스 토큰으로 바꿉니다.
콘솔 창을 열고 다음 명령을 입력합니다.
setx AZURE_COMMUNICATION_ACCESS_TOKEN "<yourAccessToken>"
환경 변수를 추가한 후에는 콘솔 창을 포함하여 실행 중인 프로그램 중에서 환경 변수를 읽어야 하는 프로그램을 다시 시작해야 할 수도 있습니다. 예를 들어 편집기로 Visual Studio를 사용하는 경우 Visual Studio를 다시 시작한 후 예제를 실행합니다.
작업
채팅 스레드 시작
thread create 명령을 사용하여 채팅 스레드를 만듭니다.
az communication chat thread create --topic "<chatTopic>" --endpoint "<endpoint>" --access-token "<token>"
위에서 설명한 대로 엔드포인트와 액세스 토큰을 환경 변수에 저장한 경우 명령에 전달할 필요가 없습니다.
az communication chat thread create --topic "<chatTopic>"
<chatTopic>을 사용하여 스레드에 항목을 제공합니다.thread update-topic명령을 사용하여 채팅 스레드가 만들어진 후 항목을 업데이트할 수 있습니다.<endpoint>를 Azure Communication Services 엔드포인트로 바꿉니다.<token>을 이전에identity token issue명령을 실행하여 얻은 액세스 토큰으로 바꿉니다.
채팅 스레드의 토픽 업데이트
az communication chat thread update-topic --thread "<chatThreadId>" --topic "<chatTopic>" --endpoint "<endpoint>" --access-token "<token>"
<chatThreadId>를 채팅 스레드 ID로 바꿉니다.<chatTopic>을 설정하려는 새 채팅 항목으로 바꿉니다.<endpoint>를 Azure Communication Services 엔드포인트로 바꿉니다.<token>을 이전에identity token issue명령을 실행하여 얻은 액세스 토큰으로 바꿉니다.
모든 채팅 스레드 나열
thread list 명령은 사용자의 채팅 스레드 목록을 반환합니다.
az communication chat thread list --start-time "<startTime>" --endpoint "<endpoint>" --access-token "<token>"
- 선택적으로
<startTime>을 사용하여 채팅 메시지를 가져올 가장 빠른 시점을 지정합니다. <endpoint>를 Azure Communication Services 엔드포인트로 바꿉니다.<token>을 이전에identity token issue명령을 실행하여 얻은 액세스 토큰으로 바꿉니다.
채팅 스레드에 메시지 보내기
message send 명령을 사용하여 만든 채팅 스레드(threadId로 식별됨)에 메시지를 보냅니다.
az communication chat message send --thread "<chatThreadId>" --display-name "<displayName>" --content "<content>" --message-type "<messageType>" --endpoint "<endpoint>" --access-token "<token>"
<chatThreadId>를 채팅 스레드 ID로 바꿉니다.<content>를 사용하여 채팅 메시지 콘텐츠를 제공합니다.<messageType>을 사용하여 메시지 콘텐츠 형식을 지정합니다. 가능한 값은text및html입니다. 값을 지정하지 않으면 기본값text로 설정됩니다.- 보낸 사람의 표시 이름을 지정하려면 선택적으로
<displayName>을 사용합니다. <endpoint>를 Azure Communication Services 엔드포인트로 바꿉니다.<token>을 이전에identity token issue명령을 실행하여 얻은 액세스 토큰으로 바꿉니다.
채팅 스레드에 채팅 메시지 나열
message list 명령은 채팅 스레드의 채팅 메시지 목록을 반환합니다.
az communication chat message list --thread "<chatThreadId>" --start-time "<startTime>" --endpoint "<endpoint>" --access-token "<token>"
<chatThreadId>를 채팅 스레드 ID로 바꿉니다.- 선택적으로
<startTime>을 사용하여 채팅 메시지를 가져올 가장 빠른 시점을 지정합니다. <endpoint>를 Azure Communication Services 엔드포인트로 바꿉니다.<token>을 이전에identity token issue명령을 실행하여 얻은 액세스 토큰으로 바꿉니다.
채팅 스레드에서 채팅 메시지 받기
message list 명령을 사용하여 채팅 메시지를 검색할 수 있습니다.
az communication chat message get --thread "<chatThreadId>" --message-id "<messageId>" --endpoint "<endpoint>" --access-token "<token>"
<chatThreadId>를 채팅 스레드 ID로 바꿉니다.<messageId>를 검색하려는 메시지의 ID로 바꿉니다.<endpoint>를 Azure Communication Services 엔드포인트로 바꿉니다.<token>을 이전에identity token issue명령을 실행하여 얻은 액세스 토큰으로 바꿉니다.
읽음 확인 보내기
message receipt send 명령을 사용하여 사용자를 대신하여 읽음 확인 이벤트를 스레드에 게시합니다.
az communication chat message receipt send --thread "<chatThreadId>" --message-id "<messageId>" --endpoint "<endpoint>" --access-token "<token>"
<chatThreadId>를 채팅 스레드 ID로 바꿉니다.<messageId>를 바꿔 현재 사용자가 읽은 최신 메시지의 ID를 지정합니다.<endpoint>를 Azure Communication Services 엔드포인트로 바꿉니다.<token>을 이전에identity token issue명령을 실행하여 얻은 액세스 토큰으로 바꿉니다.
채팅 스레드에 사용자를 참가자로 추가
채팅 스레드가 생성되면 스레드에 사용자를 추가하고 제거할 수 있습니다. 사용자를 추가하면 채팅 스레드에 메시지를 보내고 다른 참가자를 추가/제거할 수 있는 액세스 권한이 사용자에게 부여됩니다. participant add 명령을 호출하기 전에 해당 사용자에 대한 새 액세스 토큰 및 ID를 얻었는지 확인합니다.
az communication chat participant add --thread "<chatThreadId>" --user "<userId>" --display-name "<displayName>" --start-time "<startTime>" --endpoint "<endpoint>" --access-token "<token>"
<chatThreadId>를 채팅 스레드 ID로 바꿉니다.<userId>를 사용자 ID로 바꿉니다.- 보낸 사람의 표시 이름을 지정하려면 선택적으로
<displayName>을 사용합니다. - 선택적으로
<startTime>을 사용하여 채팅 메시지를 가져올 가장 빠른 시점을 지정합니다. <endpoint>를 Azure Communication Services 엔드포인트로 바꿉니다.<token>을 이전에identity token issue명령을 실행하여 얻은 액세스 토큰으로 바꿉니다.
채팅 스레드의 스레드 참가자 나열
참가자를 추가하는 방법과 유사하게 스레드에서 참가자를 나열할 수도 있습니다.
participant list 명령을 사용하여 스레드의 참여자를 검색합니다.
az communication chat participant list --thread "<chatThreadId>" --skip "<skip>" --endpoint "<endpoint>" --access-token "<token>"
<chatThreadId>를 채팅 스레드 ID로 바꿉니다.- 선택적으로
<skip>을 사용하여 응답에서 지정된 위치까지 참가자를 건너뜁니다. <endpoint>를 Azure Communication Services 엔드포인트로 바꿉니다.<token>을 이전에identity token issue명령을 실행하여 얻은 액세스 토큰으로 바꿉니다.
채팅 스레드에서 참가자 제거
'participant remove' 명령을 사용하여 채팅 스레드에서 채팅 참가자를 제거할 수 있습니다.
az communication chat participant remove --thread "<chatThreadId>" --user "<userId>" --endpoint "<endpoint>" --access-token "<token>"
<chatThreadId>를 채팅 스레드 ID로 바꿉니다.<userId>를 채팅 스레드에서 제거하려는 사용자 ID로 바꿉니다.<endpoint>를 Azure Communication Services 엔드포인트로 바꿉니다.<token>을 이전에identity token issue명령을 실행하여 얻은 액세스 토큰으로 바꿉니다.
필수 조건
시작하기 전에 다음을 확인해야 합니다.
활성 구독이 있는 Azure 계정을 만듭니다. 자세한 내용은 체험 계정 만들기를 참조하세요.
Node.js 활성 LTS 및 유지 관리 LTS 버전을 설치합니다.
Azure Communication Services 리소스를 만듭니다. 자세한 내용은 Azure Communication Services 리소스 만들기를 참조하세요. 이 빠른 시작을 위해 리소스 엔드포인트와 연결 문자열을 기록해야 합니다.
3명의 Azure Communication Services 사용자를 만들고 사용자 액세스 토큰을 발급합니다. 범위를 채팅으로 설정하고 토큰 문자열과 user_id 문자열을 기록해 둡니다. 전체 데모에서는 두 명의 초기 참가자가 있는 스레드를 만든 다음, 세 번째 참가자를 스레드에 추가합니다. 또한 Azure CLI를 사용하고 연결 문자열과 함께 아래 명령을 실행하여 사용자 및 액세스 토큰을 만들 수 있습니다.
az communication identity token issue --scope chat --connection-string "yourConnectionString"자세한 내용은 Azure CLI를 사용하여 액세스 토큰 만들기 및 관리를 참조하세요.
설정
새 웹 애플리케이션 만들기
먼저 터미널 또는 명령 창을 열어 앱에 대한 새 디렉터리를 만들고 해당 디렉터리로 이동합니다.
mkdir chat-quickstart && cd chat-quickstart
npm init -y를 실행하여 기본 설정으로 package.json 파일을 만듭니다.
npm init -y
패키지 설치
npm install 명령을 사용하여 아래 JavaScript용 Communication Services SDK를 설치합니다.
npm install @azure/communication-common --save

npm install @azure/communication-identity --save

npm install @azure/communication-signaling --save

npm install @azure/communication-chat --save
--save 옵션은 라이브러리를 package.json 파일의 종속성으로 나열합니다.
앱 프레임워크 설정
이 빠른 시작에서는 파일 집합을 사용하여 애플리케이션 자산을 번들로 묶습니다. 다음 명령을 실행하여 이러한 파일 집합을 설치하고 package.json에 개발 종속성으로 나열합니다.
npm install parcel --save-dev
프로젝트의 루트 디렉터리에 index.html 파일을 만듭니다. 이 파일을 템플릿으로 사용하여 JavaScript용 Azure Communication 채팅 SDK를 사용하는 채팅 기능을 추가합니다.
<!DOCTYPE html>
<html>
  <head>
    <title>Communication Client - Chat Sample</title>
  </head>
  <body>
    <h4>Azure Communication Services</h4>
    <h1>Chat Quickstart</h1>
    <script src="./client.js" type="module"></script>
  </body>
</html>
이 빠른 시작에 대한 애플리케이션 로직을 포함하기 위해 client.js라는 프로젝트의 루트 디렉터리에 파일을 만듭니다.
채팅 클라이언트 만들기
웹앱에서 채팅 클라이언트를 만들려면 Communications Service 엔드포인트와 필수 조건 단계의 일부로 생성된 액세스 토큰을 사용합니다.
사용자 액세스 토큰을 사용하면 Azure Communication Services에 직접 인증되는 클라이언트 애플리케이션을 빌드할 수 있습니다. 이 빠른 시작에서는 채팅 애플리케이션에 대한 토큰을 관리하는 서비스 계층을 만드는 방법을 다루지 않습니다. 채팅 아키텍처에 대한 자세한 내용은 채팅 개념을, 액세스 토큰에 대한 자세한 내용은 사용자 액세스 토큰을 참조하세요.
client.js 내부에서 아래 코드의 엔드포인트 및 액세스 토큰을 사용하여 JavaScript용 Azure Communication 채팅 SDK를 사용하는 채팅 기능을 추가합니다.
import { ChatClient } from '@azure/communication-chat';
import { AzureCommunicationTokenCredential } from '@azure/communication-common';

// Your unique Azure Communication service endpoint
let endpointUrl = '<replace with your resource endpoint>';
// The user access token generated as part of the pre-requisites
let userAccessToken = '<USER_ACCESS_TOKEN>';

let chatClient = new ChatClient(endpointUrl, new AzureCommunicationTokenCredential(userAccessToken));
console.log('Azure Communication Chat client created!');
- endpointUrl을 Communication Services 리소스 엔드포인트로 바꿉니다. 아직 만들지 않았다면 Azure Communication Services 만들기를 참조하세요.
- userAccessToken을 발급한 토큰으로 바꿉니다.
코드 실행
다음 명령을 실행하여 애플리케이션을 실행합니다.
npx parcel index.html
브라우저를 열고 http://localhost:1234/.으로 이동합니다. 브라우저 내 개발자 도구 콘솔에 다음이 표시됩니다.
Azure Communication Chat client created!
개체 모델
다음 클래스 및 인터페이스는 JavaScript용 Azure Communication Services 채팅 SDK의 주요 기능 중 일부를 처리합니다.
| 이름 | 설명 |
|---|---|
| ChatClient | 이 클래스는 채팅 기능에 필요합니다. 구독 정보를 사용하여 인스턴스화한 다음 이를 사용해 스레드를 만들고, 가져오고, 삭제하고, 채팅 이벤트를 구독합니다. |
| ChatThreadClient | 이 클래스는 채팅 스레드 기능에 필요합니다. 사용자는 ChatClient를 통해 인스턴스를 가져오고, 이를 사용하여 메시지 전송/수신/업데이트/삭제, 사용자 추가/제거/가져오기, 입력 알림 및 읽음 확인 보내기를 수행할 수 있습니다. |
채팅 스레드 시작
createThread 메서드를 사용하여 채팅 스레드를 만듭니다.
createThreadRequest는 스레드 요청을 설명하는 데 사용됩니다.
- 이 채팅에 토픽을 제공하려면
topic을 사용하세요.UpdateThread함수를 사용하여 채팅 스레드를 만든 후에 토픽을 업데이트할 수 있습니다. participants를 사용하여 채팅 스레드에 추가할 참가자를 나열합니다.
확인되면 createChatThread 메서드가 CreateChatThreadResult를 반환합니다. 이 모델에는 새로 만든 스레드의 id에 액세스할 수 있는 chatThread 속성이 포함되어 있습니다. 그리고 id를 사용하여 ChatThreadClient의 인스턴스를 가져올 수 있습니다. 그런 다음, ChatThreadClient를 사용하여 메시지 보내기 또는 참가자 나열과 같은 작업을 스레드 내에서 수행할 수 있습니다.
async function createChatThread() {
  const createChatThreadRequest = {
    topic: "Hello, World!"
  };
  const createChatThreadOptions = {
    participants: [
      {
        id: { communicationUserId: '<USER_ID>' },
        displayName: '<USER_DISPLAY_NAME>'
      }
    ]
  };
  const createChatThreadResult = await chatClient.createChatThread(
    createChatThreadRequest,
    createChatThreadOptions
  );
  const threadId = createChatThreadResult.chatThread.id;
  return threadId;
}

createChatThread().then(async threadId => {
  console.log(`Thread created:${threadId}`);
  // PLACEHOLDERS
  // <CREATE CHAT THREAD CLIENT>
  // <RECEIVE A CHAT MESSAGE FROM A CHAT THREAD>
  // <SEND MESSAGE TO A CHAT THREAD>
  // <LIST MESSAGES IN A CHAT THREAD>
  // <ADD NEW PARTICIPANT TO THREAD>
  // <LIST PARTICIPANTS IN A THREAD>
  // <REMOVE PARTICIPANT FROM THREAD>
  });
브라우저 탭을 새로 고치면 콘솔에 다음이 표시됩니다.
Thread created: <thread_id>
채팅 스레드 클라이언트 가져오기
getChatThreadClient 메서드는 이미 존재하는 스레드의 chatThreadClient를 반환합니다. 생성된 스레드에서 참가자 추가, 메시지 보내기 등의 작업을 수행하는 데 사용할 수 있습니다. threadId는 기존 채팅 스레드의 고유 ID입니다.
let chatThreadClient = chatClient.getChatThreadClient(threadId);
console.log(`Chat Thread client for threadId:${threadId}`);
client.js에서 <CREATE CHAT THREAD CLIENT> 주석 대신 이 코드를 추가하고, 브라우저 탭을 새로 고친 후 콘솔을 확인하면 다음이 보입니다.
Chat Thread client for threadId: <threadId>
모든 채팅 스레드 나열
listChatThreads 메서드는 ChatThreadItem 형식의 PagedAsyncIterableIterator를 반환합니다. 모든 채팅 스레드를 나열하는 데 사용할 수 있습니다.
[ChatThreadItem]의 반복기는 스레드 목록에서 반환된 응답입니다.
const threads = chatClient.listChatThreads();
for await (const thread of threads) {
   // your code here
}
채팅 스레드에 메시지 보내기
sendMessage 메서드를 사용하여 threadId로 식별되는 스레드에 메시지를 보냅니다.
sendMessageRequest는 메시지 요청을 설명하는 데 사용됩니다.
content를 사용하여 채팅 메시지 콘텐츠를 제공합니다.
sendMessageOptions는 작업 선택적 매개 변수를 설명하는 데 사용됩니다.
senderDisplayName을 사용하여 보낸 사람의 표시 이름을 지정합니다.type을 사용하여 메시지 유형(예: ‘text’ 또는 ‘html’)을 지정합니다.- 선택적으로
metadata를 사용하여 메시지와 함께 보내려는 다른 데이터를 포함합니다. 이 필드는 개발자가 채팅 메시지 기능을 확장하고 사용 사례에 대한 사용자 지정 정보를 추가할 수 있는 메커니즘을 제공합니다. 예를 들어, 메시지에서 파일 링크를 공유할 때 메타데이터에 'hasAttachment:true'를 추가하여 수신자의 애플리케이션이 이를 구문 분석하고 그에 따라 표시할 수 있습니다.
SendChatMessageResult는 메시지 전송 후 반환된 응답이며, 메시지의 고유 ID인 ID를 포함합니다.
const sendMessageRequest =
{
  content: 'Please take a look at the attachment'
};
let sendMessageOptions =
{
  senderDisplayName : 'Jack',
  type: 'text',
  metadata: {
    'hasAttachment': 'true',
    'attachmentUrl': 'https://contoso.com/files/attachment.docx'
  }
};
const sendChatMessageResult = await chatThreadClient.sendMessage(sendMessageRequest, sendMessageOptions);
const messageId = sendChatMessageResult.id;
console.log(`Message sent!, message id:${messageId}`);
client.js에서 <SEND MESSAGE TO A CHAT THREAD> 주석 대신 이 코드를 추가하고, 브라우저 탭을 새로 고친 후 콘솔을 확인합니다.
Message sent!, message id:<number>
채팅 스레드에서 채팅 메시지 받기
실시간 신호를 통해, 새로 들어오는 메시지를 수신 대기하도록 구독하고 메모리의 현재 메시지를 적절하게 업데이트할 수 있습니다. Azure Communication Services는 구독할 수 있는 이벤트 목록을 지원합니다.
// open notifications channel
await chatClient.startRealtimeNotifications();
// subscribe to new notification
chatClient.on("chatMessageReceived", (e) => {
  console.log("Notification chatMessageReceived!");
  // your code here
});
client.js에서 <RECEIVE A CHAT MESSAGE FROM A CHAT THREAD> 주석 대신 이 코드를 추가합니다.
브라우저 탭을 새로 고치면 콘솔에 Notification chatMessageReceived 메시지가 표시됩니다.
또는 지정된 간격으로 listMessages 메서드를 폴링하여 채팅 메시지를 가져올 수 있습니다.
const messages = chatThreadClient.listMessages();
for await (const message of messages) {
   // your code here
}
client.js에서 <LIST MESSAGES IN A CHAT THREAD> 주석 대신 이 코드를 추가합니다.
탭을 새로 고치면 채팅 스레드에서 보낸 메시지 목록을 콘솔에서 찾을 수 있습니다.
listMessages는 chatMessage.type으로 식별할 수 있는 다양한 형식의 메시지를 반환합니다.
자세한 내용은 메시지 유형을 참조하세요.
채팅 스레드에 사용자를 참가자로 추가
채팅 스레드가 생성되면 스레드에서 사용자를 추가하고 제거할 수 있습니다. 사용자를 추가하면 채팅 스레드에 메시지를 보내고 다른 참가자를 추가/제거할 수 있는 액세스 권한이 사용자에게 부여됩니다.
addParticipants 메서드를 호출하기 전에 해당 사용자에 대한 새 액세스 토큰 및 ID를 획득했는지 확인합니다. 사용자가 채팅 클라이언트를 초기화하려면 액세스 토큰이 필요합니다.
addParticipantsRequest는 participants가 채팅 스레드에 추가될 참가자를 나열하는 요청 개체를 설명합니다.
id(필수)는 채팅 스레드에 추가될 통신 식별자입니다.- 선택 사항인
displayName은 스레드 참가자의 표시 이름입니다. - 선택 사항인
shareHistoryTime은 채팅 기록이 참가자와 공유된 시간입니다. 채팅 스레드가 시작된 이후의 기록을 공유하려면 이 속성을 스레드 생성 날짜와 동일한 날짜 또는 그 이전의 날짜로 설정합니다. 참가자가 추가되기 전의 기록을 공유하지 않으려면 현재 날짜로 설정합니다. 일부 기록을 공유하려면 원하는 날짜로 설정합니다.
const addParticipantsRequest =
{
  participants: [
    {
      id: { communicationUserId: '<NEW_PARTICIPANT_USER_ID>' },
      displayName: 'Jane'
    }
  ]
};

await chatThreadClient.addParticipants(addParticipantsRequest);
NEW_PARTICIPANT_USER_ID를 새 사용자 ID로 바꾸고 client.js에서 <ADD NEW PARTICIPANT TO THREAD> 주석 대신 이 코드를 추가합니다.
채팅 스레드에 사용자 나열
const participants = chatThreadClient.listParticipants();
for await (const participant of participants) {
   // your code here
}
client.js에서 <LIST PARTICIPANTS IN A THREAD> 주석 대신 이 코드를 추가하고, 브라우저 탭을 새로 고친 후 콘솔을 확인하면 스레드의 사용자에 대한 정보가 보입니다.
채팅 스레드에서 사용자 제거
참가자를 추가하는 방법과 유사하게 채팅 스레드에서 참가자를 제거할 수 있습니다. 제거하려면 추가한 참가자의 ID를 추적해야 합니다.
removeParticipant 메서드를 사용합니다. 여기서 participant는 스레드에서 제거할 통신 사용자입니다.
await chatThreadClient.removeParticipant({ communicationUserId: <PARTICIPANT_ID> });
await listParticipants();
PARTICIPANT_ID를 이전 단계에서 사용한 사용자 ID로 바꿉니다(<NEW_PARTICIPANT_USER_ID>).
client.js에서 <REMOVE PARTICIPANT FROM THREAD> 주석 대신 이 코드를 추가합니다.
실시간 알림 연결 상태 구독
이벤트 realTimeNotificationConnected 및 realTimeNotificationDisconnected에 대한 구독을 통해 호출 서버에 대한 연결이 활성 상태인지 알 수 있습니다.
// subscribe to realTimeNotificationConnected event
chatClient.on('realTimeNotificationConnected', () => {
  console.log("Real time notification is now connected!");
  // your code here
});
// subscribe to realTimeNotificationDisconnected event
chatClient.on('realTimeNotificationDisconnected', () => {
  console.log("Real time notification is now disconnected!");
  // your code here
});
예제 코드
GitHub에서 이 빠른 시작에 대한 최종 코드를 찾습니다.
필수 조건
시작하기 전에 다음을 확인해야 합니다.
활성 구독이 있는 Azure 계정을 만듭니다. 자세한 내용은 체험 계정 만들기를 참조하세요.
Python 3.7+을 설치합니다.
Azure Communication Services 리소스를 만듭니다. 자세한 내용은 빠른 시작: Communication Services 리소스 만들기 및 관리를 참조하세요. 이 빠른 시작을 위해 리소스 엔드포인트와 연결 문자열을 기록해야 합니다.
사용자 액세스 토큰. 범위를 채팅으로 설정하고 토큰 문자열과 user_id 문자열을 기록해 둡니다. 또한 Azure CLI를 사용하고 연결 문자열과 함께 아래 명령을 실행하여 사용자 및 액세스 토큰을 만들 수 있습니다.
az communication identity token issue --scope chat --connection-string "yourConnectionString"자세한 내용은 Azure CLI를 사용하여 액세스 토큰 만들기 및 관리를 참조하세요.
설정
새 Python 애플리케이션 만들기
터미널 또는 명령 창을 열어 앱에 대한 새 디렉터리를 만들고 이 디렉터리로 이동합니다.
mkdir chat-quickstart && cd chat-quickstart
텍스트 편집기를 사용하여 프로젝트 루트 디렉터리에 start-chat.py라는 파일을 만듭니다. 기본 예외 처리를 비롯해 프로그램의 구조를 추가합니다. 다음 섹션에서는 이 빠른 시작의 모든 소스 코드를 이 파일에 추가합니다.
import os
# Add required SDK components from quickstart here

try:
    print('Azure Communication Services - Chat Quickstart')
    # Quickstart code goes here
except Exception as ex:
    print('Exception:')
    print(ex)
SDK 설치
다음 명령을 사용하여 SDK를 설치합니다.
pip install azure-communication-chat
개체 모델
다음 클래스 및 인터페이스는 Python용 Azure Communication Services 채팅 SDK의 주요 기능 중 일부를 처리합니다.
| 이름 | 설명 |
|---|---|
ChatClient |
이 클래스는 채팅 기능에 필요합니다. 구독 정보를 사용하여 인스턴스화하고 스레드를 만들고 가져오고 삭제하는 데 사용합니다. |
ChatThreadClient |
이 클래스는 채팅 대화목록 기능에 필요합니다. ChatClient를 통해 인스턴스를 가져오고 이를 사용하여 메시지를 전송, 수신, 업데이트 및 삭제할 수 있습니다. 또한 이를 통해 사용자를 추가, 제거 및 가져오고, 입력 알림과 읽음 확인을 보낼 수 있습니다. |
채팅 클라이언트 만들기
채팅 클라이언트를 만들려면 Communications Service 엔드포인트와 필수 조건 단계의 일부로 생성된 액세스 토큰을 사용합니다.
pip install azure-communication-identity
from azure.communication.chat import ChatClient, CommunicationTokenCredential

endpoint = "<replace with your resource endpoint>"
chat_client = ChatClient(endpoint, CommunicationTokenCredential("<Access Token>"))
이 빠른 시작에서는 권장되는 사항이기는 하지만 채팅 애플리케이션에 대한 토큰을 관리하는 서비스 계층을 만드는 방법을 다루지 않습니다. 자세한 내용은 채팅 개념의 "채팅 아키텍처" 섹션을 참조하세요.
채팅 스레드 시작
create_chat_thread 메서드를 사용하여 채팅 스레드를 만듭니다.
topic을 사용하여 스레드에 항목을 제공합니다. 채팅 스레드가 생성되면update_thread함수를 사용하여 항목을 업데이트할 수 있습니다.thread_participants를 사용하여 채팅 스레드에 추가할ChatParticipant를 나열합니다.ChatParticipant는CommunicationUserIdentifier유형을user로 받아들입니다.
CreateChatThreadResult는 스레드를 만들 때 반환된 결과입니다. 생성된 채팅 스레드 id를 가져오는 데 사용할 수 있습니다. 그런 다음, get_chat_thread_client 메서드를 사용하여 이 id를 ChatThreadClient 개체를 가져오는 데 사용할 수 있습니다. ChatThreadClient를 사용하면 이 채팅 스레드에 다른 채팅 작업을 수행할 수 있습니다.
topic="test topic"

create_chat_thread_result = chat_client.create_chat_thread(topic)
chat_thread_client = chat_client.get_chat_thread_client(create_chat_thread_result.chat_thread.id)
채팅 스레드 클라이언트 가져오기
get_chat_thread_client 메서드는 이미 존재하는 스레드에 대한 스레드 클라이언트를 반환합니다. 생성된 스레드에서 작업을 수행하는 데 사용할 수 있습니다. 예를 들어 참가자를 추가하고 메시지를 보낼 수 있습니다. thread_id는 기존 채팅 스레드의 고유 ID입니다.
ChatThreadClient를 사용하면 이 채팅 스레드에 다른 채팅 작업을 수행할 수 있습니다.
thread_id = create_chat_thread_result.chat_thread.id
chat_thread_client = chat_client.get_chat_thread_client(thread_id)
모든 채팅 스레드 나열
list_chat_threads 메서드는 ChatThreadItem 유형의 반복기를 반환합니다.
start_time을 사용하여 채팅 스레드를 가져올 가장 이른 시간을 지정합니다.results_per_page를 사용하여 페이지당 반환되는 최대 채팅 스레드 수를 지정합니다.
[ChatThreadItem] 반복기는 스레드 나열 시 반환된 응답입니다.
from datetime import datetime, timedelta

start_time = datetime.utcnow() - timedelta(days=2)

chat_threads = chat_client.list_chat_threads(results_per_page=5, start_time=start_time)
for chat_thread_item_page in chat_threads.by_page():
    for chat_thread_item in chat_thread_item_page:
        print(chat_thread_item)
        print('Chat Thread Id: ', chat_thread_item.id)
채팅 스레드에 메시지 보내기
send_message 메서드를 사용하여 방금 만든 채팅 스레드에 thread_id로 식별되는 메시지를 보냅니다.
content를 사용하여 채팅 메시지 콘텐츠를 제공합니다.chat_message_type을 사용하여 메시지 콘텐츠 형식을 지정합니다. 가능한 값은text및html입니다. 값을 지정하지 않으면 기본값text로 설정됩니다.sender_display_name을 사용하여 보낸 사람의 표시 이름을 지정합니다.- 선택적으로
metadata를 사용하여 메시지와 함께 보내려는 추가 데이터를 포함합니다. 이 필드는 개발자가 채팅 메시지 기능을 확장하고 사용 사례에 대한 사용자 지정 정보를 추가할 수 있는 메커니즘을 제공합니다. 예를 들어 메시지에서 파일 링크를 공유할 때 메타데이터에 'hasAttachment:true'를 추가하여 수신자의 애플리케이션이 이를 구문 분석하고 그에 따라 표시할 수 있습니다.
SendChatMessageResult는 메시지 전송 시 반환된 응답입니다. 메시지의 고유 ID를 포함합니다.
from azure.communication.chat import ChatMessageType

topic = "test topic"
create_chat_thread_result = chat_client.create_chat_thread(topic)
thread_id = create_chat_thread_result.chat_thread.id
chat_thread_client = chat_client.get_chat_thread_client(create_chat_thread_result.chat_thread.id)


content='Please take a look at the attachment'
sender_display_name='sender name'
metadata={
    'hasAttachment': 'true',
    'attachmentUrl': 'https://contoso.com/files/attachment.docx'
}

# specify chat message type with pre-built enumerations
send_message_result_w_enum = chat_thread_client.send_message(content=content, sender_display_name=sender_display_name, chat_message_type=ChatMessageType.TEXT, metadata=metadata)
print("Message sent: id: ", send_message_result_w_enum.id)
채팅 스레드에서 채팅 메시지 받기
지정된 간격으로 list_messages 메서드를 폴링하여 채팅 메시지를 가져올 수 있습니다.
results_per_page를 사용하여 페이지당 반환되는 최대 메시지 수를 지정합니다.start_time을 사용하여 메시지를 가져올 가장 이른 시간을 지정합니다.
[ChatMessage] 반복기는 메시지 나열 시 반환된 응답입니다.
from datetime import datetime, timedelta

start_time = datetime.utcnow() - timedelta(days=1)

chat_messages = chat_thread_client.list_messages(results_per_page=1, start_time=start_time)
for chat_message_page in chat_messages.by_page():
    for chat_message in chat_message_page:
        print("ChatMessage: Id=", chat_message.id, "; Content=", chat_message.content.message)
list_messages는 update_message 및 delete_message를 사용하여 메시지에 수행된 편집 또는 삭제를 포함한 최신 버전의 메시지를 반환합니다. 삭제된 메시지의 경우 ChatMessage.deleted_on은 메시지가 삭제된 시간을 나타내는 datetime 값을 반환합니다. 편집된 메시지의 경우 ChatMessage.edited_on은 메시지가 편집된 시간을 나타내는 datetime을 반환합니다. 원래 메시지 생성 시간은 메시지를 정렬하는 데 사용되는 ChatMessage.created_on을 사용하여 확인할 수 있습니다
list_messages는 ChatMessage.type으로 식별되는 다양한 유형의 메시지를 반환합니다.
자세한 내용은 메시지 유형을 참조하세요.
읽음 확인 보내기
send_read_receipt 메서드를 사용하여 사용자 대신 읽음 확인 이벤트를 스레드에 게시합니다.
message_id를 사용하여 현재 사용자가 읽은 최신 메시지의 ID를 지정합니다.
content='hello world'

send_message_result = chat_thread_client.send_message(content)
chat_thread_client.send_read_receipt(message_id=send_message_result.id)
채팅 스레드에 사용자를 참가자로 추가
채팅 스레드가 생성되면 스레드에 사용자를 추가하고 제거할 수 있습니다. 사용자를 추가하면 채팅 스레드에 메시지를 보내고 다른 참가자를 추가/제거할 수 있는 액세스 권한이 사용자에게 부여됩니다. add_participants 메서드를 호출하기 전에 해당 사용자에 대한 새 액세스 토큰 및 ID를 획득했는지 확인하세요. 사용자는 채팅 클라이언트를 초기화하기 위해 해당 액세스 토큰이 필요합니다.
새 액세스 토큰과 ID가 모든 사용자에게 제공되는 경우 add_participants 메서드를 사용하여 한 명 이상의 사용자를 채팅 스레드에 추가할 수 있습니다.
list(tuple(ChatParticipant, CommunicationError))가 반환됩니다. 참가자가 성공적으로 추가되면 빈 목록이 필요합니다. 참가자를 추가하는 동안 오류가 발생한 경우 발생한 오류와 함께 실패한 참가자로 목록이 채워집니다.
from azure.communication.identity import CommunicationIdentityClient
from azure.communication.chat import ChatParticipant
from datetime import datetime

# create 2 users
identity_client = CommunicationIdentityClient.from_connection_string('<connection_string>')
new_users = [identity_client.create_user() for i in range(2)]

# # conversely, you can also add an existing user to a chat thread; provided the user_id is known
# from azure.communication.identity import CommunicationUserIdentifier
#
# user_id = 'some user id'
# user_display_name = "Wilma Flinstone"
# new_user = CommunicationUserIdentifier(user_id)
# participant = ChatParticipant(
#     identifier=new_user,
#     display_name=user_display_name,
#     share_history_time=datetime.utcnow())

participants = []
for _user in new_users:
  chat_thread_participant = ChatParticipant(
    identifier=_user,
    display_name='Fred Flinstone',
    share_history_time=datetime.utcnow()
  )
  participants.append(chat_thread_participant)

response = chat_thread_client.add_participants(participants)

def decide_to_retry(error, **kwargs):
    """
    Insert some custom logic to decide if retry is applicable based on error
    """
    return True

# verify if all users has been successfully added or not
# in case of partial failures, you can retry to add all the failed participants
retry = [p for p, e in response if decide_to_retry(e)]
if retry:
    chat_thread_client.add_participants(retry)
채팅 스레드의 스레드 참가자 나열
참가자를 추가하는 방법과 유사하게 스레드에서 참가자를 나열할 수도 있습니다.
list_participants를 사용하여 스레드의 참가자를 검색합니다. 다음 명령은 모두 선택 사항입니다.
results_per_page를 사용하여 페이지당 반환할 최대 참가자 수를 지정합니다.skip을 사용하여 응답에서 지정된 위치까지 참가자를 건너뜁니다.
[ChatParticipant] 반복기는 참가자 나열 시 반환된 응답입니다.
chat_thread_participants = chat_thread_client.list_participants()
for chat_thread_participant_page in chat_thread_participants.by_page():
    for chat_thread_participant in chat_thread_participant_page:
        print("ChatParticipant: ", chat_thread_participant)
코드 실행
python 명령을 사용하여 애플리케이션 디렉터리에서 애플리케이션을 실행합니다.
python start-chat.py
예제 코드
GitHub에서 이 빠른 시작에 대한 최종 코드를 찾습니다.
필수 조건
활성 구독이 있는 Azure 계정. 체험 계정을 만듭니다.
JDK(Java Development Kit), 버전 8 이상.
Azure Communication Services 리소스를 만듭니다. 자세한 내용은 Azure Communication Services 리소스 만들기를 참조하세요. 이 빠른 시작을 위해 리소스 엔드포인트 및 연결 문자열을 기록해야 합니다.
사용자 액세스 토큰. 범위를 채팅으로 설정하고 토큰 문자열과 user_id 문자열을 기록해 둡니다. 또한 Azure CLI를 사용하고 연결 문자열과 함께 아래 명령을 실행하여 사용자 및 액세스 토큰을 만들 수 있습니다.
az communication identity token issue --scope chat --connection-string "yourConnectionString"자세한 내용은 Azure CLI를 사용하여 액세스 토큰 만들기 및 관리를 참조하세요.
설정
새 Java 애플리케이션 만들기
터미널 또는 명령 창을 열고 Java 애플리케이션을 만들 디렉터리로 이동합니다. 아래 명령을 실행하여 maven-archetype-quickstart 템플릿에서 Java 프로젝트를 생성합니다.
mvn archetype:generate -DgroupId=com.communication.quickstart -DartifactId=communication-quickstart -DarchetypeArtifactId=maven-archetype-quickstart -DarchetypeVersion=1.4 -DinteractiveMode=false
'생성' 목표에서 artifactId와 동일한 이름으로 디렉터리를 만들었습니다. 이 디렉터리 아래의 src/main/java directory 디렉터리는 프로젝트 소스 코드를 포함하고, src/test/java 디렉터리는 테스트 원본을 포함하고, pom.xml 파일은 프로젝트의 POM(프로젝트 개체 모델)입니다.
Java 8 이상을 사용하도록 애플리케이션의 POM 파일을 업데이트합니다.
<properties>
    <project.build.sourceEncoding>UTF-8</project.build.sourceEncoding>
    <maven.compiler.source>1.8</maven.compiler.source>
    <maven.compiler.target>1.8</maven.compiler.target>
</properties>
채팅 SDK에 대한 패키지 참조 추가
POM 파일에서 채팅 API를 사용하여 azure-communication-chat 패키지를 참조합니다.
<dependency>
    <groupId>com.azure</groupId>
    <artifactId>azure-communication-chat</artifactId>
    <version><!-- Please refer to https://search.maven.org/artifact/com.azure/azure-communication-chat for the latest version --></version>
</dependency>
인증을 위해 클라이언트가 azure-communication-common 패키지를 참조해야 합니다.
<dependency>
    <groupId>com.azure</groupId>
    <artifactId>azure-communication-common</artifactId>
    <version><!-- Please refer to https://search.maven.org/artifact/com.azure/azure-communication-common for the latest version --></version>
</dependency>
개체 모델
다음 클래스 및 인터페이스는 Java용 Azure Communication Services 채팅 SDK의 주요 기능 중 일부를 처리합니다.
| 이름 | 설명 |
|---|---|
| ChatClient | 이 클래스는 채팅 기능에 필요합니다. 구독 정보를 사용하여 인스턴스화하고 스레드를 만들고 가져오고 삭제하는 데 사용합니다. |
| ChatAsyncClient | 이 클래스는 비동기 채팅 기능에 필요합니다. 구독 정보를 사용하여 인스턴스화하고 스레드를 만들고 가져오고 삭제하는 데 사용합니다. |
| ChatThreadClient | 이 클래스는 채팅 스레드 기능에 필요합니다. 사용자는 ChatClient를 통해 인스턴스를 가져오고, 이를 사용하여 메시지 전송/수신/업데이트/삭제, 사용자 추가/제거/가져오기, 입력 알림 및 읽음 확인 보내기를 수행할 수 있습니다. |
| ChatThreadAsyncClient | 이 클래스는 비동기 채팅 스레드 기능에 필요합니다. 사용자는 ChatAsyncClient를 통해 인스턴스를 가져오고, 이를 사용하여 메시지 전송/수신/업데이트/삭제, 사용자 추가/제거/가져오기, 입력 알림 및 읽음 확인 보내기를 수행할 수 있습니다. |
채팅 클라이언트 만들기
채팅 클라이언트를 만들려면 Communications Service 엔드포인트와 필수 조건 단계의 일부로 생성된 액세스 토큰을 사용합니다. 사용자 액세스 토큰을 사용하면 Azure Communication Service에 직접 인증되는 클라이언트 애플리케이션을 빌드할 수 있습니다. 서버에서 이러한 토큰을 생성한 후 클라이언트 디바이스에 다시 전달합니다. 공통 SDK의 CommunicationTokenCredential 클래스를 사용하여 토큰을 채팅 클라이언트에 전달해야 합니다.
채팅 아키텍처에 대한 자세한 정보
Import 문을 추가할 때 com.azure.communication.chat 및 com.azure.communication.chat.models namespaces의 import 문만 추가하고 com.azure.communication.chat.implementation 네임스페이스의 import 문은 추가하지 마세요. Maven을 통해 생성된 App.java 파일에서 다음 코드를 사용하여 다음 작업을 시작할 수 있습니다.
package com.communication.quickstart;

import com.azure.communication.chat.*;
import com.azure.communication.chat.models.*;
import com.azure.communication.common.*;
import com.azure.core.http.rest.PagedIterable;

import java.io.*;
import java.util.*;

public class App
{
    public static void main( String[] args ) throws IOException
    {
        System.out.println("Azure Communication Services - Chat Quickstart");

        // Your unique Azure Communication service endpoint
        String endpoint = "<replace with your resource endpoint>";

        // User access token fetched from your trusted service
        String userAccessToken = "<USER_ACCESS_TOKEN>";

        // Create a CommunicationTokenCredential with the given access token, which is only valid until the token is valid
        CommunicationTokenCredential userCredential = new CommunicationTokenCredential(userAccessToken);

        // Initialize the chat client
        final ChatClientBuilder builder = new ChatClientBuilder();
        builder.endpoint(endpoint)
            .credential(userCredential);
        ChatClient chatClient = builder.buildClient();
    }
}
채팅 스레드 시작
createChatThread 메서드를 사용하여 채팅 스레드를 만듭니다.
createChatThreadOptions는 스레드 요청을 설명하는 데 사용됩니다.
- 구문의
topic매개 변수를 사용하여 채팅에 주제를 제공합니다. 주제는 채팅 스레드를 만든 후UpdateThread함수를 사용하여 업데이트할 수 있습니다. participants를 사용하여 스레드에 추가할 스레드 참가자를 나열합니다.ChatParticipant는 사용자 액세스 토큰 빠른 시작에서 만든 사용자를 가져옵니다.
CreateChatThreadResult는 채팅 스레드를 만들 때 반환되는 응답입니다.
여기에는 스레드 클라이언트를 가져오는 데 사용할 수 있는 ChatThread 개체를 반환하는 getChatThread() 메서드가 포함되어 있습니다. 만들어진 스레드에서 참가자 추가, 메시지 보내기 등의 작업을 수행하기 위한 ChatThreadClient를 이 클라이언트에서 가져올 수 있습니다. ChatThread 개체에는 스레드의 고유 ID를 검색하는 getId() 메서드도 포함되어 있습니다.
CommunicationUserIdentifier identity1 = new CommunicationUserIdentifier("<USER_1_ID>");
CommunicationUserIdentifier identity2 = new CommunicationUserIdentifier("<USER_2_ID>");

ChatParticipant firstThreadParticipant = new ChatParticipant()
    .setCommunicationIdentifier(identity1)
    .setDisplayName("Participant Display Name 1");

ChatParticipant secondThreadParticipant = new ChatParticipant()
    .setCommunicationIdentifier(identity2)
    .setDisplayName("Participant Display Name 2");

CreateChatThreadOptions createChatThreadOptions = new CreateChatThreadOptions("Topic")
    .addParticipant(firstThreadParticipant)
    .addParticipant(secondThreadParticipant);

CreateChatThreadResult result = chatClient.createChatThread(createChatThreadOptions);
String chatThreadId = result.getChatThread().getId();
채팅 스레드 나열
listChatThreads 메서드를 사용하여 기존 채팅 스레드 목록을 검색합니다.
PagedIterable<ChatThreadItem> chatThreads = chatClient.listChatThreads();

chatThreads.forEach(chatThread -> {
    System.out.printf("ChatThread id is %s.\n", chatThread.getId());
});
채팅 스레드 클라이언트 가져오기
getChatThreadClient 메서드는 이미 존재하는 스레드에 대한 스레드 클라이언트를 반환합니다. 생성된 스레드에서 참가자 추가, 메시지 보내기 등의 작업을 수행하는 데 사용할 수 있습니다. chatThreadId는 기존 채팅 스레드의 고유 ID입니다.
ChatThreadClient chatThreadClient = chatClient.getChatThreadClient(chatThreadId);
채팅 스레드에 메시지 보내기
sendMessage 메서드를 사용하여 chatThreadId로 식별되는 만든 스레드에 메시지를 보냅니다.
sendChatMessageOptions는 채팅 메시지 요청을 설명하는 데 사용됩니다.
content를 사용하여 채팅 메시지 콘텐츠를 제공합니다.type을 사용하여 채팅 메시지 콘텐츠 유형, TEXT 또는 HTML을 지정합니다.senderDisplayName을 사용하여 보낸 사람의 표시 이름을 지정합니다.- 선택적으로
metadata를 사용하여 메시지와 함께 보내려는 추가 데이터를 포함합니다. 이 필드는 개발자가 채팅 메시지 기능을 확장하고 사용 사례에 대한 사용자 지정 정보를 추가할 수 있는 메커니즘을 제공합니다. 예를 들어, 메시지에서 파일 링크를 공유할 때 수신자의 애플리케이션이 이를 구문 분석하고 그에 따라 표시할 수 있도록 메타데이터에hasAttachment:true를 추가할 수 있습니다.
응답 sendChatMessageResult에는 메시지의 고유 ID인 id가 포함됩니다.
Map<String, String> metadata = new HashMap<String, String>();
metadata.put("hasAttachment", "true");
metadata.put("attachmentUrl", "https://contoso.com/files/attachment.docx");

SendChatMessageOptions sendChatMessageOptions = new SendChatMessageOptions()
    .setContent("Please take a look at the attachment")
    .setType(ChatMessageType.TEXT)
    .setSenderDisplayName("Sender Display Name")
    .setMetadata(metadata);

SendChatMessageResult sendChatMessageResult = chatThreadClient.sendMessage(sendChatMessageOptions);
String chatMessageId = sendChatMessageResult.getId();
채팅 스레드에서 채팅 메시지 받기
지정된 간격으로 채팅 스레드 클라이언트에서 listMessages 메서드를 폴링하여 채팅 메시지를 가져올 수 있습니다.
chatThreadClient.listMessages().forEach(message -> {
    System.out.printf("Message id is %s.\n", message.getId());
});
listMessages는 .editMessage() 및 .deleteMessage()를 사용하여 메시지에 발생한 편집 또는 삭제를 포함한 최신 버전의 메시지를 반환합니다. 삭제된 메시지의 경우 chatMessage.getDeletedOn()은 메시지가 삭제된 시간을 나타내는 datetime 값을 반환합니다. 편집된 메시지의 경우 chatMessage.getEditedOn()은 메시지가 편집된 시간을 나타내는 datetime을 반환합니다. 원래 메시지 생성 시간은 chatMessage.getCreatedOn()을 사용하여 액세스할 수 있으며 메시지를 정렬하는 데 사용할 수 있습니다.
메시지 유형에서 메시지 유형에 대해 더 알아보세요.
읽음 확인 보내기
sendReadReceipt 메서드를 사용하여 사용자 대신 채팅 스레드에서 읽음 확인 이벤트를 게시합니다.
chatMessageId는 읽은 채팅 메시지의 고유 ID입니다.
String chatMessageId = message.getId();
chatThreadClient.sendReadReceipt(chatMessageId);
채팅 참가자 나열
listParticipants를 사용하여 chatThreadId로 식별된 채팅 스레드의 참여자가 포함된 페이징된 컬렉션을 검색합니다.
PagedIterable<ChatParticipant> chatParticipantsResponse = chatThreadClient.listParticipants();
chatParticipantsResponse.forEach(chatParticipant -> {
    System.out.printf("Participant id is %s.\n", ((CommunicationUserIdentifier) chatParticipant.getCommunicationIdentifier()).getId());
});
채팅 스레드에 사용자를 참가자로 추가
채팅 스레드가 생성되면 스레드에서 사용자를 추가하고 제거할 수 있습니다. 사용자를 추가하면 채팅 스레드에 메시지를 보내고 다른 참가자를 추가/제거할 수 있는 액세스 권한이 사용자에게 부여됩니다. 해당 사용자의 새 액세스 토큰과 ID를 가져오는 것부터 시작해야 합니다. addParticipants 메서드를 호출하기 전에 해당 사용자의 새 액세스 토큰과 ID를 획득했는지 확인합니다. 사용자가 채팅 클라이언트를 초기화하려면 액세스 토큰이 필요합니다.
addParticipants 메서드를 사용하여 참가자를 스레드에 추가합니다.
- 필수 사항인
communicationIdentifier는 사용자 액세스 토큰 빠른 시작에서 CommunicationIdentityClient를 통해 만든 CommunicationIdentifier입니다. - 선택 사항인
displayName은 스레드 참가자의 표시 이름입니다. - 선택 사항인
shareHistoryTime은 채팅 기록이 참가자와 공유된 시간입니다. 채팅 스레드가 시작된 이후의 기록을 공유하려면 이 속성을 스레드 생성 날짜와 동일한 날짜 또는 그 이전의 날짜로 설정합니다. 참가자가 추가되기 전의 기록을 공유하지 않으려면 현재 날짜로 설정합니다. 일부 기록을 공유하려면 필요한 날짜로 설정합니다.
List<ChatParticipant> participants = new ArrayList<ChatParticipant>();

CommunicationUserIdentifier identity3 = new CommunicationUserIdentifier("<USER_3_ID>");
CommunicationUserIdentifier identity4 = new CommunicationUserIdentifier("<USER_4_ID>");

ChatParticipant thirdThreadParticipant = new ChatParticipant()
    .setCommunicationIdentifier(identity3)
    .setDisplayName("Display Name 3");

ChatParticipant fourthThreadParticipant = new ChatParticipant()
    .setCommunicationIdentifier(identity4)
    .setDisplayName("Display Name 4");

participants.add(thirdThreadParticipant);
participants.add(fourthThreadParticipant);

chatThreadClient.addParticipants(participants);
코드 실행
pom.xml 파일이 포함된 디렉터리로 이동한 후 다음 mvn 명령을 사용하여 프로젝트를 컴파일합니다.
mvn compile
그런 다음, 패키지를 빌드합니다.
mvn package
다음 mvn 명령을 실행하여 앱을 실행합니다.
mvn exec:java -Dexec.mainClass="com.communication.quickstart.App" -Dexec.cleanupDaemonThreads=false
예제 코드
GitHub에서 이 빠른 시작에 대한 최종 코드를 찾습니다.
필수 조건
시작하기 전에 다음을 확인해야 합니다.
활성 구독이 있는 Azure 계정을 만듭니다. 자세한 내용은 체험 계정 만들기를 참조하세요.
Android Studio를 설치합니다. Android Studio를 사용하여 종속성을 설치하기 위한 빠른 시작용 Android 애플리케이션을 만듭니다.
Azure Communication Services 리소스를 만듭니다. 자세한 내용은 Azure Communication Services 리소스 만들기를 참조하세요. 이 빠른 시작을 위해 리소스 엔드포인트와 연결 문자열을 기록해야 합니다.
2명의 Communication Services 사용자를 만들고 사용자 액세스 토큰을 발급합니다. 범위를 채팅으로 설정하고 토큰 문자열과 user_id 문자열을 기록해 둡니다. 이 빠른 시작에서는 초기 참가자가 있는 스레드를 만든 다음, 두 번째 참가자를 스레드에 추가합니다. 또한 Azure CLI를 사용하고 연결 문자열과 함께 아래 명령을 실행하여 사용자 및 액세스 토큰을 만들 수 있습니다.
az communication identity token issue --scope chat --connection-string "yourConnectionString"자세한 내용은 Azure CLI를 사용하여 액세스 토큰 만들기 및 관리를 참조하세요.
설정
새 Android 애플리케이션 만들기
- Android Studio를 열고
Create a new project를 선택합니다. - 다음 창에서 프로젝트 템플릿으로
Empty Activity를 선택합니다. - 옵션을 선택할 때 프로젝트 이름에
ChatQuickstart를 입력합니다. - 다음을 클릭하고 프로젝트를 만들려는 디렉터리를 선택합니다.
라이브러리 설치
Gradle을 사용하여 필요한 Communication Services 종속성을 설치합니다. 명령줄에서 ChatQuickstart 프로젝트의 루트 디렉터리 안으로 이동합니다. 앱의 build.gradle 파일을 열고 ChatQuickstart 대상에 다음 종속성을 추가합니다.
implementation 'com.azure.android:azure-communication-common:' + $azureCommunicationCommonVersion
implementation 'com.azure.android:azure-communication-chat:' + $azureCommunicationChatVersion
implementation 'org.slf4j:slf4j-log4j12:1.7.29'
최신 버전 번호는 https://search.maven.org/artifact/com.azure.android/azure-communication-common 및 https://search.maven.org/artifact/com.azure.android/azure-communication-chat를 참조하세요.
루트 build.gradle의 패키징 옵션에서 메타 파일을 제외합니다.
android {
   ...
    packagingOptions {
        exclude 'META-INF/DEPENDENCIES'
        exclude 'META-INF/LICENSE'
        exclude 'META-INF/license'
        exclude 'META-INF/NOTICE'
        exclude 'META-INF/notice'
        exclude 'META-INF/ASL2.0'
        exclude("META-INF/*.md")
        exclude("META-INF/*.txt")
        exclude("META-INF/*.kotlin_module")
    }
}
(대안) Maven을 통해 라이브러리를 설치하려면
Maven 빌드 시스템을 사용하여 프로젝트로 라이브러리를 가져오려면 아티팩트 ID와 사용할 버전을 지정하여 앱의 pom.xml 파일에 있는 dependencies 섹션에 라이브러리를 추가합니다.
<dependency>
  <groupId>com.azure.android</groupId>
  <artifactId>azure-communication-chat</artifactId>
  <version><!-- Please refer to https://search.maven.org/artifact/com.azure.android/azure-communication-chat for the latest version --></version>
</dependency>
Azure 함수 설정
자세한 내용은 Azure 함수 통합을 확인하세요. 하드 코딩 애플리케이션 매개 변수를 방지하려면 Azure Function과 통합하는 것이 좋습니다.
애플리케이션 상수 설정:
모든 애플리케이션 상수를 저장하는 ApplicationConstants 클래스를 만듭니다.
public class ApplicationConstants {
    public static final String SDK_VERSION = "<your_version>";
    public final static String SDK_NAME = "azure-communication-com.azure.android.communication.chat";
    public final static String APPLICATION_ID = "Chat_Test_App";
    public final static String TAG = "[Chat Test App]";
    public static CommunicationTokenCredential COMMUNICATION_TOKEN_CREDENTIAL;
}
자리 표시자 설정
MainActivity.java 파일을 열고 편집합니다. 이 빠른 시작에서는 MainActivity에 코드를 추가하고 콘솔에서 출력을 확인합니다. 이 빠른 시작에서는 UI 빌드를 다루지 않습니다. 파일 상단에서 Azure Communication Common, Azure Communication Chat 및 기타 시스템 라이브러리를 가져옵니다.
import com.azure.android.communication.chat.*;
import com.azure.android.communication.chat.models.*;
import com.azure.android.communication.common.*;

import android.os.Bundle;
import android.util.Log;
import android.widget.Toast;

import com.jakewharton.threetenabp.AndroidThreeTen;

import java.util.ArrayList;
import java.util.List;
다음 코드를 MainActivity.java 파일의 MainActivity 클래스에 복사합니다.
    private ChatAsyncClient chatAsyncClient;

    private void log(String msg) {
        Log.i(TAG, msg);
        Toast.makeText(this, msg, Toast.LENGTH_LONG).show();
    }

   @Override
    protected void onStart() {
        super.onStart();
        try {
            AndroidThreeTen.init(this);

            // Initialize application parameters if one of the conditions in '### Initialize Application Parameters' are met.

            // <CREATE A CHAT CLIENT>

            // <CREATE A CHAT THREAD>

            // <CREATE A CHAT THREAD CLIENT>

            // <SEND A MESSAGE>

            // <RECEIVE CHAT MESSAGES>

            // <ADD A USER>

            // <LIST USERS>

            // <REMOVE A USER>

            // <<SEND A TYPING NOTIFICATION>>

            // <<SEND A READ RECEIPT>>

            // <<LIST READ RECEIPTS>>
        } catch (Exception e){
            System.out.println("Quickstart failed: " + e.getMessage());
        }
    }
애플리케이션 매개 변수 초기화
참고 항목
다음 조건 중 하나가 충족되면 ApplicationConstants 초기화를 MainActivity.java에 추가해야 합니다. 1. 푸시 알림 기능이 사용하도록 설정되어 있지 않습니다. 2. Android용 Azure Communication 채팅 라이브러리의 버전은 < '2.0.0'입니다. 그렇지 않으면 Android 푸시 알림의 11단계를 참조하세요. 참고로 사용하고 있는 SDK 버전의 샘플 APP을 참고해주세요.
ACS_ENDPOINT, FIRST_USER_ID 및 FIRST_USER_ACCESS_TOKEN은 Azure 함수 호출에서 반환됩니다. 자세한 내용은 Azure 함수 통합을 확인하세요. Azure Function 호출의 응답을 사용하여 매개 변수 목록을 초기화합니다.
ACS_ENDPOINT: Communication Services 리소스의 엔드포인트입니다.FIRST_USER_ID및SECOND_USER_ID: Communication Services 리소스에서 생성한 유효한 Communication Services 사용자 ID입니다.FIRST_USER_ACCESS_TOKEN:<FIRST_USER_ID>에 대한 통신 서비스 액세스 토큰입니다.
Azure 함수를 호출하여 애플리케이션 매개 변수를 초기화하기 위한 코드 블록:
try {
        UserTokenClient userTokenClient = new UserTokenClient(AZURE_FUNCTION_URL);
        //First user context
        userTokenClient.getNewUserContext();
        ACS_ENDPOINT = userTokenClient.getACSEndpoint();
        FIRST_USER_ID = userTokenClient.getUserId();
        FIRST_USER_ACCESS_TOKEN = userTokenClient.getUserToken();
        COMMUNICATION_TOKEN_CREDENTIAL = new CommunicationTokenCredential(FIRST_USER_ACCESS_TOKEN);
        //Second user context
        userTokenClient.getNewUserContext();
        SECOND_USER_ID = userTokenClient.getUserId();
    } catch (Throwable throwable) {
        //Your handling code
        logger.logThrowableAsError(throwable);
    }
채팅 클라이언트 만들기
<CREATE A CHAT CLIENT> 주석을 다음 코드로 바꿉니다(파일 맨 위에 import 문 배치).
import com.azure.android.core.http.policy.UserAgentPolicy;

chatAsyncClient = new ChatClientBuilder()
    .endpoint(endpoint)
    .credential(new CommunicationTokenCredential(firstUserAccessToken))
    .addPolicy(new UserAgentPolicy(APPLICATION_ID, SDK_NAME, sdkVersion))
    .buildAsyncClient();
개체 모델
다음 클래스 및 인터페이스는 JavaScript용 Azure Communication Services 채팅 SDK의 주요 기능 중 일부를 처리합니다.
| 이름 | 설명 |
|---|---|
| ChatClient/ChatAsyncClient | 이 클래스는 채팅 기능에 필요합니다. 구독 정보를 사용하여 인스턴스화한 다음 이를 사용해 스레드를 만들고, 가져오고, 삭제하고, 채팅 이벤트를 구독합니다. |
| ChatThreadClient/ChatThreadAsyncClient | 이 클래스는 채팅 스레드 기능에 필요합니다. 사용자는 ChatClient를 통해 인스턴스를 가져오고, 이를 사용하여 메시지 전송/수신/업데이트/삭제, 사용자 추가/제거/가져오기, 입력 알림 및 읽음 확인 보내기를 수행할 수 있습니다. |
채팅 스레드 시작
ChatAsyncClient를 사용하여 초기 사용자로 새 스레드를 만듭니다.
<CREATE A CHAT THREAD> 주석을 다음 코드로 바꿉니다.
// A list of ChatParticipant to start the thread with.
List<ChatParticipant> participants = new ArrayList<>();
// The display name for the thread participant.
String displayName = "initial participant";
participants.add(new ChatParticipant()
    .setCommunicationIdentifier(new CommunicationUserIdentifier(firstUserId))
    .setDisplayName(displayName));

// The topic for the thread.
final String topic = "General";
// Optional, set a repeat request ID.
final String repeatabilityRequestID = "";
// Options to pass to the create method.
CreateChatThreadOptions createChatThreadOptions = new CreateChatThreadOptions()
    .setTopic(topic)
    .setParticipants(participants)
    .setIdempotencyToken(repeatabilityRequestID);

CreateChatThreadResult createChatThreadResult =
    chatAsyncClient.createChatThread(createChatThreadOptions).get();
ChatThreadProperties chatThreadProperties = createChatThreadResult.getChatThreadProperties();
threadId = chatThreadProperties.getId();
채팅 스레드 클라이언트 가져오기
이제 채팅 스레드를 만들었으므로 스레드 내에서 작업을 수행하기 위해 ChatThreadAsyncClient를 가져옵니다. <CREATE A CHAT THREAD CLIENT> 주석을 다음 코드로 바꿉니다.
ChatThreadAsyncClient chatThreadAsyncClient = new ChatThreadClientBuilder()
    .endpoint(endpoint)
    .credential(new CommunicationTokenCredential(firstUserAccessToken))
    .addPolicy(new UserAgentPolicy(APPLICATION_ID, SDK_NAME, sdkVersion))
    .chatThreadId(threadId)
    .buildAsyncClient();
채팅 스레드에 메시지 보내기
이제 해당 스레드에 메시지를 보냅니다.
<SEND A MESSAGE> 주석을 다음 코드로 바꿉니다.
// The chat message content, required.
final String content = "Please take a look at the attachment";

// The display name of the sender, if null (i.e. not specified), an empty name will be set.
final String senderDisplayName = "An important person";

// Use metadata optionally to include any additional data you want to send along with the message.
// This field provides a mechanism for developers to extend chat message functionality and add
// custom information for your use case. For example, when sharing a file link in the message, you
// might want to add 'hasAttachment:true' in metadata so that recipient's application can parse
// that and display accordingly.
final Map<String, String> metadata = new HashMap<String, String>();
metadata.put("hasAttachment", "true");
metadata.put("attachmentUrl", "https://contoso.com/files/attachment.docx");

SendChatMessageOptions chatMessageOptions = new SendChatMessageOptions()
    .setType(ChatMessageType.TEXT)
    .setContent(content)
    .setSenderDisplayName(senderDisplayName)
    .setMetadata(metadata);

// A string is the response returned from sending a message, it is an id, which is the unique ID
// of the message.
chatMessageId = chatThreadAsyncClient.sendMessage(chatMessageOptions).get().getId();
채팅 스레드에서 채팅 메시지 받기
실시간 알림
실시간 신호를 통해, 새로 들어오는 메시지를 구독하고 메모리의 현재 메시지를 적절하게 업데이트할 수 있습니다. Azure Communication Services는 구독할 수 있는 이벤트 목록을 지원합니다.
<RECEIVE CHAT MESSAGES> 주석을 다음 코드로 바꿉니다(파일 맨 위에 import 문 배치).
// Start real time notification
chatAsyncClient.startRealtimeNotifications(firstUserAccessToken, getApplicationContext());

// Register a listener for chatMessageReceived event
chatAsyncClient.addEventHandler(ChatEventType.CHAT_MESSAGE_RECEIVED, (ChatEvent payload) -> {
    ChatMessageReceivedEvent chatMessageReceivedEvent = (ChatMessageReceivedEvent) payload;
    // You code to handle chatMessageReceived event

});
Important
알려진 문제: Android Chat 및 Calling SDK를 동일한 애플리케이션에서 함께 사용하는 경우 Chat SDK의 실시간 알림 기능이 작동하지 않습니다. 종속성 해결 문제가 발생할 수 있습니다. 솔루션에 대해 작업하는 동안 앱의 build.gradle 파일에 다음 종속성 정보를 추가하여 실시간 알림 기능을 해제하고 대신 GetMessages API를 폴링하여 들어오는 메시지를 사용자에게 표시할 수 있습니다.
implementation ("com.azure.android:azure-communication-chat:1.0.0") {
    exclude group: 'com.microsoft', module: 'trouter-client-android'
}
implementation 'com.azure.android:azure-communication-calling:1.0.0'
위의 업데이트에서 애플리케이션이 chatAsyncClient.startRealtimeNotifications() 또는 chatAsyncClient.addEventHandler()과 같은 알림 API를 사용하려고 하면 런타임 오류가 발생합니다.
푸시 알림
자세한 내용은 Android 푸시 알림을 확인하세요.
채팅 스레드에 사용자를 참가자로 추가
<ADD A USER> 주석을 다음 코드로 바꿉니다.
// The display name for the thread participant.
String secondUserDisplayName = "a new participant";
ChatParticipant participant = new ChatParticipant()
    .setCommunicationIdentifier(new CommunicationUserIdentifier(secondUserId))
    .setDisplayName(secondUserDisplayName);

chatThreadAsyncClient.addParticipant(participant);
스레드에 사용자 나열
<LIST USERS> 주석을 다음 코드로 바꿉니다(파일 맨 위에 import 문 배치).
import com.azure.android.core.rest.util.paging.PagedAsyncStream;
import com.azure.android.core.util.RequestContext;

// The maximum number of participants to be returned per page, optional.
int maxPageSize = 10;

// Skips participants up to a specified position in response.
int skip = 0;

// Options to pass to the list method.
ListParticipantsOptions listParticipantsOptions = new ListParticipantsOptions()
    .setMaxPageSize(maxPageSize)
    .setSkip(skip);

PagedAsyncStream<ChatParticipant> participantsPagedAsyncStream =
      chatThreadAsyncClient.listParticipants(listParticipantsOptions, RequestContext.NONE);

participantsPagedAsyncStream.forEach(chatParticipant -> {
    // You code to handle participant
});
채팅 스레드에서 사용자 제거
이제 스레드에서 두 번째 사용자를 제거합니다.
<REMOVE A USER> 주석을 다음 코드로 바꿉니다.
// Using the unique ID of the participant.
chatThreadAsyncClient.removeParticipant(new CommunicationUserIdentifier(secondUserId)).get();
입력 알림 보내기
<SEND A TYPING NOTIFICATION> 주석을 다음 코드로 바꿉니다.
chatThreadAsyncClient.sendTypingNotification().get();
읽음 확인 보내기
위에서 보낸 메시지에 대한 읽음 확인을 보냅니다.
<SEND A READ RECEIPT> 주석을 다음 코드로 바꿉니다.
chatThreadAsyncClient.sendReadReceipt(chatMessageId).get();
읽음 확인 나열
<READ RECEIPTS> 주석을 다음 코드로 바꿉니다.
// The maximum number of participants to be returned per page, optional.
maxPageSize = 10;
// Skips participants up to a specified position in response.
skip = 0;
// Options to pass to the list method.
ListReadReceiptOptions listReadReceiptOptions = new ListReadReceiptOptions()
    .setMaxPageSize(maxPageSize)
    .setSkip(skip);

PagedAsyncStream<ChatMessageReadReceipt> readReceiptsPagedAsyncStream =
      chatThreadAsyncClient.listReadReceipts(listReadReceiptOptions, RequestContext.NONE);

readReceiptsPagedAsyncStream.forEach(readReceipt -> {
    // You code to handle readReceipt
});
코드 실행
Android Studio에서 실행 단추를 눌러 프로젝트를 빌드하고 실행합니다. 콘솔에서 코드의 출력과 ChatClient의 로거 출력을 볼 수 있습니다.
예제 코드
GitHub에서 이 빠른 시작에 대한 최종 코드를 찾습니다.
필수 조건
시작하기 전에 다음을 확인해야 합니다.
활성 구독이 있는 Azure 계정을 만듭니다. 자세한 내용은 체험 계정 만들기를 참조하세요.
Azure Communication Services 리소스를 만듭니다. 자세한 내용은 Azure Communication Services 리소스 만들기를 참조하세요. 이 빠른 시작을 위해 리소스 엔드포인트 및 연결 문자열을 기록해야 합니다.
사용자 액세스 토큰. 범위를 채팅으로 설정하고 토큰 문자열과 user_id 문자열을 기록해 둡니다. 또한 Azure CLI를 사용하고 연결 문자열과 함께 아래 명령을 실행하여 사용자 및 액세스 토큰을 만들 수 있습니다.
az communication identity token issue --scope chat --connection-string "yourConnectionString"자세한 내용은 Azure CLI를 사용하여 액세스 토큰 만들기 및 관리를 참조하세요.
설정
새 C# 애플리케이션 만들기
콘솔 창(예: cmd, PowerShell 또는 Bash)에서 dotnet new 명령을 사용하여 ChatQuickstart라는 새 콘솔 앱을 만듭니다. 이 명령은 Program.cs라는 원본 파일 하나만 들어 있는 간단한 "Hello World" C# 프로젝트를 만듭니다.
dotnet new console -o ChatQuickstart
디렉터리를 새로 만든 앱 폴더로 변경하고 dotnet build 명령을 사용하여 애플리케이션을 컴파일합니다.
cd ChatQuickstart
dotnet build
패키지 설치
.NET용 Azure Communication 채팅 SDK 설치
dotnet add package Azure.Communication.Chat
개체 모델
다음 클래스는 C#용 Azure Communication Services 채팅 SDK의 주요 기능 중 일부를 처리합니다.
| 이름 | 설명 |
|---|---|
| ChatClient | 이 클래스는 채팅 기능에 필요합니다. 구독 정보를 사용하여 인스턴스화하고 스레드를 만들고 가져오고 삭제하는 데 사용합니다. |
| ChatThreadClient | 이 클래스는 채팅 스레드 기능에 필요합니다. 사용자는 ChatClient를 통해 인스턴스를 가져오고, 이를 사용하여 메시지 전송/수신/업데이트/삭제, 참가자 추가/제거/가져오기, 입력 알림 및 읽음 확인 보내기를 수행할 수 있습니다. |
채팅 클라이언트 만들기
채팅 클라이언트를 만들려면 Communications Service 엔드포인트와 필수 조건 단계의 일부로 생성된 액세스 토큰을 사용합니다. ID SDK의 CommunicationIdentityClient 클래스를 사용하여 사용자를 만들고 채팅 클라이언트에 전달할 토큰을 발급해야 합니다.
사용자 액세스 토큰에 대해 자세히 알아보세요.
이 빠른 시작에서는 권장되는 사항이기는 하지만 채팅 애플리케이션에 대한 토큰을 관리하는 서비스 계층을 만드는 방법을 다루지 않습니다. 채팅 아키텍처에 대한 자세한 정보
Program.cs 코드 조각을 복사하여 원본 파일에 붙여넣습니다.
using Azure;
using Azure.Communication;
using Azure.Communication.Chat;
using System;

namespace ChatQuickstart
{
    class Program
    {
        static async System.Threading.Tasks.Task Main(string[] args)
        {
            // Your unique Azure Communication service endpoint
            Uri endpoint = new Uri("<replace with your resource endpoint>");

            CommunicationTokenCredential communicationTokenCredential = new CommunicationTokenCredential(<Access_Token>);
            ChatClient chatClient = new ChatClient(endpoint, communicationTokenCredential);
        }
    }
}
채팅 스레드 시작
chatClient의 createChatThread 메서드를 사용하여 채팅 스레드를 만듭니다.
topic을 사용하여 채팅에 주제를 제공합니다. 주제는UpdateTopic함수를 사용하여 채팅 스레드를 만든 후 업데이트할 수 있습니다.participants속성을 사용하여 채팅 스레드에 추가할ChatParticipant개체 목록을 전달합니다.ChatParticipant개체가CommunicationIdentifier개체로 초기화되었습니다.CommunicationIdentifier는CommunicationUserIdentifier,MicrosoftTeamsUserIdentifier또는PhoneNumberIdentifier형식일 수 있습니다. 예를 들어,CommunicationIdentifier개체를 가져오려면 사용자 만들기 지침에 따라 만든 액세스 ID를 전달해야 합니다.
createChatThread 메서드의 응답 개체에는 chatThread 세부 정보가 포함됩니다. 참가자 추가, 메시지 보내기, 메시지 삭제 등과 같은 채팅 스레드 작업과 상호 작용하려면 chatThreadClient 클라이언트 인스턴스가 ChatClient 클라이언트에서 GetChatThreadClient 메서드를 사용하여 인스턴스화되어야 합니다.
var chatParticipant = new ChatParticipant(identifier: new CommunicationUserIdentifier(id: "<Access_ID>"))
{
    DisplayName = "UserDisplayName"
};
CreateChatThreadResult createChatThreadResult = await chatClient.CreateChatThreadAsync(topic: "Hello world!", participants: new[] { chatParticipant });
ChatThreadClient chatThreadClient = chatClient.GetChatThreadClient(threadId: createChatThreadResult.ChatThread.Id);
string threadId = chatThreadClient.Id;
채팅 스레드 클라이언트 가져오기
GetChatThreadClient 메서드는 이미 존재하는 스레드에 대한 스레드 클라이언트를 반환합니다. 생성된 스레드에서 작업(예: 멤버 추가, 메시지 보내기 등)을 수행하는 데 사용할 수 있습니다. threadId는 기존 채팅 스레드의 고유 ID입니다.
string threadId = "<THREAD_ID>";
ChatThreadClient chatThreadClient = chatClient.GetChatThreadClient(threadId: threadId);
모든 채팅 스레드 나열
GetChatThreads를 사용하여 사용자가 속한 모든 채팅 스레드를 검색합니다.
AsyncPageable<ChatThreadItem> chatThreadItems = chatClient.GetChatThreadsAsync();
await foreach (ChatThreadItem chatThreadItem in chatThreadItems)
{
    Console.WriteLine($"{ chatThreadItem.Id}");
}
채팅 스레드에 메시지 보내기
SendMessage를 사용하여 스레드에 메시지를 보냅니다.
content를 사용하여 메시지 콘텐츠를 필수적으로 제공해야 합니다.- 'Text' 또는 'Html'과 같은 메시지의 콘텐츠 형식에
type을 사용합니다. 지정되지 않는 경우 ‘Text’가 설정됩니다. senderDisplayName을 사용하여 보낸 사람의 표시 이름을 지정합니다. 지정되지 않는 경우 빈 문자열이 설정됩니다.- 선택적으로
metadata를 사용하여 메시지와 함께 보내려는 추가 데이터를 포함합니다. 이 필드는 개발자가 채팅 메시지 기능을 확장하고 사용 사례에 대한 사용자 지정 정보를 추가할 수 있는 메커니즘을 제공합니다. 예를 들어 메시지에서 파일 링크를 공유할 때 메타데이터에 'hasAttachment:true'를 추가하여 수신자의 애플리케이션이 이를 구문 분석하고 그에 따라 표시할 수 있습니다.
SendChatMessageOptions sendChatMessageOptions = new SendChatMessageOptions()
{
    Content = "Please take a look at the attachment",
    MessageType = ChatMessageType.Text
};
sendChatMessageOptions.Metadata["hasAttachment"] = "true";
sendChatMessageOptions.Metadata["attachmentUrl"] = "https://contoso.com/files/attachment.docx";

SendChatMessageResult sendChatMessageResult = await chatThreadClient.SendMessageAsync(sendChatMessageOptions);

string messageId = sendChatMessageResult.Id;
채팅 스레드에서 채팅 메시지 받기
지정된 간격으로 채팅 스레드 클라이언트에서 GetMessages 메서드를 폴링하여 채팅 메시지를 가져올 수 있습니다.
AsyncPageable<ChatMessage> allMessages = chatThreadClient.GetMessagesAsync();
await foreach (ChatMessage message in allMessages)
{
    Console.WriteLine($"{message.Id}:{message.Content.Message}");
}
GetMessages은(는) 선택적 DateTimeOffset 매개 변수를 사용합니다. 해당 오프셋이 지정되면 오프셋 시간 이후에 수신, 업데이트 또는 삭제된 메시지를 받게 됩니다. 오프셋 시간 이전에 받았지만 그 후 편집 또는 제거된 메시지도 반환됩니다.
GetMessages는 UpdateMessage 및 DeleteMessage를 사용하여 메시지에 발생한 편집 또는 삭제를 포함한 최신 버전의 메시지를 반환합니다. 삭제된 메시지의 경우 chatMessage.DeletedOn은 메시지가 삭제된 시간을 나타내는 datetime 값을 반환합니다. 편집된 메시지의 경우 chatMessage.EditedOn은 메시지가 편집된 시간을 나타내는 datetime을 반환합니다. 원래 메시지 생성 시간은 chatMessage.CreatedOn을 사용하여 액세스할 수 있으며 메시지를 정렬하는 데 사용할 수 있습니다.
GetMessages는 chatMessage.Type으로 식별할 수 있는 다양한 유형의 메시지를 반환합니다. 그 유형은 다음과 같습니다.
Text: 스레드 멤버가 보낸 일반 채팅 메시지입니다.Html: 형식이 지정된 문자 메시지 Communication Services 사용자는 현재 RichText 메시지를 보낼 수 없습니다. 이 메시지 유형은 Teams Interop 시나리오에서 Teams 사용자가 Communication Services 사용자에게 보내는 메시지에서 지원합니다.TopicUpdated: 주제가 업데이트되었음을 나타내는 시스템 메시지입니다. (읽기 전용)ParticipantAdded: 한 명 이상의 참가자가 채팅 스레드에 추가되었음을 나타내는 시스템 메시지입니다(읽기 전용).ParticipantRemoved: 참가자가 채팅 스레드에서 제거되었음을 나타내는 시스템 메시지입니다.
자세한 내용은 메시지 유형을 참조하세요.
채팅 스레드에 사용자를 참가자로 추가
스레드가 생성되면 스레드에서 사용자를 추가하고 제거할 수 있습니다. 사용자를 추가하면 스레드에 메시지를 보내고 다른 참가자를 추가/제거할 수 있는 액세스 권한이 해당 사용자에게 부여됩니다. AddParticipants를 호출하기 전에 해당 사용자에 대한 새 액세스 토큰 및 ID를 획득했는지 확인하세요. 사용자가 채팅 클라이언트를 초기화하려면 액세스 토큰이 필요합니다.
AddParticipants를 사용하여 채팅 스레드에 참가자를 하나 이상 추가합니다. 다음은 각 스레드 참가자에 대해 지원되는 특성입니다.
- 필수 사항인
communicationUser는 스레드 참가자의 ID입니다. - 선택 사항인
displayName은 스레드 참가자의 표시 이름입니다. - 선택 사항인
shareHistoryTime은 채팅 기록이 참가자와 공유된 시간입니다.
var josh = new CommunicationUserIdentifier(id: "<Access_ID_For_Josh>");
var gloria = new CommunicationUserIdentifier(id: "<Access_ID_For_Gloria>");
var amy = new CommunicationUserIdentifier(id: "<Access_ID_For_Amy>");

var participants = new[]
{
    new ChatParticipant(josh) { DisplayName = "Josh" },
    new ChatParticipant(gloria) { DisplayName = "Gloria" },
    new ChatParticipant(amy) { DisplayName = "Amy" }
};

await chatThreadClient.AddParticipantsAsync(participants: participants);
스레드 참가자 가져오기
GetParticipants를 사용하여 채팅 스레드의 참가자를 검색합니다.
AsyncPageable<ChatParticipant> allParticipants = chatThreadClient.GetParticipantsAsync();
await foreach (ChatParticipant participant in allParticipants)
{
    Console.WriteLine($"{((CommunicationUserIdentifier)participant.User).Id}:{participant.DisplayName}:{participant.ShareHistoryTime}");
}
읽음 확인 보내기
SendReadReceipt를 사용하여 다른 참가자에게 사용자가 메시지를 읽었음을 알립니다.
await chatThreadClient.SendReadReceiptAsync(messageId: messageId);
코드 실행
dotnet run 명령을 사용하여 애플리케이션 디렉터리에서 애플리케이션을 실행합니다.
dotnet run
예제 코드
GitHub에서 이 빠른 시작에 대한 최종 코드를 찾습니다.
필수 조건
시작하기 전에 다음을 확인해야 합니다.
활성 구독이 있는 Azure 계정을 만듭니다. 자세한 내용은 체험 계정 만들기를 참조하세요.
Xcode 및 CocoaPods를 설치합니다. Xcode를 사용하여 빠른 시작에 사용할 iOS 애플리케이션을 만들고, CocoaPods를 사용하여 종속성을 설치합니다.
Azure Communication Services 리소스를 만듭니다. 자세한 내용은 빠른 시작: Communication Services 리소스 만들기 및 관리를 참조하세요. 이 빠른 시작을 위해 리소스 엔드포인트와 연결 문자열을 기록해야 합니다.
2명의 Azure Communication Services 사용자를 만들고 사용자 액세스 토큰을 발급합니다. 범위를 채팅으로 설정하고 토큰 문자열과 user_id 문자열을 기록해 둡니다. 이 빠른 시작에서는 초기 참가자가 있는 스레드를 만든 다음, 두 번째 참가자를 스레드에 추가합니다. 또한 Azure CLI를 사용하고 연결 문자열과 함께 아래 명령을 실행하여 사용자 및 액세스 토큰을 만들 수 있습니다.
az communication identity token issue --scope chat --connection-string "yourConnectionString"자세한 내용은 Azure CLI를 사용하여 액세스 토큰 만들기 및 관리를 참조하세요.
설정
새 iOS 애플리케이션 만들기
Xcode를 열고 Create a new Xcode project를 선택합니다. 그런 다음, 플랫폼에 iOS를, 템플릿에 앱을 선택합니다.
프로젝트 이름으로 ChatQuickstart를 입력합니다. 그런 다음, 인터페이스로 Storyboard를, 수명 주기로 UIKit App Delegate를, 언어로 Swift를 선택합니다.
다음을 클릭하고 프로젝트를 만들려는 디렉터리를 선택합니다.
라이브러리 설치
CocoaPods를 사용하여 필요한 Communication Services 종속성을 설치합니다.
명령줄에서 ChatQuickstart iOS 프로젝트의 루트 디렉터리 안으로 이동합니다. pod init 명령을 사용하여 Podfile을 만듭니다.
Podfile를 열고 ChatQuickstart 대상에 다음 종속성을 추가합니다.
pod 'AzureCommunicationChat', '~> 1.3.5'
pod install 명령을 사용하여 종속성을 설치합니다. 이는 Xcode 작업 영역도 만듭니다.
pod install을 설치한 후 새로 만든 .xcworkspace를 선택하여 Xcode에서 프로젝트를 다시 엽니다.
자리 표시자 설정
Xcode에서 작업 영역 ChatQuickstart.xcworkspace를 연 후 ViewController.swift를 엽니다.
이 빠른 시작에서는 viewController에 코드를 추가하고 Xcode 콘솔에서 출력을 확인합니다. iOS에서 사용자 인터페이스를 구축하는 방법은 이 빠른 시작에서 다루지 않습니다.
viewController.swift 상단에서 AzureCommunication 및 AzureCommunicatonChat 라이브러리를 가져옵니다.
import AzureCommunicationCommon
import AzureCommunicationChat
ViewController의 viewDidLoad() 메서드에 다음 코드를 복사합니다.
override func viewDidLoad() {
        super.viewDidLoad()
        // Do any additional setup after loading the view.

        let semaphore = DispatchSemaphore(value: 0)
        DispatchQueue.global(qos: .background).async {
            do {
                // <CREATE A CHAT CLIENT>

                // <CREATE A CHAT THREAD>

                // <LIST ALL CHAT THREADS>

                // <GET A CHAT THREAD CLIENT>

                // <SEND A MESSAGE>

                // <SEND A READ RECEIPT >

                // <RECEIVE MESSAGES>

                // <ADD A USER>

                // <LIST USERS>
            } catch {
                print("Quickstart failed: \(error.localizedDescription)")
            }
        }
    }
데모를 위해 세마포를 사용하여 코드를 동기화합니다. 다음 단계에서는 Azure Communication Services 채팅 라이브러리를 사용하여 자리 표시자를 샘플 코드로 바꿉니다.
채팅 클라이언트 만들기
채팅 클라이언트를 만들려면 Communications Service 엔드포인트와 필수 조건 단계의 일부로 생성된 액세스 토큰을 사용합니다.
사용자 액세스 토큰에 대해 자세히 알아보세요.
이 빠른 시작에서는 권장되는 사항이기는 하지만 채팅 애플리케이션에 대한 토큰을 관리하는 서비스 계층을 만드는 방법을 다루지 않습니다. 채팅 아키텍처에 대한 자세한 정보
<CREATE A CHAT CLIENT> 주석을 다음 코드 조각으로 바꿉니다.
let endpoint = "<ACS_RESOURCE_ENDPOINT>"
let credential =
try CommunicationTokenCredential(
    token: "<ACCESS_TOKEN>"
)
let options = AzureCommunicationChatClientOptions()

let chatClient = try ChatClient(
    endpoint: endpoint,
    credential: credential,
    withOptions: options
)
<ACS_RESOURCE_ENDPOINT>를 실제 Azure Communication Services 리소스의 엔드포인트로 바꿉니다. <ACCESS_TOKEN>을 올바른 Communication Services 액세스 토큰으로 바꿉니다.
개체 모델
다음 클래스 및 인터페이스는 iOS용 Azure Communication Services 채팅 SDK의 주요 기능 중 일부를 처리합니다.
| 이름 | 설명 |
|---|---|
ChatClient |
이 클래스는 채팅 기능에 필요합니다. 구독 정보를 사용하여 인스턴스화한 다음 이를 사용해 스레드를 만들고, 가져오고, 삭제하고, 채팅 이벤트를 구독합니다. |
ChatThreadClient |
이 클래스는 채팅 대화목록 기능에 필요합니다. ChatClient를 통해 인스턴스를 가져오고 이를 사용하여 메시지를 전송, 수신, 업데이트 및 삭제할 수 있습니다. 또한 이를 통해 사용자를 추가, 제거 및 가져오고, 입력 알림과 읽음 확인을 보낼 수 있습니다. |
채팅 스레드 시작
CreateChatThreadResult는 채팅 스레드를 만들 때 반환되는 응답입니다.
ChatThreadProperties 개체인 chatThread 속성을 포함합니다. 이 개체에는 생성된 스레드에서 참가자 추가, 메시지 보내기 등 작업을 수행하기 위해 ChatThreadClient를 가져오는 데 사용할 수 있는 threadId가 포함됩니다.
<CREATE A CHAT THREAD> 주석을 다음 코드 조각으로 바꿉니다.
let request = CreateChatThreadRequest(
    topic: "Quickstart",
    participants: [
        ChatParticipant(
            id: CommunicationUserIdentifier("<USER_ID>"),
            displayName: "Jack"
        )
    ]
)

var threadId: String?
chatClient.create(thread: request) { result, _ in
    switch result {
    case let .success(result):
        threadId = result.chatThread?.id

    case .failure:
        fatalError("Failed to create thread.")
    }
    semaphore.signal()
}
semaphore.wait()
<USER_ID>를 올바른 Communication Services 사용자 ID로 바꿉니다.
계속하기 전에 여기서 세마포를 사용하여 완료 처리기를 기다립니다. 이후 단계에서는 완료 처리기에 반환된 응답의 threadId를 사용합니다.
모든 채팅 스레드 나열
채팅 스레드를 만든 후에는 ChatClient에서 listChatThreads 메서드를 호출하여 모든 채팅 대화목록을 나열할 수 있습니다. <LIST ALL CHAT THREADS> 주석을 다음 코드로 바꿉니다.
chatClient.listThreads { result, _ in
    switch result {
    case let .success(threads):
        guard let chatThreadItems = threads.pageItems else {
            print("No threads returned.")
            return
        }

        for chatThreadItem in chatThreadItems {
            print("Thread id: \(chatThreadItem.id)")
        }
    case .failure:
        print("Failed to list threads")
    }
    semaphore.signal()
}
semaphore.wait()
채팅 스레드 클라이언트 가져오기
createClient 메서드는 이미 존재하는 스레드의 ChatThreadClient를 반환합니다. 생성된 스레드에서 참가자 추가, 메시지 보내기 등의 작업을 수행하는 데 사용할 수 있습니다. threadId는 기존 채팅 스레드의 고유 ID입니다.
<GET A CHAT THREAD CLIENT> 주석을 다음 코드로 바꿉니다.
let chatThreadClient = try chatClient.createClient(forThread: threadId!)
채팅 스레드에 메시지 보내기
send 메서드를 사용하여 threadId로 식별되는 스레드에 메시지를 보냅니다.
SendChatMessageRequest는 메시지 요청을 설명하는 데 사용됩니다.
content를 사용하여 채팅 메시지 콘텐츠를 제공합니다.senderDisplayName을 사용하여 보낸 사람의 표시 이름을 지정합니다.type을 사용하여 메시지 유형(예: ‘text’ 또는 ‘html’)을 지정합니다.- 선택적으로
metadata를 사용하여 메시지와 함께 보내려는 추가 데이터를 포함합니다. 이 필드는 개발자가 채팅 메시지 기능을 확장하고 사용 사례에 대한 사용자 지정 정보를 추가할 수 있는 메커니즘을 제공합니다. 예를 들어 메시지에서 파일 링크를 공유할 때 메타데이터에 'hasAttachment:true'를 추가하여 수신자의 애플리케이션이 이를 구문 분석하고 그에 따라 표시할 수 있습니다.
SendChatMessageResult는 메시지 전송 후 반환된 응답이며, 메시지의 고유 ID인 ID를 포함합니다.
<SEND A MESSAGE> 주석을 다음 코드 조각으로 바꿉니다.
let message = SendChatMessageRequest(
                        content: "Hello!",
                        senderDisplayName: "Jack",
                        type: .text,
                        metadata: [
                            "hasAttachment": "true",
                            "attachmentUrl": "https://contoso.com/files/attachment.docx"
                        ]
                    )

var messageId: String?

chatThreadClient.send(message: message) { result, _ in
    switch result {
    case let .success(result):
        print("Message sent, message id: \(result.id)")
        messageId = result.id
    case .failure:
        print("Failed to send message")
    }
    semaphore.signal()
}
semaphore.wait()
읽음 확인 보내기
sendReadReceipt 메서드를 사용하여 사용자 대신 채팅 스레드에서 읽음 확인 이벤트를 게시합니다.
messageId는 읽은 채팅 메시지의 고유 ID입니다.
<SEND A READ RECEIPT> 주석을 다음 코드로 바꿉니다.
if let id = messageId {
    chatThreadClient.sendReadReceipt(forMessage: id) { result, _ in
        switch result {
        case .success:
            print("Read receipt sent")
        case .failure:
            print("Failed to send read receipt")
        }
        semaphore.signal()
    }
    semaphore.wait()
} else {
    print("Cannot send read receipt without a message id")
}
채팅 스레드에서 채팅 메시지 받기
실시간 신호를 통해, 새로 들어오는 메시지를 수신 대기하도록 구독하고 메모리의 현재 메시지를 적절하게 업데이트할 수 있습니다. Azure Communication Services는 구독할 수 있는 이벤트 목록을 지원합니다.
<RECEIVE MESSAGES> 주석을 다음 코드로 바꿉니다. 알림을 사용하도록 설정한 후 새 메시지를 보내 ChatMessageReceivedEvents를 확인해 봅니다.
chatClient.startRealTimeNotifications { result in
    switch result {
    case .success:
        print("Real-time notifications started.")
    case .failure:
        print("Failed to start real-time notifications.")
    }
    semaphore.signal()
}
semaphore.wait()

chatClient.register(event: .chatMessageReceived, handler: { response in
    switch response {
    case let .chatMessageReceivedEvent(event):
        print("Received a message: \(event.message)")
    default:
        return
    }
})
또는 지정된 간격으로 listMessages 메서드를 폴링하여 채팅 메시지를 가져올 수 있습니다. listMessages에 관해서는 다음 코드 조각을 참조하세요.
chatThreadClient.listMessages { result, _ in
    switch result {
    case let .success(messagesResult):
        guard let messages = messagesResult.pageItems else {
            print("No messages returned.")
            return
        }

        for message in messages {
            print("Received message with id: \(message.id)")
        }

    case .failure:
        print("Failed to receive messages")
    }
    semaphore.signal()
}
semaphore.wait()
채팅 스레드에 사용자를 참가자로 추가
스레드가 생성되면 스레드에서 사용자를 추가하고 제거할 수 있습니다. 사용자를 추가하면 스레드에 메시지를 보내고 다른 참가자를 추가/제거할 수 있는 액세스 권한이 해당 사용자에게 부여됩니다. add를 호출하기 전에 해당 사용자에 대한 새 액세스 토큰 및 ID를 획득했는지 확인하세요. 사용자가 채팅 클라이언트를 초기화하려면 액세스 토큰이 필요합니다.
ChatThreadClient의 add 메서드를 사용하여 채팅 스레드에 참가자를 하나 이상 추가합니다. 다음은 각 스레드 참가자에 대해 지원되는 특성입니다.
- 필수 사항인
id는 스레드 참가자의 ID입니다. - 선택 사항인
displayName은 스레드 참가자의 표시 이름입니다. - 선택 사항인
shareHistoryTime은 채팅 기록이 참가자와 공유된 시간입니다.
<ADD A USER> 주석을 다음 코드로 바꿉니다.
let user = ChatParticipant(
    id: CommunicationUserIdentifier("<USER_ID>"),
    displayName: "Jane"
)

chatThreadClient.add(participants: [user]) { result, _ in
    switch result {
    case let .success(result):
        if let errors = result.invalidParticipants, !errors.isEmpty {
            print("Error adding participant")
        } else {
            print("Added participant")
        }
    case .failure:
        print("Failed to add the participant")
    }
    semaphore.signal()
}
semaphore.wait()
<USER_ID>를 추가할 사용자의 Communication Services 사용자 ID로 바꿉니다.
스레드에 사용자 나열
listParticipants 메서드를 사용하여 특정 채팅 스레드의 모든 참가자를 가져옵니다.
<LIST USERS> 주석을 다음 코드로 바꿉니다.
chatThreadClient.listParticipants { result, _ in
    switch result {
    case let .success(participantsResult):
        guard let participants = participantsResult.pageItems else {
            print("No participants returned.")
            return
        }

        for participant in participants {
            let user = participant.id as! CommunicationUserIdentifier
            print("User with id: \(user.identifier)")
        }
    case .failure:
        print("Failed to list participants")
    }
    semaphore.signal()
}
semaphore.wait()
푸시 알림
푸시 알림은 모바일 앱이 포그라운드에서 실행되고 있지 않은 상황에서 채팅 스레드에서 들어오는 메시지를 클라이언트에게 알립니다. 현재 알림 허브로 채팅 푸시 알림을 보내는 것은 버전 1.3.0의 IOS SDK에서 지원됩니다. 자세한 내용은 채팅 앱에서 푸시 알림 사용 문서를 참조하세요.
코드 실행
Xcode에서 실행 단추를 눌러 프로젝트를 빌드하고 실행합니다. 콘솔에서 코드의 출력과 ChatClient의 로거 출력을 볼 수 있습니다.
참고: Build Settings > Build Options > Enable Bitcode를 No로 설정합니다. 현재 iOS용 AzureCommunicationChat SDK는 비트코드 사용을 지원하지 않습니다. 다음 GitHub 이슈는 이를 추적합니다.
예제 코드
GitHub에서 이 빠른 시작에 대한 최종 코드를 찾습니다.
필수 조건
활성 구독이 있는 Azure 계정. 아직 없는 경우 체험 Azure 계정을 만듭니다.
활성 Azure Communication Services 리소스. 아직 없는 경우 Communication Services 리소스를 만듭니다.
활성 Azure Logic Apps 리소스 또는 사용하려는 트리거로 빈 Logic Apps를 만듭니다. 현재 Communication Services 채팅 커넥터는 작업만 제공하므로 논리 앱에는 최소한 트리거가 필요합니다.
사용자 만들기
편집 모드에서 열린 Power Automate 흐름으로 Power Automate에서 다음 단계를 완료합니다.
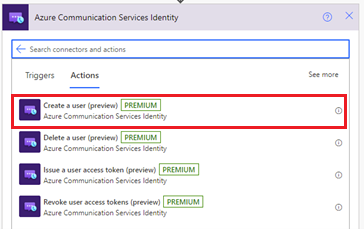
Communication Services ID 커넥터를 사용하여 워크플로에 새 단계를 추가하려면 다음을 수행합니다.
새 작업을 추가하려는 디자이너 단계에서 새 단계를 선택합니다. 또는 새 작업을 단계 사이에 추가하려면 포인터를 해당 단계 사이의 화살표 위로 이동하고, 더하기 기호(+)를 선택한 다음, 작업 추가를 선택합니다.
작업 선택 검색 상자에 Communication Services ID를 입력합니다. 작업 목록에서 사용자 만들기를 선택합니다.
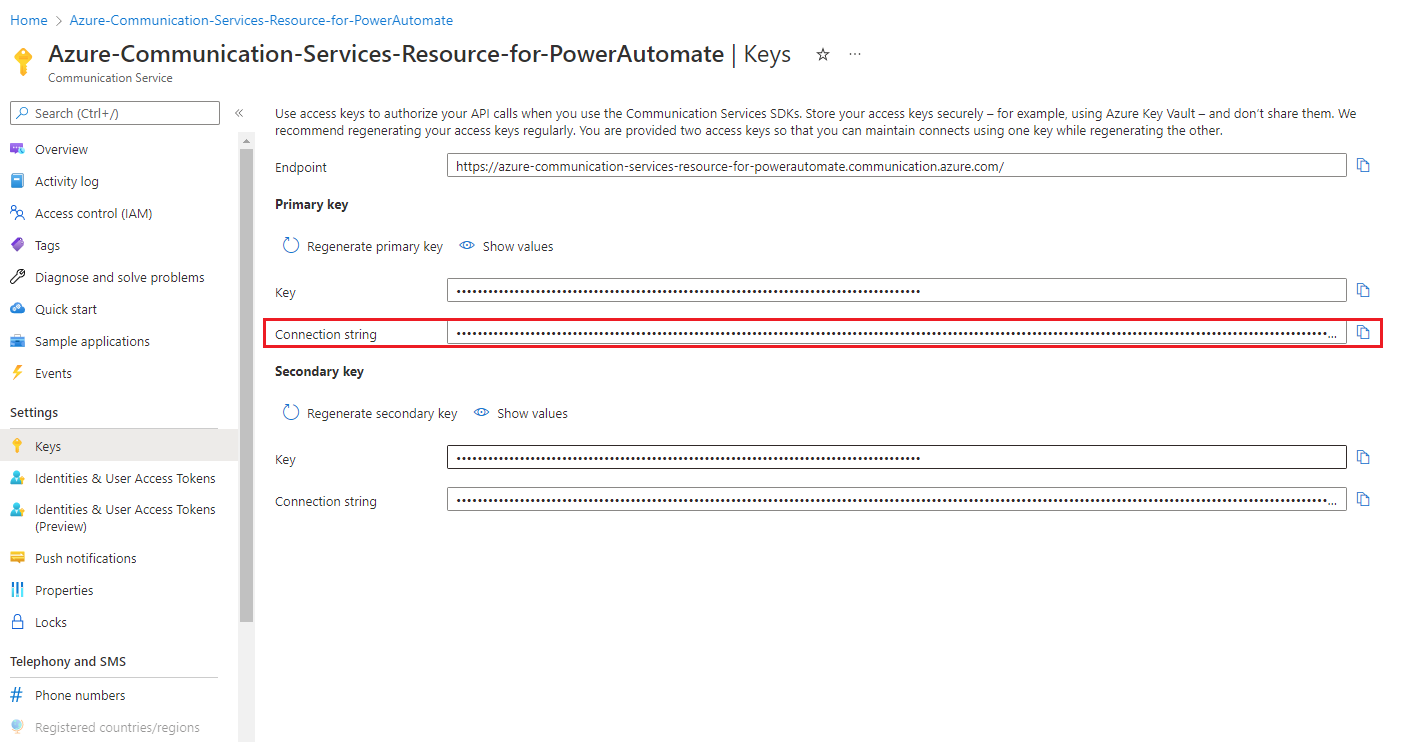
연결 문자열을 입력합니다. Azure Portal에서 연결 문자열 URL을 가져오려면 Azure Communication Services 리소스로 이동합니다. 리소스 메뉴에서 키를 선택한 다음, 연결 문자열을 선택합니다. 복사 아이콘을 선택하여 연결 문자열을 복사합니다.
연결 이름을 입력합니다.
고급 옵션 표시를 선택한 다음 토큰 범위를 선택합니다. 작업은 지정된 범위로 액세스 토큰과 만료 시간을 생성합니다. 이 작업은 Communication Services 사용자 ID인 사용자 ID도 생성합니다.

토큰 범위 항목에서 채팅을 선택합니다.
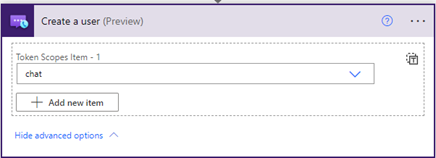
만들기를 실행합니다. 사용자 ID와 액세스 토큰이 표시됩니다.

채팅 스레드 만들기
새 작업을 추가합니다.
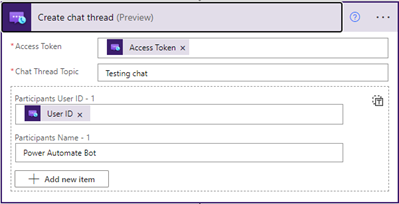
작업 선택 검색 상자에 Communication Services 채팅을 입력합니다. 작업 목록에서 채팅 스레드 만들기를 선택합니다.

Communication Services 엔드포인트 URL을 입력합니다. Azure Portal에서 엔드포인트 URL을 가져오려면 Azure Communication Services 리소스로 이동합니다. 리소스 메뉴에서 키를 선택한 다음 엔드포인트를 선택합니다.
연결 이름을 입력합니다.
이전 섹션에서 생성된 액세스 토큰을 선택한 다음 채팅 스레드 항목 설명을 추가합니다. 만들어진 사용자를 추가하고 참가자의 이름을 입력합니다.
메시지 보내기
새 작업을 추가합니다.
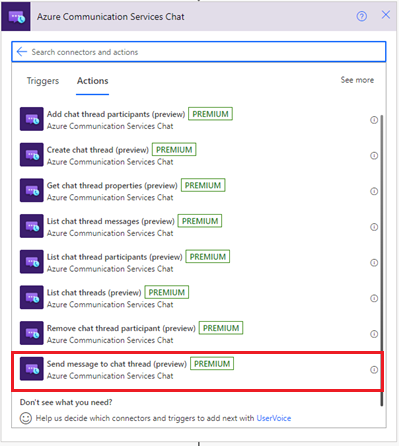
작업 선택 검색 상자에 Communication Services 채팅을 입력합니다. 작업 목록에서 채팅 스레드로 메시지 보내기를 선택합니다.
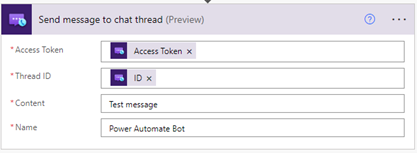
액세스 토큰, 스레드 ID, 콘텐츠 및 이름을 입력합니다.
채팅 스레드 메시지 나열
메시지를 올바르게 보냈는지 확인하려면:
새 작업을 추가합니다.
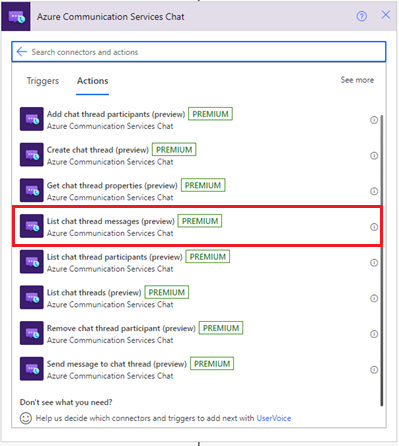
작업 선택 검색 상자에 Communication Services 채팅을 입력합니다. 작업 목록에서 채팅 스레드 메시지 나열을 선택합니다.
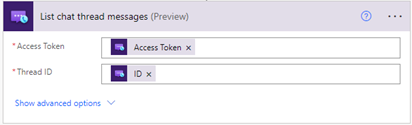
액세스 토큰과 스레드 ID를 입력합니다.
논리 앱 테스트
워크플로를 수동으로 시작하려면 디자이너 도구 모음에서 실행을 선택합니다. 워크플로는 사용자를 만들고 해당 사용자에 대한 액세스 토큰을 발급한 다음 토큰을 제거하고 사용자를 삭제합니다. 자세한 내용은 워크플로를 실행하는 방법을 검토합니다.
이제 채팅 스레드 메시지 나열을 선택합니다. 작업 출력에서 전송된 메시지를 확인합니다.

워크플로 리소스 정리
논리 앱 워크플로 및 관련 리소스를 정리하려면 Logic Apps 리소스를 정리하는 방법을 검토하세요.
리소스 정리
Communication Services 구독을 정리하고 제거하려면 리소스 또는 리소스 그룹을 삭제하면 됩니다. 리소스 그룹을 삭제하면 해당 리소스 그룹에 연결된 다른 모든 리소스가 함께 삭제됩니다. 리소스 정리에 대해 자세히 알아보세요.
다음 단계
이 빠른 시작에서는 다음을 수행하는 방법을 알아보았습니다.
- 채팅 클라이언트 만들기
- 두 명의 사용자가 있는 스레드 만들기
- 스레드에 메시지 보내기
- 스레드에서 메시지 받기
- 스레드에서 사용자 제거
다음을 수행할 수도 있습니다.
- UI 라이브러리 시작
- 채팅 개념에 대한 자세한 정보
- 채팅 SDK 숙지
- React Native 애플리케이션에서 채팅 SDK 사용.
피드백
출시 예정: 2024년 내내 콘텐츠에 대한 피드백 메커니즘으로 GitHub 문제를 단계적으로 폐지하고 이를 새로운 피드백 시스템으로 바꿀 예정입니다. 자세한 내용은 다음을 참조하세요. https://aka.ms/ContentUserFeedback
다음에 대한 사용자 의견 제출 및 보기