빠른 시작: Teams 통화 큐에 통화 앱 조인
이 빠른 시작에서는 Azure Communication Services 사용자에서 Teams 통화 큐로 통화를 시작하는 방법을 알아봅니다. 다음 단계를 통해 이를 달성할 수 있습니다.
- Teams 테넌트와 Azure Communication Services 리소스 페더레이션을 사용하도록 설정합니다.
- Teams 관리 센터를 통해 Teams 통화 큐를 선택하거나 만듭니다.
- Teams 관리 센터를 통해 통화 큐의 이메일 주소를 가져옵니다.
- Graph API를 통해 통화 큐의 개체 ID를 가져옵니다.
- Azure Communication Services Calling SDK로 통화를 시작합니다.
끝으로 건너뛰려면 GitHub에서 이 빠른 시작을 샘플로 다운로드할 수 있습니다.
Teams 테넌트에서 상호 운용성 사용
Teams 관리자 역할이 있는 Microsoft Entra 사용자는 MicrosoftTeams 모듈과 함께 PowerShell cmdlet을 실행하여 테넌트에서 Communication Services 리소스를 사용하도록 설정할 수 있습니다.
1. Microsoft Teams 모듈 준비
먼저 PowerShell을 열고 다음 명령을 사용하여 Teams 모듈이 있는지 유효성을 검사합니다.
Get-module *teams*
MicrosoftTeams 모듈이 보이지 않으면 먼저 설치합니다. 모듈을 설치하려면 PowerShell을 관리자 권한으로 실행해야 합니다. 그런 후 다음 명령을 실행합니다.
Install-Module -Name MicrosoftTeams
설치될 모듈에 대한 정보를 받게 되며 Y 또는 A 답변으로 확인할 수 있습니다. 모듈이 설치되었지만 오래된 경우 다음 명령을 실행하여 모듈을 업데이트할 수 있습니다.
Update-Module MicrosoftTeams
2. Microsoft Teams 모듈에 연결
모듈이 설치되고 준비되면 다음 명령을 사용하여 MicrosoftTeams 모듈에 연결할 수 있습니다. 로그인하라는 대화형 창이 표시됩니다. 사용하려는 사용자 계정에는 Teams 관리자 권한이 있어야 합니다. 그렇지 않으면 다음 단계에서 access denied 응답을 가져올 수 있습니다.
Connect-MicrosoftTeams
3. 테넌트 구성 사용
Communication Services 리소스와의 상호 운용성은 테넌트 구성 및 할당된 정책을 통해 제어됩니다. Teams 테넌트에는 단일 테넌트 구성이 있으며 Teams 사용자는 글로벌 정책 또는 사용자 지정 정책을 할당했습니다. 자세한 내용은 Teams에서 정책 할당을 참조하세요.
로그인에 성공한 후 cmdlet Set-CsTeamsAcsFederationConfiguration을 실행하여 테넌트에서 Communication Services 리소스를 사용하도록 설정할 수 있습니다. 텍스트 IMMUTABLE_RESOURCE_ID를 통신 리소스에서 변경할 수 없는 리소스 ID로 바꿉니다. 이 정보를 가져오는 방법에 대한 자세한 내용은 여기에서 확인할 수 있습니다.
$allowlist = @('IMMUTABLE_RESOURCE_ID')
Set-CsTeamsAcsFederationConfiguration -EnableAcsUsers $True -AllowedAcsResources $allowlist
4. 테넌트 정책 사용
각 Teams 사용자는 Communication Services 사용자가 이 Teams 사용자에게 전화를 걸 수 있는지 여부를 결정하는 External Access Policy를 할당했습니다. cmdlet Set-CsExternalAccessPolicy를 사용하여 Teams 사용자에게 할당된 정책이 EnableAcsFederationAccess를 $true로 설정했는지 확인합니다.
Set-CsExternalAccessPolicy -Identity Global -EnableAcsFederationAccess $true
Teams 통화 큐 만들기 또는 선택
Teams 통화 큐는 Microsoft Teams의 기능으로 지정된 사용자 또는 에이전트 그룹 간에 수신 전화를 효율적으로 분산합니다. 고객 지원 또는 통화 센터 시나리오에 유용합니다. 통화는 큐에 배치되고 미리 결정된 라우팅 방법에 따라 사용 가능한 다음 에이전트에 할당됩니다. 에이전트는 알림을 받고 Teams의 통화 컨트롤을 사용하여 통화를 처리할 수 있습니다. 이 기능은 성능 추적을 위한 보고 및 분석을 제공합니다. 통화 처리를 간소화하고 일관된 고객 환경을 보장하며 에이전트 생산성을 최적화합니다. Teams 관리 센터를 통해 기존 통화 큐를 선택하거나 새 통화 큐를 만들 수 있습니다.
여기에서 Teams 관리 센터를 사용하여 통화 큐를 만드는 방법에 대해 자세히 알아봅니다.
통화 큐에 대한 개체 ID 찾기
통화 큐를 만든 후 나중에 통화에 사용할 상관 관계 개체 ID를 찾아야 합니다. 개체 ID는 통화 큐에 연결된 리소스 계정에 연결됩니다. Teams 관리자에서 리소스 계정 탭을 열고 이메일을 찾습니다.
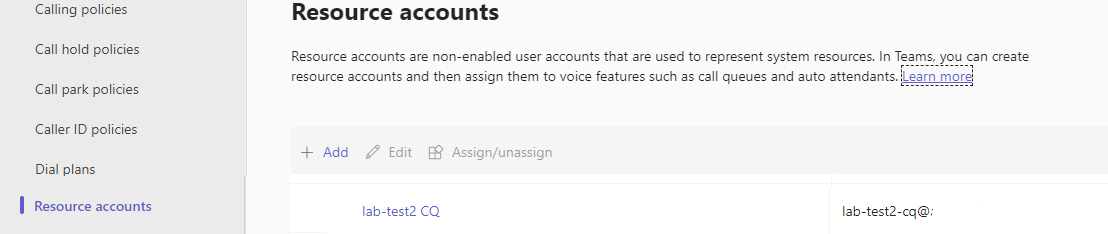 리소스 계정에 필요한 모든 정보는 검색에서 이 이메일을 사용하여 Microsoft Graph Explorer에서 찾을 수 있습니다.
https://graph.microsoft.com/v1.0/users/lab-test2-cq-@contoso.com
결과에서 "ID" 필드를 찾을 수 있습니다.
    "userPrincipalName": "lab-test2-cq@contoso.com",
    "id": "31a011c2-2672-4dd0-b6f9-9334ef4999db"
필수 조건
- 활성 구독이 있는 Azure 계정을 얻습니다. 체험 계정을 만듭니다.
- Node.js 활성 LTS 및 유지 관리 LTS 버전(8.11.1 및 10.14.1)
- 활성 Communication Services 리소스를 만듭니다. Communication Services 리소스 만들기
설정
새 Node.js 애플리케이션 만들기
터미널 또는 명령 창을 열고 앱의 새 디렉터리를 만들고 해당 디렉터리로 이동합니다.
mkdir calling-quickstart && cd calling-quickstart
패키지 설치
npm install 명령을 사용하여 JavaScript용 Azure Communication Services Calling SDK를 설치합니다.
Important
이 빠른 시작에서는 Azure Communication Services Calling SDK 버전 next을 사용합니다.
npm install @azure/communication-common@next --save
npm install @azure/communication-calling@next --save
앱 프레임워크 설정
이 빠른 시작에서는 webpack을 사용하여 애플리케이션 자산을 번들로 묶습니다. 다음 명령을 실행하여 webpack, webpack-cli 및 webpack-dev-server npm 패키지를 설치하고 package.json에 개발 종속성으로 나열합니다.
npm install copy-webpack-plugin@^11.0.0 webpack@^5.88.2 webpack-cli@^5.1.4 webpack-dev-server@^4.15.1 --save-dev
프로젝트의 루트 디렉터리에 index.html 파일을 만듭니다. 이 파일을 사용하여 사용자가 1:1 영상 통화를 걸 수 있도록 하는 기본 레이아웃을 구성합니다.
코드는 다음과 같습니다.
<!-- index.html -->
<!DOCTYPE html>
<html>
    <head>
        <title>Azure Communication Services - Calling Web SDK</title>
    </head>
    <body>
        <h4>Azure Communication Services - Calling Web SDK</h4>
        <input id="user-access-token"
            type="text"
            placeholder="User access token"
            style="margin-bottom:1em; width: 500px;"/>
        <button id="initialize-teams-call-agent" type="button">Initialize Call Agent</button>
        <br>
        <br>
        <input id="application-object-id"
            type="text"
            placeholder="Enter callee's Teams user identity in format: 'APP_GUID'"
            style="margin-bottom:1em; width: 500px; display: block;"/>
        <button id="start-call-button" type="button" disabled="true">Start Call</button>
        <button id="hangup-call-button" type="button" disabled="true">Hang up Call</button>
        <button id="accept-call-button" type="button" disabled="true">Accept Call</button>
        <button id="start-video-button" type="button" disabled="true">Start Video</button>
        <button id="stop-video-button" type="button" disabled="true">Stop Video</button>
        <br>
        <br>
        <div id="connectedLabel" style="color: #13bb13;" hidden>Call is connected!</div>
        <br>
        <div id="remoteVideoContainer" style="width: 40%;" hidden>Remote participants' video streams:</div>
        <br>
        <div id="localVideoContainer" style="width: 30%;" hidden>Local video stream:</div>
        <!-- points to the bundle generated from client.js -->
        <script src="./main.js"></script>
    </body>
</html>
웹 SDK 개체 모델을 호출하는 Azure Communication Services
Azure Communication Services Calling SDK의 주 기능 중 일부를 처리하는 클래스와 인터페이스는 다음과 같습니다.
| 이름 | 설명 |
|---|---|
CallClient |
통화 SDK의 주 진입점입니다. |
CallAgent |
통화를 시작하고 관리하는 데 사용됩니다. |
DeviceManager |
미디어 디바이스를 관리하는 데 사용됩니다. |
Call |
통화를 나타내는 데 사용됩니다. |
LocalVideoStream |
로컬 시스템의 카메라 디바이스에 대한 로컬 비디오 스트림을 만드는 데 사용됩니다. |
RemoteParticipant |
통화에서 원격 참가자를 나타내는 데 사용됩니다. |
RemoteVideoStream |
원격 참가자로부터 원격 비디오 스트림을 나타내는 데 사용됩니다. |
이 빠른 시작에 대한 애플리케이션 로직을 포함하기 위해 client.js라는 프로젝트의 루트 디렉터리에 파일을 만듭니다. client.js에 다음 코드를 추가합니다.
// Make sure to install the necessary dependencies
const { CallClient, VideoStreamRenderer, LocalVideoStream } = require('@azure/communication-calling');
const { AzureCommunicationTokenCredential } = require('@azure/communication-common');
const { AzureLogger, setLogLevel } = require("@azure/logger");
// Set the log level and output
setLogLevel('verbose');
AzureLogger.log = (...args) => {
    console.log(...args);
};
// Calling web sdk objects
let callAgent;
let deviceManager;
let call;
let incomingCall;
let localVideoStream;
let localVideoStreamRenderer;
// UI widgets
let userAccessToken = document.getElementById('user-access-token');
let callQueueId = document.getElementById('application-object-id');
let initializeCallAgentButton = document.getElementById('initialize-teams-call-agent');
let startCallButton = document.getElementById('start-call-button');
let hangUpCallButton = document.getElementById('hangup-call-button');
let acceptCallButton = document.getElementById('accept-call-button');
let startVideoButton = document.getElementById('start-video-button');
let stopVideoButton = document.getElementById('stop-video-button');
let connectedLabel = document.getElementById('connectedLabel');
let remoteVideoContainer = document.getElementById('remoteVideoContainer');
let localVideoContainer = document.getElementById('localVideoContainer');
/**
 * Create an instance of CallClient. Initialize a CallAgent instance with a AzureCommunicationTokenCredential via created CallClient. CallAgent enables us to make outgoing calls and receive incoming calls.
 * You can then use the CallClient.getDeviceManager() API instance to get the DeviceManager.
 */
initializeCallAgentButton.onclick = async () => {
    try {
        const callClient = new CallClient();
        tokenCredential = new AzureCommunicationTokenCredential(userAccessToken.value.trim());
        callAgent = await callClient.createCallAgent(tokenCredential)
        // Set up a camera device to use.
        deviceManager = await callClient.getDeviceManager();
        await deviceManager.askDevicePermission({ video: true });
        await deviceManager.askDevicePermission({ audio: true });
        // Listen for an incoming call to accept.
        callAgent.on('incomingCall', async (args) => {
            try {
                incomingCall = args.incomingCall;
                acceptCallButton.disabled = false;
                startCallButton.disabled = true;
            } catch (error) {
                console.error(error);
            }
        });
        startCallButton.disabled = false;
        initializeCallAgentButton.disabled = true;
    } catch(error) {
        console.error(error);
    }
}
/**
 * Place a 1:1 outgoing video call to a Teams Call Queue
 * Add an event listener to initiate a call when the `startCallButton` is selected.
 * Enumerate local cameras using the deviceManager `getCameraList` API.
 * In this quickstart, we're using the first camera in the collection. Once the desired camera is selected, a
 * LocalVideoStream instance will be constructed and passed within `videoOptions` as an item within the
 * localVideoStream array to the call method. When the call connects, your application will be sending a video stream to the other participant.
 */
startCallButton.onclick = async () => {
    try {
        const localVideoStream = await createLocalVideoStream();
        const videoOptions = localVideoStream ? { localVideoStreams: [localVideoStream] } : undefined;
        call = callAgent.startCall([{ teamsAppId: callQueueId.value.trim(), cloud:"public" }], { videoOptions: videoOptions });
        // Subscribe to the call's properties and events.
        subscribeToCall(call);
    } catch (error) {
        console.error(error);
    }
}
/**
 * Accepting an incoming call with a video
 * Add an event listener to accept a call when the `acceptCallButton` is selected.
 * You can accept incoming calls after subscribing to the `CallAgent.on('incomingCall')` event.
 * You can pass the local video stream to accept the call with the following code.
 */
acceptCallButton.onclick = async () => {
    try {
        const localVideoStream = await createLocalVideoStream();
        const videoOptions = localVideoStream ? { localVideoStreams: [localVideoStream] } : undefined;
        call = await incomingCall.accept({ videoOptions });
        // Subscribe to the call's properties and events.
        subscribeToCall(call);
    } catch (error) {
        console.error(error);
    }
}
// Subscribe to a call obj.
// Listen for property changes and collection udpates.
subscribeToCall = (call) => {
    try {
        // Inspect the initial call.id value.
        console.log(`Call Id: ${call.id}`);
        //Subsribe to call's 'idChanged' event for value changes.
        call.on('idChanged', () => {
            console.log(`Call ID changed: ${call.id}`);
        });
        // Inspect the initial call.state value.
        console.log(`Call state: ${call.state}`);
        // Subscribe to call's 'stateChanged' event for value changes.
        call.on('stateChanged', async () => {
            console.log(`Call state changed: ${call.state}`);
            if(call.state === 'Connected') {
                connectedLabel.hidden = false;
                acceptCallButton.disabled = true;
                startCallButton.disabled = true;
                hangUpCallButton.disabled = false;
                startVideoButton.disabled = false;
                stopVideoButton.disabled = false;
            } else if (call.state === 'Disconnected') {
                connectedLabel.hidden = true;
                startCallButton.disabled = false;
                hangUpCallButton.disabled = true;
                startVideoButton.disabled = true;
                stopVideoButton.disabled = true;
                console.log(`Call ended, call end reason={code=${call.callEndReason.code}, subCode=${call.callEndReason.subCode}}`);
            }
        });
        call.localVideoStreams.forEach(async (lvs) => {
            localVideoStream = lvs;
            await displayLocalVideoStream();
        });
        call.on('localVideoStreamsUpdated', e => {
            e.added.forEach(async (lvs) => {
                localVideoStream = lvs;
                await displayLocalVideoStream();
            });
            e.removed.forEach(lvs => {
               removeLocalVideoStream();
            });
        });

        call.on('isLocalVideoStartedChanged', () => {
            console.log(`isLocalVideoStarted changed: ${call.isLocalVideoStarted}`);
        });
        console.log(`isLocalVideoStarted: ${call.isLocalVideoStarted}`);
        // Inspect the call's current remote participants and subscribe to them.
        call.remoteParticipants.forEach(remoteParticipant => {
            subscribeToRemoteParticipant(remoteParticipant);
        });
        // Subscribe to the call's 'remoteParticipantsUpdated' event to be
        // notified when new participants are added to the call or removed from the call.
        call.on('remoteParticipantsUpdated', e => {
            // Subscribe to new remote participants that are added to the call.
            e.added.forEach(remoteParticipant => {
                subscribeToRemoteParticipant(remoteParticipant)
            });
            // Unsubscribe from participants that are removed from the call
            e.removed.forEach(remoteParticipant => {
                console.log('Remote participant removed from the call.');
            });
        });
    } catch (error) {
        console.error(error);
    }
}
// Subscribe to a remote participant obj.
// Listen for property changes and collection udpates.
subscribeToRemoteParticipant = (remoteParticipant) => {
    try {
        // Inspect the initial remoteParticipant.state value.
        console.log(`Remote participant state: ${remoteParticipant.state}`);
        // Subscribe to remoteParticipant's 'stateChanged' event for value changes.
        remoteParticipant.on('stateChanged', () => {
            console.log(`Remote participant state changed: ${remoteParticipant.state}`);
        });
        // Inspect the remoteParticipants's current videoStreams and subscribe to them.
        remoteParticipant.videoStreams.forEach(remoteVideoStream => {
            subscribeToRemoteVideoStream(remoteVideoStream)
        });
        // Subscribe to the remoteParticipant's 'videoStreamsUpdated' event to be
        // notified when the remoteParticiapant adds new videoStreams and removes video streams.
        remoteParticipant.on('videoStreamsUpdated', e => {
            // Subscribe to newly added remote participant's video streams.
            e.added.forEach(remoteVideoStream => {
                subscribeToRemoteVideoStream(remoteVideoStream)
            });
            // Unsubscribe from newly removed remote participants' video streams.
            e.removed.forEach(remoteVideoStream => {
                console.log('Remote participant video stream was removed.');
            })
        });
    } catch (error) {
        console.error(error);
    }
}
/**
 * Subscribe to a remote participant's remote video stream obj.
 * You have to subscribe to the 'isAvailableChanged' event to render the remoteVideoStream. If the 'isAvailable' property
 * changes to 'true' a remote participant is sending a stream. Whenever the availability of a remote stream changes
 * you can choose to destroy the whole 'Renderer' a specific 'RendererView' or keep them. Displaying RendererView without a video stream will result in a blank video frame.
 */
subscribeToRemoteVideoStream = async (remoteVideoStream) => {
    // Create a video stream renderer for the remote video stream.
    let videoStreamRenderer = new VideoStreamRenderer(remoteVideoStream);
    let view;
    const renderVideo = async () => {
        try {
            // Create a renderer view for the remote video stream.
            view = await videoStreamRenderer.createView();
            // Attach the renderer view to the UI.
            remoteVideoContainer.hidden = false;
            remoteVideoContainer.appendChild(view.target);
        } catch (e) {
            console.warn(`Failed to createView, reason=${e.message}, code=${e.code}`);
        }
    }

    remoteVideoStream.on('isAvailableChanged', async () => {
        // Participant has switched video on.
        if (remoteVideoStream.isAvailable) {
            await renderVideo();
        // Participant has switched video off.
        } else {
            if (view) {
                view.dispose();
                view = undefined;
            }
        }
    });
    // Participant has video on initially.
    if (remoteVideoStream.isAvailable) {
        await renderVideo();
    }
}
// Start your local video stream.
// This will send your local video stream to remote participants so they can view it.
startVideoButton.onclick = async () => {
    try {
        const localVideoStream = await createLocalVideoStream();
        await call.startVideo(localVideoStream);
    } catch (error) {
        console.error(error);
    }
}
// Stop your local video stream.
// This will stop your local video stream from being sent to remote participants.
stopVideoButton.onclick = async () => {
    try {
        await call.stopVideo(localVideoStream);
    } catch (error) {
        console.error(error);
    }
}
/**
 * To render a LocalVideoStream, you need to create a new instance of VideoStreamRenderer, and then
 * create a new VideoStreamRendererView instance using the asynchronous createView() method.
 * You may then attach view.target to any UI element.
 */
// Create a local video stream for your camera device
createLocalVideoStream = async () => {
    const camera = (await deviceManager.getCameras())[0];
    if (camera) {
        return new LocalVideoStream(camera);
    } else {
        console.error(`No camera device found on the system`);
    }
}
// Display your local video stream preview in your UI
displayLocalVideoStream = async () => {
    try {
        localVideoStreamRenderer = new VideoStreamRenderer(localVideoStream);
        const view = await localVideoStreamRenderer.createView();
        localVideoContainer.hidden = false;
        localVideoContainer.appendChild(view.target);
    } catch (error) {
        console.error(error);
    }
}
// Remove your local video stream preview from your UI
removeLocalVideoStream = async() => {
    try {
        localVideoStreamRenderer.dispose();
        localVideoContainer.hidden = true;
    } catch (error) {
        console.error(error);
    }
}
// End the current call
hangUpCallButton.addEventListener("click", async () => {
    // end the current call
    await call.hangUp();
});
webpack 로컬 서버 코드 추가
이 빠른 시작에 대한 로컬 서버 논리를 포함하도록 webpack.config.js라는 프로젝트의 루트 디렉터리에 파일을 만듭니다. 다음 코드를 webpack.config.js에 추가합니다.
const path = require('path');
const CopyPlugin = require("copy-webpack-plugin");

module.exports = {
    mode: 'development',
    entry: './client.js',
    output: {
        filename: 'main.js',
        path: path.resolve(__dirname, 'dist'),
    },
    devServer: {
        static: {
            directory: path.join(__dirname, './')
        },
    },
    plugins: [
        new CopyPlugin({
            patterns: [
                './index.html'
            ]
        }),
    ]
};
코드 실행
webpack-dev-server를 사용하여 앱을 빌드하고 실행합니다. 다음 명령을 실행하여 로컬 웹 서버에서 애플리케이션 호스트를 번들로 묶습니다.
npx webpack serve --config webpack.config.js
통화를 설정하는 수동 단계:
- 브라우저를 열고 http://localhost:8080/.으로 이동합니다.
- 유효한 사용자 액세스 토큰을 입력합니다. 사용할 수 있는 액세스 토큰이 아직 없는 경우 사용자 액세스 토큰 설명서를 참조하세요.
- "에이전트 호출 초기화" 단추를 클릭합니다.
- 통화 큐 개체 ID를 입력하고 "통화 시작" 단추를 선택합니다. 애플리케이션은 지정된 개체 ID를 사용하여 통화 큐에 대한 발신 통화를 시작합니다.
- 통화가 통화 큐에 연결됩니다.
- Communication Services 사용자는 구성에 따라 통화 큐를 통해 라우팅됩니다.
리소스 정리
Communication Services 구독을 정리하고 제거하려면 리소스 또는 리소스 그룹을 삭제하면 됩니다. 리소스 그룹을 삭제하면 해당 리소스 그룹에 연결된 다른 모든 리소스가 함께 삭제됩니다. 리소스 정리에 대해 자세히 알아보세요.
다음 단계
자세한 내용은 다음 문서를 참조하세요.
- Teams Voice Apps로 UI 호출 시작하기
- 통화 SDK 기능에 대해 알아보기
- 통화 작동 방식에 대한 자세한 정보