작업 영역 모델 레지스트리 예제
참고
이 설명서에서는 작업 영역 모델 레지스트리에 대해 설명합니다. Azure Databricks는 Unity 카탈로그에서 모델을 사용하는 것이 좋습니다. Unity 카탈로그의 모델은 중앙 집중식 모델 거버넌스, 작업 영역 간 액세스, 계보 및 배포를 제공합니다. 작업 영역 모델 레지스트리는 나중에 더 이상 사용되지 않습니다.
이 예제에서는 작업 영역 모델 레지스트리를 사용하여 풍력 발전 단지의 일일 전력 출력을 예측하는 기계 학습 애플리케이션을 빌드하는 방법을 보여 줍니다. 이 예제에서는 다음을 수행합니다.
- MLflow를 사용하여 모델 추적 및 로그
- 모델 레지스트리를 사용하여 모델 등록
- 모델 설명 및 모델 버전 단계 전환
- 프로덕션 애플리케이션과 등록된 모델 통합
- 모델 레지스트리에서 모델 검색 및 검색
- 모델 보관 및 삭제
이 문서에서는 MLflow 추적 및 MLflow 모델 레지스트리 UI 및 API를 사용하여 이러한 단계를 수행하는 방법을 설명합니다.
MLflow 추적 및 레지스트리 API를 사용하여 이러한 모든 단계를 수행하는 Notebook은 모델 레지스트리 예제 Notebook을 참조하세요.
MLflow 추적을 사용하여 데이터 세트 로드, 모델 학습 및 추적
모델 레지스트리에 모델을 등록하려면 먼저 실험 실행 중에 모델을 학습하고 기록해야 합니다. 이 섹션에서는 풍력 발전 단지 데이터 세트를 로드하고, 모델을 학습시키고, 학습 실행을 MLflow에 기록하는 방법을 보여 줍니다.
데이터 세트 로드
다음 코드는 미국 풍력 발전 단지에 대한 날씨 데이터 및 전력 출력 정보를 포함하는 데이터 세트를 로드합니다. 데이터 세트에는 , wind speed및 기능이 6시간마다 샘플링되고(에서 00:00한 번, 에서 08:00한 번, 에 16:00한 번) 및 몇 년 동안 매일 집계 전력 출력(power)이 포함 wind directionair temperature 됩니다.
import pandas as pd
wind_farm_data = pd.read_csv("https://github.com/dbczumar/model-registry-demo-notebook/raw/master/dataset/windfarm_data.csv", index_col=0)

def get_training_data():
  training_data = pd.DataFrame(wind_farm_data["2014-01-01":"2018-01-01"])
  X = training_data.drop(columns="power")
  y = training_data["power"]
  return X, y

def get_validation_data():
  validation_data = pd.DataFrame(wind_farm_data["2018-01-01":"2019-01-01"])
  X = validation_data.drop(columns="power")
  y = validation_data["power"]
  return X, y

def get_weather_and_forecast():
  format_date = lambda pd_date : pd_date.date().strftime("%Y-%m-%d")
  today = pd.Timestamp('today').normalize()
  week_ago = today - pd.Timedelta(days=5)
  week_later = today + pd.Timedelta(days=5)

  past_power_output = pd.DataFrame(wind_farm_data)[format_date(week_ago):format_date(today)]
  weather_and_forecast = pd.DataFrame(wind_farm_data)[format_date(week_ago):format_date(week_later)]
  if len(weather_and_forecast) < 10:
    past_power_output = pd.DataFrame(wind_farm_data).iloc[-10:-5]
    weather_and_forecast = pd.DataFrame(wind_farm_data).iloc[-10:]

  return weather_and_forecast.drop(columns="power"), past_power_output["power"]
모델 학습
다음 코드는 TensorFlow Keras를 사용하여 신경망을 학습하여 데이터 세트의 날씨 기능을 기반으로 전력 출력을 예측합니다. MLflow는 모델의 하이퍼 매개 변수, 성능 메트릭, 소스 코드 및 아티팩트 추적에 사용됩니다.
def train_keras_model(X, y):
  import tensorflow.keras
  from tensorflow.keras.models import Sequential
  from tensorflow.keras.layers import Dense

  model = Sequential()
  model.add(Dense(100, input_shape=(X_train.shape[-1],), activation="relu", name="hidden_layer"))
  model.add(Dense(1))
  model.compile(loss="mse", optimizer="adam")

  model.fit(X_train, y_train, epochs=100, batch_size=64, validation_split=.2)
  return model

import mlflow

X_train, y_train = get_training_data()

with mlflow.start_run():
  # Automatically capture the model's parameters, metrics, artifacts,
  # and source code with the `autolog()` function
  mlflow.tensorflow.autolog()

  train_keras_model(X_train, y_train)
  run_id = mlflow.active_run().info.run_id
MLflow UI를 사용하여 모델 등록 및 관리
이 섹션에서는 다음을 수행합니다.
등록된 새 모델 만들기
Azure Databricks Notebook의 오른쪽 사이드바에서 실험 아이콘
 을 클릭하여 MLflow 실험 실행 사이드바로 이동합니다.
TensorFlow Keras 모델 학습 세션에 해당하는 MLflow 실행을 찾아 실행 세부 정보 보기 아이콘을 클릭하여 MLflow 실행 UI에서 엽니다.
MLflow UI에서 아티팩트 섹션까지 아래로 스크롤하여 model이라는 디렉터리를 클릭합니다. 표시되는 모델 등록 단추를 클릭합니다.

드롭다운 메뉴에서 새 모델 만들기 를 선택하고 모델 이름을
power-forecasting-model입력합니다.등록을 클릭합니다. 라는
power-forecasting-model새 모델을 등록하고 새 모델 버전Version 1인 을 만듭니다.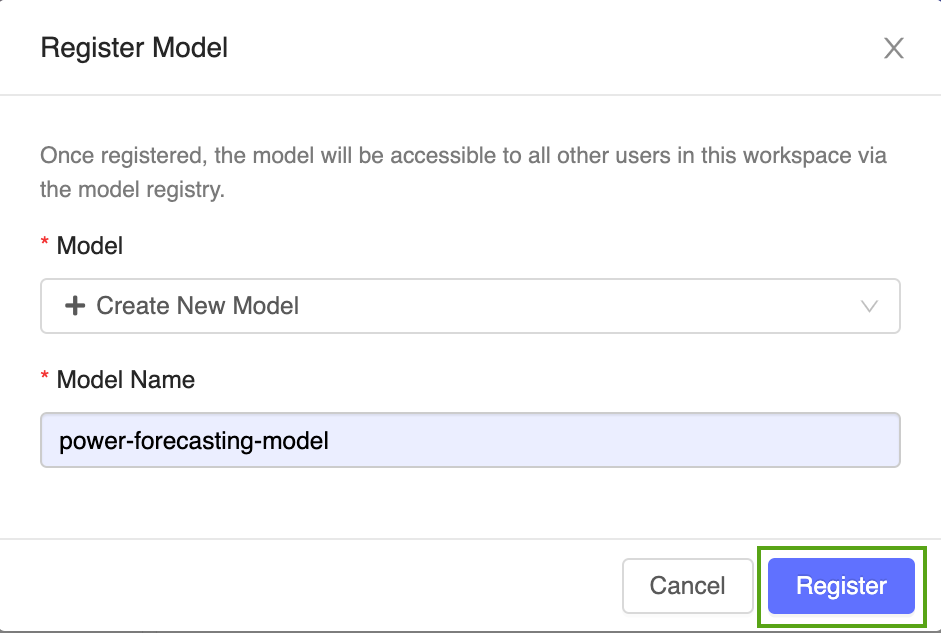
잠시 후 MLflow UI에 등록된 새 모델에 대한 링크가 표시됩니다. 이 링크를 따라 MLflow 모델 레지스트리 UI에서 새 모델 버전을 엽니다.
모델 레지스트리 UI 살펴보기
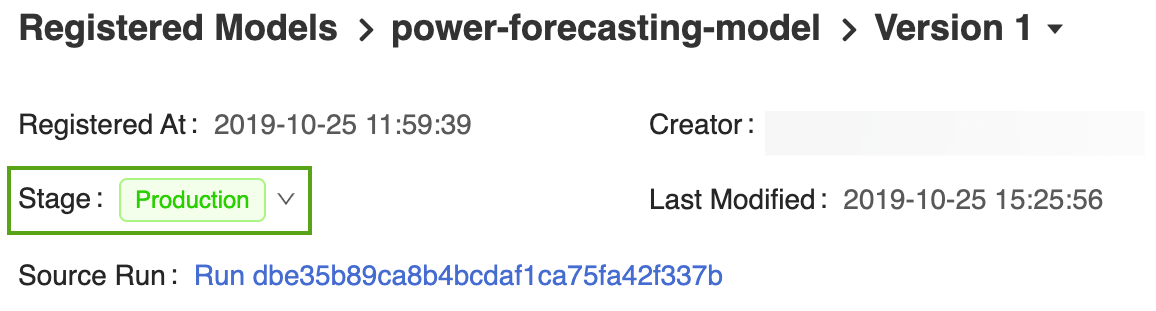
MLflow 모델 레지스트리 UI의 모델 버전 페이지에서는 작성자, 생성 시간 및 현재 단계를 포함하여 등록된 예측 모델에 대한 Version 1 정보를 제공합니다.
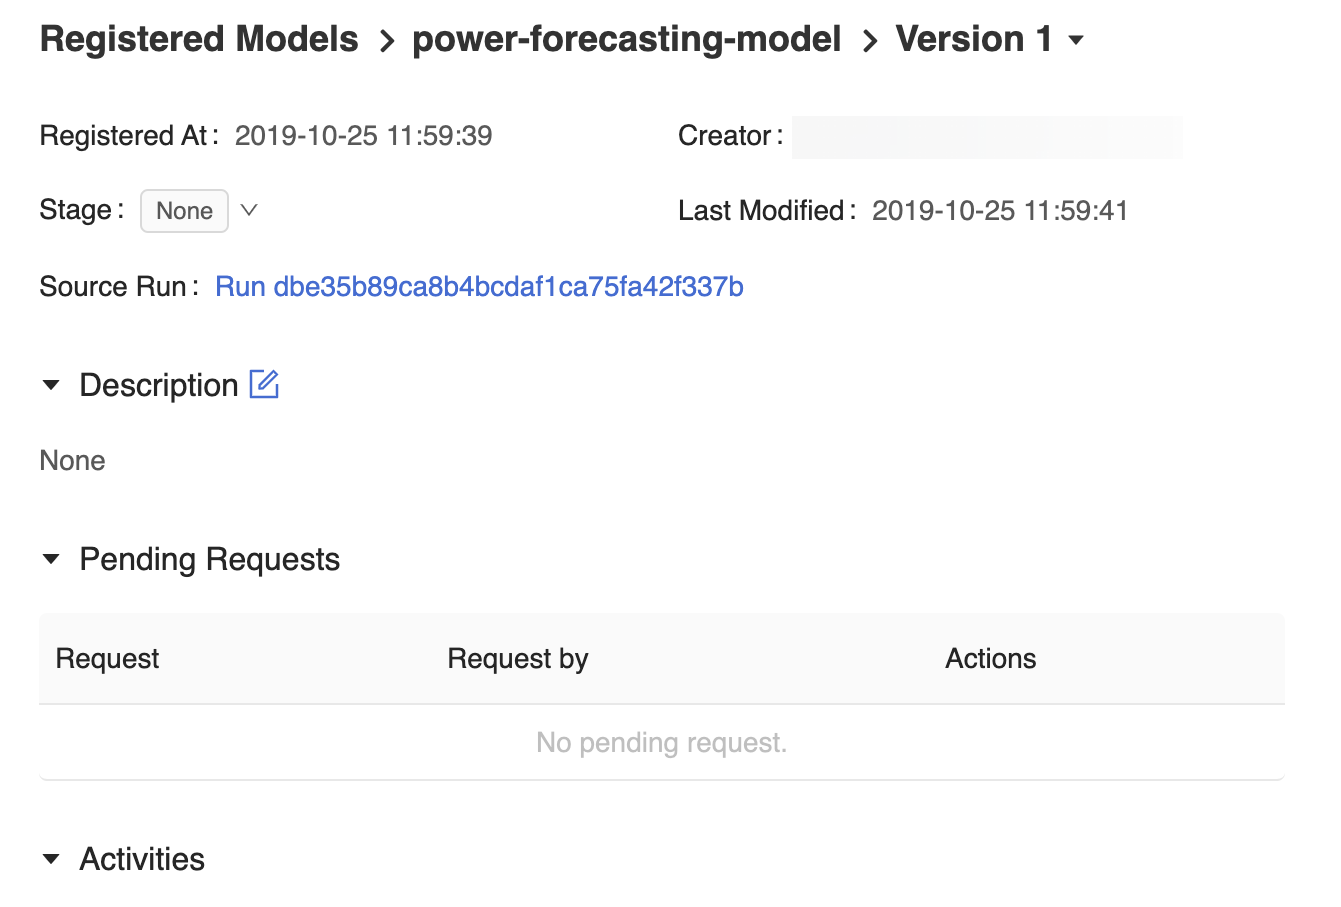
모델 버전 페이지에서는 MLflow 실행 UI에서 모델을 만드는 데 사용된 MLflow 실행을 여는 소스 실행 링크도 제공합니다. MLflow 실행 UI에서 원본 Notebook 링크에 액세스하여 모델을 학습시키는 데 사용된 Azure Databricks Notebook의 스냅샷 볼 수 있습니다.


MLflow 모델 레지스트리로 다시 이동하려면 사이드바에서 ![]() 모델을 클릭합니다.
모델을 클릭합니다.
결과 MLflow 모델 레지스트리 홈페이지에는 해당 버전 및 단계를 포함하여 Azure Databricks 작업 영역에 등록된 모든 모델 목록이 표시됩니다.
power-forecasting-model 링크를 클릭하여 모든 버전의 예측 모델을 표시하는 등록된 모델 페이지를 엽니다.
모델 설명 추가
등록된 모델 및 모델 버전에 설명을 추가할 수 있습니다. 등록된 모델 설명은 여러 모델 버전에 적용되는 정보를 기록하는 데 유용합니다(예: 모델링 문제 및 데이터 세트에 대한 일반적인 개요). 모델 버전 설명은 특정 모델 버전의 고유한 특성(예: 모델 개발에 사용되는 방법론 및 알고리즘)을 자세히 설명하는 데 유용합니다.
등록된 전원 예측 모델에 개략적인 설명을 추가합니다.
 아이콘을 클릭하고 다음 설명을 입력합니다.
This model forecasts the power output of a wind farm based on weather data. The weather data consists of three features: wind speed, wind direction, and air temperature.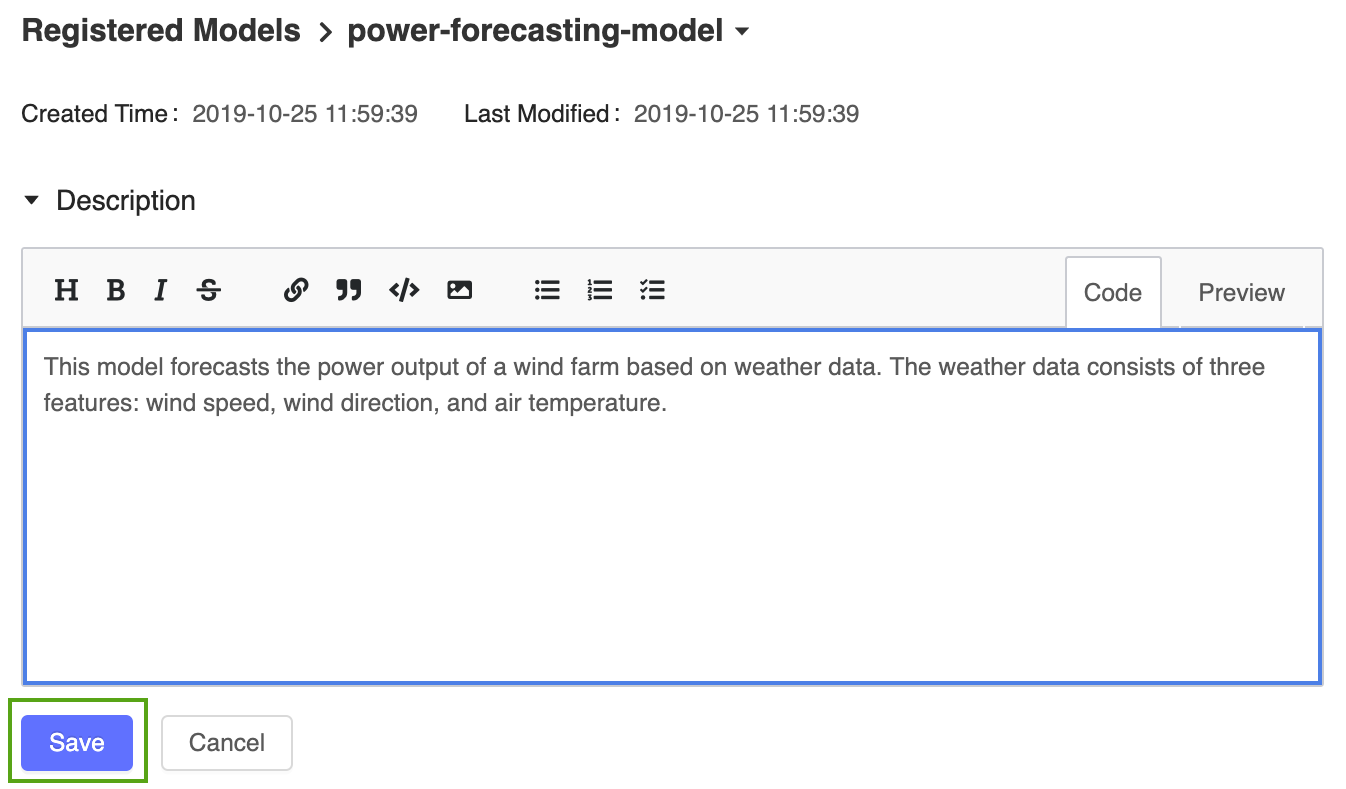
저장을 클릭합니다.
등록된 모델 페이지에서 버전 1 링크를 클릭하여 모델 버전 페이지로 다시 이동합니다.
- 아이콘을 클릭하고 다음 설명을 입력합니다.
This model version was built using TensorFlow Keras. It is a feed-forward neural network with one hidden layer.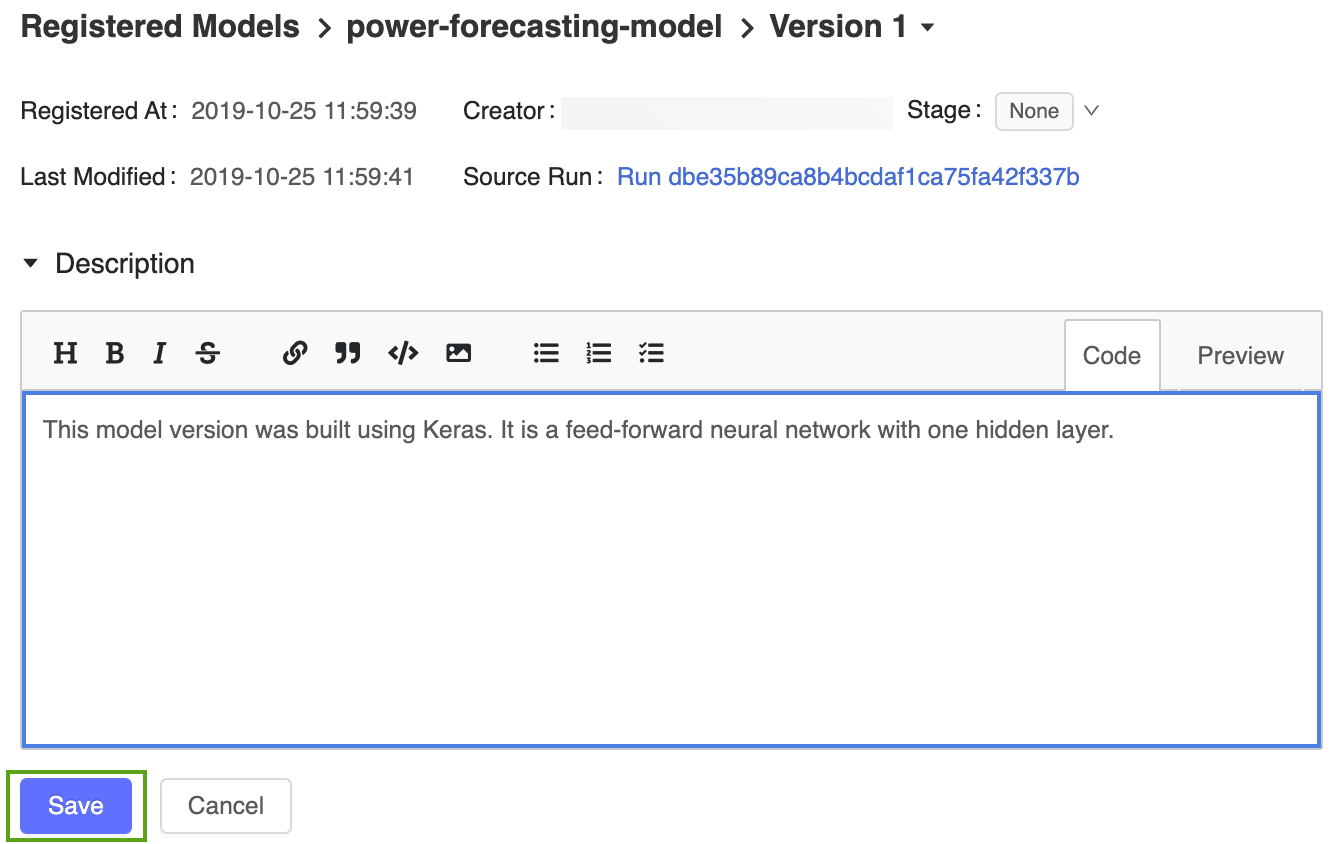
저장을 클릭합니다.
모델 버전 전환
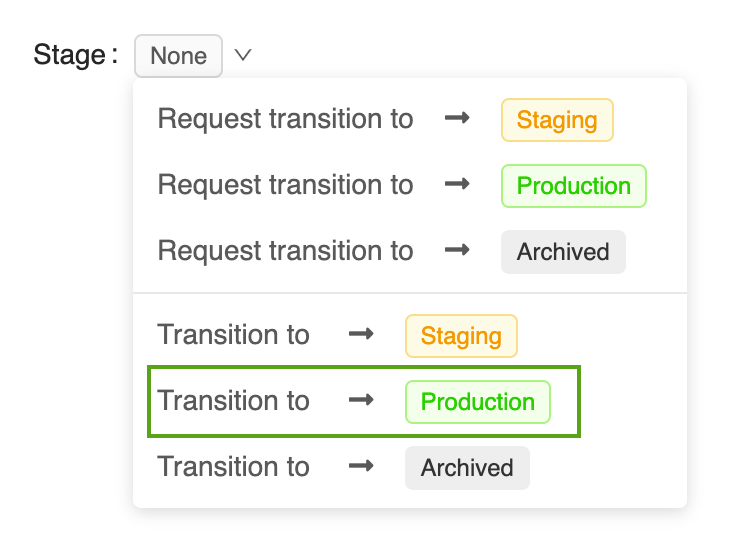
MLflow 모델 레지스트리는 없음, 스테이징, 프로덕션 및 의 여러 모델 단계를 정의합니다 Archived. 각 스테이지에는 고유한 의미가 있습니다. 예를 들어 스테이징 은 모델 테스트를 위한 것이지만 프로덕션 은 테스트 또는 검토 프로세스를 완료하고 애플리케이션에 배포된 모델을 위한 것입니다.
스테이지 단추를 클릭하여 사용 가능한 모델 단계 목록과 사용 가능한 스테이지 전환 옵션을 표시합니다.
전환 -> 프로덕션을 선택하고 스테이지 전환 확인 창에서 확인을 눌러 모델을 프로덕션으로 전환합니다.
모델 버전이 프로덕션으로 전환되면 현재 단계가 UI에 표시되고 전환을 반영하기 위해 항목이 활동 로그에 추가됩니다.

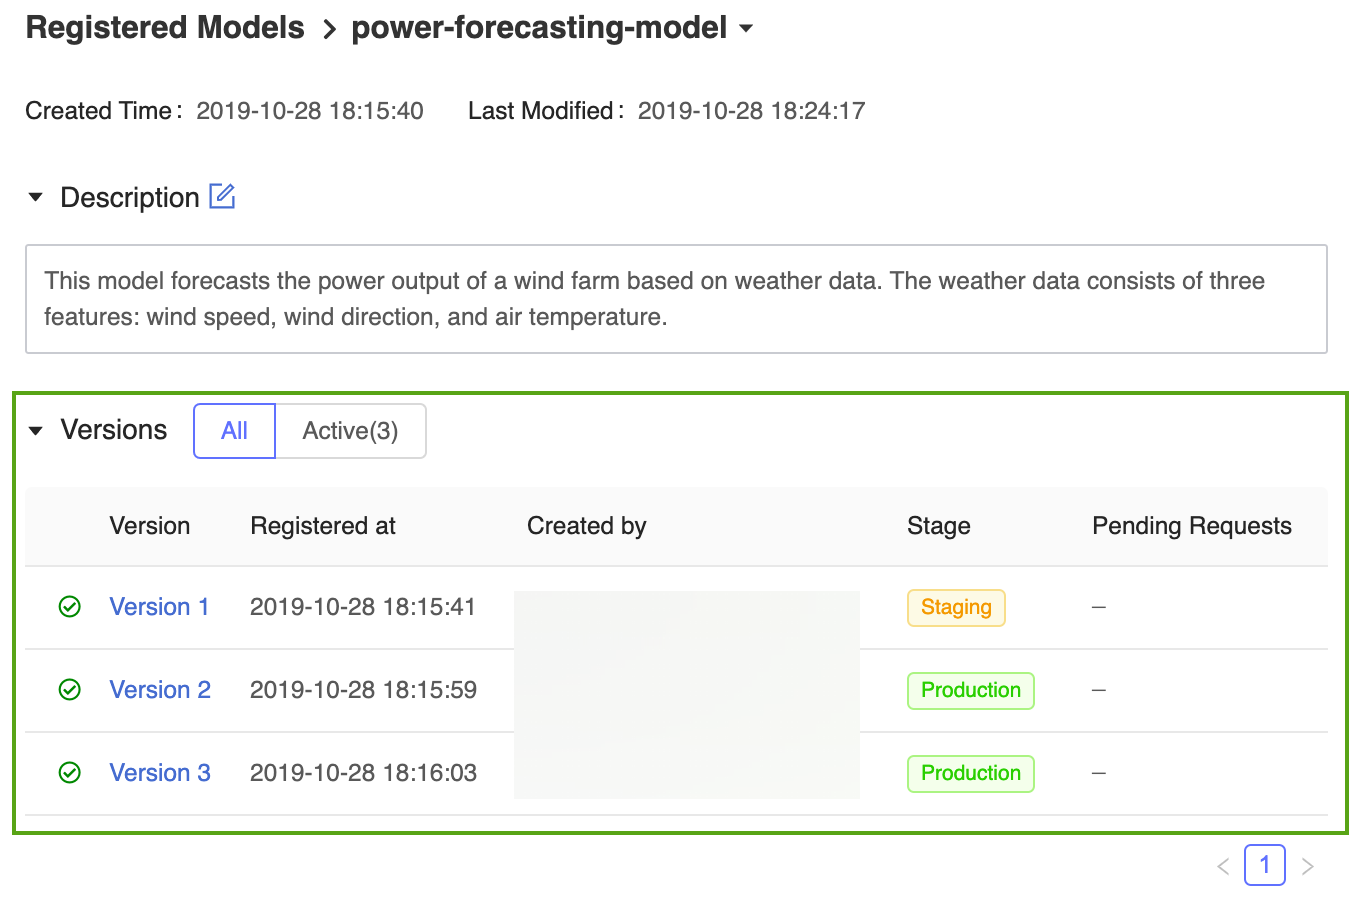
MLflow 모델 레지스트리를 사용하면 여러 모델 버전이 동일한 단계를 공유할 수 있습니다. 스테이지별로 모델을 참조할 때 모델 레지스트리는 최신 모델 버전(가장 큰 버전 ID가 있는 모델 버전)을 사용합니다. 등록된 모델 페이지에는 특정 모델의 모든 버전이 표시됩니다.
MLflow API를 사용하여 모델 등록 및 관리
이 섹션에서는 다음을 수행합니다.
프로그래밍 방식으로 모델 이름 정의
이제 모델이 등록되어 프로덕션으로 전환되었으므로 MLflow 프로그래밍 API를 사용하여 참조할 수 있습니다. 등록된 모델의 이름을 다음과 같이 정의합니다.
model_name = "power-forecasting-model"
모델 등록
model_name = get_model_name()

import mlflow

# The default path where the MLflow autologging function stores the TensorFlow Keras model
artifact_path = "model"
model_uri = "runs:/{run_id}/{artifact_path}".format(run_id=run_id, artifact_path=artifact_path)

model_details = mlflow.register_model(model_uri=model_uri, name=model_name)

import time
from mlflow.tracking.client import MlflowClient
from mlflow.entities.model_registry.model_version_status import ModelVersionStatus

# Wait until the model is ready
def wait_until_ready(model_name, model_version):
  client = MlflowClient()
  for _ in range(10):
    model_version_details = client.get_model_version(
      name=model_name,
      version=model_version,
    )
    status = ModelVersionStatus.from_string(model_version_details.status)
    print("Model status: %s" % ModelVersionStatus.to_string(status))
    if status == ModelVersionStatus.READY:
      break
    time.sleep(1)

wait_until_ready(model_details.name, model_details.version)
API를 사용하여 모델 및 모델 버전 설명 추가
from mlflow.tracking.client import MlflowClient

client = MlflowClient()
client.update_registered_model(
  name=model_details.name,
  description="This model forecasts the power output of a wind farm based on weather data. The weather data consists of three features: wind speed, wind direction, and air temperature."
)

client.update_model_version(
  name=model_details.name,
  version=model_details.version,
  description="This model version was built using TensorFlow Keras. It is a feed-forward neural network with one hidden layer."
)
API를 사용하여 모델 버전 전환 및 세부 정보 검색
client.transition_model_version_stage(
  name=model_details.name,
  version=model_details.version,
  stage='production',
)
model_version_details = client.get_model_version(
  name=model_details.name,
  version=model_details.version,
)
print("The current model stage is: '{stage}'".format(stage=model_version_details.current_stage))

latest_version_info = client.get_latest_versions(model_name, stages=["production"])
latest_production_version = latest_version_info[0].version
print("The latest production version of the model '%s' is '%s'." % (model_name, latest_production_version))
API를 사용하여 등록된 모델의 버전 로드
MLflow Models 구성 요소는 여러 기계 학습 프레임워크에서 모델을 로드하기 위한 함수를 정의합니다. 예를 들어 는 mlflow.tensorflow.load_model() MLflow 형식으로 저장된 TensorFlow 모델을 로드하는 데 사용되며 mlflow.sklearn.load_model() MLflow 형식으로 저장된 scikit-learn 모델을 로드하는 데 사용됩니다.
이러한 함수는 MLflow 모델 레지스트리에서 모델을 로드할 수 있습니다.
import mlflow.pyfunc

model_version_uri = "models:/{model_name}/1".format(model_name=model_name)

print("Loading registered model version from URI: '{model_uri}'".format(model_uri=model_version_uri))
model_version_1 = mlflow.pyfunc.load_model(model_version_uri)

model_production_uri = "models:/{model_name}/production".format(model_name=model_name)

print("Loading registered model version from URI: '{model_uri}'".format(model_uri=model_production_uri))
model_production = mlflow.pyfunc.load_model(model_production_uri)
프로덕션 모델을 사용하여 전력 출력 예측
이 섹션에서는 풍력 발전 단지의 일기 예보 데이터를 평가하는 데 프로덕션 모델을 사용합니다. 애플리케이션은 forecast_power() 지정된 단계에서 최신 버전의 예측 모델을 로드하고 이를 사용하여 향후 5일 동안 전력 생산을 예측합니다.
def plot(model_name, model_stage, model_version, power_predictions, past_power_output):
  import pandas as pd
  import matplotlib.dates as mdates
  from matplotlib import pyplot as plt
  index = power_predictions.index
  fig = plt.figure(figsize=(11, 7))
  ax = fig.add_subplot(111)
  ax.set_xlabel("Date", size=20, labelpad=20)
  ax.set_ylabel("Power\noutput\n(MW)", size=20, labelpad=60, rotation=0)
  ax.tick_params(axis='both', which='major', labelsize=17)
  ax.xaxis.set_major_formatter(mdates.DateFormatter('%m/%d'))
  ax.plot(index[:len(past_power_output)], past_power_output, label="True", color="red", alpha=0.5, linewidth=4)
  ax.plot(index, power_predictions.squeeze(), "--", label="Predicted by '%s'\nin stage '%s' (Version %d)" % (model_name, model_stage, model_version), color="blue", linewidth=3)
  ax.set_ylim(ymin=0, ymax=max(3500, int(max(power_predictions.values) * 1.3)))
  ax.legend(fontsize=14)
  plt.title("Wind farm power output and projections", size=24, pad=20)
  plt.tight_layout()
  display(plt.show())

def forecast_power(model_name, model_stage):
  from mlflow.tracking.client import MlflowClient
  client = MlflowClient()
  model_version = client.get_latest_versions(model_name, stages=[model_stage])[0].version
  model_uri = "models:/{model_name}/{model_stage}".format(model_name=model_name, model_stage=model_stage)
  model = mlflow.pyfunc.load_model(model_uri)
  weather_data, past_power_output = get_weather_and_forecast()
  power_predictions = pd.DataFrame(model.predict(weather_data))
  power_predictions.index = pd.to_datetime(weather_data.index)
  print(power_predictions)
  plot(model_name, model_stage, int(model_version), power_predictions, past_power_output)
새 모델 버전 만들기
클래식 기계 학습 기술은 전력 예측에도 효과적입니다. 다음 코드는 scikit-learn을 사용하여 임의 포리스트 모델을 학습시키고 함수를 통해 MLflow 모델 레지스트리에 mlflow.sklearn.log_model() 등록합니다.
import mlflow.sklearn
from sklearn.ensemble import RandomForestRegressor
from sklearn.metrics import mean_squared_error

with mlflow.start_run():
  n_estimators = 300
  mlflow.log_param("n_estimators", n_estimators)

  rand_forest = RandomForestRegressor(n_estimators=n_estimators)
  rand_forest.fit(X_train, y_train)

  val_x, val_y = get_validation_data()
  mse = mean_squared_error(rand_forest.predict(val_x), val_y)
  print("Validation MSE: %d" % mse)
  mlflow.log_metric("mse", mse)

  # Specify the `registered_model_name` parameter of the `mlflow.sklearn.log_model()`
  # function to register the model with the MLflow Model Registry. This automatically
  # creates a new model version
  mlflow.sklearn.log_model(
    sk_model=rand_forest,
    artifact_path="sklearn-model",
    registered_model_name=model_name,
  )
MLflow 모델 레지스트리 검색을 사용하여 새 모델 버전 ID 가져오기
from mlflow.tracking.client import MlflowClient
client = MlflowClient()

model_version_infos = client.search_model_versions("name = '%s'" % model_name)
new_model_version = max([model_version_info.version for model_version_info in model_version_infos])

wait_until_ready(model_name, new_model_version)
새 모델 버전에 설명 추가
client.update_model_version(
  name=model_name,
  version=new_model_version,
  description="This model version is a random forest containing 100 decision trees that was trained in scikit-learn."
)
새 모델 버전을 스테이징으로 전환하고 모델 테스트
프로덕션 애플리케이션에 모델을 배포하기 전에 스테이징 환경에서 테스트하는 것이 가장 좋습니다. 다음 코드는 새 모델 버전을 스테이징 으로 전환하고 성능을 평가합니다.
client.transition_model_version_stage(
  name=model_name,
  version=new_model_version,
  stage="Staging",
)

forecast_power(model_name, "Staging")
프로덕션에 새 모델 버전 배포
새 모델 버전이 스테이징에서 잘 수행되는지 확인한 후 다음 코드는 모델을 프로덕션 으로 전환하고 프로덕션 모델과 함께 출력 예측 섹션에서 정확히 동일한 애플리케이션 코드를 사용하여 전원 예측을 생성합니다.
client.transition_model_version_stage(
  name=model_name,
  version=new_model_version,
  stage="production",
)

forecast_power(model_name, "production")
이제 프로덕션 단계에 예측 모델의 두 가지 모델 버전, 즉 Keras 모델에서 학습된 모델 버전과 scikit-learn에서 학습된 버전이 있습니다.
참고
스테이지별로 모델을 참조할 때 MLflow 모델 모델 레지스트리는 자동으로 최신 프로덕션 버전을 사용합니다. 이렇게 하면 애플리케이션 코드를 변경하지 않고 프로덕션 모델을 업데이트할 수 있습니다.
모델 보관 및 삭제
모델 버전이 더 이상 사용되지 않는 경우 이를 보관하거나 삭제할 수 있습니다. 등록된 전체 모델을 삭제할 수도 있습니다. 그러면 연결된 모델 버전이 모두 제거됩니다.
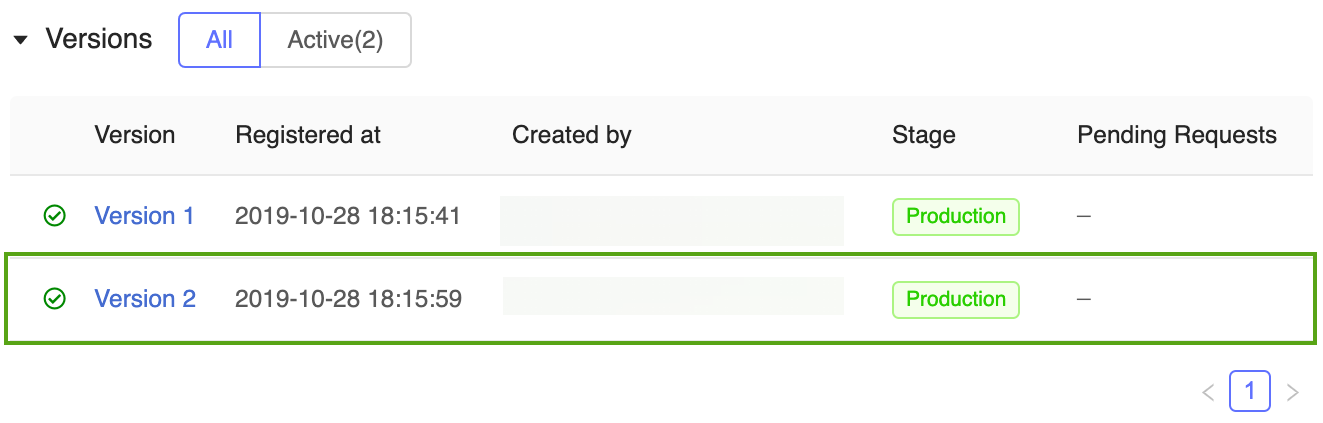
전원 예측 모델의 보관 Version 1
더 이상 사용되지 않으므로 전원 예측 모델의 보관 Version 1 . MLflow 모델 레지스트리 UI 또는 MLflow API를 통해 모델을 보관할 수 있습니다.
MLflow UI의 보관 Version 1
전원 예측 모델을 보관 Version 1 하려면 다음을 수행합니다.
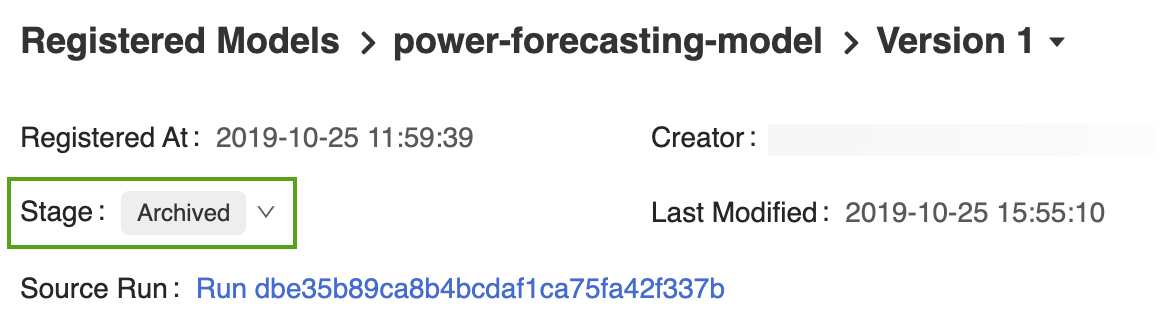
MLflow 모델 레지스트리 UI에서 해당 모델 버전 페이지를 엽니다.
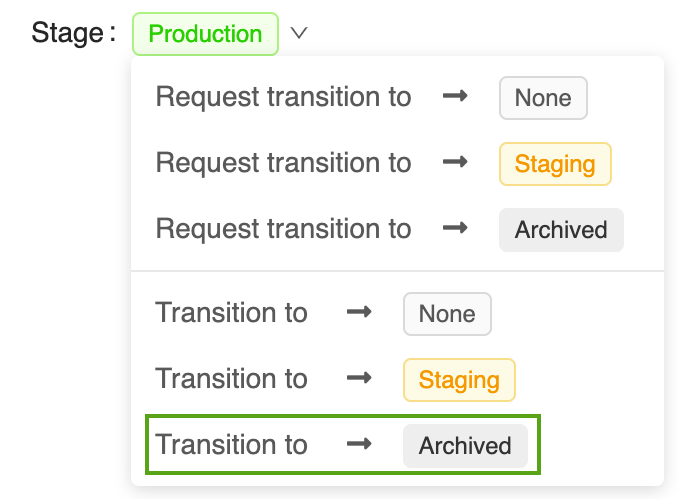
스테이지 단추를 클릭하고 전환 대상 -> 보관됨을 선택합니다.
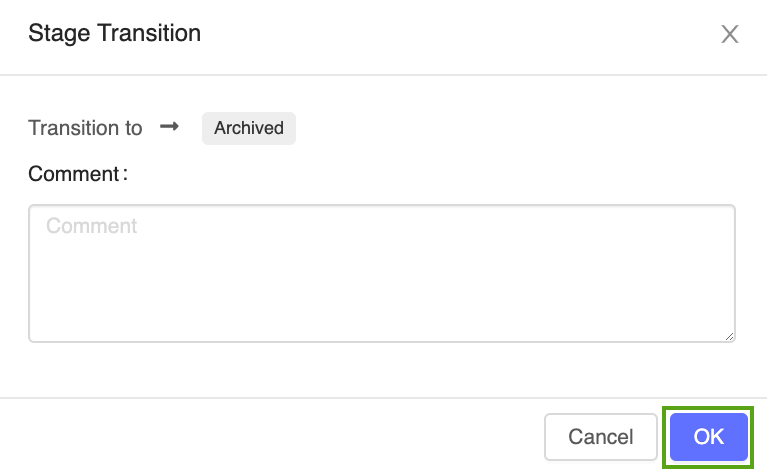
스테이지 전환 확인 창에서 확인을 누릅니다.
MLflow API를 사용하여 보관 Version 1
다음 코드는 함수를 MlflowClient.update_model_version() 사용하여 전원 예측 모델을 보관 Version 1 합니다.
from mlflow.tracking.client import MlflowClient

client = MlflowClient()
client.transition_model_version_stage(
  name=model_name,
  version=1,
  stage="Archived",
)
전원 예측 모델 삭제 Version 1
MLflow UI 또는 MLflow API를 사용하여 모델 버전을 삭제할 수도 있습니다.
Warning
모델 버전 삭제는 영구적이며 실행 취소할 수 없습니다.
MLflow UI에서 삭제 Version 1
전원 예측 모델을 삭제 Version 1 하려면 다음을 수행합니다.
MLflow 모델 레지스트리 UI에서 해당 모델 버전 페이지를 엽니다.
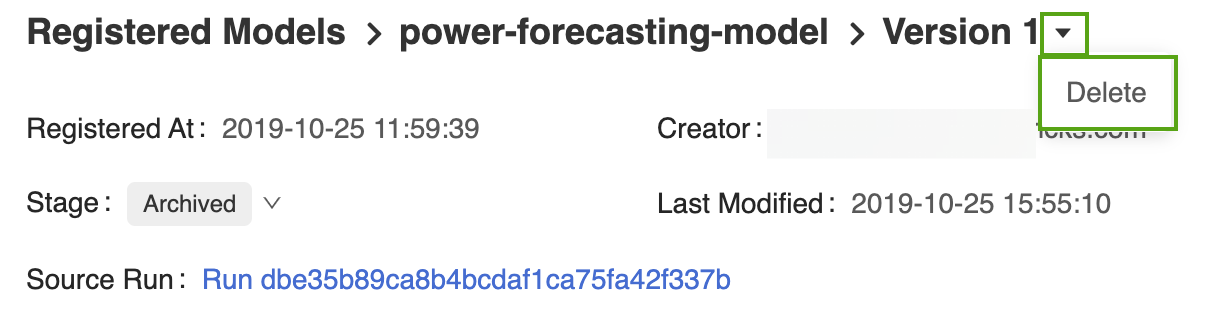
버전 식별자 옆에 있는 드롭다운 화살표를 선택하고 삭제를 클릭합니다.
MLflow API를 사용하여 삭제 Version 1
client.delete_model_version(
   name=model_name,
   version=1,
)
MLflow API를 사용하여 모델 삭제
먼저 나머지 모델 버전 단계를 모두 없음 또는 보관됨으로 전환해야 합니다.
from mlflow.tracking.client import MlflowClient

client = MlflowClient()
client.transition_model_version_stage(
  name=model_name,
  version=2,
  stage="Archived",
)
client.delete_registered_model(name=model_name)