Azure Databricks 클러스터의 지역 재해 복구
이 문서에서는 Azure Databricks 클러스터에 유용한 재해 복구 아키텍처와 해당 디자인을 수행하는 단계를 설명합니다.
Azure Databricks 아키텍처
Azure Portal에서 Azure Databricks 작업 영역을 만들면 관리되는 애플리케이션 이 선택한 Azure 지역(예: 미국 서부)의 구독에서 Azure 리소스로 배포됩니다. 이 어플라이언스는 구독에서 사용할 수 있는 네트워크 보안 그룹 및 Azure Storage 계정을 사용하여 Azure Virtual Network에 배포됩니다. 가상 네트워크는 Databricks 작업 영역에 경계 수준 보안을 제공하고 네트워크 보안 그룹을 통해 보호됩니다. 작업 영역 내에서 작업자 및 드라이버 VM 유형 및 Databricks 런타임 버전을 제공하여 Databricks 클러스터를 만듭니다. 지속형 데이터는 스토리지 계정에서 사용할 수 있습니다. 클러스터가 만들어지면 Notebook, REST API 또는 ODBC/JDBC 엔드포인트를 통해 특정 클러스터에 연결하여 작업을 실행할 수 있습니다.
Databricks 제어 평면은 Databricks 작업 영역 환경을 관리하고 모니터링합니다. 클러스터 만들기와 같은 모든 관리 작업은 컨트롤 플레인에서 시작됩니다. 예약된 작업과 같은 모든 메타데이터는 Azure Database에 저장되며 데이터베이스 백업은 구현되는 쌍을 이루는 지역으로 자동으로 지역 복제됩니다.
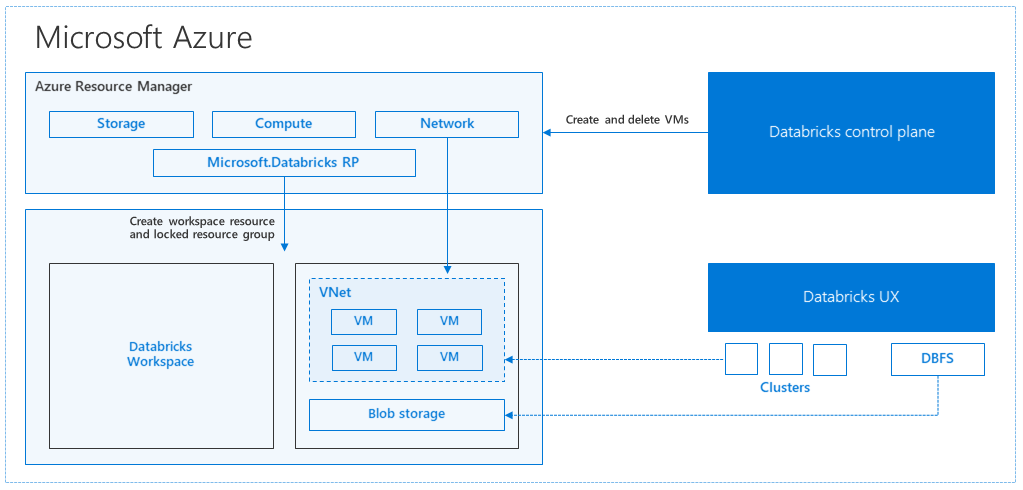
이 아키텍처의 장점 중 하나는 사용자가 Azure Databricks를 계정의 모든 스토리지 리소스에 연결할 수 있다는 것입니다. 주요 이점은 컴퓨팅(Azure Databricks)과 스토리지를 서로 독립적으로 확장할 수 있다는 것입니다.
지역 재해 복구 토폴로지를 만드는 방법
이전 아키텍처 설명에는 Azure Databricks를 사용하는 빅 데이터 파이프라인에 사용되는 다양한 구성 요소(Azure Storage, Azure Database 및 기타 데이터 원본)가 있습니다. Azure Databricks는 빅 데이터 파이프라인을 위한 컴퓨팅입니다. 이는 본질적으로 일시적입니다. 즉, Azure Storage에서 데이터를 계속 사용할 수 있지만 필요하지 않은 경우 컴퓨팅 비용을 지불하지 않도록 컴퓨팅(Azure Databricks 클러스터)을 종료할 수 있습니다. 작업 대기 시간이 높지 않도록 컴퓨팅(Azure Databricks) 및 스토리지 원본은 동일한 지역에 있어야 합니다.
고유한 지역 재해 복구 토폴로지를 만들려면 다음 요구 사항을 따릅니다.
별도의 Azure 지역에 여러 Azure Databricks 작업 영역을 프로비전합니다. 예를 들어 미국 동부에서 기본 Azure Databricks 작업 영역을 만듭니다. 미국 서부와 같은 별도의 지역에 보조 재해 복구 Azure Databricks 작업 영역을 만듭니다. 쌍을 이루는 Azure 지역 목록은 지역 간 복제를 참조 하세요. Azure Databricks 지역에 대한 자세한 내용은 지원되는 지역을 참조 하세요.
지역 중복 스토리지를 사용합니다. 기본적으로 Azure Databricks와 연결된 데이터는 Azure Storage에 저장되고 Databricks 작업의 결과는 Azure Blob Storage에 저장되므로 처리된 데이터는 내구성이 뛰어나고 클러스터가 종료된 후에도 고가용성 상태로 유지됩니다. 클러스터 스토리지 및 작업 스토리지는 동일한 가용성 영역에 있습니다. 지역 사용 불가로부터 보호하기 위해 Azure Databricks 작업 영역은 기본적으로 지역 중복 스토리지를 사용합니다. 지역 중복 스토리지를 사용하면 데이터가 Azure 쌍을 이루는 지역에 복제됩니다. Databricks는 지역 중복 스토리지 기본값을 유지하는 것이 좋지만 로컬 중복 스토리지를 대신 사용해야 하는 경우 작업 영역에 대한 ARM 템플릿으로 설정할
storageAccountSkuNameStandard_LRS수 있습니다.보조 지역이 만들어지면 사용자, 사용자 폴더, Notebook, 클러스터 구성, 작업 구성, 라이브러리, 스토리지, 초기화 스크립트를 마이그레이션하고 액세스 제어를 다시 구성해야 합니다. 추가 세부 정보는 다음 섹션에 설명되어 있습니다.
지역 재해
지역 재해에 대비하려면 보조 지역에서 다른 Azure Databricks 작업 영역 집합을 명시적으로 유지 관리해야 합니다. 재해 복구를 참조하세요.
재해 복구에 권장되는 도구는 주로 Terraform(인프라 복제용) 및 델타 딥 클론(데이터 복제용)입니다.
자세한 마이그레이션 단계
컴퓨터에서 Databricks 명령줄 인터페이스 설정
이 문서에서는 Azure Databricks REST API에 대한 사용자용 래퍼이므로 대부분의 자동화된 단계에 명령줄 인터페이스를 사용하는 여러 코드 예제를 보여 줍니다.
마이그레이션 단계를 수행하기 전에, 작업에 사용할 데스크톱 컴퓨터 또는 가상 머신에 databricks-cli를 설치합니다. 자세한 내용은 Databricks CLI 설치를 참조하세요.
pip install databricks-cli참고 항목
이 문서에서 제공하는 모든 python 스크립트는 Python 2.7 + < 3.x에서 작동합니다.
두 개의 프로필 구성.
한 프로필은 기본 작업 영역에 대해 구성하고, 다른 프로필은 보조 작업 영역에 대해 구성합니다.
databricks configure --profile primary --token
databricks configure --profile secondary --token
이 문서의 코드 블록은 해당 작업 영역 명령을 사용하여 각 후속 단계에서 프로필 간에 전환합니다. 만드는 프로필의 이름을 각 코드 블록으로 바꿔야 합니다.
EXPORT_PROFILE = "primary"
IMPORT_PROFILE = "secondary"
필요한 경우 명령줄에서 수동으로 전환할 수 있습니다.
databricks workspace ls --profile primary
databricks workspace ls --profile secondary
Microsoft Entra ID(이전의 Azure Active Directory) 사용자 마이그레이션
기본 작업 영역에 있는 보조 작업 영역에 동일한 Microsoft Entra ID(이전의 Azure Active Directory) 사용자를 수동으로 추가합니다.
사용자 폴더 및 Notebook 마이그레이션
다음 Python 코드를 사용하여 사용자당 중첩된 폴더 구조 및 Notebook을 포함하는 샌드박스 사용자 환경을 마이그레이션합니다.
참고 항목
기본 API는 해당 라이브러리를 지원하지 않으므로 이 단계에서 라이브러리는 복사되지 않습니다.
다음 Python 스크립트를 복사하여 파일에 저장하고 Databricks 명령줄에서 실행합니다. 예들 들어
python scriptname.py입니다.import sys import os import subprocess from subprocess import call, check_output EXPORT_PROFILE = "primary" IMPORT_PROFILE = "secondary" # Get a list of all users user_list_out = check_output(["databricks", "workspace", "ls", "/Users", "--profile", EXPORT_PROFILE]) user_list = (user_list_out.decode(encoding="utf-8")).splitlines() print (user_list) # Export sandboxed environment(folders, notebooks) for each user and import into new workspace. #Libraries are not included with these APIs / commands. for user in user_list: #print("Trying to migrate workspace for user ".decode() + user) print (("Trying to migrate workspace for user ") + user) subprocess.call(str("mkdir -p ") + str(user), shell = True) export_exit_status = call("databricks workspace export_dir /Users/" + str(user) + " ./" + str(user) + " --profile " + EXPORT_PROFILE, shell = True) if export_exit_status==0: print ("Export Success") import_exit_status = call("databricks workspace import_dir ./" + str(user) + " /Users/" + str(user) + " --profile " + IMPORT_PROFILE, shell=True) if import_exit_status==0: print ("Import Success") else: print ("Import Failure") else: print ("Export Failure") print ("All done")클러스터 구성 마이그레이션
Notebook이 마이그레이션되면 필요에 따라 클러스터 구성을 새 작업 영역으로 마이그레이션할 수 있습니다. 모두 대신 선택적 클러스터 구성 마이그레이션을 수행하려는 경우가 아니면 databricks-cli를 사용하는 거의 완전히 자동화된 단계입니다.
참고 항목
아쉽게도 클러스터 구성 엔드포인트 만들기가 없으며, 이 스크립트는 각 클러스터를 즉시 만들려고 합니다. 구독에서 사용할 수 있는 코어가 충분하지 않으면 클러스터 만들기가 실패할 수 있습니다. 구성이 성공적으로 전송되는 한, 오류를 무시할 수 있습니다.
제공된 다음 스크립트는 이전 클러스터에서 새 클러스터 ID로의 매핑을 인쇄합니다. 이 ID는 나중에 작업 마이그레이션에 사용할 수 있습니다(기존 클러스터를 사용하도록 구성된 작업의 경우).
다음 Python 스크립트를 복사하여 파일에 저장하고 Databricks 명령줄에서 실행합니다. 예들 들어
python scriptname.py입니다.import sys import os import subprocess import json from subprocess import call, check_output EXPORT_PROFILE = "primary" IMPORT_PROFILE = "secondary" # Get all clusters info from old workspace clusters_out = check_output(["databricks", "clusters", "list", "--profile", EXPORT_PROFILE]) clusters_info_list = str(clusters_out.decode(encoding="utf-8")). splitlines() print("Printting Cluster info List") print(clusters_info_list) # Create a list of all cluster ids clusters_list = [] ##for cluster_info in clusters_info_list: clusters_list.append (cluster_info.split(None, 1)[0]) for cluster_info in clusters_info_list: if cluster_info != '': clusters_list.append(cluster_info.split(None, 1)[0]) # Optionally filter cluster ids out manually, so as to create only required ones in new workspace # Create a list of mandatory / optional create request elements cluster_req_elems = ["num_workers","autoscale","cluster_name","spark_version","spark_conf","node_type_id","driver_node_type_id","custom_tags","cluster_log_conf","spark_env_vars","autotermination_minutes","enable_elastic_disk"] print("Printing Cluster element List") print (cluster_req_elems) print(str(len(clusters_list)) + " clusters found in the primary site" ) print ("---------------------------------------------------------") # Try creating all / selected clusters in new workspace with same config as in old one. cluster_old_new_mappings = {} i = 0 for cluster in clusters_list: i += 1 print("Checking cluster " + str(i) + "/" + str(len(clusters_list)) + " : " +str(cluster)) cluster_get_out_f = check_output(["databricks", "clusters", "get", "--cluster-id", str(cluster), "--profile", EXPORT_PROFILE]) cluster_get_out=str(cluster_get_out_f.decode(encoding="utf-8")) print ("Got cluster config from old workspace") print (cluster_get_out) # Remove extra content from the config, as we need to build create request with allowed elements only cluster_req_json = json.loads(cluster_get_out) cluster_json_keys = cluster_req_json.keys() #Don't migrate Job clusters if cluster_req_json['cluster_source'] == u'JOB' : print ("Skipping this cluster as it is a Job cluster : " + cluster_req_json['cluster_id'] ) print ("---------------------------------------------------------") continue #cluster_req_json.pop(key, None) for key in cluster_json_keys: if key not in cluster_req_elems: print (cluster_req_json) #cluster_del_item=cluster_json_keys .keys() cluster_req_json.popitem(key, None) # Create the cluster, and store the mapping from old to new cluster ids #Create a temp file to store the current cluster info as JSON strCurrentClusterFile = "tmp_cluster_info.json" #delete the temp file if exists if os.path.exists(strCurrentClusterFile) : os.remove(strCurrentClusterFile) fClusterJSONtmp = open(strCurrentClusterFile,"w+") fClusterJSONtmp.write(json.dumps(cluster_req_json)) fClusterJSONtmp.close() #cluster_create_out = check_output(["databricks", "clusters", "create", "--json", json.dumps(cluster_req_json), "--profile", IMPORT_PROFILE]) cluster_create_out = check_output(["databricks", "clusters", "create", "--json-file", strCurrentClusterFile , "--profile", IMPORT_PROFILE]) cluster_create_out_json = json.loads(cluster_create_out) cluster_old_new_mappings[cluster] = cluster_create_out_json['cluster_id'] print ("Cluster create request sent to secondary site workspace successfully") print ("---------------------------------------------------------") #delete the temp file if exists if os.path.exists(strCurrentClusterFile) : os.remove(strCurrentClusterFile) print ("Cluster mappings: " + json.dumps(cluster_old_new_mappings)) print ("All done") print ("P.S. : Please note that all the new clusters in your secondary site are being started now!") print (" If you won't use those new clusters at the moment, please don't forget terminating your new clusters to avoid charges")작업 구성 마이그레이션
이전 단계에서 클러스터 구성을 마이그레이션한 경우 작업 구성을 새 작업 영역으로 마이그레이션하도록 선택할 수 있습니다. 모든 작업이 아닌 선택적 작업 구성 마이그레이션을 수행하려는 경우 외에는 모든 단계가 databricks-cli를 사용하여 완전히 자동화되었습니다.
참고 항목
예약된 작업에 대한 구성에는 "일정" 정보도 포함되므로 기본적으로 마이그레이션되는 즉시 구성된 타이밍에 따라 작동하기 시작합니다. 따라서 다음 코드 블록은 마이그레이션 중에 일정 정보를 제거합니다(이전 작업 영역과 새 작업 영역에서 중복 실행을 방지하기 위해). 중단 준비가 끝나면 이러한 작업의 일정을 구성합니다.
작업 구성에는 새 클러스터 또는 기존 클러스터에 대한 설정이 필요합니다. 기존 클러스터를 사용하는 경우 아래 스크립트 /코드는 이전 클러스터 ID를 새 클러스터 ID로 바꾸려고 시도합니다.
다음 Python 스크립트를 복사하여 파일에 저장합니다. 및 에 대한
old_cluster_idnew_cluster_id값을 이전 단계에서 수행한 클러스터 마이그레이션의 출력으로 바꿉습니다. databricks-cli 명령줄에서 실행합니다(예: .)python scriptname.py.import sys import os import subprocess import json from subprocess import call, check_output EXPORT_PROFILE = "primary" IMPORT_PROFILE = "secondary" # Please replace the old to new cluster id mappings from cluster migration output cluster_old_new_mappings = {"0227-120427-tryst214": "0229-032632-paper88"} # Get all jobs info from old workspace try: jobs_out = check_output(["databricks", "jobs", "list", "--profile", EXPORT_PROFILE]) jobs_info_list = jobs_out.splitlines() except: print("No jobs to migrate") sys.exit(0) # Create a list of all job ids jobs_list = [] for jobs_info in jobs_info_list: jobs_list.append(jobs_info.split(None, 1)[0]) # Optionally filter job ids out manually, so as to create only required ones in new workspace # Create each job in the new workspace based on corresponding settings in the old workspace for job in jobs_list: print("Trying to migrate ") + job job_get_out = check_output(["databricks", "jobs", "get", "--job-id", job, "--profile", EXPORT_PROFILE]) print("Got job config from old workspace") job_req_json = json.loads(job_get_out) job_req_settings_json = job_req_json['settings'] # Remove schedule information so job doesn't start before proper cutover job_req_settings_json.pop('schedule', None) # Replace old cluster id with new cluster id, if job configured to run against an existing cluster if 'existing_cluster_id' in job_req_settings_json: if job_req_settings_json['existing_cluster_id'] in cluster_old_new_mappings: job_req_settings_json['existing_cluster_id'] = cluster_old_new_mappings[job_req_settings_json['existing_cluster_id']] else: print("Mapping not available for old cluster id ") + job_req_settings_json['existing_cluster_id'] continue call(["databricks", "jobs", "create", "--json", json.dumps(job_req_settings_json), "--profile", IMPORT_PROFILE]) print("Sent job create request to new workspace successfully") print("All done")라이브러리 마이그레이션
현재 한 작업 영역에서 다른 작업 영역으로 라이브러리를 마이그레이션하는 간단한 방법은 없습니다. 대신 이러한 라이브러리를 새 작업 영역에 수동으로 다시 설치합니다. DBFS CLI 조합을 사용하여 작업 영역 및 라이브러리 CLI에 사용자 지정 라이브러리를 업로드하는 작업을 자동화할 수 있습니다.
Azure Blob Storage 및 Azure Data Lake Storage 탑재 마이그레이션
Notebook 기반 솔루션을 사용하여 모든 Azure Blob Storage 및 Azure Data Lake Storage(Gen 2) 탑재 지점을 수동으로 다시 탑재합니다. 스토리지 리소스는 기본 작업 영역에 탑재되었을 것이며, 보조 작업 영역에서도 반복해야 합니다. 탑재를 위한 외부 API는 없습니다.
클러스터 init 스크립트 마이그레이션
DBFS CLI를 사용하여 모든 클러스터 초기화 스크립트를 기존 작업 영역에서 새 작업 영역으로 마이그레이션할 수 있습니다. 먼저 필요한 스크립트를 로컬 데스크톱 또는 가상 머신으로
dbfs:/dat abricks/init/..복사합니다. 다음으로, 해당 스크립트를 동일한 경로의 새 작업 영역에 복사합니다.// Primary to local dbfs cp -r dbfs:/databricks/init ./old-ws-init-scripts --profile primary // Local to Secondary workspace dbfs cp -r old-ws-init-scripts dbfs:/databricks/init --profile secondary수동으로 액세스 제어를 다시 구성하고 다시 적용합니다.
기존 기본 작업 영역이 프리미엄 또는 엔터프라이즈 계층(SKU)을 사용하도록 구성된 경우 Access 컨트롤도 사용할 수 있습니다.
Access 컨트롤을 사용하는 경우 리소스(Notebook, 클러스터, 작업, 테이블)에 액세스 제어를 수동으로 다시 적용합니다.
Azure 에코시스템에 대한 재해 복구
다른 Azure 서비스를 사용하는 경우 해당 서비스에 대한 재해 복구 모범 사례를 구현해야 합니다. 예를 들어 외부 Hive 메타스토어 인스턴스를 사용하도록 선택하는 경우 Azure SQL Database, Azure HDInsight 및/또는 Azure Database for MySQL에 대한 재해 복구를 고려해야 합니다. 재해 복구에 대한 일반적인 내용은 Azure 애플리케이션에 대한 재해 복구를 참조하세요.
다음 단계
자세한 내용은 Azure Databricks 설명서를 참조 하세요.
피드백
출시 예정: 2024년 내내 콘텐츠에 대한 피드백 메커니즘으로 GitHub 문제를 단계적으로 폐지하고 이를 새로운 피드백 시스템으로 바꿀 예정입니다. 자세한 내용은 다음을 참조하세요. https://aka.ms/ContentUserFeedback
다음에 대한 사용자 의견 제출 및 보기