이 문서에서는 Python 스크립트에서 Azure SDK 관리 라이브러리를 사용하여 Linux 가상 머신을 포함하는 리소스 그룹을 만드는 방법을 알아봅니다.
해당하는 Azure CLI 명령은 이 문서의 뒷부분에 나와 있습니다. Azure Portal을 사용하려면 Linux VM 만들기 및 Windows VM 만들기를 참조하세요.
비고
코드를 통해 가상 머신을 만드는 것은 가상 머신에 필요한 여러 다른 리소스를 프로비전하는 다중 단계 프로세스입니다. 명령줄에서 이러한 코드를 실행하는 경우 생략하도록 선택한 모든 설정에 대한 기본값으로 이러한 보조 리소스를 자동으로 프로비전하는 명령을 사용하는 az vm create 것이 훨씬 쉽습니다. 유일한 필수 인수는 리소스 그룹, VM 이름, 이미지 이름 및 인증 자격 증명입니다. 자세한 내용은 Azure CLI를 사용하여 가상 머신 빠른 만들기를 참조하세요.
1: 로컬 개발 환경 설정
아직 실행하지 않은 경우 이 코드를 실행할 수 있는 환경을 설정합니다. 몇 가지 옵션은 다음과 같습니다.
#!/bin/bash
# Create a virtual environment
python -m venv .venv
# Activate the virtual environment
source .venv/Scripts/activate # only required for Windows (Git Bash)
conda 환경을 사용합니다. Conda를 설치하려면 Miniconda 설치를 참조하세요.
Visual Studio Code 또는 GitHub Codespaces에서 개발 컨테이너를 사용합니다.
2: 필요한 Azure 라이브러리 패키지 설치
이 스크립트에 필요한 Azure SDK 관리 패키지를 지정하는 requirements.txt 파일을 만듭니다.
azure-mgmt-resource
azure-mgmt-compute
azure-mgmt-network
azure-identity
다음으로 requirements.txt에서 지정된 관리 라이브러리를 설치합니다.
pip install -r requirements.txt
3: 가상 머신을 만드는 코드 작성
다음 코드를 사용하여 provision_vm.py 이라는 Python 파일을 만듭니다. 주석은 세부 정보를 설명합니다.
# Import the needed credential and management objects from the libraries.
import os

from azure.identity import DefaultAzureCredential
from azure.mgmt.compute import ComputeManagementClient
from azure.mgmt.network import NetworkManagementClient
from azure.mgmt.resource import ResourceManagementClient

print(
    "Provisioning a virtual machine...some operations might take a \
minute or two."
)

# Acquire a credential object.
credential = DefaultAzureCredential()

# Retrieve subscription ID from environment variable.
subscription_id = os.environ["AZURE_SUBSCRIPTION_ID"]


# Step 1: Provision a resource group

# Obtain the management object for resources.
resource_client = ResourceManagementClient(credential, subscription_id)

# Constants we need in multiple places: the resource group name and
# the region in which we provision resources. You can change these
# values however you want.
RESOURCE_GROUP_NAME = "PythonAzureExample-VM-rg"
LOCATION = "westus2"

# Provision the resource group.
rg_result = resource_client.resource_groups.create_or_update(
    RESOURCE_GROUP_NAME, {"location": LOCATION}
)

print(
    f"Provisioned resource group {rg_result.name} in the \
{rg_result.location} region"
)

# For details on the previous code, see Example: Provision a resource
# group at https://learn.microsoft.com/azure/developer/python/
# azure-sdk-example-resource-group

# Step 2: provision a virtual network

# A virtual machine requires a network interface client (NIC). A NIC
# requires a virtual network and subnet along with an IP address.
# Therefore we must provision these downstream components first, then
# provision the NIC, after which we can provision the VM.

# Network and IP address names
VNET_NAME = "python-example-vnet"
SUBNET_NAME = "python-example-subnet"
IP_NAME = "python-example-ip"
IP_CONFIG_NAME = "python-example-ip-config"
NIC_NAME = "python-example-nic"

# Obtain the management object for networks
network_client = NetworkManagementClient(credential, subscription_id)

# Provision the virtual network and wait for completion
poller = network_client.virtual_networks.begin_create_or_update(
    RESOURCE_GROUP_NAME,
    VNET_NAME,
    {
        "location": LOCATION,
        "address_space": {"address_prefixes": ["10.0.0.0/16"]},
    },
)

vnet_result = poller.result()

print(
    f"Provisioned virtual network {vnet_result.name} with address \
prefixes {vnet_result.address_space.address_prefixes}"
)

# Step 3: Provision the subnet and wait for completion
poller = network_client.subnets.begin_create_or_update(
    RESOURCE_GROUP_NAME,
    VNET_NAME,
    SUBNET_NAME,
    {"address_prefix": "10.0.0.0/24"},
)
subnet_result = poller.result()

print(
    f"Provisioned virtual subnet {subnet_result.name} with address \
prefix {subnet_result.address_prefix}"
)

# Step 4: Provision an IP address and wait for completion
poller = network_client.public_ip_addresses.begin_create_or_update(
    RESOURCE_GROUP_NAME,
    IP_NAME,
    {
        "location": LOCATION,
        "sku": {"name": "Standard"},
        "public_ip_allocation_method": "Static",
        "public_ip_address_version": "IPV4",
    },
)

ip_address_result = poller.result()

print(
    f"Provisioned public IP address {ip_address_result.name} \
with address {ip_address_result.ip_address}"
)

# Step 5: Provision the network interface client
poller = network_client.network_interfaces.begin_create_or_update(
    RESOURCE_GROUP_NAME,
    NIC_NAME,
    {
        "location": LOCATION,
        "ip_configurations": [
            {
                "name": IP_CONFIG_NAME,
                "subnet": {"id": subnet_result.id},
                "public_ip_address": {"id": ip_address_result.id},
            }
        ],
    },
)

nic_result = poller.result()

print(f"Provisioned network interface client {nic_result.name}")

# Step 6: Provision the virtual machine

# Obtain the management object for virtual machines
compute_client = ComputeManagementClient(credential, subscription_id)

VM_NAME = "ExampleVM"
USERNAME = "azureuser"
PASSWORD = "ChangePa$$w0rd24"

print(
    f"Provisioning virtual machine {VM_NAME}; this operation might \
take a few minutes."
)

# Provision the VM specifying only minimal arguments, which defaults
# to an Ubuntu 18.04 VM on a Standard DS1 v2 plan with a public IP address
# and a default virtual network/subnet.

poller = compute_client.virtual_machines.begin_create_or_update(
    RESOURCE_GROUP_NAME,
    VM_NAME,
    {
        "location": LOCATION,
        "storage_profile": {
            "image_reference": {
                "publisher": "Canonical",
                "offer": "UbuntuServer",
                "sku": "16.04.0-LTS",
                "version": "latest",
            }
        },
        "hardware_profile": {"vm_size": "Standard_DS1_v2"},
        "os_profile": {
            "computer_name": VM_NAME,
            "admin_username": USERNAME,
            "admin_password": PASSWORD,
        },
        "network_profile": {
            "network_interfaces": [
                {
                    "id": nic_result.id,
                }
            ]
        },
    },
)

vm_result = poller.result()

print(f"Provisioned virtual machine {vm_result.name}")
코드의 인증
이 문서의 뒷부분에서는 Azure CLI 사용하여 샘플 코드를 실행하여 Azure 로그인합니다. 계정에 Azure 구독에서 리소스 그룹 및 스토리지 리소스를 만들 수 있는 충분한 권한이 있는 경우 스크립트는 추가 구성 없이 성공적으로 실행됩니다.
프로덕션 환경에서 이 코드를 사용하려면 서비스 주체를 사용하여 인증하고 환경 변수를 설정합니다. 이 방법을 사용하면 대화형 로그인을 사용하지 않고도 안전하고 자동화된 액세스를 사용할 수 있습니다. 자세한 지침은 Azure 서비스를 사용하여 Python 앱을 인증하는 방법을 참조하세요.
서비스 주체에 리소스 그룹 및 스토리지 계정을 만들 수 있는 충분한 권한이 있는 역할이 할당되었는지 확인합니다. 예를 들어 구독 수준에서 기여자 역할을 할당하면 필요한 액세스 권한이 제공됩니다. 역할 할당에 대한 자세한 내용은 Azure의 RBAC(역할 기반 액세스 제어)를 참조하세요.
코드에 사용되는 클래스에 대한 참조 링크
- DefaultAzureCredential(azure.identity)
- ResourceManagementClient(azure.mgmt.resource)
- NetworkManagementClient(azure.mgmt.network)
- ComputeManagementClient(azure.mgmt.compute)
4. 스크립트 실행
아직 로그인하지 않은 경우 Azure CLI 사용하여 Azure 로그인합니다.
az login환경 변수를
AZURE_SUBSCRIPTION_ID구독 ID로 설정합니다. ( az account show 명령을 실행하고 출력의id속성에서 구독 ID를 가져옵니다.export AZURE_SUBSCRIPTION_ID=$(az account show --query id -o tsv)스크립트를 실행합니다.
python provision_vm.py
프로비전 프로세스를 완료하는 데 몇 분 정도 걸립니다.
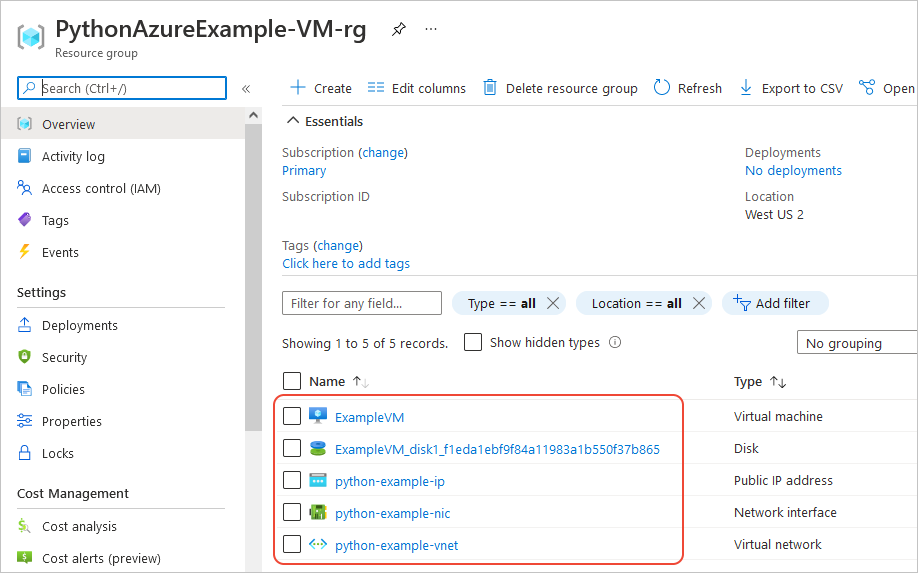
5. 리소스 확인
Azure 포털을 열고 PythonAzureExample-VM-rg 리소스 그룹으로 이동하여 가상 머신, 가상 디스크, 네트워크 보안 그룹, 공용 IP 주소, 네트워크 인터페이스 및 가상 네트워크를 확인합니다.
Azure CLI 사용하여 az vm list 명령을 사용하여 VM이 있는지 확인할 수도 있습니다.
az vm list --resource-group PythonAzureExample-VM-rg
동등한 Azure CLI 명령
# Provision the resource group

az group create -n PythonAzureExample-VM-rg -l westus2

# Provision a virtual network and subnet

az network vnet create -g PythonAzureExample-VM-rg -n python-example-vnet \
    --address-prefix 10.0.0.0/16 --subnet-name python-example-subnet \
    --subnet-prefix 10.0.0.0/24

# Provision a public IP address

az network public-ip create -g PythonAzureExample-VM-rg -n python-example-ip \
    --allocation-method Dynamic --version IPv4

# Provision a network interface client

az network nic create -g PythonAzureExample-VM-rg --vnet-name python-example-vnet \
    --subnet python-example-subnet -n python-example-nic \
    --public-ip-address python-example-ip

# Provision the virtual machine

az vm create -g PythonAzureExample-VM-rg -n ExampleVM -l "westus2" \
    --nics python-example-nic --image UbuntuLTS --public-ip-sku Standard \
    --admin-username azureuser --admin-password ChangePa$$w0rd24
용량 제한에 대한 오류가 발생하면 다른 크기 또는 지역을 사용해 보세요. 자세한 내용은 사용할 수 없는 SKU에 대한 오류 해결을 참조하세요.
6: 리소스 정리
이 문서에서 만든 가상 머신 및 네트워크를 계속 사용하려면 리소스를 삭제하지 마세요. 그렇지 않으면 az group delete 명령을 실행하여 리소스 그룹을 삭제합니다.
리소스 그룹은 구독에서 진행 중인 요금이 발생하지 않지만 가상 머신과 같이 그룹에 포함된 리소스는 계속 요금이 부과될 수 있습니다. 적극적으로 사용하지 않는 리소스 그룹을 정리합니다. 인수를 --no-wait 사용하면 작업이 완료되는 것을 기다리지 않고 명령이 즉시 반환됩니다.
az group delete -n PythonAzureExample-VM-rg --no-wait
이 메서드를 ResourceManagementClient.resource_groups.begin_delete 사용하여 코드에서 리소스 그룹을 삭제할 수도 있습니다.
예제: 리소스 그룹 만들기의 코드는 사용량을 보여 줍니다.
참고하십시오
- 예: 리소스 그룹 만들기
- 예: 구독의 리소스 그룹 나열
- 예: Azure Storage 만들기
- 예: Azure Storage 사용
- 예: 웹앱 만들기 및 코드 배포
- 예: 데이터베이스 만들기 및 쿼리
- 가상 머신에서 Azure Managed Disks 사용
- Python용 Azure SDK에 대한 간단한 설문 조사 완료
다음 리소스에는 Python 사용하여 가상 머신을 만드는 보다 포괄적인 예제가 포함되어 있습니다.
- Azure Virtual Machines 관리 샘플 - Python (GitHub). 이 샘플에서는 VM 시작 및 다시 시작, VM 중지 및 삭제, 디스크 크기 증가 및 데이터 디스크 관리와 같은 더 많은 관리 작업을 보여 줍니다.