참고 항목
Python에서 보내는 알림을 구현하기 위한 샘플 참조 구현이며 공식적으로 지원되는 Notifications Hub Python SDK가 아닙니다. 샘플은 Python 3.4를 사용하여 만들어졌습니다.
이 문서는 다음을 수행하는 방법을 보여줍니다.
- Python에서 Notification Hubs 기능에 대한 REST 클라이언트를 빌드합니다.
- Python 인터페이스를 사용하여 알림 허브 REST API에 알림을 보냅니다.
- 디버깅/교육 목적으로 HTTP REST 요청/응답의 덤프를 가져옵니다.
선택한 모바일 플랫폼에 대한 시작 자습서를 따라 Python에서 백 엔드 부분을 구현할 수 있습니다.
참고 항목
샘플의 범위는 알림을 보내는 것으로만 제한되며 등록 관리를 수행하지 않습니다.
클라이언트 인터페이스
기본 클라이언트 인터페이스는 .NET Notification Hubs SDK에서 사용할 수 있는 동일한 메서드를 제공할 수 있습니다. 이 인터페이스를 사용하면 현재 이 사이트에서 사용할 수 있고 인터넷 커뮤니티에서 제공하는 모든 자습서 및 샘플을 직접 번역할 수 있습니다.
Python REST 래퍼 샘플에서 사용 가능한 모든 코드를 찾을 수 있습니다.
예를 들어 클라이언트를 만들려면 다음을 수행합니다.
isDebug = True
hub = NotificationHub("myConnectionString", "myNotificationHubName", isDebug)
Windows 알림 메시지를 보내려면 다음을 수행합니다.
wns_payload = """<toast><visual><binding template=\"ToastText01\"><text id=\"1\">Hello world!</text></binding></visual></toast>"""
hub.send_windows_notification(wns_payload)
구현
아직 수행하지 않은 경우 백 엔드를 구현해야 하는 마지막 섹션까지 시작 자습서 를 따릅니다.
전체 REST 래퍼를 구현하기 위한 모든 세부 정보는 MSDN에서 찾을 수 있습니다. 이 섹션에서는 Notification Hubs REST 엔드포인트에 액세스하고 알림을 보내는 데 필요한 기본 단계의 Python 구현에 대해 설명합니다.
- 연결 문자열 구문 분석
- 권한 부여 토큰 생성
- HTTP REST API를 사용하여 알림 보내기
연결 문자열 구문 분석
다음은 생성자가 연결 문자열 구문 분석하는 클라이언트를 구현하는 기본 클래스입니다.
class NotificationHub:
    API_VERSION = "?api-version=2013-10"
    DEBUG_SEND = "&test"

    def __init__(self, connection_string=None, hub_name=None, debug=0):
        self.HubName = hub_name
        self.Debug = debug

        # Parse connection string
        parts = connection_string.split(';')
        if len(parts) != 3:
            raise Exception("Invalid ConnectionString.")

        for part in parts:
            if part.startswith('Endpoint'):
                self.Endpoint = 'https' + part[11:].lower()
            if part.startswith('SharedAccessKeyName'):
                self.SasKeyName = part[20:]
            if part.startswith('SharedAccessKey'):
                self.SasKeyValue = part[16:]
보안 토큰 만들기
보안 토큰 만들기의 세부 정보는 여기에서 확인할 수 있습니다.
클래스에 NotificationHub 다음 메서드를 추가하여 현재 요청의 URI 및 연결 문자열 추출된 자격 증명을 기반으로 토큰을 만듭니다.
@staticmethod
def get_expiry():
    # By default returns an expiration of 5 minutes (=300 seconds) from now
    return int(round(time.time() + 300))


@staticmethod
def encode_base64(data):
    return base64.b64encode(data)


def sign_string(self, to_sign):
    key = self.SasKeyValue.encode('utf-8')
    to_sign = to_sign.encode('utf-8')
    signed_hmac_sha256 = hmac.HMAC(key, to_sign, hashlib.sha256)
    digest = signed_hmac_sha256.digest()
    encoded_digest = self.encode_base64(digest)
    return encoded_digest


def generate_sas_token(self):
    target_uri = self.Endpoint + self.HubName
    my_uri = urllib.parse.quote(target_uri, '').lower()
    expiry = str(self.get_expiry())
    to_sign = my_uri + '\n' + expiry
    signature = urllib.parse.quote(self.sign_string(to_sign))
    auth_format = 'SharedAccessSignature sig={0}&se={1}&skn={2}&sr={3}'
    sas_token = auth_format.format(signature, expiry, self.SasKeyName, my_uri)
    return sas_token
HTTP REST API를 사용하여 알림 보내기
참고 항목
MPNS(Microsoft Push Notification Service)는 더 이상 사용되지 않으며 더 이상 지원되지 않습니다.
먼저 알림을 나타내는 클래스를 정의합니다.
class Notification:
    def __init__(self, notification_format=None, payload=None, debug=0):
        valid_formats = ['template', 'apple', 'gcm',
                         'windows', 'windowsphone', "adm", "baidu"]
        if not any(x in notification_format for x in valid_formats):
            raise Exception(
                "Invalid Notification format. " +
                "Must be one of the following - 'template', 'apple', 'gcm', 'windows', 'windowsphone', 'adm', 'baidu'")

        self.format = notification_format
        self.payload = payload

        # array with keynames for headers
        # Note: Some headers are mandatory: Windows: X-WNS-Type, WindowsPhone: X-NotificationType
        # Note: For Apple you can set Expiry with header: ServiceBusNotification-ApnsExpiry
        # in W3C DTF, YYYY-MM-DDThh:mmTZD (for example, 1997-07-16T19:20+01:00).
        self.headers = None
이 클래스는 네이티브 알림 본문 또는 템플릿 알림의 속성 집합, 형식(네이티브 플랫폼 또는 템플릿) 및 플랫폼별 속성(예: Apple 만료 속성 및 WNS 헤더)이 포함된 헤더 집합에 대한 컨테이너입니다.
사용 가능한 모든 옵션에 대한 Notification Hubs REST API 설명서 및 특정 알림 플랫폼의 형식을 참조하세요.
이제 이 클래스를 사용하여 클래스 내에 송신 알림 메서드를 작성합니다 NotificationHub .
def make_http_request(self, url, payload, headers):
    parsed_url = urllib.parse.urlparse(url)
    connection = http.client.HTTPSConnection(
        parsed_url.hostname, parsed_url.port)

    if self.Debug > 0:
        connection.set_debuglevel(self.Debug)
        # adding this querystring parameter gets detailed information about the PNS send notification outcome
        url += self.DEBUG_SEND
        print("--- REQUEST ---")
        print("URI: " + url)
        print("Headers: " + json.dumps(headers, sort_keys=True,
                                       indent=4, separators=(' ', ': ')))
        print("--- END REQUEST ---\n")

    connection.request('POST', url, payload, headers)
    response = connection.getresponse()

    if self.Debug > 0:
        # print out detailed response information for debugging purpose
        print("\n\n--- RESPONSE ---")
        print(str(response.status) + " " + response.reason)
        print(response.msg)
        print(response.read())
        print("--- END RESPONSE ---")

    elif response.status != 201:
        # Successful outcome of send message is HTTP 201 - Created
        raise Exception(
            "Error sending notification. Received HTTP code " + str(response.status) + " " + response.reason)

    connection.close()


def send_notification(self, notification, tag_or_tag_expression=None):
    url = self.Endpoint + self.HubName + '/messages' + self.API_VERSION

    json_platforms = ['template', 'apple', 'gcm', 'adm', 'baidu']

    if any(x in notification.format for x in json_platforms):
        content_type = "application/json"
        payload_to_send = json.dumps(notification.payload)
    else:
        content_type = "application/xml"
        payload_to_send = notification.payload

    headers = {
        'Content-type': content_type,
        'Authorization': self.generate_sas_token(),
        'ServiceBusNotification-Format': notification.format
    }

    if isinstance(tag_or_tag_expression, set):
        tag_list = ' || '.join(tag_or_tag_expression)
    else:
        tag_list = tag_or_tag_expression

    # add the tags/tag expressions to the headers collection
    if tag_list != "":
        headers.update({'ServiceBusNotification-Tags': tag_list})

    # add any custom headers to the headers collection that the user may have added
    if notification.headers is not None:
        headers.update(notification.headers)

    self.make_http_request(url, payload_to_send, headers)


def send_apple_notification(self, payload, tags=""):
    nh = Notification("apple", payload)
    self.send_notification(nh, tags)


def send_google_notification(self, payload, tags=""):
    nh = Notification("gcm", payload)
    self.send_notification(nh, tags)


def send_adm_notification(self, payload, tags=""):
    nh = Notification("adm", payload)
    self.send_notification(nh, tags)


def send_baidu_notification(self, payload, tags=""):
    nh = Notification("baidu", payload)
    self.send_notification(nh, tags)


def send_mpns_notification(self, payload, tags=""):
    nh = Notification("windowsphone", payload)

    if "<wp:Toast>" in payload:
        nh.headers = {'X-WindowsPhone-Target': 'toast',
                      'X-NotificationClass': '2'}
    elif "<wp:Tile>" in payload:
        nh.headers = {'X-WindowsPhone-Target': 'tile',
                      'X-NotificationClass': '1'}

    self.send_notification(nh, tags)


def send_windows_notification(self, payload, tags=""):
    nh = Notification("windows", payload)

    if "<toast>" in payload:
        nh.headers = {'X-WNS-Type': 'wns/toast'}
    elif "<tile>" in payload:
        nh.headers = {'X-WNS-Type': 'wns/tile'}
    elif "<badge>" in payload:
        nh.headers = {'X-WNS-Type': 'wns/badge'}

    self.send_notification(nh, tags)


def send_template_notification(self, properties, tags=""):
    nh = Notification("template", properties)
    self.send_notification(nh, tags)
이러한 메서드는 알림을 보낼 올바른 본문 및 헤더를 사용하여 알림 허브의 /messages 엔드포인트에 HTTP POST 요청을 보냅니다.
디버그 속성을 통해 자세한 로깅 사용
Notification Hub를 초기화하는 동안 디버그 속성을 사용하도록 설정하면 HTTP 요청 및 응답 덤프에 대한 자세한 로깅 정보와 자세한 알림 메시지 전송 결과가 기록됩니다. Notification Hubs TestSend 속성은 알림 보내기 결과에 대한 자세한 정보를 반환합니다. 사용하려면 다음 코드를 사용하여 초기화합니다.
hub = NotificationHub("myConnectionString", "myNotificationHubName", isDebug)
알림 허브 보내기 요청 HTTP URL은 결과적으로 "테스트" 쿼리 문자열과 함께 추가됩니다.
자습서 완료
이제 Python 백 엔드에서 알림을 전송하여 시작 자습서를 완료할 수 있습니다.
Notification Hubs 클라이언트를 초기화합니다(시작 자습서에 설명된 대로 연결 문자열 및 허브 이름으로 대체).
hub = NotificationHub("myConnectionString", "myNotificationHubName")
그리고 대상 모바일 플랫폼에 따라 보내기 코드를 추가합니다. 또한 이 샘플은 플랫폼에 따라 알림 보내기를 사용하도록 설정하는 상위 수준의 메서드를 추가합니다(예: send_windows_notification(Windows), send_apple_notification(Apple) 등).
Windows 스토어 및 Windows 전화 8.1(Silverlight가 아닌 경우)
wns_payload = """<toast><visual><binding template=\"ToastText01\"><text id=\"1\">Test</text></binding></visual></toast>"""
hub.send_windows_notification(wns_payload)
Windows 전화 8.0 및 8.1 Silverlight
hub.send_mpns_notification(toast)
iOS
alert_payload = {
    'data':
        {
            'msg': 'Hello!'
        }
}
hub.send_apple_notification(alert_payload)
Android
gcm_payload = {
    'data':
        {
            'msg': 'Hello!'
        }
}
hub.send_google_notification(gcm_payload)
Kindle Fire
adm_payload = {
    'data':
        {
            'msg': 'Hello!'
        }
}
hub.send_adm_notification(adm_payload)
Baidu
baidu_payload = {
    'data':
        {
            'msg': 'Hello!'
        }
}
hub.send_baidu_notification(baidu_payload)
Python 코드를 실행하면 대상 디바이스에 알림이 표시됩니다.
예제
속성 사용 debug
NotificationHub를 초기화하는 동안 디버그 플래그를 사용하도록 설정하면 요청에 전달된 HTTP 헤더와 알림 허브에서 수신된 HTTP 응답을 이해할 수 있는 다음과 같은 자세한 HTTP 요청 및 응답 덤프와 NotificationOutcome이 표시됩니다.
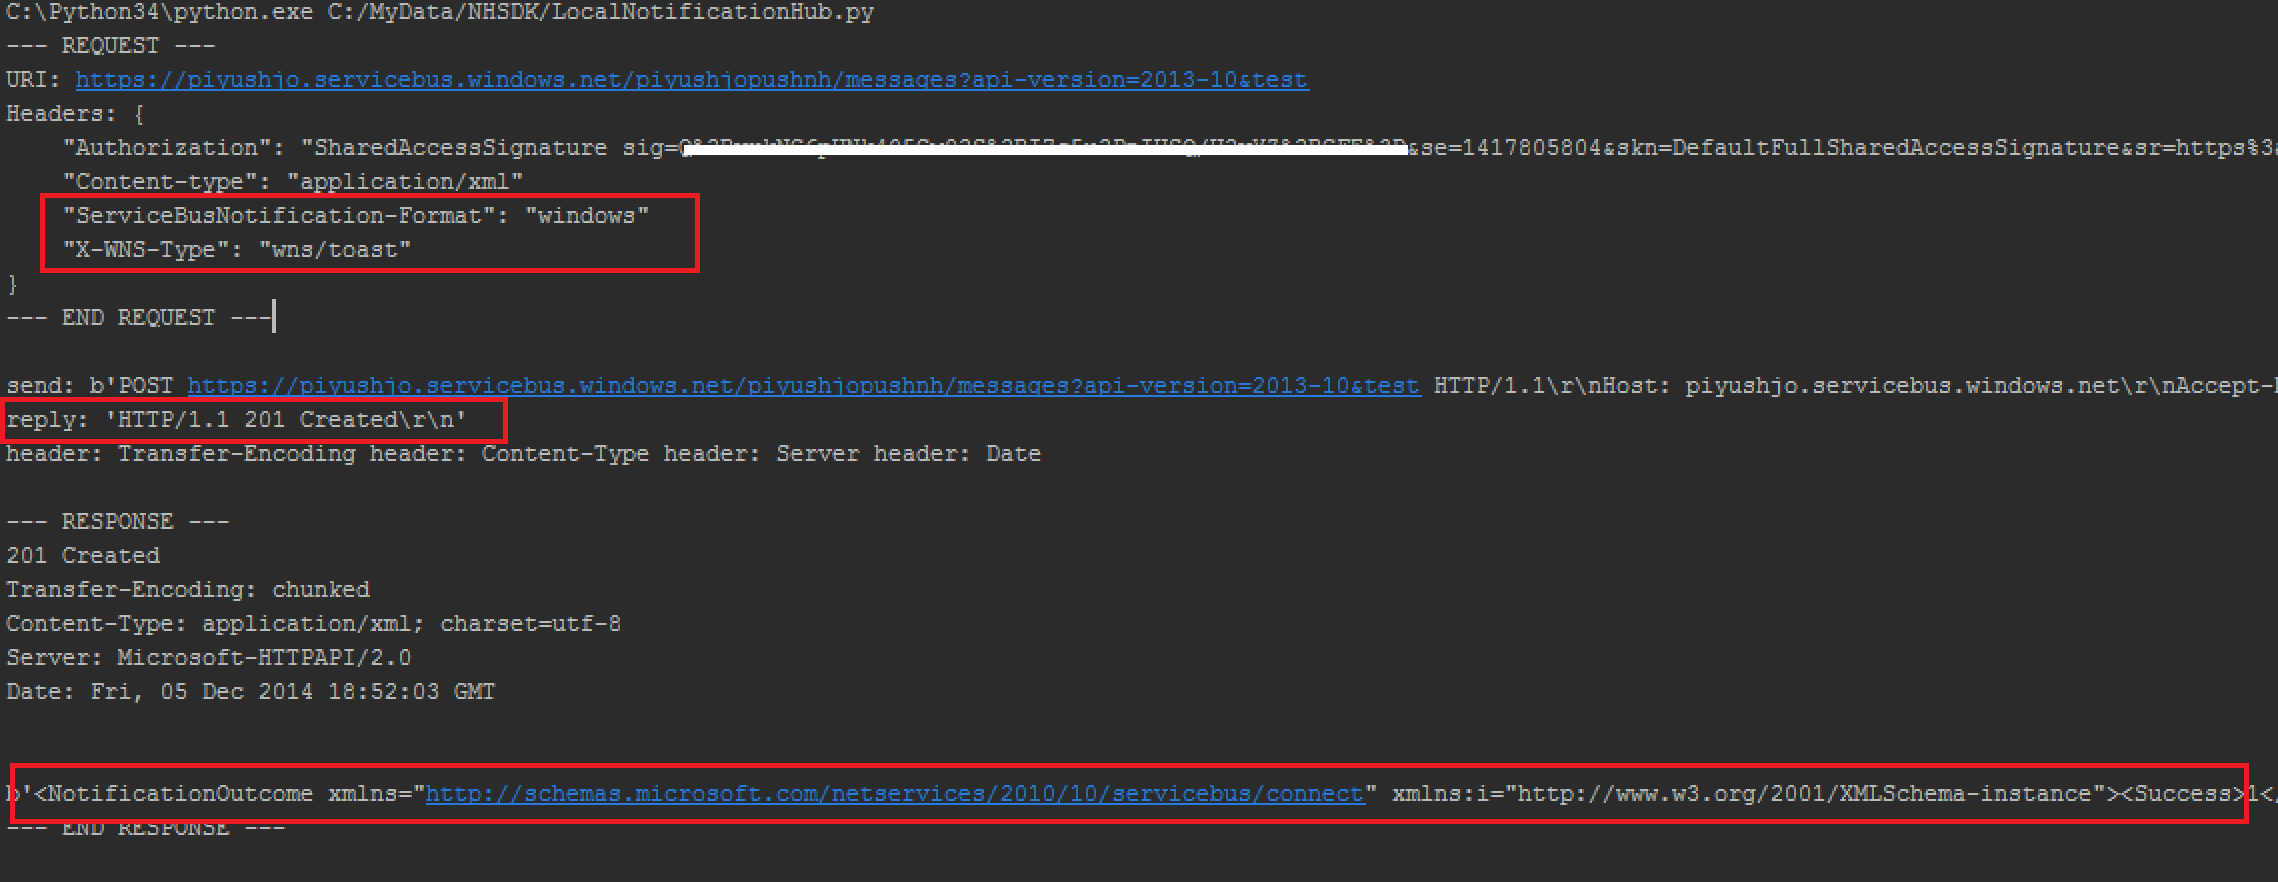
예를 들어 메시지가 푸시 알림 서비스로 전송되면
- 메시지가 푸시 알림 서비스로 성공적으로 전송되면 입니다.
<Outcome>The Notification was successfully sent to the Push Notification System</Outcome> - 푸시 알림에 대한 대상을 찾을 수 없는 경우 다음 출력이 응답으로 표시될 수 있습니다(등록에 일부 일치하지 않는 태그가 있었기 때문에 알림을 배달할 등록이 없음을 나타낸 것).
'<NotificationOutcome xmlns="http://schemas.microsoft.com/netservices/2010/10/servicebus/connect" xmlns:i="https://www.w3.org/2001/XMLSchema-instance"><Success>0</Success><Failure>0</Failure><Results i:nil="true"/></NotificationOutcome>'
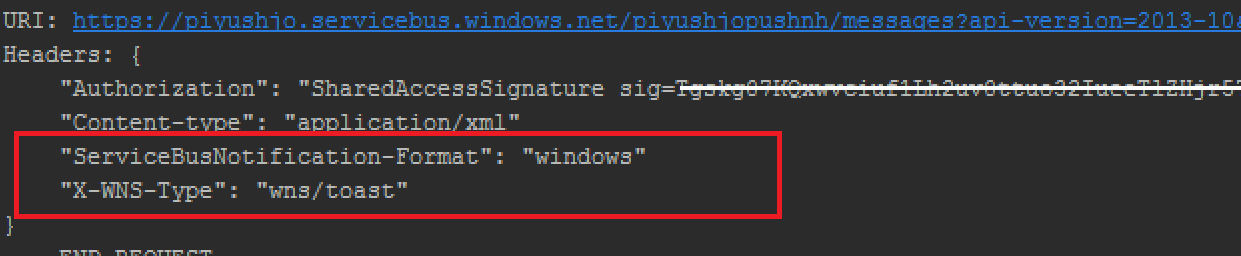
Windows에 알림 메시지 브로드캐스트
Windows 클라이언트에 브로드캐스트 알림 메시지를 보낼 때 전송되는 헤더를 확인합니다.
hub.send_windows_notification(wns_payload)
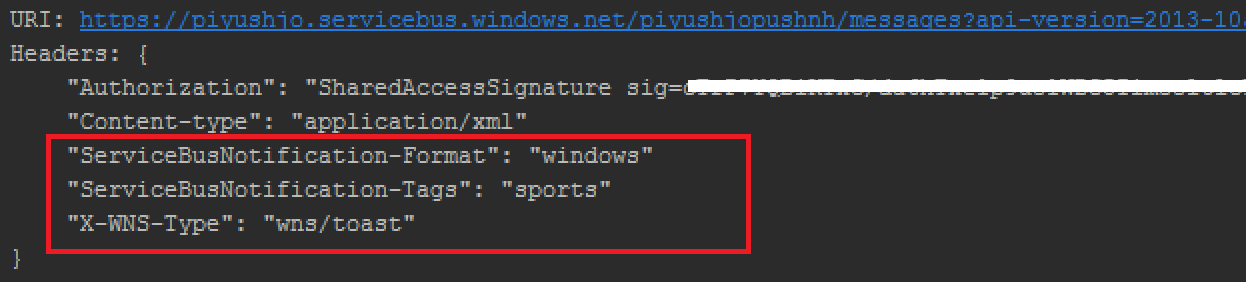
태그(또는 태그 식)를 지정하는 알림 보내기
HTTP 요청에 추가되는 Tags HTTP 헤더를 확인합니다(아래 예제에서는 알림이 'sports' 페이로드가 있는 등록으로만 전송됨).
hub.send_windows_notification(wns_payload, "sports")
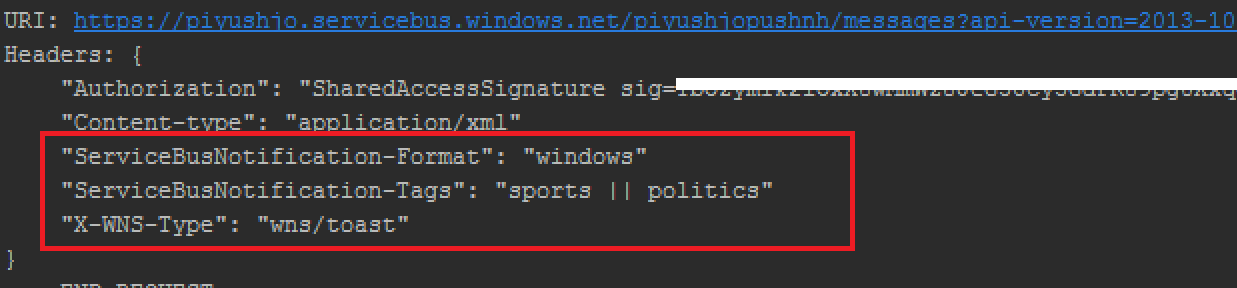
여러 태그를 지정하는 알림 보내기
여러 태그를 보낼 때 태그 HTTP 헤더가 어떻게 변경되는지 확인합니다.
tags = {'sports', 'politics'}
hub.send_windows_notification(wns_payload, tags)
템플릿 알림
형식 HTTP 헤더가 변경되고 페이로드 본문이 HTTP 요청 본문의 일부로 전송됩니다.
클라이언트 쪽 - 등록된 템플릿:
var template = @"<toast><visual><binding template=""ToastText01""><text id=""1"">$(greeting_en)</text></binding></visual></toast>";
서버 쪽 - 페이로드 보내기:
template_payload = {'greeting_en': 'Hello', 'greeting_fr': 'Salut'}
hub.send_template_notification(template_payload)

다음 단계
이 문서에서는 Notification Hubs용 Python REST 클라이언트를 만드는 방법을 보여 줍니다. 여기에서 다음을 수행할 수 있습니다.
- 이 문서의 모든 코드를 포함하는 전체 Python REST 래퍼 샘플을 다운로드합니다.
- 속보 자습서
- 지역화 뉴스 자습서