Red Hat Enterprise Linux의 SAP NetWeaver에 대한 Azure Virtual Machines 고가용성
이 문서에서는 VM(가상 머신)을 배포하고, VM을 구성하고, 클러스터 프레임워크를 설치하고, 고가용성 SAP NetWeaver 7.50 시스템을 설치하는 방법을 설명합니다.
예제 구성 및 설치 명령에서 ASCS 인스턴스 번호 00, ERS 인스턴스 번호 02, SAP 시스템 ID NW1을 사용합니다. 예제의 리소스(예: VM, 가상 네트워크)의 이름은 리소스 접두사가 NW1인 ASCS/SCS 템플릿을 사용하여 리소스를 만들었다고 가정합니다.
필수 조건
다음 SAP Note 및 문서를 먼저 읽어 보세요.
- SAP Note 1928533, 다음 항목을 포함합니다.
- SAP 소프트웨어 배포에 지원되는 Azure VM 크기 목록
- Azure VM 크기에 대한 중요한 용량 정보.
- 지원되는 SAP 소프트웨어 및 운영 체제(OS)와 데이터베이스 조합입니다.
- Microsoft Azure에서 Windows 및 Linux에 필요한 SAP 커널 버전입니다.
- SAP Note 2015553는 Azure에서 SAP을 지원하는 SAP 소프트웨어 배포에 대한 필수 구성 요소를 나열합니다.
- SAP Note 2002167은 RHEL(Red Hat Enterprise Linux)용 OS 설정을 권고합니다.
- SAP Note 2009879에는 Red Hat Enterprise Linux용 SAP HANA 지침이 있습니다.
- SAP Note 2178632는 Azure에서 SAP에 대해 보고된 모든 모니터링 메트릭에 대한 자세한 정보를 포함하고 있습니다.
- SAP Note 2191498는 Azure에서 Linux에 필요한 SAP Host Agent 버전을 포함하고 있습니다.
- SAP Note 2243692는 Azure에서 Linux의 SAP 라이선스에 대한 정보를 포함하고 있습니다.
- SAP Note 1999351에는 SAP용 Azure 고급 모니터링 확장에 대한 추가 문제 해결 정보가 있습니다.
- SAP Community WIKI는 Linux에 필요한 모든 SAP Note를 포함하고 있습니다.
- Linux에서 SAP용 Azure Virtual Machines 계획 및 구현
- Linux에서 SAP용 Azure Virtual Machines 배포
- Linux에서 SAP용 Azure Virtual Machines DBMS 배포
- Red Hat Gluster Storage용 제품 설명서
- Pacemaker 클러스터의 SAP Netweaver
- 일반 RHEL 설명서:
- Azure 특정 RHEL 설명서:
- Support Policies for RHEL High Availability Clusters - Microsoft Azure Virtual Machines as Cluster Members(RHEL 고가용성 클러스터용 지원 정책 - Microsoft Azure Virtual Machines(클러스터 멤버))
- Installing and Configuring a Red Hat Enterprise Linux 7.4 (and later) High-Availability Cluster on Microsoft Azure(Microsoft Azure에서 Red Hat Enterprise Linux 7.4 이상 고가용성 클러스터 설치 및 구성)
개요
SAP NetWeaver의 가용성을 높이려면 공유 스토리지가 필요합니다. GlusterFS는 별도의 클러스터에서 구성되며, 여러 SAP 시스템에서 사용할 수 있습니다.
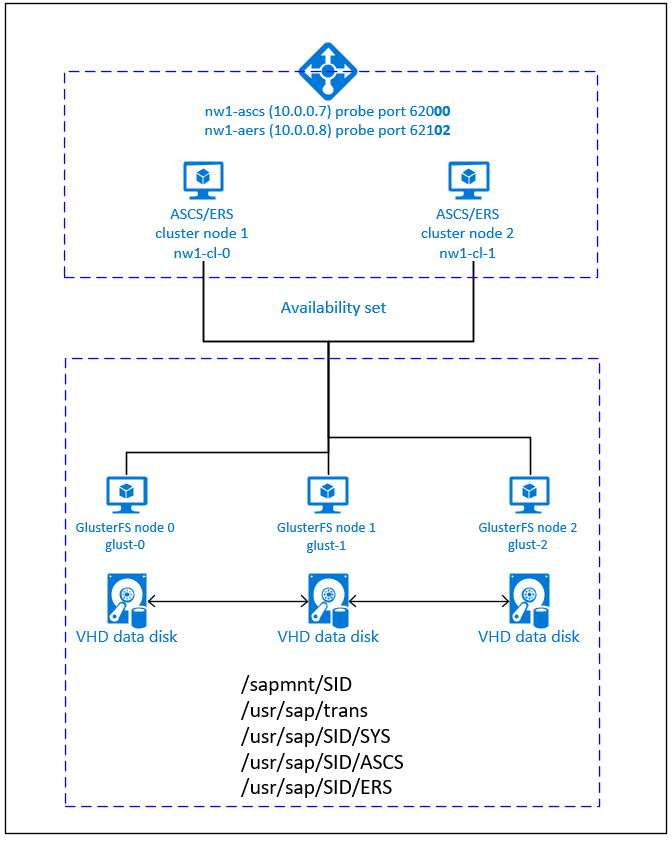
SAP NetWeaver ASCS, SAP NetWeaver SCS, SAP NetWeaver ERS 및 SAP HANA 데이터베이스는 가상 호스트 이름 및 가상 IP 주소를 사용합니다. Azure에서는 가상 IP 주소를 사용하려면 부하 분산 장치가 필요합니다. 표준 Azure Load Balancer를 사용하는 것이 좋습니다. 여기 나와 있는 구성은 다음이 포함된 부하 분산 장치를 보여 줍니다.
- ASCS의 프런트 엔드 IP 주소 10.0.0.7
- ERS의 프런트 엔드 IP 주소 10.0.0.8
- ASCS용 프로브 포트 62000
- ERS용 프로브 포트 62101
GlusterFS 설정
SAP NetWeaver에는 전송 및 프로필 디렉터리에 대한 공유 스토리지가 필요합니다. SAP NetWeaver용 GlusterFS를 설정하는 방법을 보려면 SAP NetWeaver용 Red Hat Enterprise Linux에 있는 Azure VM의 GlusterFS를 참조하세요.
인프라 준비
Azure Marketplace에는 다양한 버전의 Red Hat을 사용하여 새 VM을 배포하는 데 사용할 수 있는 고가용성 추가 기능이 포함된 SAP에 적합한 이미지가 포함되어 있습니다.
Azure Portal을 통해 수동으로 Linux VM 배포
이 문서에서는 Azure Virtual Network, 서브넷 및 리소스 그룹을 이미 배포했다고 가정합니다.
SAP ASCS, ERS 및 애플리케이션 서버에 대한 VM을 배포합니다. SAP 시스템에 지원되는 적합한 RHEL 이미지를 선택합니다. 가상 머신 확장 집합, 가용성 영역 또는 가용성 집합 같은 배포 옵션 중 하나에서 VM을 선택합니다.
Azure Load Balancer 구성
VM 구성 중에 네트워킹 섹션에서 기존 부하 분산 장치를 만들거나 선택할 수 있는 옵션이 있습니다. 아래 단계에 따라 SAP ASCS 및 SAP ERS의 고가용성 설정에 대한 표준 부하 분산 장치를 구성합니다.
부하 분산 장치 만들기 가이드를 따라 Azure Portal을 사용하여 고가용성 SAP 시스템용 표준 부하 분산 장치를 설정합니다. 부하 분산 장치를 설정하는 동안 다음 사항을 고려합니다.
- 프런트 엔드 IP 구성: 두 개의 프런트 엔드 IP(ASCS용 및 ERS용)를 만듭니다. ASCS/ERS 가상 머신과 동일한 가상 네트워크 및 서브넷을 선택합니다.
- 백 엔드 풀: 백 엔드 풀을 만들고 ASCS 및 ERS VM을 추가합니다.
- 인바운드 규칙: ASCS용과 ERS용으로 하나씩 두 개의 부하 분산 규칙을 만듭니다. 두 부하 분산 규칙 모두에 대해 동일한 단계를 수행합니다.
- 프런트 엔드 IP 주소: 프런트 엔드 IP 선택
- 백 엔드 풀: 백 엔드 풀 선택
- "고가용성 포트" 확인
- 프로토콜: TCP
- 상태 프로브: 아래 세부 정보로 상태 프로브 만들기(ASCS 및 ERS 모두에 적용)
- 프로토콜: TCP
- 포트: [예: ASCS의 경우 620<인스턴스 번호>, ERS의 경우 621<인스턴스 번호>]
- 간격: 5
- 프로브 임계값: 2
- 유휴 제한 시간(분): 30
- "부동 IP 사용" 확인
참고 항목
상태 프로브 구성 속성 numberOfProbes(포털에서 “비정상 임계값”으로 알려짐)는 적용되지 않습니다. 따라서 성공하거나 실패한 연속 프로브 수를 제어하려면 "probeThreshold" 속성을 2로 설정합니다. 현재 Azure Portal을 사용하여 이 속성을 설정할 수 없으므로 Azure CLI 또는 PowerShell 명령을 사용합니다.
참고 항목
공용 IP 주소가 없는 VM이 내부(공용 IP 주소 없음) 표준 Azure 부하 분산 장치의 백 엔드 풀에 배치되면 공용 엔드포인트로의 라우팅을 허용하도록 추가 구성이 수행되지 않는 한 아웃바운드 인터넷 연결이 이루어지지 않습니다. 아웃바운드 연결을 달성하는 방법에 대한 자세한 내용은 SAP 고가용성 시나리오에서 Azure 표준 Load Balancer를 사용하는 VM에 대한 공용 엔드포인트 연결을 참조하세요.
Important
Azure Load Balancer 뒤에 배치되는 Azure VM에서 TCP 타임스탬프를 사용하도록 설정하면 안 됩니다. TCP 타임스탬프를 사용하도록 설정하면 상태 프로브에 오류가 발생합니다. net.ipv4.tcp_timestamps 매개 변수를 0으로 설정합니다. 자세한 내용은 부하 분산 장치 상태 프로브를 참조하세요.
(A)SCS 설정
다음으로 SAP ASCS 및 ERS 인스턴스를 준비하고 설치합니다.
Pacemaker 클러스터 만들기
Azure의 Red Hat Enterprise Linux에서 Pacemaker 설정 단계에 따라 이 (A)SCS 서버용 기본 Pacemaker 클러스터를 만듭니다.
SAP NetWeaver 설치 준비
다음 항목에는 접두사가 붙습니다.
- [A]: 모든 노드에 적용 가능
- [1]: 노드 1에만 적용 가능
- [2]: 노드 2에만 적용 가능
[A] 호스트 이름 확인을 설정합니다.
DNS 서버를 사용하거나 모든 노드의
/etc/hosts파일을 수정할 수 있습니다. 다음 예제에서는/etc/hosts파일을 사용하는 방법을 보여 줍니다. 다음 명령에서 IP 주소와 호스트 이름을 바꿉니다.sudo vi /etc/hosts/etc/hosts파일에 다음 줄을 삽입합니다. 사용자 환경에 맞게 IP 주소와 호스트 이름을 변경합니다.# IP addresses of the GlusterFS nodes 10.0.0.40 glust-0 10.0.0.41 glust-1 10.0.0.42 glust-2 # IP address of the load balancer frontend configuration for SAP NetWeaver ASCS 10.0.0.7 nw1-ascs # IP address of the load balancer frontend configuration for SAP NetWeaver ASCS ERS 10.0.0.8 nw1-aers[A] 공유 디렉터리를 만듭니다.
sudo mkdir -p /sapmnt/NW1
sudo mkdir -p /usr/sap/trans
sudo mkdir -p /usr/sap/NW1/SYS
sudo mkdir -p /usr/sap/NW1/ASCS00
sudo mkdir -p /usr/sap/NW1/ERS02

sudo chattr +i /sapmnt/NW1
sudo chattr +i /usr/sap/trans
sudo chattr +i /usr/sap/NW1/SYS
sudo chattr +i /usr/sap/NW1/ASCS00
sudo chattr +i /usr/sap/NW1/ERS02
[A] GlusterFS 클라이언트 및 기타 필수 패키지를 설치합니다.
sudo yum -y install glusterfs-fuse resource-agents resource-agents-sap[A]
resource-agents-sap의 버전을 확인합니다.설치된
resource-agents-sap패키지 버전이 3.9.5-124.el7 이상인지 확인합니다.sudo yum info resource-agents-sap # Loaded plugins: langpacks, product-id, search-disabled-repos # Repodata is over 2 weeks old. Install yum-cron? Or run: yum makecache fast # Installed Packages # Name : resource-agents-sap # Arch : x86_64 # Version : 3.9.5 # Release : 124.el7 # Size : 100 k # Repo : installed # From repo : rhel-sap-for-rhel-7-server-rpms # Summary : SAP cluster resource agents and connector script # URL : https://github.com/ClusterLabs/resource-agents # License : GPLv2+ # Description : The SAP resource agents and connector script interface with # : Pacemaker to allow SAP instances to be managed in a cluster # : environment.[A] 탑재 항목을 추가합니다.
sudo vi /etc/fstab

# Add the following lines to fstab, save and exit
glust-0:/NW1-sapmnt /sapmnt/NW1 glusterfs backup-volfile-servers=glust-1:glust-2 0 0
glust-0:/NW1-trans /usr/sap/trans glusterfs backup-volfile-servers=glust-1:glust-2 0 0
glust-0:/NW1-sys /usr/sap/NW1/SYS glusterfs backup-volfile-servers=glust-1:glust-2 0 0
새 공유를 탑재합니다.
sudo mount -a[A] SWAP 파일을 구성합니다.
sudo vi /etc/waagent.conf

# Set the property ResourceDisk.EnableSwap to y
# Create and use swapfile on resource disk.
ResourceDisk.EnableSwap=y

# Set the size of the SWAP file with property ResourceDisk.SwapSizeMB
# The free space of resource disk varies by virtual machine size. Make sure that you do not set a value that is too big. You can check the SWAP space with command swapon
# Size of the swapfile.
ResourceDisk.SwapSizeMB=2000
에이전트를 다시 시작하여 변경 내용을 활성화합니다.
sudo service waagent restart[A] RHEL을 구성합니다.
RHEL 버전에 따라 SAP Note 2002167, SAP Note 2772999 또는 SAP Note 3108316에서 언급된 구성을 수행합니다.
SAP NetWeaver ASCS/ERS 설치
[1] 클러스터 기본 속성을 구성합니다.
pcs resource defaults resource-stickiness=1
pcs resource defaults migration-threshold=3
[1] ASCS 인스턴스에 대한 가상 IP 리소스 및 상태 프로브를 만듭니다.
sudo pcs node standby nw1-cl-1

sudo pcs resource create fs_NW1_ASCS Filesystem device='glust-0:/NW1-ascs' \
  directory='/usr/sap/NW1/ASCS00' fstype='glusterfs' \
  options='backup-volfile-servers=glust-1:glust-2' \
  --group g-NW1_ASCS

sudo pcs resource create vip_NW1_ASCS IPaddr2 \
  ip=10.0.0.7 \
  --group g-NW1_ASCS

sudo pcs resource create nc_NW1_ASCS azure-lb port=62000 \
  --group g-NW1_ASCS
클러스터 상태가 정상이며 모든 리소스가 시작되었는지 확인합니다. 리소스가 실행 중인 노드는 중요하지 않습니다.
sudo pcs status

# Node nw1-cl-1: standby
# Online: [ nw1-cl-0 ]
#
# Full list of resources:
#
# rsc_st_azure    (stonith:fence_azure_arm):      Started nw1-cl-0
#  Resource Group: g-NW1_ASCS
#      fs_NW1_ASCS        (ocf::heartbeat:Filesystem):    Started nw1-cl-0
#      nc_NW1_ASCS        (ocf::heartbeat:azure-lb):      Started nw1-cl-0
#      vip_NW1_ASCS       (ocf::heartbeat:IPaddr2):       Started nw1-cl-0
[1] SAP NetWeaver ASCS를 설치합니다.
ASCS에 대한 부하 분산 장치 프런트 엔드 구성의 IP 주소에 매핑되는 가상 호스트 이름(예: nw1-ascs, 10.0.0.7) 및 부하 분산 장치의 프로브에 사용한 인스턴스 번호(예: 00)를 사용하여 첫 번째 노드에 SAP NetWeaver ASCS를 루트로 설치합니다.
sapinst매개 변수SAPINST_REMOTE_ACCESS_USER를 사용하여 루트가 아닌 사용자가sapinst에 연결할 수 있습니다.# Allow access to SWPM. This rule is not permanent. If you reboot the machine, you have to run the command again. sudo firewall-cmd --zone=public --add-port=4237/tcp sudo <swpm>/sapinst SAPINST_REMOTE_ACCESS_USER=sapadmin설치에서 /usr/sap/NW1/ASCS00에 하위 폴더를 만들지 못하면 ASCS00 폴더의 소유자와 그룹을 설정하고 다시 시도합니다.
sudo chown nw1adm /usr/sap/NW1/ASCS00
sudo chgrp sapsys /usr/sap/NW1/ASCS00
[1] ERS 인스턴스에 대한 가상 IP 리소스 및 상태 프로브를 만듭니다.
sudo pcs node unstandby nw1-cl-1
sudo pcs node standby nw1-cl-0

sudo pcs resource create fs_NW1_AERS Filesystem device='glust-0:/NW1-aers' \
  directory='/usr/sap/NW1/ERS02' fstype='glusterfs' \
  options='backup-volfile-servers=glust-1:glust-2' \
 --group g-NW1_AERS

sudo pcs resource create vip_NW1_AERS IPaddr2 \
  ip=10.0.0.8 \
 --group g-NW1_AERS

sudo pcs resource create nc_NW1_AERS azure-lb port=62102 \
 --group g-NW1_AERS
클러스터 상태가 정상이며 모든 리소스가 시작되었는지 확인합니다. 리소스가 실행 중인 노드는 중요하지 않습니다.
sudo pcs status

# Node nw1-cl-0: standby
# Online: [ nw1-cl-1 ]
#
# Full list of resources:
#
# rsc_st_azure    (stonith:fence_azure_arm):      Started nw1-cl-1
#  Resource Group: g-NW1_ASCS
#      fs_NW1_ASCS        (ocf::heartbeat:Filesystem):    Started nw1-cl-1
#      nc_NW1_ASCS        (ocf::heartbeat:azure-lb):      Started nw1-cl-1
#      vip_NW1_ASCS       (ocf::heartbeat:IPaddr2):       Started nw1-cl-1
#  Resource Group: g-NW1_AERS
#      fs_NW1_AERS        (ocf::heartbeat:Filesystem):    Started nw1-cl-1
#      nc_NW1_AERS        (ocf::heartbeat:azure-lb):      Started nw1-cl-1
#      vip_NW1_AERS       (ocf::heartbeat:IPaddr2):       Started nw1-cl-1
[2] SAP NetWeaver ERS를 설치합니다.
ERS에 대한 부하 분산 장치 프런트 엔드 구성의 IP 주소에 매핑되는 가상 호스트 이름(예: nw1-aers, 10.0.0.8) 및 부하 분산 장치의 프로브에 사용한 인스턴스 번호(예: 02)를 사용하여 두 번째 노드에 SAP NetWeaver ERS를 루트로 설치합니다.
sapinst매개 변수SAPINST_REMOTE_ACCESS_USER를 사용하여 루트가 아닌 사용자가sapinst에 연결할 수 있습니다.# Allow access to SWPM. This rule is not permanent. If you reboot the machine, you have to run the command again. sudo firewall-cmd --zone=public --add-port=4237/tcp sudo <swpm>/sapinst SAPINST_REMOTE_ACCESS_USER=sapadmin설치에서 /usr/sap/NW1/ERS02에 하위 폴더를 만들지 못하면 ERS02 폴더의 소유자와 그룹을 설정하고 다시 시도합니다.
sudo chown nw1adm /usr/sap/NW1/ERS02
sudo chgrp sapsys /usr/sap/NW1/ERS02
[1] ASCS/SCS 및 ERS 인스턴스 프로필을 조정합니다.
ASCS/SCS 프로필:
sudo vi /sapmnt/NW1/profile/NW1_ASCS00_nw1-ascs

# Change the restart command to a start command
#Restart_Program_01 = local $(_EN) pf=$(_PF)
Start_Program_01 = local $(_EN) pf=$(_PF)

# Add the keep alive parameter, if using ENSA1
enque/encni/set_so_keepalive = true
ENSA1 및 ENSA2 모두에서
keepaliveOS 매개 변수는 SAP Note 1410736에 설명된 대로 설정해야 합니다.ERS 프로필:
sudo vi /sapmnt/NW1/profile/NW1_ERS02_nw1-aers

# Change the restart command to a start command
#Restart_Program_00 = local $(_ER) pf=$(_PFL) NR=$(SCSID)
Start_Program_00 = local $(_ER) pf=$(_PFL) NR=$(SCSID)

# remove Autostart from ERS profile
# Autostart = 1
[A] 연결 유지를 구성합니다.
SAP NetWeaver 애플리케이션 서버와 ASCS/SCS 간의 통신은 소프트웨어 부하 분산 장치를 통해 라우팅됩니다. 부하 분산 장치는 구성 가능한 시간 제한이 지나면 비활성 연결을 끊습니다. 이를 방지하려면, ENSA1을 사용하는 경우 SAP NetWeaver ASCS/SCS 프로필에서 매개 변수를 설정합니다. ENSA1 및 ENSA2 모두에 대해 모든 SAP 서버에서 Linux 시스템
keepalive설정을 변경합니다. 자세한 내용은 SAP Note 1410736을 참조하세요.# Change the Linux system configuration sudo sysctl net.ipv4.tcp_keepalive_time=300[A]
/usr/sap/sapservices파일을 업데이트합니다.sapinit시작 스크립트에 의해 인스턴스가 시작되지 않도록 하려면/usr/sap/sapservices파일에서 Pacemaker가 관리하는 모든 인스턴스를 주석 처리해야 합니다.sudo vi /usr/sap/sapservices # On the node where you installed the ASCS, comment out the following line # LD_LIBRARY_PATH=/usr/sap/NW1/ASCS00/exe:$LD_LIBRARY_PATH; export LD_LIBRARY_PATH; /usr/sap/NW1/ASCS00/exe/sapstartsrv pf=/usr/sap/NW1/SYS/profile/NW1_ASCS00_nw1-ascs -D -u nw1adm # On the node where you installed the ERS, comment out the following line # LD_LIBRARY_PATH=/usr/sap/NW1/ERS02/exe:$LD_LIBRARY_PATH; export LD_LIBRARY_PATH; /usr/sap/NW1/ERS02/exe/sapstartsrv pf=/usr/sap/NW1/ERS02/profile/NW1_ERS02_nw1-aers -D -u nw1adm[1] SAP 클러스터 리소스를 만듭니다.
ENSA1 또는 ENSA2 시스템을 실행하는지 여부에 따라 해당 탭을 선택하여 리소스를 정의합니다. SAP는 SAP NetWeaver 7.52에서 복제를 포함하여 ENSA2에 대한 지원을 도입했습니다. ABAP 플랫폼 1809부터 ENSA2가 기본적으로 설치됩니다. ENSA2 지원에 대해서는 큐에 넣기 서버 2 지원에 대한 SAP Note 2630416을 참조하세요.
ENSA2(큐에 넣기 서버 2 아키텍처)를 사용하는 경우 리소스 에이전트 resource-agents-sap-4.1.1-12.el7.x86_64 이상을 설치하고 리소스를 여기에 나와 있는 대로 정의합니다.
sudo pcs property set maintenance-mode=true sudo pcs resource create rsc_sap_NW1_ASCS00 SAPInstance \ InstanceName=NW1_ASCS00_nw1-ascs START_PROFILE="/sapmnt/NW1/profile/NW1_ASCS00_nw1-ascs" \ AUTOMATIC_RECOVER=false \ meta resource-stickiness=5000 migration-threshold=1 failure-timeout=60 \ op monitor interval=20 on-fail=restart timeout=60 \ op start interval=0 timeout=600 op stop interval=0 timeout=600 \ --group g-NW1_ASCS sudo pcs resource meta g-NW1_ASCS resource-stickiness=3000 sudo pcs resource create rsc_sap_NW1_ERS02 SAPInstance \ InstanceName=NW1_ERS02_nw1-aers START_PROFILE="/sapmnt/NW1/profile/NW1_ERS02_nw1-aers" \ AUTOMATIC_RECOVER=false IS_ERS=true \ op monitor interval=20 on-fail=restart timeout=60 op start interval=0 timeout=600 op stop interval=0 timeout=600 \ --group g-NW1_AERS sudo pcs constraint colocation add g-NW1_AERS with g-NW1_ASCS -5000 sudo pcs constraint location rsc_sap_NW1_ASCS00 rule score=2000 runs_ers_NW1 eq 1 sudo pcs constraint order start g-NW1_ASCS then stop g-NW1_AERS kind=Optional symmetrical=false sudo pcs node unstandby nw1-cl-0 sudo pcs property set maintenance-mode=false참고 항목
이전 버전에서 업그레이드하고 큐에 넣기 서버 2로 전환하는 경우 SAP Note 2641322를 참조하세요.
참고 항목
앞의 구성에서 시간 제한은 단지 예제이며 특정 SAP 설정에 맞게 조정해야 할 수 있습니다.
클러스터 상태가 정상이며 모든 리소스가 시작되었는지 확인합니다. 리소스가 실행 중인 노드는 중요하지 않습니다.
sudo pcs status

# Online: [ nw1-cl-0 nw1-cl-1 ]
#
# Full list of resources:
#
# rsc_st_azure    (stonith:fence_azure_arm):      Started nw1-cl-0
#  Resource Group: g-NW1_ASCS
#      fs_NW1_ASCS        (ocf::heartbeat:Filesystem):    Started nw1-cl-1
#      nc_NW1_ASCS        (ocf::heartbeat:azure-lb):      Started nw1-cl-1
#      vip_NW1_ASCS       (ocf::heartbeat:IPaddr2):       Started nw1-cl-1
#      rsc_sap_NW1_ASCS00 (ocf::heartbeat:SAPInstance):   Started nw1-cl-1
#  Resource Group: g-NW1_AERS
#      fs_NW1_AERS        (ocf::heartbeat:Filesystem):    Started nw1-cl-0
#      nc_NW1_AERS        (ocf::heartbeat:azure-lb):      Started nw1-cl-0
#      vip_NW1_AERS       (ocf::heartbeat:IPaddr2):       Started nw1-cl-0
#      rsc_sap_NW1_ERS02  (ocf::heartbeat:SAPInstance):   Started nw1-cl-0
[A] 두 노드에서 ASCS 및 ERS용 방화벽 규칙을 추가합니다.
# Probe Port of ASCS
sudo firewall-cmd --zone=public --add-port={62000,3200,3600,3900,8100,50013,50014,50016}/tcp --permanent
sudo firewall-cmd --zone=public --add-port={62000,3200,3600,3900,8100,50013,50014,50016}/tcp
# Probe Port of ERS
sudo firewall-cmd --zone=public --add-port={62102,3202,3302,50213,50214,50216}/tcp --permanent
sudo firewall-cmd --zone=public --add-port={62102,3202,3302,50213,50214,50216}/tcp
SAP NetWeaver 애플리케이션 서버 준비
일부 데이터베이스에서는 데이터베이스 인스턴스 설치가 애플리케이션 서버에서 실행되어야 합니다. 이러한 경우 애플리케이션 서버 VM을 사용할 수 있도록 준비합니다.
다음 단계에서는 ASCS/SCS 및 HANA 서버와 다른 서버에 애플리케이션 서버를 설치한다고 가정합니다. 그 외의 경우에는 호스트 이름 확인을 구성하는 단계 등 일부 단계를 수행할 필요가 없습니다.
호스트 이름 확인을 설정합니다.
DNS 서버를 사용하거나 모든 노드의
/etc/hosts파일을 수정할 수 있습니다. 다음 예제에서는/etc/hosts파일을 사용하는 방법을 보여 줍니다. 다음 명령에서 IP 주소와 호스트 이름을 바꿉니다.sudo vi /etc/hosts/etc/hosts에 다음 줄을 삽입합니다. 사용자 환경에 맞게 IP 주소와 호스트 이름을 변경합니다.# IP addresses of the GlusterFS nodes 10.0.0.40 glust-0 10.0.0.41 glust-1 10.0.0.42 glust-2 # IP address of the load balancer frontend configuration for SAP NetWeaver ASCS 10.0.0.7 nw1-ascs # IP address of the load balancer frontend configuration for SAP NetWeaver ASCS ERS 10.0.0.8 nw1-aers # IP address of the load balancer frontend configuration for database 10.0.0.13 nw1-dbsapmnt디렉터리를 만듭니다.sudo mkdir -p /sapmnt/NW1 sudo mkdir -p /usr/sap/trans sudo chattr +i /sapmnt/NW1 sudo chattr +i /usr/sap/transGlusterFS 클라이언트 및 기타 요구 사항을 설치합니다.
sudo yum -y install glusterfs-fuse uuidd탑재 항목을 추가합니다.
sudo vi /etc/fstab

# Add the following lines to fstab, save and exit
glust-0:/NW1-sapmnt /sapmnt/NW1 glusterfs backup-volfile-servers=glust-1:glust-2 0 0
glust-0:/NW1-trans /usr/sap/trans glusterfs backup-volfile-servers=glust-1:glust-2 0 0
새 공유를 탑재합니다.
sudo mount -aSWAP 파일을 구성합니다.
sudo vi /etc/waagent.conf

# Set the property ResourceDisk.EnableSwap to y
# Create and use swapfile on resource disk.
ResourceDisk.EnableSwap=y

# Set the size of the SWAP file with property ResourceDisk.SwapSizeMB
# The free space of resource disk varies by virtual machine size. Make sure that you do not set a value that is too big. You can check the SWAP space with command swapon
# Size of the swapfile.
ResourceDisk.SwapSizeMB=2000
에이전트를 다시 시작하여 변경 내용을 활성화합니다.
sudo service waagent restart
데이터베이스 설치
이 예제에서는 SAP NetWeaver가 SAP HANA에 설치됩니다. 이 설치에 지원되는 모든 데이터베이스를 사용할 수 있습니다. Azure에 SAP HANA를 설치하는 방법에 대한 자세한 내용은 Red Hat Enterprise Linux에 설치된 Azure VM의 SAP HANA 고가용성을 참조하세요. 지원되는 데이터베이스 목록은 SAP Note 1928533을 참조하세요.
SAP 데이터베이스 인스턴스 설치를 실행합니다.
데이터베이스에 대한 부하 분산 장치 프런트 엔드 구성의 IP 주소에 매핑되는 가상 호스트 이름(예: nw1-db 및 10.0.0.13)을 사용하여 SAP NetWeaver 데이터베이스 인스턴스를 루트로 설치합니다.
sapinst매개 변수SAPINST_REMOTE_ACCESS_USER를 사용하여 루트가 아닌 사용자가sapinst에 연결할 수 있습니다.sudo <swpm>/sapinst SAPINST_REMOTE_ACCESS_USER=sapadmin
SAP NetWeaver 애플리케이션 서버 설치
다음 단계에 따라 SAP 애플리케이션 서버를 설치합니다.
애플리케이션 서버를 준비합니다.
이전 섹션인 SAP NetWeaver 애플리케이션 서버 준비의 단계에 따라 애플리케이션 서버를 준비합니다.
SAP NetWeaver 애플리케이션 서버를 설치합니다.
기본 또는 추가 SAP NetWeaver 애플리케이션 서버를 설치합니다.
sapinst매개 변수SAPINST_REMOTE_ACCESS_USER를 사용하여 루트가 아닌 사용자가sapinst에 연결할 수 있습니다.sudo <swpm>/sapinst SAPINST_REMOTE_ACCESS_USER=sapadminSAP HANA 보안 저장소를 업데이트합니다.
설치한 SAP HANA System Replication의 가상 이름을 가리키도록 SAP HANA 보안 저장소를 업데이트합니다.
다음 명령을 실행하여 항목을 <sapsid>adm으로 나열합니다.
hdbuserstore List모든 항목을 나열하고 다음과 유사하게 표시되어야 합니다.
DATA FILE       : /home/nw1adm/.hdb/nw1-di-0/SSFS_HDB.DAT
KEY FILE        : /home/nw1adm/.hdb/nw1-di-0/SSFS_HDB.KEY

KEY DEFAULT
  ENV : 10.0.0.14:30313
  USER: SAPABAP1
  DATABASE: NW1
출력은 기본 항목의 IP 주소가 부하 분산 장치의 IP 주소가 아니라 VM을 가리키고 있음을 나타냅니다. 이 항목은 부하 분산 장치의 가상 호스트 이름을 가리키도록 변경해야 합니다. 동일한 포트(위 출력의 30313) 및 데이터베이스 이름(위 출력의 HN1)을 사용해야 합니다.
su - nw1adm
hdbuserstore SET DEFAULT nw1-db:30313@NW1 SAPABAP1 <password of ABAP schema>
클러스터 설정 테스트
ASCS 인스턴스를 수동으로 마이그레이션합니다.
테스트 시작 전 리소스 상태:
rsc_st_azure    (stonith:fence_azure_arm):      Started nw1-cl-0
 Resource Group: g-NW1_ASCS
     fs_NW1_ASCS        (ocf::heartbeat:Filesystem):    Started nw1-cl-0
     nc_NW1_ASCS        (ocf::heartbeat:azure-lb):      Started nw1-cl-0
     vip_NW1_ASCS       (ocf::heartbeat:IPaddr2):       Started nw1-cl-0
     rsc_sap_NW1_ASCS00 (ocf::heartbeat:SAPInstance):   Started nw1-cl-0
 Resource Group: g-NW1_AERS
     fs_NW1_AERS        (ocf::heartbeat:Filesystem):    Started nw1-cl-1
     nc_NW1_AERS        (ocf::heartbeat:azure-lb):      Started nw1-cl-1
     vip_NW1_AERS       (ocf::heartbeat:IPaddr2):       Started nw1-cl-1
     rsc_sap_NW1_ERS02  (ocf::heartbeat:SAPInstance):   Started nw1-cl-1
루트 권한으로 다음 명령을 실행하여 ASCS 인스턴스를 마이그레이션합니다.
[root@nw1-cl-0 ~]# pcs resource move rsc_sap_NW1_ASCS00

[root@nw1-cl-0 ~]# pcs resource clear rsc_sap_NW1_ASCS00

# Remove failed actions for the ERS that occurred as part of the migration
[root@nw1-cl-0 ~]# pcs resource cleanup rsc_sap_NW1_ERS02
테스트 후 리소스 상태:
rsc_st_azure    (stonith:fence_azure_arm):      Started nw1-cl-0
 Resource Group: g-NW1_ASCS
     fs_NW1_ASCS        (ocf::heartbeat:Filesystem):    Started nw1-cl-1
     nc_NW1_ASCS        (ocf::heartbeat:azure-lb):      Started nw1-cl-1
     vip_NW1_ASCS       (ocf::heartbeat:IPaddr2):       Started nw1-cl-1
     rsc_sap_NW1_ASCS00 (ocf::heartbeat:SAPInstance):   Started nw1-cl-1
 Resource Group: g-NW1_AERS
     fs_NW1_AERS        (ocf::heartbeat:Filesystem):    Started nw1-cl-0
     nc_NW1_AERS        (ocf::heartbeat:azure-lb):      Started nw1-cl-0
     vip_NW1_AERS       (ocf::heartbeat:IPaddr2):       Started nw1-cl-0
     rsc_sap_NW1_ERS02  (ocf::heartbeat:SAPInstance):   Started nw1-cl-0
노드 크래시를 시뮬레이션합니다.
테스트 시작 전 리소스 상태:
rsc_st_azure    (stonith:fence_azure_arm):      Started nw1-cl-0
 Resource Group: g-NW1_ASCS
     fs_NW1_ASCS        (ocf::heartbeat:Filesystem):    Started nw1-cl-1
     nc_NW1_ASCS        (ocf::heartbeat:azure-lb):      Started nw1-cl-1
     vip_NW1_ASCS       (ocf::heartbeat:IPaddr2):       Started nw1-cl-1
     rsc_sap_NW1_ASCS00 (ocf::heartbeat:SAPInstance):   Started nw1-cl-1
 Resource Group: g-NW1_AERS
     fs_NW1_AERS        (ocf::heartbeat:Filesystem):    Started nw1-cl-0
     nc_NW1_AERS        (ocf::heartbeat:azure-lb):      Started nw1-cl-0
     vip_NW1_AERS       (ocf::heartbeat:IPaddr2):       Started nw1-cl-0
     rsc_sap_NW1_ERS02  (ocf::heartbeat:SAPInstance):   Started nw1-cl-0
ASCS 인스턴스를 실행 중인 노드에서 루트 권한으로 다음 명령을 실행합니다.
[root@nw1-cl-1 ~]# echo b > /proc/sysrq-trigger노드가 다시 시작된 후의 상태는 다음과 같습니다.
Online: [ nw1-cl-0 nw1-cl-1 ]

Full list of resources:

rsc_st_azure    (stonith:fence_azure_arm):      Started nw1-cl-0
 Resource Group: g-NW1_ASCS
     fs_NW1_ASCS        (ocf::heartbeat:Filesystem):    Started nw1-cl-0
     nc_NW1_ASCS        (ocf::heartbeat:azure-lb):      Started nw1-cl-0
     vip_NW1_ASCS       (ocf::heartbeat:IPaddr2):       Started nw1-cl-0
     rsc_sap_NW1_ASCS00 (ocf::heartbeat:SAPInstance):   Started nw1-cl-0
 Resource Group: g-NW1_AERS
     fs_NW1_AERS        (ocf::heartbeat:Filesystem):    Started nw1-cl-1
     nc_NW1_AERS        (ocf::heartbeat:azure-lb):      Started nw1-cl-1
     vip_NW1_AERS       (ocf::heartbeat:IPaddr2):       Started nw1-cl-1
     rsc_sap_NW1_ERS02  (ocf::heartbeat:SAPInstance):   Started nw1-cl-1

Failed Actions:
* rsc_sap_NW1_ERS02_monitor_11000 on nw1-cl-0 'not running' (7): call=45, status=complete, exitreason='',
    last-rc-change='Tue Aug 21 13:52:39 2018', queued=0ms, exec=0ms
참고 항목
SBD를 STONITH 메커니즘으로 사용하는 경우 다시 부팅 후 노드가 클러스터에 다시 조인하려고 하면 /var/log/messages에 "we were allegendly just fenced"라는 메시지가 수신되고 Pacemaker 및 Corosync 서비스가 종료될 수 있습니다. 이 문제를 해결하려면 RedHat KB A node shutdowns down pacemaker after getting fenced and restarting corosync and pacemaker에 설명된 해결 방법을 따르면 됩니다. 하지만 Azure에서는 Corosync 서비스가 시작될 때까지 150초의 대기 시간을 설정합니다. 이러한 단계가 모든 클러스터 노드에 적용되는지 확인합니다.
다음 명령을 실행하여 오류가 발생한 리소스를 정리합니다.
[root@nw1-cl-0 ~]# pcs resource cleanup rsc_sap_NW1_ERS02테스트 후 리소스 상태:
rsc_st_azure    (stonith:fence_azure_arm):      Started nw1-cl-0
 Resource Group: g-NW1_ASCS
     fs_NW1_ASCS        (ocf::heartbeat:Filesystem):    Started nw1-cl-0
     nc_NW1_ASCS        (ocf::heartbeat:azure-lb):      Started nw1-cl-0
     vip_NW1_ASCS       (ocf::heartbeat:IPaddr2):       Started nw1-cl-0
     rsc_sap_NW1_ASCS00 (ocf::heartbeat:SAPInstance):   Started nw1-cl-0
 Resource Group: g-NW1_AERS
     fs_NW1_AERS        (ocf::heartbeat:Filesystem):    Started nw1-cl-1
     nc_NW1_AERS        (ocf::heartbeat:azure-lb):      Started nw1-cl-1
     vip_NW1_AERS       (ocf::heartbeat:IPaddr2):       Started nw1-cl-1
     rsc_sap_NW1_ERS02  (ocf::heartbeat:SAPInstance):   Started nw1-cl-1
네트워크 통신을 차단합니다.
테스트 시작 전 리소스 상태:
rsc_st_azure    (stonith:fence_azure_arm):      Started nw1-cl-0
 Resource Group: g-NW1_ASCS
     fs_NW1_ASCS        (ocf::heartbeat:Filesystem):    Started nw1-cl-0
     nc_NW1_ASCS        (ocf::heartbeat:azure-lb):      Started nw1-cl-0
     vip_NW1_ASCS       (ocf::heartbeat:IPaddr2):       Started nw1-cl-0
     rsc_sap_NW1_ASCS00 (ocf::heartbeat:SAPInstance):   Started nw1-cl-0
 Resource Group: g-NW1_AERS
     fs_NW1_AERS        (ocf::heartbeat:Filesystem):    Started nw1-cl-1
     nc_NW1_AERS        (ocf::heartbeat:azure-lb):      Started nw1-cl-1
     vip_NW1_AERS       (ocf::heartbeat:IPaddr2):       Started nw1-cl-1
     rsc_sap_NW1_ERS02  (ocf::heartbeat:SAPInstance):   Started nw1-cl-1
방화벽 규칙을 실행하여 노드 중 하나에서 통신을 차단합니다.
 # Execute iptable rule on nw1-cl-0 (10.0.0.7) to block the incoming and outgoing traffic to nw1-cl-1 (10.0.0.8)
 iptables -A INPUT -s 10.0.0.8 -j DROP; iptables -A OUTPUT -d 10.0.0.8 -j DROP
클러스터 노드가 서로 통신할 수 없는 경우 분할 브레인 시나리오의 위험이 있습니다. 이러한 상황에서 클러스터 노드는 동시에 서로 울타리를 치려고 시도하므로 펜스 경합을 초래합니다. 이러한 상황을 방지하려면 클러스터 구성에서 priority-fencing-delay 속성을 설정하는 것이 좋습니다(pacemaker-2.0.4-6.el8 이상에만 적용됨).
클러스터는
priority-fencing-delay속성을 사용하도록 설정하여 특히 ASCS 리소스를 호스팅하는 노드에서 펜싱 작업의 지연을 발생시켜 노드가 펜스 경합에서 승리할 수 있도록 합니다.다음 명령을 실행하여 방화벽 규칙을 삭제합니다.
 # If the iptables rule set on the server gets reset after a reboot, the rules will be cleared out. In case they have not been reset, please proceed to remove the iptables rule using the following command.
 iptables -D INPUT -s 10.0.0.8 -j DROP; iptables -D OUTPUT -d 10.0.0.8 -j DROP
메시지 서버 프로세스를 종료합니다.
테스트 시작 전 리소스 상태:
rsc_st_azure    (stonith:fence_azure_arm):      Started nw1-cl-0
 Resource Group: g-NW1_ASCS
     fs_NW1_ASCS        (ocf::heartbeat:Filesystem):    Started nw1-cl-0
     nc_NW1_ASCS        (ocf::heartbeat:azure-lb):      Started nw1-cl-0
     vip_NW1_ASCS       (ocf::heartbeat:IPaddr2):       Started nw1-cl-0
     rsc_sap_NW1_ASCS00 (ocf::heartbeat:SAPInstance):   Started nw1-cl-0
 Resource Group: g-NW1_AERS
     fs_NW1_AERS        (ocf::heartbeat:Filesystem):    Started nw1-cl-1
     nc_NW1_AERS        (ocf::heartbeat:azure-lb):      Started nw1-cl-1
     vip_NW1_AERS       (ocf::heartbeat:IPaddr2):       Started nw1-cl-1
     rsc_sap_NW1_ERS02  (ocf::heartbeat:SAPInstance):   Started nw1-cl-1
루트 권한으로 다음 명령을 실행하여 메시지 서버 프로세스를 확인한 후 종료합니다.
[root@nw1-cl-0 ~]# pgrep -f ms.sapNW1 | xargs kill -9메시지 서버를 한 번만 종료하면
sapstart가 다시 시작합니다. 충분히 자주 종료하면 Pacemaker는 결국 ASCS 인스턴스를 다른 노드로 이동합니다. 테스트 후에 다음 명령을 루트 권한으로 실행하여 ASCS 및 ERS 인스턴스의 리소스 상태를 정리합니다.[root@nw1-cl-0 ~]# pcs resource cleanup rsc_sap_NW1_ASCS00 [root@nw1-cl-0 ~]# pcs resource cleanup rsc_sap_NW1_ERS02테스트 후 리소스 상태:
rsc_st_azure (stonith:fence_azure_arm): Started nw1-cl-0 Resource Group: g-NW1_ASCS fs_NW1_ASCS (ocf::heartbeat:Filesystem): Started nw1-cl-1 nc_NW1_ASCS (ocf::heartbeat:azure-lb): Started nw1-cl-1 vip_NW1_ASCS (ocf::heartbeat:IPaddr2): Started nw1-cl-1 rsc_sap_NW1_ASCS00 (ocf::heartbeat:SAPInstance): Started nw1-cl-1 Resource Group: g-NW1_AERS fs_NW1_AERS (ocf::heartbeat:Filesystem): Started nw1-cl-0 nc_NW1_AERS (ocf::heartbeat:azure-lb): Started nw1-cl-0 vip_NW1_AERS (ocf::heartbeat:IPaddr2): Started nw1-cl-0 rsc_sap_NW1_ERS02 (ocf::heartbeat:SAPInstance): Started nw1-cl-0큐에 넣기 서버 프로세스를 종료합니다.
테스트 시작 전 리소스 상태:
rsc_st_azure (stonith:fence_azure_arm): Started nw1-cl-0 Resource Group: g-NW1_ASCS fs_NW1_ASCS (ocf::heartbeat:Filesystem): Started nw1-cl-1 nc_NW1_ASCS (ocf::heartbeat:azure-lb): Started nw1-cl-1 vip_NW1_ASCS (ocf::heartbeat:IPaddr2): Started nw1-cl-1 rsc_sap_NW1_ASCS00 (ocf::heartbeat:SAPInstance): Started nw1-cl-1 Resource Group: g-NW1_AERS fs_NW1_AERS (ocf::heartbeat:Filesystem): Started nw1-cl-0 nc_NW1_AERS (ocf::heartbeat:azure-lb): Started nw1-cl-0 vip_NW1_AERS (ocf::heartbeat:IPaddr2): Started nw1-cl-0 rsc_sap_NW1_ERS02 (ocf::heartbeat:SAPInstance): Started nw1-cl-0ASCS 인스턴스를 실행 중인 노드에서 루트 권한으로 다음 명령을 실행하여 큐에 넣기 서버를 종료합니다.
#If using ENSA1 [root@nw1-cl-1 ~]# pgrep -f en.sapNW1 | xargs kill -9 #If using ENSA2 [root@nw1-cl-1 ~]# pgrep -f enq.sapNW1 | xargs kill -9ENSA1의 경우 ASCS 인스턴스는 즉시 다른 노드로 장애 조치(Failover)되어야 합니다. 또한 ASCS 인스턴스가 시작된 후 ERS 인스턴스도 장애 조치(Failover)되어야 합니다. 테스트 후에 다음 명령을 루트 권한으로 실행하여 ASCS 및 ERS 인스턴스의 리소스 상태를 정리합니다.
[root@nw1-cl-0 ~]# pcs resource cleanup rsc_sap_NW1_ASCS00
[root@nw1-cl-0 ~]# pcs resource cleanup rsc_sap_NW1_ERS02
테스트 후 리소스 상태:
rsc_st_azure    (stonith:fence_azure_arm):      Started nw1-cl-0
 Resource Group: g-NW1_ASCS
     fs_NW1_ASCS        (ocf::heartbeat:Filesystem):    Started nw1-cl-0
     nc_NW1_ASCS        (ocf::heartbeat:azure-lb):      Started nw1-cl-0
     vip_NW1_ASCS       (ocf::heartbeat:IPaddr2):       Started nw1-cl-0
     rsc_sap_NW1_ASCS00 (ocf::heartbeat:SAPInstance):   Started nw1-cl-0
 Resource Group: g-NW1_AERS
     fs_NW1_AERS        (ocf::heartbeat:Filesystem):    Started nw1-cl-1
     nc_NW1_AERS        (ocf::heartbeat:azure-lb):      Started nw1-cl-1
     vip_NW1_AERS       (ocf::heartbeat:IPaddr2):       Started nw1-cl-1
     rsc_sap_NW1_ERS02  (ocf::heartbeat:SAPInstance):   Started nw1-cl-1
큐에 넣기 복제 서버 프로세스를 종료합니다.
테스트 시작 전 리소스 상태:
rsc_st_azure    (stonith:fence_azure_arm):      Started nw1-cl-0
 Resource Group: g-NW1_ASCS
     fs_NW1_ASCS        (ocf::heartbeat:Filesystem):    Started nw1-cl-0
     nc_NW1_ASCS        (ocf::heartbeat:azure-lb):      Started nw1-cl-0
     vip_NW1_ASCS       (ocf::heartbeat:IPaddr2):       Started nw1-cl-0
     rsc_sap_NW1_ASCS00 (ocf::heartbeat:SAPInstance):   Started nw1-cl-0
 Resource Group: g-NW1_AERS
     fs_NW1_AERS        (ocf::heartbeat:Filesystem):    Started nw1-cl-1
     nc_NW1_AERS        (ocf::heartbeat:azure-lb):      Started nw1-cl-1
     vip_NW1_AERS       (ocf::heartbeat:IPaddr2):       Started nw1-cl-1
     rsc_sap_NW1_ERS02  (ocf::heartbeat:SAPInstance):   Started nw1-cl-1
ERS 인스턴스를 실행 중인 노드에서 루트 권한으로 다음 명령을 실행하여 큐에 넣기 복제 서버 프로세스를 종료합니다.
#If using ENSA1
[root@nw1-cl-1 ~]# pgrep -f er.sapNW1 | xargs kill -9

#If using ENSA2
[root@nw1-cl-1 ~]# pgrep -f enqr.sapNW1 | xargs kill -9
명령을 한 번만 실행하면
sapstart가 프로세스를 다시 시작합니다. 충분히 자주 실행하면sapstart가 해당 프로세스를 다시 시작하지 않으며 리소스는 중지된 상태가 됩니다. 테스트 후에 다음 명령을 루트 권한으로 실행하여 ERS 인스턴스의 리소스 상태를 정리합니다.[root@nw1-cl-0 ~]# pcs resource cleanup rsc_sap_NW1_ERS02테스트 후 리소스 상태:
rsc_st_azure    (stonith:fence_azure_arm):      Started nw1-cl-0
 Resource Group: g-NW1_ASCS
     fs_NW1_ASCS        (ocf::heartbeat:Filesystem):    Started nw1-cl-0
     nc_NW1_ASCS        (ocf::heartbeat:azure-lb):      Started nw1-cl-0
     vip_NW1_ASCS       (ocf::heartbeat:IPaddr2):       Started nw1-cl-0
     rsc_sap_NW1_ASCS00 (ocf::heartbeat:SAPInstance):   Started nw1-cl-0
 Resource Group: g-NW1_AERS
     fs_NW1_AERS        (ocf::heartbeat:Filesystem):    Started nw1-cl-1
     nc_NW1_AERS        (ocf::heartbeat:azure-lb):      Started nw1-cl-1
     vip_NW1_AERS       (ocf::heartbeat:IPaddr2):       Started nw1-cl-1
     rsc_sap_NW1_ERS02  (ocf::heartbeat:SAPInstance):   Started nw1-cl-1
큐에 넣기
sapstartsrv프로세스를 종료합니다.테스트 시작 전 리소스 상태:
rsc_st_azure    (stonith:fence_azure_arm):      Started nw1-cl-0
 Resource Group: g-NW1_ASCS
     fs_NW1_ASCS        (ocf::heartbeat:Filesystem):    Started nw1-cl-0
     nc_NW1_ASCS        (ocf::heartbeat:azure-lb):      Started nw1-cl-0
     vip_NW1_ASCS       (ocf::heartbeat:IPaddr2):       Started nw1-cl-0
     rsc_sap_NW1_ASCS00 (ocf::heartbeat:SAPInstance):   Started nw1-cl-0
 Resource Group: g-NW1_AERS
     fs_NW1_AERS        (ocf::heartbeat:Filesystem):    Started nw1-cl-1
     nc_NW1_AERS        (ocf::heartbeat:azure-lb):      Started nw1-cl-1
     vip_NW1_AERS       (ocf::heartbeat:IPaddr2):       Started nw1-cl-1
     rsc_sap_NW1_ERS02  (ocf::heartbeat:SAPInstance):   Started nw1-cl-1
ASCS를 실행 중인 노드에서 루트 권한으로 다음 명령을 실행합니다.
[root@nw1-cl-0 ~]# pgrep -fl ASCS00.*sapstartsrv # 59545 sapstartsrv [root@nw1-cl-0 ~]# kill -9 59545sapstartsrv프로세스는 모니터링의 일부분으로 항상 Pacemaker 리소스 에이전트에 의해 다시 시작되어야 합니다. 테스트 후 리소스 상태:rsc_st_azure (stonith:fence_azure_arm): Started nw1-cl-0 Resource Group: g-NW1_ASCS fs_NW1_ASCS (ocf::heartbeat:Filesystem): Started nw1-cl-0 nc_NW1_ASCS (ocf::heartbeat:azure-lb): Started nw1-cl-0 vip_NW1_ASCS (ocf::heartbeat:IPaddr2): Started nw1-cl-0 rsc_sap_NW1_ASCS00 (ocf::heartbeat:SAPInstance): Started nw1-cl-0 Resource Group: g-NW1_AERS fs_NW1_AERS (ocf::heartbeat:Filesystem): Started nw1-cl-1 nc_NW1_AERS (ocf::heartbeat:azure-lb): Started nw1-cl-1 vip_NW1_AERS (ocf::heartbeat:IPaddr2): Started nw1-cl-1 rsc_sap_NW1_ERS02 (ocf::heartbeat:SAPInstance): Started nw1-cl-1
다음 단계
- PAS 및 AAS 인스턴스가 RHEL에서 SAP NetWeaver HA 클러스터를 사용하여 배포되는 비용 최적화 시나리오를 배포하려면 RHEL에서 SAP ASCS/SCS 고가용성 VM을 사용하여 SAP 대화 상자 인스턴스 설치를 참조하세요.
- SAP 애플리케이션 다중 SID에 대한 RHEL의 Azure VM에서 HA 가이드를 참조하세요.
- SAP용 Azure Virtual Machines 계획 및 구현을 참조하세요.
- SAP용 Azure Virtual Machines 배포 참조
- SAP용 Azure Virtual Machines DBMS 배포를 참조하세요.
- Azure의 SAP HANA(큰 인스턴스)에 대한 HA 및 재해 복구 계획을 설정하는 방법을 알아보려면 Azure의 SAP HANA(큰 인스턴스) 고가용성 및 재해 복구를 참조하세요.
- Azure VM에서 HA를 설정하고 SAP HANA 재해 복구를 계획하는 방법을 알아보려면 Azure Virtual Machines에서 SAP HANA의 고가용성을 참조하세요.