이 빠른 시작에서는 런타임 시 MIP C++ SDK에서 사용하는 클라이언트 초기화 패턴을 구현하는 방법을 보여 줍니다.
비고
이 빠른 시작에 설명된 단계는 MIP 파일, 정책 또는 보호 SDK를 사용하는 모든 클라이언트 애플리케이션에 필요합니다. 이 빠른 시작에서는 파일 SDK를 사용하는 방법을 보여 주지만, 정책 및 보호 SDK를 사용하는 클라이언트에 동일한 패턴이 적용됩니다. 각 빠른 시작이 이전 빠른 시작을 기반으로 빌드될 때 나머지 빠른 시작을 직렬로 완료합니다. 이 빠른 시작은 첫 번째 빠른 시작입니다.
필수 조건
아직 없는 경우 다음을 수행해야 합니다.
- MIP(Microsoft Information Protection) SDK 설정 및 구성의 단계를 완료합니다. 이 "클라이언트 애플리케이션 초기화" 빠른 시작은 적절한 SDK 설정 및 구성을 사용합니다.
- 선택 사항:
- 프로필 및 엔진 개체를 검토합니다. 프로필 및 엔진 개체는 MIP 파일/정책/보호 SDK를 사용하는 클라이언트에서 요구하는 범용 개념입니다.
- 인증 개념을 검토하여 SDK 및 클라이언트 애플리케이션에서 인증 및 동의를 구현하는 방법을 알아봅니다.
- 관찰자 개념을 검토하여 관찰자에 대해 자세히 알아보고 어떻게 구현되는지 알아봅니다. MIP SDK는 관찰자 패턴을 사용하여 비동기 이벤트 알림을 구현합니다.
Visual Studio 솔루션 및 프로젝트 만들기
먼저 다른 빠른 시작 가이드들이 기반으로 삼을 초기 Visual Studio 솔루션 및 프로젝트를 생성하고 설정합니다.
Visual Studio 2022 이상을 열고 파일 메뉴, 새로 만들기, 프로젝트를 선택합니다. 새 프로젝트 대화 상자에서 다음을 수행합니다.
왼쪽 창의 설치됨, 기타 언어에서 Visual C++를 선택합니다.
가운데 창에서 Windows 콘솔 애플리케이션을 선택합니다.
아래쪽 창에서 프로젝트 이름, 위치 및 포함된 솔루션 이름을 적절하게 업데이트합니다.
완료되면 오른쪽 아래에 있는 확인 단추를 클릭합니다.

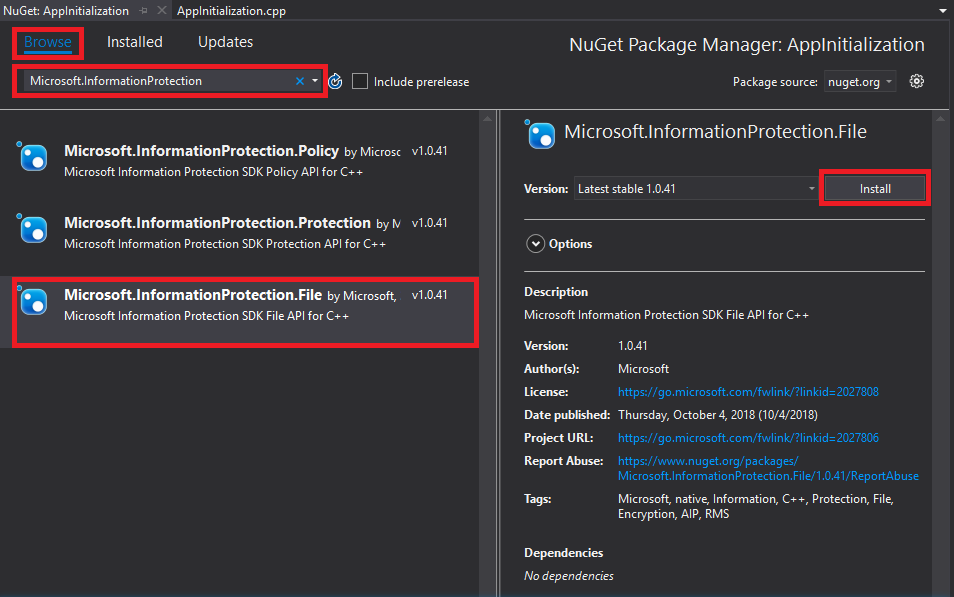
MIP 파일 SDK에 대한 NuGet 패키지를 프로젝트에 추가합니다.
솔루션 탐색기에서 프로젝트 노드(위쪽/솔루션 노드 바로 아래)를 마우스 오른쪽 단추로 클릭하고 NuGet 패키지 관리를 선택합니다.
편집기 그룹 탭 영역에서 NuGet 패키지 관리자 탭이 열리는 경우:
- 찾아보기를 선택합니다.
- 검색 상자에 "Microsoft.InformationProtection"을 입력합니다.
- "Microsoft.InformationProtection.File" 패키지를 선택합니다.
- "설치"를 클릭한 다음 미리 보기 변경 내용 확인 대화 상자가 표시되면 "확인"을 클릭합니다.


관찰자 클래스를 구현하여 파일 프로필 및 엔진 개체 모니터링
이제 SDK mip::FileProfile::Observer 의 클래스를 확장하여 파일 프로필 관찰자 클래스에 대한 기본 구현을 만듭니다. 관찰자는 인스턴스화되고 나중에 파일 프로필 개체의 로드를 모니터링하고 엔진 개체를 프로필에 추가하는 데 사용됩니다.
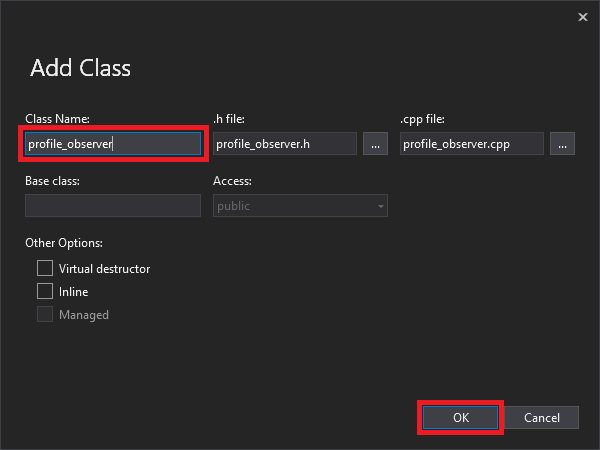
헤더/.h 및 구현/.cpp 파일을 모두 생성하는 새 클래스를 프로젝트에 추가합니다.
솔루션 탐색기에서 프로젝트 노드를 다시 마우스 오른쪽 단추로 클릭하고 추가를 선택한 다음 클래스를 선택합니다.
클래스 추가 대화 상자에서 다음을 수행합니다.
- 클래스 이름 필드에 "profile_observer"를 입력합니다. 입력한 이름에 따라 .h 파일 과 .cpp 파일 필드가 모두 자동으로 채워집니다.
- 완료되면 확인 단추를 클릭합니다.
클래스에 대한 .h 및 .cpp 파일을 생성한 후 두 파일이 모두 편집기 그룹 탭에서 열립니다. 이제 새 관찰자 클래스를 구현하도록 각 파일을 업데이트합니다.
"생성된 클래스를 선택하거나 삭제하여 'profile_observer.h'를 업데이트하십시오." 이전 단계(#pragma, #include)에서 생성된 전처리기 지시문을 제거하지 마세요. 그런 다음, 기존 전처리기 지시문 다음에 다음 소스를 복사하여 파일에 붙여넣습니다.
#include <memory>
#include "mip/file/file_profile.h"

class ProfileObserver final : public mip::FileProfile::Observer {
public:
     ProfileObserver() { }
     void OnLoadSuccess(const std::shared_ptr<mip::FileProfile>& profile, const std::shared_ptr<void>& context) override;
     void OnLoadFailure(const std::exception_ptr& error, const std::shared_ptr<void>& context) override;
     void OnAddEngineSuccess(const std::shared_ptr<mip::FileEngine>& engine, const std::shared_ptr<void>& context) override;
     void OnAddEngineFailure(const std::exception_ptr& error, const std::shared_ptr<void>& context) override;
};
"profile_observer.cpp"를 업데이트하여 생성된
profile_observer클래스 구현을 선택하거나 삭제하십시오. 이전 단계(#pragma, #include)에서 생성된 전처리기 지시문을 제거하지 마세요. 그런 다음, 기존 전처리기 지시문 다음에 다음 소스를 복사하여 파일에 붙여넣습니다.#include <future> using std::promise; using std::shared_ptr; using std::static_pointer_cast; using mip::FileEngine; using mip::FileProfile; void ProfileObserver::OnLoadSuccess(const shared_ptr<FileProfile>& profile, const shared_ptr<void>& context) { auto promise = static_pointer_cast<std::promise<shared_ptr<FileProfile>>>(context); promise->set_value(profile); } void ProfileObserver::OnLoadFailure(const std::exception_ptr& error, const shared_ptr<void>& context) { auto promise = static_pointer_cast<std::promise<shared_ptr<FileProfile>>>(context); promise->set_exception(error); } void ProfileObserver::OnAddEngineSuccess(const shared_ptr<FileEngine>& engine, const shared_ptr<void>& context) { auto promise = static_pointer_cast<std::promise<shared_ptr<FileEngine>>>(context); promise->set_value(engine); } void ProfileObserver::OnAddEngineFailure(const std::exception_ptr& error, const shared_ptr<void>& context) { auto promise = static_pointer_cast<std::promise<shared_ptr<FileEngine>>>(context); promise->set_exception(error); }
필요에 따라 F6(빌드 솔루션)을 사용하여 솔루션의 테스트 컴파일/링크를 실행하여 계속하기 전에 성공적으로 빌드되도록 합니다.

인증 대리자 구현
MIP SDK는 클라이언트 애플리케이션과 인증 작업을 공유하는 메커니즘을 제공하는 클래스 확장성을 사용하여 인증을 구현합니다. 클라이언트는 적절한 OAuth2 액세스 토큰을 획득하고 런타임에 MIP SDK에 제공해야 합니다.
이제 SDK의 mip::AuthDelegate 클래스를 확장하고, mip::AuthDelegate::AcquireOAuth2Token() 순수 가상 함수를 재정의 및 구현하여 인증 대리자를 만듭니다. 인증 대리자는 파일 프로필 및 파일 엔진 개체에 의해 인스턴스화되고 나중에 사용됩니다.
이전 섹션의 1단계에서 사용한 것과 동일한 Visual Studio "클래스 추가" 기능을 사용하여 프로젝트에 다른 클래스를 추가합니다. 이번에는 클래스 이름 필드에 "auth_delegate"를 입력합니다.
이제 각 파일을 업데이트하여 새 인증 대리자 클래스를 구현합니다.
생성된
auth_delegate모든 클래스 코드를 다음 소스로 바꿔서 "auth_delegate.h"를 업데이트합니다. 이전 단계(#pragma, #include)에서 생성된 전처리기 지시문을 제거하지 마세요.#include <string> #include "mip/common_types.h" class AuthDelegateImpl final : public mip::AuthDelegate { public: AuthDelegateImpl() = delete; // Prevents default constructor AuthDelegateImpl( const std::string& appId) // AppID for registered AAD app : mAppId(appId) {}; bool AcquireOAuth2Token( // Called by MIP SDK to get a token const mip::Identity& identity, // Identity of the account to be authenticated, if known const OAuth2Challenge& challenge, // Authority (AAD tenant issuing token), and resource (API being accessed; "aud" claim). OAuth2Token& token) override; // Token handed back to MIP SDK private: std::string mAppId; std::string mToken; std::string mAuthority; std::string mResource; };생성된
auth_delegate모든 클래스 구현을 다음 소스로 바꿔서 "auth_delegate.cpp"을 업데이트합니다. 이전 단계(#pragma, #include)에서 생성된 전처리기 지시문을 제거하지 마세요.중요합니다
다음 토큰 획득 코드는 프로덕션 사용에 적합하지 않습니다. 프로덕션 환경에서는 다음을 사용하여 토큰을 동적으로 획득하는 코드로 바꿔야 합니다.
- Microsoft Entra 앱 등록에 지정된 appId 및 회신/리디렉션 URI(회신/리디렉션 URI는 앱 등록과 일치 해야 합니다 ).
- SDK에서
challenge인수로 전달하는 권한 및 리소스 URL입니다(리소스 URL은 앱 등록의 API/권한과 반드시 일치해야 합니다) - SDK 내에서 전달된
identity인수와 계정이 일치하는 유효한 앱/사용자 자격 증명입니다. OAuth2 "네이티브" 클라이언트는 사용자 자격 증명을 묻는 메시지를 표시하고 "권한 부여 코드" 흐름을 사용해야 합니다. OAuth2 "기밀 클라이언트"는 "클라이언트 자격 증명" 흐름(예: 서비스)과 함께 자체 보안 자격 증명을 사용하거나 "권한 부여 코드" 흐름(예: 웹앱)을 사용하여 사용자 자격 증명을 묻는 메시지를 표시할 수 있습니다.
OAuth2 토큰 획득은 복잡한 프로토콜이며 일반적으로 라이브러리를 사용하여 수행됩니다. TokenAcquireOAuth2Token()은 필요에 따라 MIP SDK 에서만 호출됩니다.
#include <iostream>
using std::cout;
using std::cin;
using std::string;

bool AuthDelegateImpl::AcquireOAuth2Token(const mip::Identity& identity, const OAuth2Challenge& challenge, OAuth2Token& token)
{
     // Acquire a token manually, reuse previous token if same authority/resource. In production, replace with token acquisition code.
     string authority = challenge.GetAuthority();
     string resource = challenge.GetResource();
     if (mToken == "" || (authority != mAuthority || resource != mResource))
     {
         cout << "\nRun the PowerShell script to generate an access token using the following values, then copy/paste it below:\n";
         cout << "Set $authority to: " + authority + "\n";
         cout << "Set $resourceUrl to: " + resource + "\n";
         cout << "Sign in with user account: " + identity.GetEmail() + "\n";
         cout << "Enter access token: ";
         cin >> mToken;
         mAuthority = authority;
         mResource = resource;
         system("pause");
     }

     // Pass access token back to MIP SDK
     token.SetAccessToken(mToken);

     // True = successful token acquisition; False = failure
     return true;
}
필요에 따라 F6(빌드 솔루션)을 사용하여 솔루션의 테스트 컴파일/링크를 실행하여 계속하기 전에 성공적으로 빌드되도록 합니다.
동의 대리자 구현
이제 SDK의 mip::ConsentDelegate 클래스를 확장하고 mip::AuthDelegate::GetUserConsent() 순수 가상 함수를 재정의/구현하여 동의 대리자의 구현을 만드세요. 동의 대리자는 파일 프로필 및 파일 엔진 개체에 의해 인스턴스화되고 나중에 사용됩니다.
이전에 사용한 것과 동일한 Visual Studio "클래스 추가" 기능을 사용하여 프로젝트에 다른 클래스를 추가합니다. 이번에는 클래스 이름 필드에 "consent_delegate"를 입력합니다.
이제 각 파일을 업데이트하여 새 동의 대리자 클래스를 구현합니다.
생성된
consent_delegate모든 클래스 코드를 다음 소스로 바꿔서 "consent_delegate.h"를 업데이트합니다. 이전 단계(#pragma, #include)에서 생성된 전처리기 지시문을 제거하지 마세요.#include "mip/common_types.h" #include <string> class ConsentDelegateImpl final : public mip::ConsentDelegate { public: ConsentDelegateImpl() = default; virtual mip::Consent GetUserConsent(const std::string& url) override; };생성된
consent_delegate모든 클래스 구현을 다음 소스로 바꿔서 "consent_delegate.cpp"을 업데이트합니다. 이전 단계(#pragma, #include)에서 생성된 전처리기 지시문을 제거하지 마세요.#include <iostream> using mip::Consent; using std::string; Consent ConsentDelegateImpl::GetUserConsent(const string& url) { // Accept the consent to connect to the url std::cout << "SDK will connect to: " << url << std::endl; return Consent::AcceptAlways; }
필요에 따라 F6(빌드 솔루션)을 사용하여 솔루션의 테스트 컴파일/링크를 실행하여 계속하기 전에 성공적으로 빌드되도록 합니다.
파일 프로필 및 엔진 생성
언급했듯이 MIP API를 사용하는 SDK 클라이언트에는 프로필 및 엔진 개체가 필요합니다. 프로필 및 엔진 개체를 인스턴스화하는 코드를 추가하여 이 빠른 시작의 코딩 부분을 완료합니다.
솔루션 탐색기에서 메서드 구현
main()이 포함된 프로젝트에서 .cpp 파일을 엽니다. 기본 이름은 프로젝트 생성 시 지정한 이름을 포함한 프로젝트와 동일합니다.생성된 구현을 제거합니다
main(). 프로젝트를 만드는 동안 Visual Studio에서 생성된 전처리기 지시문을 제거하지 마세요(#pragma, #include). 전처리기 지시문 다음에 다음 코드를 추가합니다.
#include "mip/mip_context.h"
#include "auth_delegate.h"
#include "consent_delegate.h"
#include "profile_observer.h"

using std::promise;
using std::future;
using std::make_shared;
using std::shared_ptr;
using std::string;
using std::cout;
using mip::ApplicationInfo;
using mip::FileProfile;
using mip::FileEngine;

int main()
{
  // Construct/initialize objects required by the application's profile object
  // ApplicationInfo object (App ID, name, version)
  ApplicationInfo appInfo{"<application-id>",
                          "<application-name>",
                          "<application-version>"};

  // Create MipConfiguration object.
  std::shared_ptr<mip::MipConfiguration> mipConfiguration = std::make_shared<mip::MipConfiguration>(appInfo,
				                                                                                               "mip_data",
                                                                                      			         mip::LogLevel::Trace,
                                                                                                     false);


  std::shared_ptr<mip::MipContext> mMipContext = mip::MipContext::Create(mipConfiguration);

  auto profileObserver = make_shared<ProfileObserver>();                     // Observer object
  auto authDelegateImpl = make_shared<AuthDelegateImpl>("<application-id>"); // Authentication delegate object (App ID)
  auto consentDelegateImpl = make_shared<ConsentDelegateImpl>();             // Consent delegate object

  // Construct/initialize profile object
  FileProfile::Settings profileSettings(
                                mMipContext,
                                mip::CacheStorageType::OnDisk,
                                consentDelegateImpl,
                                profileObserver);

  // Set up promise/future connection for async profile operations; load profile asynchronously
  auto profilePromise = make_shared<promise<shared_ptr<FileProfile>>>();
  auto profileFuture = profilePromise->get_future();

  try
	  {
		  mip::FileProfile::LoadAsync(profileSettings, profilePromise);
  }
	  catch (const std::exception& e)
	  {
		  cout << "An exception occurred... are the Settings and ApplicationInfo objects populated correctly?\n\n" << e.what() << "'\n";

		  system("pause");
		  return 1;
	  }
	  auto profile = profileFuture.get();

  // Construct/initialize engine object
  FileEngine::Settings engineSettings(
                                  mip::Identity("<engine-account>"), // Engine identity (account used for authentication)
                                  authDelegateImpl,		       // Token acquisition implementation
				    "<engine-state>",                  // User-defined engine state
                                  "en-US");                          // Locale (default = en-US)

  // Set the engineId for caching.
  engineSettings.SetEngineId("<engine-account>");
  // Set up promise/future connection for async engine operations; add engine to profile asynchronously
  auto enginePromise = make_shared<promise<shared_ptr<FileEngine>>>();
  auto engineFuture = enginePromise->get_future();
  profile->AddEngineAsync(engineSettings, enginePromise);
  std::shared_ptr<FileEngine> engine;
  try
  {
    engine = engineFuture.get();
  }
  catch (const std::exception& e)
  {
    cout << "An exception occurred... is the access token incorrect/expired?\n\n" << e.what() << "'\n";

    system("pause");
    return 1;
  }

  // Application shutdown. Null out profile and engine, call ReleaseAllResources();
  // Application may crash at shutdown if resources aren't properly released.
  // handler = nullptr; // This will be used in later quick starts.
  engine = nullptr;
  profile = nullptr;
  mMipContext->ShutDown();
  mMipContext = nullptr;

  return 0;
  }
문자열 상수로 방금 붙여넣은 소스 코드의 모든 자리 표시자 값을 바꿉니다.
Placeholder 가치 예시 <application-id> "MIP SDK 설정 및 구성" 문서의 2단계에서 등록된 애플리케이션에 할당된 Microsoft Entra 애플리케이션 ID(GUID)입니다. 2개의 인스턴스를 교체합니다. "0edbblll-8773-44de-b87c-b8c6276d41eb"<애플리케이션 이름> 애플리케이션에 대한 사용자 정의 친숙한 이름입니다. 유효한 ASCII 문자(';' 제외)를 포함해야 하며 Microsoft Entra 등록에서 사용한 응용 프로그램 이름과 이상적으로 일치해야 합니다. "AppInitialization"<애플리케이션 버전> 애플리케이션에 대한 사용자 정의 버전 정보입니다. 유효한 ASCII 문자(';'제외)를 포함해야 합니다. "1.1.0.0"<엔진 계정> 엔진의 ID에 사용되는 계정입니다. 토큰을 획득하는 동안 사용자 계정으로 인증하는 경우 이 값과 일치해야 합니다. "user1@tenant.onmicrosoft.com"<엔진 상태> 엔진과 연결할 사용자 정의 상태입니다. "My App State"이제 애플리케이션의 최종 빌드를 수행하고 오류를 해결합니다. 코드가 성공적으로 빌드되어야 하지만 다음 빠른 시작을 완료할 때까지는 아직 제대로 실행되지 않습니다. 애플리케이션을 실행하는 경우 다음과 유사한 출력이 표시됩니다. 다음 빠른 시작을 완료할 때까지 제공할 액세스 토큰이 없습니다.
다음 단계
이제 초기화 코드가 완료되었으므로 MIP 파일 SDK를 경험할 수 있는 다음 빠른 시작을 준비했습니다.