자습서: XAML 및 C#을 사용하여 Visual Studio에서 첫 번째 유니버설 Windows 플랫폼 애플리케이션 만들기
참고 항목
UWP(유니버설 Windows 플랫폼)의 현재 기능에 만족한다면 프로젝트 형식을 Windows 앱 SDK 마이그레이션할 필요가 없습니다. WinUI 2.x 및 Windows SDK는 UWP 프로젝트 형식을 지원합니다. WinUI 3 및 Windows 앱 SDK 시작하려면 Windows 앱 SDK 자습서의 단계를 수행할 수 있습니다.
Visual Studio IDE(통합 개발 환경)에 대한 이 소개에서는 모든 Windows 10 이상의 디바이스에서 실행되는 “Hello World” 앱을 만듭니다. 이렇게 하려면 UWP(유니버설 Windows 플랫폼) 프로젝트 템플릿, XAML(Extensible Application Markup Language) 및 C# 프로그래밍 언어를 사용합니다.
아직 Visual Studio를 설치하지 않은 경우 Visual Studio 다운로드 페이지로 이동하여 체험용으로 설치합니다.
프로젝트 만들기
먼저, 유니버설 Windows 플랫폼 프로젝트를 만듭니다. 아무것도 추가하지 않아도 필요한 모든 템플릿 파일과 함께 프로젝트 형식이 제공됩니다.
Visual Studio를 열고 시작 창에서 새 프로젝트 만들기를 선택합니다.
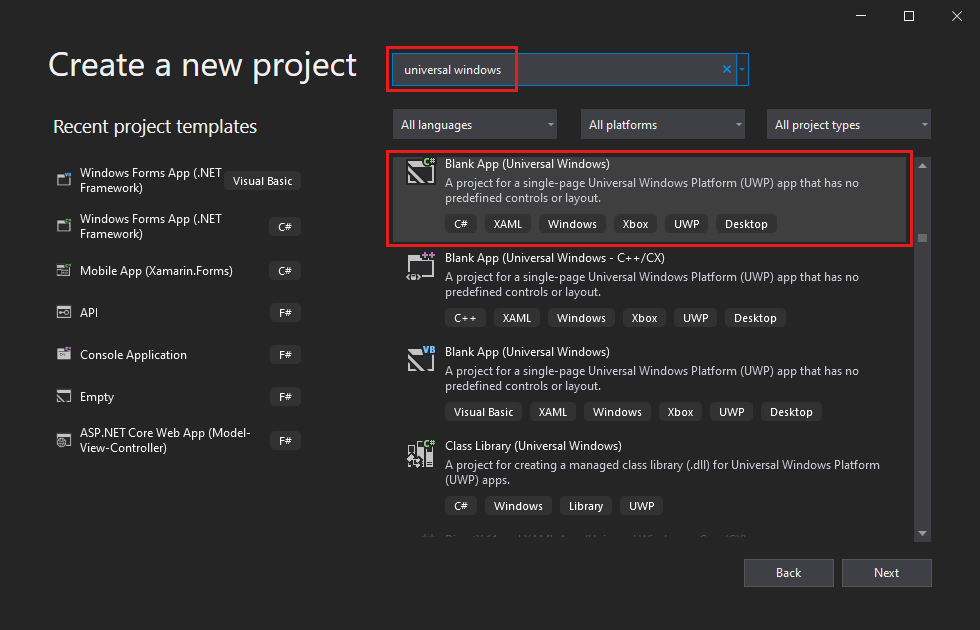
새 프로젝트 만들기 화면에서 검색 상자에 ‘유니버설 Windows’를 입력하고, 비어 있는 앱(유니버설 Windows)에 사용할 C# 템플릿을 선택하고, 다음을 선택합니다.

참고 항목
비어 있는 앱(유니버설 Windows) 프로젝트 템플릿이 표시되지 않으면 추가 도구 및 기능 설치 링크를 클릭합니다.

Visual Studio 설치 관리자가 시작됩니다. 유니버설 Windows 플랫폼 개발 워크로드를 선택한 다음, 수정을 선택합니다.
프로젝트 이름을 HelloWorld로 지정하고 만들기를 선택합니다.

새 유니버설 Windows 플랫폼 프로젝트 대화 상자에서 기본 대상 버전 및 최소 버전 설정에 동의합니다.

참고 항목
처음으로 Visual Studio를 사용하여 UWP 앱을 만든 경우 설정 대화 상자가 나타날 수 있습니다. 개발자 모드를 선택한 다음, 예를 선택합니다.

Visual Studio는 사용자용 추가 개발자 모드 패키지를 설치합니다. 패키지 설치가 완료되면 설정 대화 상자를 닫습니다.
Visual Studio를 열고 시작 창에서 새 프로젝트 만들기를 선택합니다.
새 프로젝트 만들기 화면에서 검색 상자에 ‘유니버설 Windows’를 입력하고, 비어 있는 앱(유니버설 Windows)에 사용할 C# 템플릿을 선택하고, 다음을 선택합니다.

참고 항목
비어 있는 앱(유니버설 Windows) 프로젝트 템플릿이 표시되지 않으면 추가 도구 및 기능 설치 링크를 클릭합니다.

Visual Studio 설치 관리자가 시작됩니다. 유니버설 Windows 플랫폼 개발 워크로드를 선택한 다음, 수정을 선택합니다.
프로젝트 이름을 HelloWorld로 지정하고 만들기를 선택합니다.

새 유니버설 Windows 플랫폼 프로젝트 대화 상자에서 기본 대상 버전 및 최소 버전 설정에 동의합니다.

참고 항목
Visual Studio를 사용하여 UWP 앱을 처음 만든 경우 Windows 용 개발자 모드 사용 대화 상자가 나타납니다. 개발자가 설정 열 설정을 선택합니다. 개발자 모드를 켜고 예를 선택합니다.

Visual Studio는 사용자용 추가 개발자 모드 패키지를 설치합니다. 패키지 설치가 완료되면 설정 대화 상자를 닫습니다.
애플리케이션 만들기
개발을 시작할 때입니다. 단추 컨트롤을 추가하고 해당 단추에 작업을 추가한 다음, 모양을 확인하려면 "Hello World" 앱을 시작합니다.
디자인 캔버스에 단추 추가
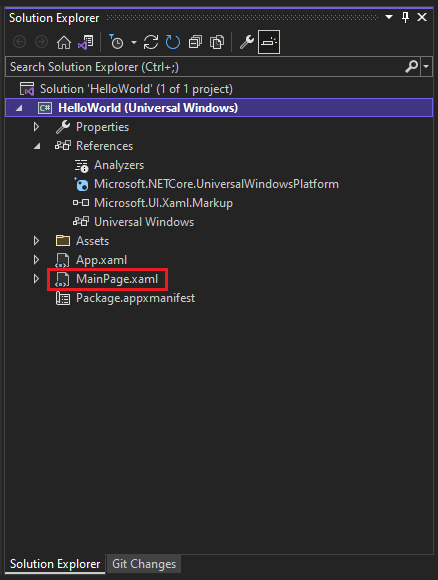
솔루션 탐색기에서 MainPage.xaml을 두 번 클릭하여 분할 보기를 엽니다.

디자인 캔버스를 포함하는 XAML 디자이너 및 코드를 추가하거나 변경할 수 있는 XAML 편집기라는 두 개의 창이 있습니다.

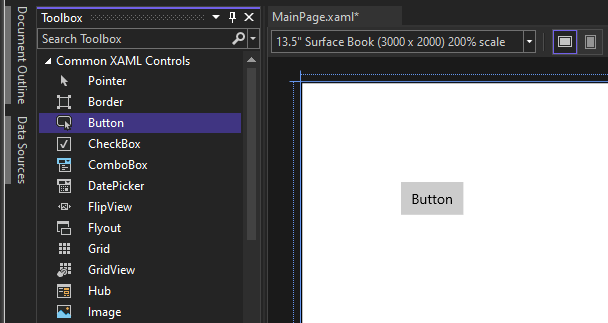
도구 상자를 선택하여 도구 상자 플라이아웃 창을 엽니다.

(도구 상자 옵션이 표시되지 않으면 메뉴 모음에서 열 수 있습니다. 이렇게 하려면 보기>도구 모음을 선택합니다. 또는 Ctrl+Alt+X를 누릅니다.)
Pin 아이콘을 클릭하여 도구 상자 창을 고정합니다.

단추 컨트롤을 클릭해 디자인 캔버스로 끌어옵니다.

XAML 편집기에 코드가 표시되면 단추가 추가된 것도 확인할 수 있습니다.

솔루션 탐색기에서 MainPage.xaml을 두 번 클릭하여 분할 보기를 엽니다.

디자인 캔버스를 포함하는 XAML 디자이너 및 코드를 추가하거나 변경할 수 있는 XAML 편집기라는 두 개의 창이 있습니다.

도구 상자를 선택하여 도구 상자 플라이아웃 창을 엽니다.

(도구 상자 옵션이 표시되지 않으면 메뉴 모음에서 열 수 있습니다. 이렇게 하려면 보기>도구 모음을 선택합니다. 또는 Ctrl+Alt+X를 누릅니다.)
고정 아이콘을 선택하여 도구 상자 창을 고정합니다.

단추 컨트롤을 선택하고 디자인 캔버스로 끌어옵니다.

XAML 편집기에 코드가 표시되면 단추가 추가된 것도 확인할 수 있습니다.

단추에 레이블 추가
XAML 편집기에서 Button Content 값을 “Button”에서 “Hello World!”로 변경합니다.

XAML 디자이너에서도 단추가 변경되는지 확인합니다.

XAML 편집기에서 Button Content 값을 “Button”에서 “Hello World!”로 변경합니다.

XAML 디자이너에서도 단추가 변경되는지 확인합니다.

이벤트 처리기 추가
"이벤트 처리기"는 복잡해 보이지만 이벤트가 발생할 때 호출되는 코드에 대한 다른 이름에 지나지 않습니다. 이 경우 "Hello World!" 단추에 작업을 추가합니다.
디자인 캔버스에서 단추 컨트롤을 두 번 클릭합니다.
코드 숨김 페이지, MainPage.xaml.cs에서 이벤트 처리기 코드를 편집합니다.
여기부터가 흥미로운 부분입니다. 기본 이벤트 처리기는 다음과 같습니다.

다음과 같이 되도록 바꿔보겠습니다.

복사 및 붙여넣기할 코드는 다음과 같습니다.
private async void Button_Click(object sender, RoutedEventArgs e)
{
   MediaElement mediaElement = new MediaElement();
   var synth = new Windows.Media.SpeechSynthesis.SpeechSynthesizer();
   Windows.Media.SpeechSynthesis.SpeechSynthesisStream stream = await synth.SynthesizeTextToStreamAsync("Hello, World!");
   mediaElement.SetSource(stream, stream.ContentType);
   mediaElement.Play();
}
디자인 캔버스에서 단추 컨트롤을 두 번 클릭합니다.
코드 숨김 페이지, MainPage.xaml.cs에서 이벤트 처리기 코드를 편집합니다.
여기부터가 흥미로운 부분입니다. 기본 이벤트 처리기는 다음과 같습니다.

다음과 같이 되도록 바꿔보겠습니다.

복사 및 붙여넣기할 코드는 다음과 같습니다.
private async void Button_Click(object sender, RoutedEventArgs e)
{
   MediaElement mediaElement = new MediaElement();
   var synth = new Windows.Media.SpeechSynthesis.SpeechSynthesizer();
   Windows.Media.SpeechSynthesis.SpeechSynthesisStream stream = await synth.SynthesizeTextToStreamAsync("Hello, World!");
   mediaElement.SetSource(stream, stream.ContentType);
   mediaElement.Play();
}
무엇을 했습니까?
코드는 일부 Windows API를 사용하여 음성 합성 개체를 만든 다음, 텍스트를 제공하여 읽게 합니다. (SpeechSynthesis를 사용하는 방법에 대한 자세한 내용은 System.Speech.Synthesis를 참조하세요.)
애플리케이션 실행
"Hello World" UWP 앱을 빌드하고 배포하고 시작하여 모양과 음성을 확인할 때입니다. 방법은 다음과 같습니다.
재생 단추(로컬 머신텍스트가 있음)을 사용하여 로컬 머신에서 애플리케이션을 시작합니다.

(또는 앱을 시작하려면 메뉴 모음에서 디버그>디버깅 시작을 선택하거나 F5 키를 누릅니다.)
시작 화면이 사라진 직후 나타나는 앱을 봅니다. 앱은 다음과 같아야 합니다.

Hello World 단추를 클릭합니다.
Windows 10 이상 디바이스에서는 문자 그대로 “Hello, World!”라고 말합니다.
앱을 닫으려면 도구 모음에서 디버깅 중지 단추를 클릭합니다. 또는 메뉴 모음에서 디버그>디버깅 중지를 선택하거나 Shift+F5를 누릅니다.
"Hello World" UWP 앱을 빌드하고 배포하고 시작하여 모양과 음성을 확인할 때입니다. 방법은 다음과 같습니다.
재생 단추(로컬 머신텍스트가 있음)을 사용하여 로컬 머신에서 애플리케이션을 시작합니다.

(또는 앱을 시작하려면 메뉴 모음에서 디버그>디버깅 시작을 선택하거나 F5 키를 누릅니다.)
시작 화면이 사라진 직후 나타나는 앱을 봅니다. 앱은 다음 이미지와 유사합니다.

Hello World 단추를 선택합니다.
Windows 10 이상 디바이스에서는 문자 그대로 “Hello, World!”라고 말합니다.
앱을 닫으려면 도구 모음에서 디버깅 중지 단추를 선택합니다. 또는 메뉴 모음에서 디버그>디버깅 중지를 선택하거나 Shift+F5를 누릅니다.
다음 단계
축하합니다. 이 자습서를 마쳤습니다. UWP 및 Visual Studio IDE에 대한 몇 가지 기본 사항을 알게 됐기를 바랍니다. 자세히 알아보려면 계속 다음 자습서를 사용하세요.