이 빠른 시작에서는 Windows 앱 SDK를 사용하여 푸시 알림을 보내고 받는 데스크톱 Windows 애플리케이션을 만듭니다.
필수 조건
- Windows 앱 개발 시작
- Windows App SDK를 사용하는 새 프로젝트 생성 또는 기존 프로젝트에서 Windows App SDK 사용
- Windows 앱 SDK 푸시 알림을 사용하려면 Azure 계정이 필요합니다.
- 푸시 알림 개요를 읽기
샘플 앱
이 빠른 시작에서는 앱에 푸시 알림 지원을 추가하는 방법을 안내합니다. GitHub있는 샘플 앱의 컨텍스트에서 이 빠른 시작의 예제 코드를 참조하세요.
API 참고 자료
푸시 알림에 대한 API 참조 설명서는 Microsoft.Windows.PushNotifications 네임스페이스를 참조하세요.
AAD(Azure Active Directory)에서 앱 ID 구성
Windows 앱 SDK의 푸시 알림은 AAD(Azure Active Directory)의 ID를 사용합니다. Azure 자격 증명은 WNS 채널 URI를 요청하고 푸시 알림을 보내기 위해 액세스 토큰을 요청할 때 필요합니다. 참고: Microsoft 파트너 센터에서는 Windows 앱 SDK의 푸시 알림이 지원되지 않습니다.
1단계: AAD 앱 등록 만들기
Azure 계정에 로그인하고 새 AAD 앱 등록 리소스를 만듭니다. 새 등록선택합니다.
2단계: 이름 입력 및 다중 테넌트 옵션 선택
앱 이름을 입력합니다.
푸시 알림에는 다중 테넌트 옵션이 필요하므로 선택합니다.
- 테넌트에 대한 자세한 내용은 앱에 누가 로그인할 수 있는지에 대한 정보를 참조하십시오..
등록을 선택합니다.
활성화 등록 및 액세스 토큰 요청 중에 사용할 애플리케이션(클라이언트) ID을 Azure AppId로 기록해 두십시오.
디렉터리(테넌트) ID를 기록해 두십시오. 이는 액세스 토큰을 요청할 때 사용할 Azure TenantId입니다.
중요합니다
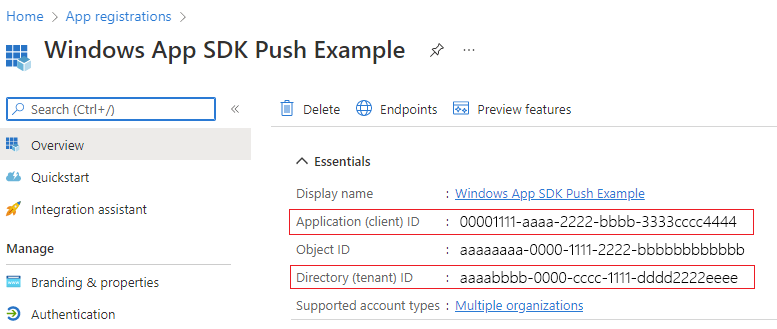 해당 애플리케이션(클라이언트) ID 및 디렉터리(테넌트) ID를 기록해 두십시오.
채널 요청 시 사용할 개체 ID과(와) Azure Object ID를 기록해 두십시오. 중요한 점은 이것이 Essentials 페이지에 나열된 개체 ID가 아니라는 것입니다. 대신 올바른
개체 ID 를 찾으려면,Essentials 페이지의 로컬 디렉터리 필드에 있는관리 애플리케이션에서 앱 이름을 클릭하십시오. 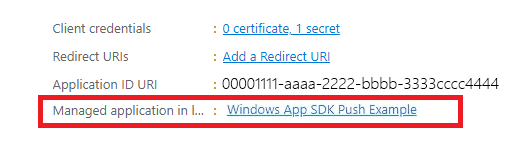
개체 ID 필드 보여 주는
스크린샷 비고
서비스 주체 개체 ID를 얻으려면, 앱과 연결된 ID가 없다면 다음 문서 중 하나의 단계에 따라 Azure 포털에서 만들거나 명령줄을 사용하여 만들어야 합니다.
포털을 사용하여 리소스에 액세스할 수 있는 Azure AD 애플리케이션 및 서비스 주체를 만듭니다.
Azure PowerShell을 사용하여 인증서 서비스 주체 만들기
3단계: 앱 등록에 대한 비밀 만들기
푸시 알림을 보내기 위해 액세스 토큰을 요청할 때, 당신의 비밀은 Azure AppId/ClientId와 함께 사용됩니다.

인증서 및 비밀로 이동하고 새 클라이언트 암호를 선택합니다.
중요합니다
비밀을 만든 후 복사하여 Azure Key Vault와 같은 안전한 위치에 저장해야 합니다. 만든 직후에 한 번만 볼 수 있습니다.
4단계: 앱의 패키지 패밀리 이름을 Azure AppId에 매핑
앱이 패키지된 경우(외부 위치에서 패키지하는 것을 포함하여) 이 방법을 사용하여 앱의 패키지 패밀리 이름(PFN)과 Azure AppId를 매핑할 수 있습니다.
앱이 패키지된 Win32 앱이라면 "Win_App_SDK_Push@microsoft.com"로 제목 "Windows 앱 SDK 푸시 알림 매핑 요청"과 본문 "PFN: [your PFN], AppId: [your APPId], ObjectId: [your ObjectId]"을 포함하여 이메일을 보내 패키지 패밀리 이름(PFN) 매핑 요청을 생성하세요. 매핑 요청은 매주 완료됩니다. 매핑 요청이 완료되면 알림이 표시됩니다.
푸시 알림을 받도록 앱 구성
1단계: 네임스페이스 선언 추가
Windows 앱 SDK 푸시 알림의 네임스페이스 Microsoft.Windows.PushNotifications을(를) 추가합니다.
#include <winrt/Microsoft.Windows.PushNotifications.h>

using namespace winrt::Microsoft::Windows::PushNotifications;
2단계: 앱 매니페스트에 COM 활성화기 추가
중요합니다
앱이 패키지로 포장되지 않은 경우(즉, 런타임에 패키지 ID가 없는 경우) 3단계로 건너뛰세요: 앱 시작 시 푸시 알림에 등록하고 응답합니다.
앱이 패키지된 경우(외부 위치로 패키지된 경우 포함): Package.appxmanifest를 엽니다. 요소 내부에 다음을 추가합니다 <Application> .
Id및 ExecutableDisplayName 값을 앱과 관련된 값으로 바꿉습니다.
<!--Packaged apps only-->
<!--package.appxmanifest-->

<Package
  ...
  xmlns:com="http://schemas.microsoft.com/appx/manifest/com/windows10"
  ...
  <Applications>
    <Application>
      ...
      <Extensions>

        <!--Register COM activator-->
        <com:Extension Category="windows.comServer">
          <com:ComServer>
              <com:ExeServer Executable="SampleApp\SampleApp.exe" DisplayName="SampleApp" Arguments="----WindowsAppRuntimePushServer:">
                <com:Class Id="[Your app's Azure AppId]" DisplayName="Windows App SDK Push" />
            </com:ExeServer>
          </com:ComServer>
        </com:Extension>

      </Extensions>
    </Application>
  </Applications>
 </Package>
3단계: 앱 시작 시 푸시 알림 등록 및 응답
다음을 추가하도록 앱의 main() 메서드를 업데이트합니다.
- 앱을 푸시 알림 수신 상태로 등록하려면 PushNotificationManager::Default().Register() 을(를) 호출하세요.
- AppInstance::GetCurrent().GetActivatedEventArgs()를 호출하여 활성화 요청의 원본을 확인하십시오. 푸시 알림에서 활성화가 트리거된 경우 알림의 페이로드에 따라 응답합니다.
중요합니다
PushNotificationManager::Default().Register를 호출한 후 AppInstance.GetCurrent.GetActivatedEventArgs를 호출해야 합니다.
다음 샘플은 GitHub에 있는 패키지된 샘플 앱에서 가져온 것입니다.
// cpp-console.cpp
#include "pch.h"
#include <iostream>
#include <winrt/Microsoft.Windows.PushNotifications.h>
#include <winrt/Microsoft.Windows.AppLifecycle.h>
#include <winrt/Windows.Foundation.h>
#include <wil/result.h>
#include <wil/cppwinrt.h>


using namespace winrt;
using namespace Windows::Foundation;

using namespace winrt::Microsoft::Windows::PushNotifications;
using namespace winrt::Microsoft::Windows::AppLifecycle;

winrt::guid remoteId{ "7edfab6c-25ae-4678-b406-d1848f97919a" }; // Replace this with your own Azure ObjectId


void SubscribeForegroundEventHandler()
{
    winrt::event_token token{ PushNotificationManager::Default().PushReceived([](auto const&, PushNotificationReceivedEventArgs const& args)
    {
        auto payload{ args.Payload() };

        std::string payloadString(payload.begin(), payload.end());
        std::cout << "\nPush notification content received in the FOREGROUND: " << payloadString << std::endl;
    }) };
}

int main()
{
    // Setup an event handler, so we can receive notifications in the foreground while the app is running.
    SubscribeForegroundEventHandler();

    PushNotificationManager::Default().Register();

    auto args{ AppInstance::GetCurrent().GetActivatedEventArgs() };
    switch (args.Kind())
    {
        // When it is launched normally (by the users, or from the debugger), the sample requests a WNS Channel URI and
        // displays it, then waits for notifications. This user can take a copy of the WNS Channel URI and use it to send
        // notifications to the sample
        case ExtendedActivationKind::Launch:
        {
            // Checks to see if push notifications are supported. Certain self-contained apps may not support push notifications by design
            if (PushNotificationManager::IsSupported())
            {
                // Request a WNS Channel URI which can be passed off to an external app to send notifications to.
                // The WNS Channel URI uniquely identifies this app for this user and device.
                PushNotificationChannel channel{ RequestChannel() };
                if (!channel)
                {
                    std::cout << "\nThere was an error obtaining the WNS Channel URI" << std::endl;

                    if (remoteId == winrt::guid { "00000000-0000-0000-0000-000000000000" })
                    {
                        std::cout << "\nThe ObjectID has not been set. Refer to the readme file accompanying this sample\nfor the instructions on how to obtain and setup an ObjectID" << std::endl;
                    }
                }

                std::cout << "\nPress 'Enter' at any time to exit App." << std::endl;
                std::cin.ignore();
            }
            else
            {
                // App implements its own custom socket here to receive messages from the cloud since Push APIs are unsupported.
            }
        }
        break;

        // When it is activated from a push notification, the sample only displays the notification.
        // It doesn’t register for foreground activation of perform any other actions
        // because background activation is meant to let app perform only small tasks in order to preserve battery life.
        case ExtendedActivationKind::Push:
        {
            PushNotificationReceivedEventArgs pushArgs{ args.Data().as<PushNotificationReceivedEventArgs>() };

            // Call GetDeferral to ensure that code runs in low power
            auto deferral{ pushArgs.GetDeferral() };

            auto payload{ pushArgs.Payload() } ;

            // Do stuff to process the raw notification payload
            std::string payloadString(payload.begin(), payload.end());
            std::cout << "\nPush notification content received in the BACKGROUND: " << payloadString.c_str() << std::endl;
            std::cout << "\nPress 'Enter' to exit the App." << std::endl;

            // Call Complete on the deferral when finished processing the payload.
            // This removes the override that kept the app running even when the system was in a low power mode.
            deferral.Complete();
            std::cin.ignore();
        }
        break;

        default:
            std::cout << "\nUnexpected activation type" << std::endl;
            std::cout << "\nPress 'Enter' to exit the App." << std::endl;
            std::cin.ignore();
            break;
    }

    // We do not call PushNotificationManager::UnregisterActivator
    // because then we wouldn't be able to receive background activations, once the app has closed.
    // Call UnregisterActivator once you don't want to receive push notifications anymore.
}
4단계: WNS 채널 URI를 요청하고 WNS 서버에 등록
WNS 채널 URI는 푸시 알림을 보내기 위한 HTTP 엔드포인트입니다. 각 클라이언트는 채널 URI를 요청하고 푸시 알림을 받으려면 WNS 서버에 등록해야 합니다.
비고
WNS 채널 URI는 30일 후에 만료됩니다.
auto channelOperation{ PushNotificationManager::Default().CreateChannelAsync(winrt::guid("[Your app's Azure ObjectID]")) };
PushNotificationManager가 채널 URI를 생성하려고 시도하며, 최대 15분 동안 자동으로 재시도합니다. 호출이 완료되기를 기다리는 이벤트 처리기를 만듭니다. 호출이 완료되면 WNS 서버에 URI를 등록합니다.
// cpp-console.cpp

winrt::Windows::Foundation::IAsyncOperation<PushNotificationChannel> RequestChannelAsync()
{
    // To obtain an AAD RemoteIdentifier for your app,
    // follow the instructions on https://learn.microsoft.com/azure/active-directory/develop/quickstart-register-app
    auto channelOperation = PushNotificationManager::Default().CreateChannelAsync(remoteId);

    // Setup the inprogress event handler
    channelOperation.Progress(
        [](auto&& sender, auto&& args)
        {
            if (args.status == PushNotificationChannelStatus::InProgress)
            {
                // This is basically a noop since it isn't really an error state
                std::cout << "Channel request is in progress." << std::endl << std::endl;
            }
            else if (args.status == PushNotificationChannelStatus::InProgressRetry)
            {
                LOG_HR_MSG(
                    args.extendedError,
                    "The channel request is in back-off retry mode because of a retryable error! Expect delays in acquiring it. RetryCount = %d",
                    args.retryCount);
            }
        });

    auto result = co_await channelOperation;

    if (result.Status() == PushNotificationChannelStatus::CompletedSuccess)
    {
        auto channelUri = result.Channel().Uri();

        std::cout << "channelUri: " << winrt::to_string(channelUri.ToString()) << std::endl << std::endl;

        auto channelExpiry = result.Channel().ExpirationTime();

        // Caller's responsibility to keep the channel alive
        co_return result.Channel();
    }
    else if (result.Status() == PushNotificationChannelStatus::CompletedFailure)
    {
        LOG_HR_MSG(result.ExtendedError(), "We hit a critical non-retryable error with channel request!");
        co_return nullptr;
    }
    else
    {
        LOG_HR_MSG(result.ExtendedError(), "Some other failure occurred.");
        co_return nullptr;
    }

};

PushNotificationChannel RequestChannel()
{
    auto task = RequestChannelAsync();
    if (task.wait_for(std::chrono::seconds(300)) != AsyncStatus::Completed)
    {
        task.Cancel();
        return nullptr;
    }

    auto result = task.GetResults();
    return result;
}
5단계: 앱 빌드 및 설치
Visual Studio를 사용하여 앱을 빌드하고 설치합니다. 솔루션 탐색기에서 솔루션 파일을 마우스 오른쪽 버튼으로 클릭한 후을 선택하여
앱에 푸시 알림 보내기
이 시점에서 모든 구성이 완료되고 WNS 서버가 클라이언트 앱에 푸시 알림을 보낼 수 있습니다. 다음 단계에서는 자세한 내용은 푸시 알림 서버 요청 및 응답 헤더을 참조하세요.
1단계: 액세스 토큰 요청
푸시 알림을 보내려면 WNS 서버가 먼저 액세스 토큰을 요청해야 합니다. Azure TenantId, Azure AppId 및 비밀을 사용하여 HTTP POST 요청을 보냅니다. Azure TenantId 및 Azure AppId 검색에 대한 자세한 내용은 로그인하기 위한 테넌트 및 앱 ID 값 가져오기을 참조하세요.
HTTP 샘플 요청:
POST /{tenantID}/oauth2/v2.0/token Http/1.1
Host: login.microsoftonline.com
Content-Type: application/x-www-form-urlencoded
Content-Length: 160

grant_type=client_credentials&client_id=<Azure_App_Registration_AppId_Here>&client_secret=<Azure_App_Registration_Secret_Here>&scope=https://wns.windows.com/.default/
C# 샘플 요청:
//Sample C# Access token request
var client = new RestClient("https://login.microsoftonline.com/{tenantID}/oauth2/v2.0");
var request = new RestRequest("/token", Method.Post);
request.AddHeader("Content-Type", "application/x-www-form-urlencoded");
request.AddParameter("grant_type", "client_credentials");
request.AddParameter("client_id", "[Your app's Azure AppId]");
request.AddParameter("client_secret", "[Your app's secret]");
request.AddParameter("scope", "https://wns.windows.com/.default");
RestResponse response = await client.ExecutePostAsync(request);
Console.WriteLine(response.Content);
요청이 성공하면 access_token 필드에 토큰이 포함된 응답을 받게 됩니다.
{
    "token_type":"Bearer",
    "expires_in":"86399",
    "ext_expires_in":"86399",
    "expires_on":"1653771789",
    "not_before":"1653685089",
    "access_token":"[your access token]"
}
2단계. 원시 알림 보내기
이전 단계에서 얻은 액세스 토큰과 보내려는 푸시 알림의 콘텐츠가 포함된 HTTP POST 요청을 만듭니다. 푸시 알림의 콘텐츠가 앱에 전달됩니다.
POST /?token=[The token query string parameter from your channel URL. E.g. AwYAAABa5cJ3...] HTTP/1.1
Host: dm3p.notify.windows.com
Content-Type: application/octet-stream
X-WNS-Type: wns/raw
Authorization: Bearer [your access token]
Content-Length: 46

{ Sync: "Hello from the Contoso App Service" }
var client = new RestClient("[Your channel URL. E.g. https://wns2-by3p.notify.windows.com/?token=AwYAAABa5cJ3...]");
var request = new RestRequest();
request.Method = Method.Post;
request.AddHeader("Content-Type", "application/octet-stream");
request.AddHeader("X-WNS-Type", "wns/raw");
request.AddHeader("Authorization", "Bearer [your access token]");
request.AddBody("Notification body");
RestResponse response = await client.ExecutePostAsync(request);");
3단계: 클라우드 기반 앱 알림 보내기
원시 알림을 보내는 데만 관심이 있는 경우 이 단계를 무시합니다. 클라우드에서 제공되는 앱 알림(푸시 토스트 알림)을 보내려면 먼저 Windows 앱 SDK의 앱 알림 빠른 시작을 따르십시오. 앱 알림은 푸시(클라우드에서 전송)하거나 로컬로 보낼 수 있습니다. 클라우드 소스 앱 알림을 보내는 것은 2단계에서 원시 알림을 보내는 것과 비슷하지만, X-WNS-Type 헤더는 toast이며, Content-Type은 text/xml이고, 콘텐츠에는 앱 알림 XML 페이로드가 포함됩니다. XML 페이로드를 생성하는 방법에 대한 자세한 내용은 알림 XML 스키마 를 참조하세요.
전송하려는 클라우드 원본 앱 알림의 콘텐츠 및 액세스 토큰을 포함하는 HTTP POST 요청을 만듭니다. 푸시 알림의 콘텐츠가 앱에 전달됩니다.
POST /?token=AwYAAAB%2fQAhYEiAESPobjHzQcwGCTjHu%2f%2fP3CCNDcyfyvgbK5xD3kztniW%2bjba1b3aSSun58SA326GMxuzZooJYwtpgzL9AusPDES2alyQ8CHvW94cO5VuxxLDVzrSzdO1ZVgm%2bNSB9BAzOASvHqkMHQhsDy HTTP/1.1
Host: dm3p.notify.windows.com
Content-Type: text/xml
X-WNS-Type: wns/toast
Authorization: Bearer [your access token]
Content-Length: 180

<toast><visual><binding template="ToastGeneric"><text>Example cloud toast notification</text><text>This is an example cloud notification using XML</text></binding></visual></toast>
var client = new RestClient("https://dm3p.notify.windows.com/?token=AwYAAAB%2fQAhYEiAESPobjHzQcwGCTjHu%2f%2fP3CCNDcyfyvgbK5xD3kztniW%2bjba1b3aSSun58SA326GMxuzZooJYwtpgzL9AusPDES2alyQ8CHvW94cO5VuxxLDVzrSzdO1ZVgm%2bNSB9BAzOASvHqkMHQhsDy");
client.Timeout = -1;

var request = new RestRequest(Method.POST);
request.AddHeader("Content-Type", "text/xml");
request.AddHeader("X-WNS-Type", "wns/toast");
request.AddHeader("Authorization", "Bearer <AccessToken>");
request.AddParameter("text/xml", "<toast><visual><binding template=\"ToastGeneric\"><text>Example cloud toast notification</text><text>This is an example cloud notification using XML</text></binding></visual></toast>",  ParameterType.RequestBody);
Console.WriteLine(response.Content);
리소스
- WNS(Windows 푸시 알림 서비스)
- GitHub 푸시 알림 샘플 코드
- Microsoft.Windows.PushNotifications API 세부 정보
- GitHub 푸시 알림 명세서
- 토스트 콘텐츠
- 알림 XML 스키마
GitHub에서 Microsoft와 공동 작업
이 콘텐츠의 원본은 GitHub에서 찾을 수 있으며, 여기서 문제와 끌어오기 요청을 만들고 검토할 수도 있습니다. 자세한 내용은 참여자 가이드를 참조하세요.

Windows developer