DirectX의 좌표계
참고
이 문서는 레거시 WinRT 네이티브 API와 관련이 있습니다. 새 네이티브 앱 프로젝트의 경우 OpenXR API를 사용하는 것이 좋습니다.
좌표계는 Windows Mixed Reality API에서 제공하는 공간 이해의 기초를 형성합니다.
오늘날의 착석 VR 또는 싱글룸 VR 장치는 추적된 공간에 대한 하나의 기본 좌표계를 설정합니다. HoloLens와 같은 Mixed Reality 디바이스는 정의되지 않은 대규모 환경을 위해 설계되었으며, 사용자가 돌아다니는 동안 디바이스가 주변 환경을 검색하고 학습합니다. 디바이스는 사용자의 회의실에 대한 지식을 지속적으로 개선하는 데 적응하지만 앱 수명 동안 서로의 관계를 변경하는 좌표계가 생성됩니다. Windows Mixed Reality 앉은 몰입형 헤드셋부터 월드에 연결된 참조 프레임까지 다양한 디바이스를 지원합니다.
참고
이 문서의 코드 조각은 현재 C++ 홀로그램 프로젝트 템플릿에서 사용되는 C++17 규격 C++/WinRT 대신 C++/CX를 사용하는 방법을 보여 줍니다. 개념은 C++/WinRT 프로젝트에 해당하지만 코드를 번역해야 합니다.
Windows의 공간 좌표계
Windows의 실제 좌표계를 추론하는 데 사용되는 핵심 형식은 SpatialCoordinateSystem입니다. 이 형식의 instance 임의의 좌표계를 나타내며, 각 좌표계의 세부 정보를 이해하지 않고 두 좌표계 간에 변환하는 데 사용할 수 있는 변환 행렬 데이터를 가져오는 방법을 제공합니다.
공간 정보를 반환하는 메서드는 SpatialCoordinateSystem 매개 변수를 수락하여 이러한 좌표가 반환되는 데 가장 유용한 좌표계를 결정할 수 있도록 합니다. 공간 정보는 사용자 주변의 점, 광선 또는 볼륨으로 표시되며 이러한 좌표의 단위는 항상 미터 단위로 표시됩니다.
SpatialCoordinateSystem은 디바이스의 위치를 나타내는 좌표계를 포함하여 다른 좌표계와 동적 관계를 맺습니다. 디바이스는 언제든지 일부 좌표계를 찾을 수 있고 다른 좌표계는 찾을 수 없습니다. 대부분의 좌표계에서 앱은 해당 좌표계를 배치할 수 없는 기간을 처리할 준비가 되어 있어야 합니다.
애플리케이션은 SpatialCoordinateSystems를 직접 만들면 안 되며, 대신 Perception API를 통해 사용해야 합니다. Perception API에는 세 가지 기본 좌표계 원본이 있으며, 각 소스는 좌표계 페이지에 설명된 개념에 매핑됩니다.
- 고정된 참조 프레임을 가져오려면 SpatialStationaryFrameOfReference 를 만들거나 현재 SpatialStageFrameOfReference에서 하나를 가져옵니다.
- 공간 앵커를 얻으려면 SpatialAnchor를 만듭니다.
- 연결된 참조 프레임을 얻으려면 SpatialLocatorAttachedFrameOfReference를 만듭니다.
이러한 개체에서 반환된 모든 좌표계는 오른손으로, +y 위쪽, 오른쪽에는 +x, 뒤로는 +z입니다. 양수 x 방향으로 왼쪽 또는 오른쪽의 손가락을 가리키고 양수 y 방향으로 컬링하여 양수 z축이 가리키는 방향을 기억할 수 있습니다. 엄지가 가리키는 방향이 해당 좌표계에 대해 양의 z-축이 가리키는 방향입니다. 다음 그림은 이 두 좌표계를 보여 줍니다.
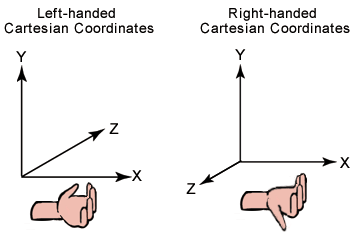
왼쪽 및 오른쪽 좌표계
SpatialLocator 클래스를 사용하여 HoloLens 위치에 따라 SpatialCoordinateSystem으로 부트스트랩하는 연결되거나 고정된 참조 프레임을 만듭니다. 이 프로세스에 대해 자세히 알아보려면 다음 섹션을 계속 진행하세요.
공간 단계를 사용하여 세계에 홀로그램 배치
불투명 Windows Mixed Reality 몰입형 헤드셋의 좌표계는 정적 SpatialStageFrameOfReference::Current 속성을 사용하여 액세스됩니다. 이 API는 다음을 제공합니다.
- 좌표계
- 플레이어가 앉을지 모바일인지에 대한 정보
- 플레이어가 이동식인 경우 산책할 수 있는 안전한 영역의 경계
- 헤드셋이 방향성인지 여부를 나타내는 표시입니다.
- 공간 단계에 대한 업데이트에 대한 이벤트 처리기입니다.
먼저 공간 단계를 가져와서 업데이트를 구독합니다.
공간 단계 초기화를 위한 코드
SpatialStageManager::SpatialStageManager(
    const std::shared_ptr<DX::DeviceResources>& deviceResources,
    const std::shared_ptr<SceneController>& sceneController)
    : m_deviceResources(deviceResources), m_sceneController(sceneController)
{
    // Get notified when the stage is updated.
    m_spatialStageChangedEventToken = SpatialStageFrameOfReference::CurrentChanged +=
        ref new EventHandler<Object^>(std::bind(&SpatialStageManager::OnCurrentChanged, this, _1));

    // Make sure to get the current spatial stage.
    OnCurrentChanged(nullptr);
}
OnCurrentChanged 메서드에서 앱은 공간 단계를 검사하고 플레이어 환경을 업데이트해야 합니다. 이 예제에서는 사용자가 지정한 스테이지 경계 및 시작 위치와 스테이지의 보기 범위 및 이동 속성 범위를 시각화합니다. 또한 스테이지를 제공할 수 없는 경우 자체 고정 좌표계로 대체됩니다.
공간 단계 업데이트에 대한 코드
void SpatialStageManager::OnCurrentChanged(Object^ /*o*/)
{
    // The event notifies us that a new stage is available.
    // Get the current stage.
    m_currentStage = SpatialStageFrameOfReference::Current;

    // Clear previous content.
    m_sceneController->ClearSceneObjects();

    if (m_currentStage != nullptr)
    {
        // Obtain stage geometry.
        auto stageCoordinateSystem = m_currentStage->CoordinateSystem;
        auto boundsVertexArray = m_currentStage->TryGetMovementBounds(stageCoordinateSystem);

        // Visualize the area where the user can move around.
        std::vector<float3> boundsVertices;
        boundsVertices.resize(boundsVertexArray->Length);
        memcpy(boundsVertices.data(), boundsVertexArray->Data, boundsVertexArray->Length * sizeof(float3));
        std::vector<unsigned short> indices = TriangulatePoints(boundsVertices);
        m_stageBoundsShape =
            std::make_shared<SceneObject>(
                    m_deviceResources,
                    reinterpret_cast<std::vector<XMFLOAT3>&>(boundsVertices),
                    indices,
                    XMFLOAT3(DirectX::Colors::SeaGreen),
                    stageCoordinateSystem);
        m_sceneController->AddSceneObject(m_stageBoundsShape);

        // In this sample, we draw a visual indicator for some spatial stage properties.
        // If the view is forward-only, the indicator is a half circle pointing forward - otherwise, it
        // is a full circle.
        // If the user can walk around, the indicator is blue. If the user is seated, it is red.

        // The indicator is rendered at the origin - which is where the user declared the center of the
        // stage to be during setup - above the plane of the stage bounds object.
        float3 visibleAreaCenter = float3(0.f, 0.001f, 0.f);

        // Its shape depends on the look direction range.
        std::vector<float3> visibleAreaIndicatorVertices;
        if (m_currentStage->LookDirectionRange == SpatialLookDirectionRange::ForwardOnly)
        {
            // Half circle for forward-only look direction range.
            visibleAreaIndicatorVertices = CreateCircle(visibleAreaCenter, 0.25f, 9, XM_PI);
        }
        else
        {
            // Full circle for omnidirectional look direction range.
            visibleAreaIndicatorVertices = CreateCircle(visibleAreaCenter, 0.25f, 16, XM_2PI);
        }

        // Its color depends on the movement range.
        XMFLOAT3 visibleAreaColor;
        if (m_currentStage->MovementRange == SpatialMovementRange::NoMovement)
        {
            visibleAreaColor = XMFLOAT3(DirectX::Colors::OrangeRed);
        }
        else
        {
            visibleAreaColor = XMFLOAT3(DirectX::Colors::Aqua);
        }

        std::vector<unsigned short> visibleAreaIndicatorIndices = TriangulatePoints(visibleAreaIndicatorVertices);

        // Visualize the look direction range.
        m_stageVisibleAreaIndicatorShape =
            std::make_shared<SceneObject>(
                    m_deviceResources,
                    reinterpret_cast<std::vector<XMFLOAT3>&>(visibleAreaIndicatorVertices),
                    visibleAreaIndicatorIndices,
                    visibleAreaColor,
                    stageCoordinateSystem);
        m_sceneController->AddSceneObject(m_stageVisibleAreaIndicatorShape);
    }
    else
    {
        // No spatial stage was found.
        // Fall back to a stationary coordinate system.
        auto locator = SpatialLocator::GetDefault();
        if (locator)
        {
            m_stationaryFrameOfReference = locator->CreateStationaryFrameOfReferenceAtCurrentLocation();

            // Render an indicator, so that we know we fell back to a mode without a stage.
            std::vector<float3> visibleAreaIndicatorVertices;
            float3 visibleAreaCenter = float3(0.f, -2.0f, 0.f);
            visibleAreaIndicatorVertices = CreateCircle(visibleAreaCenter, 0.125f, 16, XM_2PI);
            std::vector<unsigned short> visibleAreaIndicatorIndices = TriangulatePoints(visibleAreaIndicatorVertices);
            m_stageVisibleAreaIndicatorShape =
                std::make_shared<SceneObject>(
                    m_deviceResources,
                    reinterpret_cast<std::vector<XMFLOAT3>&>(visibleAreaIndicatorVertices),
                    visibleAreaIndicatorIndices,
                    XMFLOAT3(DirectX::Colors::LightSlateGray),
                    m_stationaryFrameOfReference->CoordinateSystem);
            m_sceneController->AddSceneObject(m_stageVisibleAreaIndicatorShape);
        }
    }
}
스테이지 경계를 정의하는 꼭짓점 집합은 시계 방향으로 제공됩니다. Windows Mixed Reality 셸은 사용자가 접근할 때 경계에 울타리를 그립니다. 하지만 고유한 용도로 걷기 가능한 영역을 삼각형으로 만들 수 있습니다. 다음 알고리즘을 사용하여 스테이지를 삼각형으로 만들 수 있습니다.
공간 단계 삼각화 코드
std::vector<unsigned short> SpatialStageManager::TriangulatePoints(std::vector<float3> const& vertices)
{
    size_t const& vertexCount = vertices.size();

    // Segments of the shape are removed as they are triangularized.
    std::vector<bool> vertexRemoved;
    vertexRemoved.resize(vertexCount, false);
    unsigned int vertexRemovedCount = 0;

    // Indices are used to define triangles.
    std::vector<unsigned short> indices;

    // Decompose into convex segments.
    unsigned short currentVertex = 0;
    while (vertexRemovedCount < (vertexCount - 2))
    {
        // Get next triangle:
        // Start with the current vertex.
        unsigned short index1 = currentVertex;

        // Get the next available vertex.
        unsigned short index2 = index1 + 1;

        // This cycles to the next available index.
        auto CycleIndex = [=](unsigned short indexToCycle, unsigned short stopIndex)
        {
            // Make sure the index does not exceed bounds.
            if (indexToCycle >= unsigned short(vertexCount))
            {
                indexToCycle -= unsigned short(vertexCount);
            }

            while (vertexRemoved[indexToCycle])
            {
                // If the vertex is removed, go to the next available one.
                ++indexToCycle;

                // Make sure the index does not exceed bounds.
                if (indexToCycle >= unsigned short(vertexCount))
                {
                    indexToCycle -= unsigned short(vertexCount);
                }

                // Prevent cycling all the way around.
                // Should not be needed, as we limit with the vertex count.
                if (indexToCycle == stopIndex)
                {
                    break;
                }
            }

            return indexToCycle;
        };
        index2 = CycleIndex(index2, index1);

        // Get the next available vertex after that.
        unsigned short index3 = index2 + 1;
        index3 = CycleIndex(index3, index1);

        // Vertices that may define a triangle inside the 2D shape.
        auto& v1 = vertices[index1];
        auto& v2 = vertices[index2];
        auto& v3 = vertices[index3];

        // If the projection of the first segment (in clockwise order) onto the second segment is
        // positive, we know that the clockwise angle is less than 180 degrees, which tells us
        // that the triangle formed by the two segments is contained within the bounding shape.
        auto v2ToV1 = v1 - v2;
        auto v2ToV3 = v3 - v2;
        float3 normalToV2ToV3 = { -v2ToV3.z, 0.f, v2ToV3.x };
        float projectionOntoNormal = dot(v2ToV1, normalToV2ToV3);
        if (projectionOntoNormal >= 0)
        {
            // Triangle is contained within the 2D shape.

            // Remove peak vertex from the list.
            vertexRemoved[index2] = true;
            ++vertexRemovedCount;

            // Create the triangle.
            indices.push_back(index1);
            indices.push_back(index2);
            indices.push_back(index3);

            // Continue on to the next outer triangle.
            currentVertex = index3;
        }
        else
        {
            // Triangle is a cavity in the 2D shape.
            // The next triangle starts at the inside corner.
            currentVertex = index2;
        }
    }

    indices.shrink_to_fit();
    return indices;
}
고정된 참조 프레임을 사용하여 홀로그램을 세계에 배치합니다.
SpatialStationaryFrameOfReference 클래스는 사용자가 이동할 때 사용자 주변을 기준으로 고정된 상태로 유지되는 참조 프레임을 나타냅니다. 이 참조 프레임은 디바이스 근처에서 좌표를 안정적으로 유지하는 데 우선 순위를 줍니다. SpatialStationaryFrameOfReference의 한 가지 주요 용도는 홀로그램을 렌더링할 때 렌더링 엔진 내에서 기본 월드 좌표계 역할을 하는 것입니다.
SpatialStationaryFrameOfReference를 얻으려면 SpatialLocator 클래스를 사용하고 CreateStationaryFrameOfReferenceAtCurrentLocation을 호출합니다.
Windows Holographic 앱 템플릿 코드에서:
           // The simplest way to render world-locked holograms is to create a stationary reference frame
           // when the app is launched. This is roughly analogous to creating a "world" coordinate system
           // with the origin placed at the device's position as the app is launched.
           referenceFrame = locator.CreateStationaryFrameOfReferenceAtCurrentLocation();
- 고정 참조 프레임은 전체 공간을 기준으로 가장 적합한 위치를 제공하도록 설계되었습니다. 해당 참조 프레임 내의 개별 위치는 약간 드리프트할 수 있습니다. 디바이스가 환경에 대해 자세히 알아보기 때문에 정상입니다.
- 개별 홀로그램의 정확한 배치가 필요한 경우 SpatialAnchor를 사용하여 개별 홀로그램을 실제 세계의 위치에 고정해야 합니다(예: 사용자가 특별한 관심을 나타내는 지점). 앵커 위치는 드리프트되지 않지만 수정할 수 있습니다. 앵커는 수정이 발생한 후 다음 프레임에서 시작하는 수정된 위치를 사용합니다.
공간 앵커를 사용하여 홀로그램을 세계에 배치
공간 앵커 는 홀로그램을 실제 세계의 특정 장소에 배치할 수 있는 좋은 방법이며, 시스템은 앵커가 시간이 지남에 따라 제자리에 유지되도록 합니다. 이 항목에서는 앵커를 만들고 사용하는 방법과 앵커 데이터로 작업하는 방법을 설명합니다.
선택한 SpatialCoordinateSystem 내의 모든 위치 및 방향에서 SpatialAnchor를 만들 수 있습니다. 디바이스는 현재 해당 좌표계를 찾을 수 있어야 하며 시스템이 공간 앵커 제한에 도달하지 않아야 합니다.
정의되면 SpatialAnchor의 좌표계는 초기 위치의 정확한 위치와 방향을 유지하기 위해 지속적으로 조정됩니다. 그런 다음 이 SpatialAnchor를 사용하여 정확한 위치에서 사용자 주변에 고정된 홀로그램을 렌더링할 수 있습니다.
앵커와의 거리가 증가함에 따라 앵커를 제자리에 유지하는 조정의 효과가 확대됩니다. 앵커 원본에서 약 3미터 이상 떨어진 앵커를 기준으로 콘텐츠를 렌더링하지 않아야 합니다.
CoordinateSystem 속성은 장치가 앵커의 정확한 위치를 조정할 때 감속이 적용된 상태에서 앵커를 기준으로 콘텐츠를 배치할 수 있는 좌표계를 가져옵니다.
RawCoordinateSystem 속성 및 해당 RawCoordinateSystemAdjusted 이벤트를 사용하여 이러한 조정을 직접 관리합니다.
공간 앵커 유지 및 공유
SpatialAnchorStore 클래스를 사용하여 SpatialAnchor를 로컬로 유지한 다음, 동일한 HoloLens 디바이스의 향후 앱 세션에서 다시 가져올 수 있습니다.
Azure Spatial Anchors를 사용하여 로컬 SpatialAnchor에서 지속형 클라우드 앵커를 만들 수 있습니다. 그러면 앱이 여러 HoloLens, iOS 및 Android 디바이스에서 찾을 수 있습니다. 여러 디바이스에서 공통 공간 앵커를 공유하면 각 사용자는 동일한 실제 위치에서 해당 앵커를 기준으로 렌더링된 콘텐츠를 실시간으로 볼 수 있습니다.
HoloLens, iOS 및 Android 디바이스에서 비동기 홀로그램 지속성에 Azure Spatial Anchors 를 사용할 수도 있습니다. 지속형 클라우드 공간 앵커를 공유하면 여러 디바이스가 동시에 함께 존재하지 않더라도 시간이 지남에 따라 동일한 지속형 홀로그램을 관찰할 수 있습니다.
HoloLens 앱에서 공유 환경 빌드를 시작하려면 5분 Azure Spatial Anchors HoloLens 빠른 시작을 사용해 보세요.
Azure Spatial Anchors를 사용하여 실행한 후 HoloLens에서 앵커를 만들고 찾을 수 있습니다. Android 및 iOS에서도 연습을 사용할 수 있으므로 모든 디바이스에서 동일한 앵커를 공유할 수 있습니다.
홀로그램 콘텐츠에 대한 SpatialAnchors 만들기
이 코드 샘플에서는 누름 제스처가 검색될 때 앵커를 만들도록 Windows Holographic 앱 템플릿을 수정했습니다. 그런 다음 렌더링 패스 중에 큐브가 앵커에 배치됩니다.
도우미 클래스에서 여러 앵커를 지원하므로 이 코드 샘플을 사용하려는 만큼 큐브를 배치할 수 있습니다.
참고
앵커에 대한 ID는 앱에서 제어하는 ID입니다. 이 예제에서는 앱의 앵커 컬렉션에 현재 저장된 앵커 수에 따라 순차적으로 명명 체계를 만들었습니다.
   // Check for new input state since the last frame.
   SpatialInteractionSourceState^ pointerState = m_spatialInputHandler->CheckForInput();
   if (pointerState != nullptr)
   {
       // Try to get the pointer pose relative to the SpatialStationaryReferenceFrame.
       SpatialPointerPose^ pointerPose = pointerState->TryGetPointerPose(currentCoordinateSystem);
       if (pointerPose != nullptr)
       {
           // When a Pressed gesture is detected, the anchor will be created two meters in front of the user.

           // Get the gaze direction relative to the given coordinate system.
           const float3 headPosition = pointerPose->Head->Position;
           const float3 headDirection = pointerPose->Head->ForwardDirection;

           // The anchor position in the StationaryReferenceFrame.
           static const float distanceFromUser = 2.0f; // meters
           const float3 gazeAtTwoMeters = headPosition + (distanceFromUser * headDirection);

           // Create the anchor at position.
           SpatialAnchor^ anchor = SpatialAnchor::TryCreateRelativeTo(currentCoordinateSystem, gazeAtTwoMeters);

           if ((anchor != nullptr) && (m_spatialAnchorHelper != nullptr))
           {
               // In this example, we store the anchor in an IMap.
               auto anchorMap = m_spatialAnchorHelper->GetAnchorMap();

               // Create an identifier for the anchor.
               String^ id = ref new String(L"HolographicSpatialAnchorStoreSample_Anchor") + anchorMap->Size;

               anchorMap->Insert(id->ToString(), anchor);
           }
       }
   }
SpatialAnchorStore를 비동기적으로 로드하고 캐시합니다.
다음을 포함하여 이 지속성을 처리하는 데 도움이 되는 SampleSpatialAnchorHelper 클래스를 작성하는 방법을 살펴보겠습니다.
- Platform::String 키로 인덱싱된 메모리 내 앵커 컬렉션을 저장합니다.
- 로컬 메모리 내 컬렉션과 별도로 유지되는 시스템의 SpatialAnchorStore에서 앵커를 로드합니다.
- 앱이 이를 선택하면 앵커의 로컬 메모리 내 컬렉션을 SpatialAnchorStore에 저장합니다.
SpatialAnchorStore에 SpatialAnchor 개체를 저장하는 방법은 다음과 같습니다.
클래스가 시작되면 SpatialAnchorStore를 비동기적으로 요청합니다. 여기에는 API가 앵커 저장소를 로드할 때 시스템 I/O가 포함되며, 이 API는 비동기식으로 만들어 I/O가 차단되지 않도록 합니다.
   // Request the spatial anchor store, which is the WinRT object that will accept the imported anchor data.
   return create_task(SpatialAnchorManager::RequestStoreAsync())
       .then([](task<SpatialAnchorStore^> previousTask)
   {
       std::shared_ptr<SampleSpatialAnchorHelper> newHelper = nullptr;

       try
       {
           SpatialAnchorStore^ anchorStore = previousTask.get();

           // Once the SpatialAnchorStore has been loaded by the system, we can create our helper class.

           // Using "new" to access private constructor
           newHelper = std::shared_ptr<SampleSpatialAnchorHelper>(new SampleSpatialAnchorHelper(anchorStore));

           // Now we can load anchors from the store.
           newHelper->LoadFromAnchorStore();
       }
       catch (Exception^ exception)
       {
           PrintWstringToDebugConsole(
               std::wstring(L"Exception while loading the anchor store: ") +
               exception->Message->Data() +
               L"\n"
               );
       }

       // Return the initialized class instance.
       return newHelper;
   });
앵커를 저장하는 데 사용할 수 있는 SpatialAnchorStore가 제공됩니다. Strings인 키 값을 SpatialAnchors인 데이터 값과 연결하는 IMapView입니다. 샘플 코드에서는 도우미 클래스의 public 함수를 통해 액세스할 수 있는 프라이빗 클래스 멤버 변수에 저장합니다.
   SampleSpatialAnchorHelper::SampleSpatialAnchorHelper(SpatialAnchorStore^ anchorStore)
   {
       m_anchorStore = anchorStore;
       m_anchorMap = ref new Platform::Collections::Map<String^, SpatialAnchor^>();
   }
참고
일시 중단/다시 시작 이벤트를 연결하여 앵커 저장소를 저장하고 로드하는 것을 잊지 마세요.
   void HolographicSpatialAnchorStoreSampleMain::SaveAppState()
   {
       // For example, store information in the SpatialAnchorStore.
       if (m_spatialAnchorHelper != nullptr)
       {
           m_spatialAnchorHelper->TrySaveToAnchorStore();
       }
   }
   void HolographicSpatialAnchorStoreSampleMain::LoadAppState()
   {
       // For example, load information from the SpatialAnchorStore.
       LoadAnchorStore();
   }
앵커 저장소에 콘텐츠 저장
시스템에서 앱을 일시 중단하면 앵커 저장소에 공간 앵커를 저장해야 합니다. 앱 구현에 필요한 앵커 저장소를 다른 시간에 저장할 수도 있습니다.
메모리 내 앵커를 SpatialAnchorStore에 저장할 준비가 되면 컬렉션을 반복하고 각 앵커를 저장할 수 있습니다.
   // TrySaveToAnchorStore: Stores all anchors from memory into the app's anchor store.
   //
   // For each anchor in memory, this function tries to store it in the app's AnchorStore. The operation will fail if
   // the anchor store already has an anchor by that name.
   //
   bool SampleSpatialAnchorHelper::TrySaveToAnchorStore()
   {
       // This function returns true if all the anchors in the in-memory collection are saved to the anchor
       // store. If zero anchors are in the in-memory collection, we will still return true because the
       // condition has been met.
       bool success = true;

       // If access is denied, 'anchorStore' will not be obtained.
       if (m_anchorStore != nullptr)
       {
           for each (auto& pair in m_anchorMap)
           {
               auto const& id = pair->Key;
               auto const& anchor = pair->Value;

               // Try to save the anchors.
               if (!m_anchorStore->TrySave(id, anchor))
               {
                   // This may indicate the anchor ID is taken, or the anchor limit is reached for the app.
                   success=false;
               }
           }
       }

       return success;
   }
앱이 다시 시작될 때 앵커 저장소에서 콘텐츠 로드
앵커 저장소의 IMapView에서 앱이 다시 시작될 때 또는 언제든지 SpatialAnchors의 메모리 내 데이터베이스로 앵커 저장소의 저장된 앵커를 전송하여 AnchorStore에서 저장된 앵커를 복원할 수 있습니다.
SpatialAnchorStore에서 앵커를 복원하려면 관심 있는 각 앵커를 고유한 메모리 내 컬렉션으로 복원합니다.
Strings를 만든 SpatialAnchors와 연결하려면 SpatialAnchors의 고유한 메모리 내 데이터베이스가 필요합니다. 샘플 코드에서는 Windows::Foundation::Collections::IMap을 사용하여 앵커를 저장하여 SpatialAnchorStore에 대해 동일한 키와 데이터 값을 쉽게 사용할 수 있도록 합니다.
   // This is an in-memory anchor list that is separate from the anchor store.
   // These anchors may be used, reasoned about, and so on before committing the collection to the store.
   Windows::Foundation::Collections::IMap<Platform::String^, Windows::Perception::Spatial::SpatialAnchor^>^ m_anchorMap;
참고
복원된 앵커는 즉시 찾을 수 없습니다. 예를 들어 별도의 방이나 다른 건물의 앵커일 수 있습니다. AnchorStore에서 검색된 앵커는 이를 사용하기 전에 위치 여부를 테스트해야 합니다.
참고
이 예제 코드에서는 AnchorStore에서 모든 앵커를 검색합니다. 이는 요구 사항이 아닙니다. 앱은 구현에 의미 있는 문자열 키 값을 사용하여 앵커의 특정 하위 집합을 선택하고 선택할 수도 있습니다.
   // LoadFromAnchorStore: Loads all anchors from the app's anchor store into memory.
   //
   // The anchors are stored in memory using an IMap, which stores anchors using a string identifier. Any string can be used as
   // the identifier; it can have meaning to the app, such as "Game_Leve1_CouchAnchor," or it can be a GUID that is generated
   // by the app.
   //
   void SampleSpatialAnchorHelper::LoadFromAnchorStore()
   {
       // If access is denied, 'anchorStore' will not be obtained.
       if (m_anchorStore != nullptr)
       {
           // Get all saved anchors.
           auto anchorMapView = m_anchorStore->GetAllSavedAnchors();
           for each (auto const& pair in anchorMapView)
           {
               auto const& id = pair->Key;
               auto const& anchor = pair->Value;
               m_anchorMap->Insert(id, anchor);
           }
       }
   }
필요한 경우 앵커 저장소 지우기
경우에 따라 앱 상태를 지우고 새 데이터를 작성해야 합니다. SpatialAnchorStore를 사용하여 이 작업을 수행하는 방법은 다음과 같습니다.
도우미 클래스를 사용하면 Clear 함수를 래핑할 필요가 거의 없습니다. 도우미 클래스에는 SpatialAnchorStore instance 소유할 책임이 있으므로 샘플 구현에서 이 작업을 수행하도록 선택합니다.
   // ClearAnchorStore: Clears the AnchorStore for the app.
   //
   // This function clears the AnchorStore. It has no effect on the anchors stored in memory.
   //
   void SampleSpatialAnchorHelper::ClearAnchorStore()
   {
       // If access is denied, 'anchorStore' will not be obtained.
       if (m_anchorStore != nullptr)
       {
           // Clear all anchors from the store.
           m_anchorStore->Clear();
       }
   }
예: 고정 참조 프레임 좌표계에 앵커 좌표계 연결
앵커가 있고 앵커의 좌표계에 있는 항목을 다른 콘텐츠에 이미 사용 중인 SpatialStationaryReferenceFrame과 연결하려고 합니다. TryGetTransformTo를 사용하여 앵커의 좌표계에서 고정 참조 프레임의 변환을 가져올 수 있습니다.
   // In this code snippet, someAnchor is a SpatialAnchor^ that has been initialized and is valid in the current environment.
   float4x4 anchorSpaceToCurrentCoordinateSystem;
   SpatialCoordinateSystem^ anchorSpace = someAnchor->CoordinateSystem;
   const auto tryTransform = anchorSpace->TryGetTransformTo(currentCoordinateSystem);
   if (tryTransform != nullptr)
   {
       anchorSpaceToCurrentCoordinateSystem = tryTransform->Value;
   }
이 프로세스는 다음 두 가지 방법으로 유용합니다.
- 두 참조 프레임을 서로 상대적으로 이해할 수 있는지를 알려 줍니다.
- 이 경우 한 좌표계에서 다른 좌표계로 직접 이동하는 변환을 제공합니다.
이 정보를 사용하면 두 참조 프레임 간의 개체 간의 공간 관계를 이해할 수 있습니다.
렌더링의 경우 원래 참조 프레임 또는 앵커에 따라 개체를 그룹화하여 더 나은 결과를 얻을 수 있습니다. 각 그룹에 대해 별도의 그리기 패스를 수행합니다. 뷰 행렬은 처음에 동일한 좌표계를 사용하여 만든 모델 변환이 있는 개체에 대해 더 정확합니다.
디바이스 연결 참조 프레임을 사용하여 홀로그램 만들기
디바이스의 위치에 연결된 상태로 유지 되는 홀로그램을 렌더링하려는 경우가 있습니다(예: 디버깅 정보가 있는 패널 또는 정보 메시지). 이를 위해 연결된 참조 프레임을 사용합니다.
SpatialLocatorAttachedFrameOfReference 클래스는 실제가 아닌 디바이스를 기준으로 하는 좌표계를 정의합니다. 이 프레임에는 참조 프레임을 만들 때 사용자가 향하고 있던 방향을 가리키는 사용자 주변을 기준으로 고정된 제목이 있습니다. 그 때부터 이 참조 프레임의 모든 방향은 사용자가 디바이스를 회전하는 경우에도 해당 고정 제목을 기준으로 합니다.
HoloLens의 경우 이 프레임의 좌표계 원점은 사용자의 머리 회전 중앙에 있으므로 해당 위치가 헤드 회전의 영향을 받지 않습니다. 앱은 이 지점을 기준으로 오프셋을 지정하여 홀로그램을 사용자 앞에 배치할 수 있습니다.
SpatialLocatorAttachedFrameOfReference를 얻으려면 SpatialLocator 클래스를 사용하고 CreateAttachedFrameOfReferenceAtCurrentHeading을 호출합니다.
이는 Windows Mixed Reality 디바이스의 전체 범위에 적용됩니다.
디바이스에 연결된 참조 프레임 사용
이 섹션에서는 이 API를 사용하여 디바이스 연결 참조 프레임을 사용하도록 설정하기 위해 Windows Holographic 앱 템플릿에서 변경된 내용에 대해 설명합니다. 이 "연결된" 홀로그램은 고정 또는 고정된 홀로그램과 함께 작동하며, 디바이스가 일시적으로 세계에서 위치를 찾을 수 없는 경우에도 사용할 수 있습니다.
먼저 SpatialStationaryFrameOfReference 대신 SpatialLocatorAttachedFrameOfReference를 저장하도록 템플릿을 변경했습니다.
HolographicTagAlongSampleMain.h에서:
   // A reference frame attached to the holographic camera.
   Windows::Perception::Spatial::SpatialLocatorAttachedFrameOfReference^   m_referenceFrame;
HolographicTagAlongSampleMain.cpp에서:
   // In this example, we create a reference frame attached to the device.
   m_referenceFrame = m_locator->CreateAttachedFrameOfReferenceAtCurrentHeading();
업데이트하는 동안 이제 프레임 예측을 사용하여 에서 가져온 타임스탬프를 통해 좌표계를 가져옵니다.
   // Next, we get a coordinate system from the attached frame of reference that is
   // associated with the current frame. Later, this coordinate system is used for
   // for creating the stereo view matrices when rendering the sample content.
   SpatialCoordinateSystem^ currentCoordinateSystem =
       m_referenceFrame->GetStationaryCoordinateSystemAtTimestamp(prediction->Timestamp);
공간 포인터 포즈를 취하고 사용자의 응시를 따릅니다.
홀로그램 셸이 사용자의 응시를 따를 수 있는 방법과 유사하게 예제 홀로그램이 사용자의 응시를 따르도록 합니다. 이를 위해 동일한 타임스탬프에서 SpatialPointerPose를 가져와야 합니다.
SpatialPointerPose^ pose = SpatialPointerPose::TryGetAtTimestamp(currentCoordinateSystem, prediction->Timestamp);
이 SpatialPointerPose에는 사용자의 현재 제목에 따라 홀로그램을 배치하는 데 필요한 정보가 있습니다.
사용자 편의를 위해 선형 보간("lerp")을 사용하여 일정 기간 동안 위치 변경을 원활하게 수행합니다. 홀로그램을 응시에 잠그는 것보다 사용자에게 더 편안합니다. 태그를 따라 홀로그램의 위치를 내포하면 움직임을 약화시켜 홀로그램을 안정시킬 수 있습니다. 이 댐핑을 수행하지 않은 경우 일반적으로 사용자 머리의 눈에 띄지 않는 움직임으로 간주되기 때문에 사용자에게 홀로그램 지터가 표시됩니다.
StationaryQuadRenderer::P ositionHologram에서:
   const float& dtime = static_cast<float>(timer.GetElapsedSeconds());

   if (pointerPose != nullptr)
   {
       // Get the gaze direction relative to the given coordinate system.
       const float3 headPosition  = pointerPose->Head->Position;
       const float3 headDirection = pointerPose->Head->ForwardDirection;

       // The tag-along hologram follows a point 2.0m in front of the user's gaze direction.
       static const float distanceFromUser = 2.0f; // meters
       const float3 gazeAtTwoMeters = headPosition + (distanceFromUser * headDirection);

       // Lerp the position, to keep the hologram comfortably stable.
       auto lerpedPosition = lerp(m_position, gazeAtTwoMeters, dtime * c_lerpRate);

       // This will be used as the translation component of the hologram's
       // model transform.
       SetPosition(lerpedPosition);
   }
참고
디버깅 패널의 경우 보기를 방해하지 않도록 홀로그램의 위치를 약간 옆으로 변경하도록 선택할 수 있습니다. 이 작업을 수행하는 방법의 예는 다음과 같습니다.
StationaryQuadRenderer::P ositionHologram의 경우:
       // If you're making a debug view, you might not want the tag-along to be directly in the
       // center of your field of view. Use this code to position the hologram to the right of
       // the user's gaze direction.
       /*
       const float3 offset = float3(0.13f, 0.0f, 0.f);
       static const float distanceFromUser = 2.2f; // meters
       const float3 gazeAtTwoMeters = headPosition + (distanceFromUser * (headDirection + offset));
       */
홀로그램을 회전하여 카메라를 향하게 합니다.
홀로그램을 배치하는 것만으로는 충분하지 않습니다. 이 경우 쿼드입니다. 또한 사용자를 향하도록 개체를 회전해야 합니다. 이 회전은 세계 공간에서 발생합니다. 이러한 유형의 광고판은 홀로그램이 사용자 환경의 일부로 남을 수 있기 때문입니다. 홀로그램이 디스플레이 방향에 잠기므로 보기 공간 광고판은 그다지 편안하지 않습니다. 이 경우 스테레오 렌더링을 방해하지 않는 뷰 공간 광고판 변환을 가져오려면 왼쪽 및 오른쪽 보기 행렬을 보간해야 합니다. 여기서는 X 및 Z 축을 회전하여 사용자를 향합니다.
StationaryQuadRenderer::Update에서:
   // Seconds elapsed since previous frame.
   const float& dTime = static_cast<float>(timer.GetElapsedSeconds());

   // Create a direction normal from the hologram's position to the origin of person space.
   // This is the z-axis rotation.
   XMVECTOR facingNormal = XMVector3Normalize(-XMLoadFloat3(&m_position));

   // Rotate the x-axis around the y-axis.
   // This is a 90-degree angle from the normal, in the xz-plane.
   // This is the x-axis rotation.
   XMVECTOR xAxisRotation = XMVector3Normalize(XMVectorSet(XMVectorGetZ(facingNormal), 0.f, -XMVectorGetX(facingNormal), 0.f));

   // Create a third normal to satisfy the conditions of a rotation matrix.
   // The cross product  of the other two normals is at a 90-degree angle to
   // both normals. (Normalize the cross product to avoid floating-point math
   // errors.)
   // Note how the cross product will never be a zero-matrix because the two normals
   // are always at a 90-degree angle from one another.
   XMVECTOR yAxisRotation = XMVector3Normalize(XMVector3Cross(facingNormal, xAxisRotation));

   // Construct the 4x4 rotation matrix.

   // Rotate the quad to face the user.
   XMMATRIX rotationMatrix = XMMATRIX(
       xAxisRotation,
       yAxisRotation,
       facingNormal,
       XMVectorSet(0.f, 0.f, 0.f, 1.f)
       );

   // Position the quad.
   const XMMATRIX modelTranslation = XMMatrixTranslationFromVector(XMLoadFloat3(&m_position));

   // The view and projection matrices are provided by the system; they are associated
   // with holographic cameras, and updated on a per-camera basis.
   // Here, we provide the model transform for the sample hologram. The model transform
   // matrix is transposed to prepare it for the shader.
   XMStoreFloat4x4(&m_modelConstantBufferData.model, XMMatrixTranspose(rotationMatrix * modelTranslation));
연결된 홀로그램 렌더링
이 예제에서는 홀로그램을 배치한 SpatialLocatorAttachedReferenceFrame의 좌표계에서 홀로그램을 렌더링하도록 선택합니다. (다른 좌표계를 사용하여 렌더링하기로 결정한 경우 디바이스 연결 참조 프레임의 좌표계에서 해당 좌표계로 변환을 가져와야 합니다.)
HolographicTagAlongSampleMain::Render에서:
   // The view and projection matrices for each holographic camera will change
   // every frame. This function refreshes the data in the constant buffer for
   // the holographic camera indicated by cameraPose.
   pCameraResources->UpdateViewProjectionBuffer(
       m_deviceResources,
       cameraPose,
       m_referenceFrame->GetStationaryCoordinateSystemAtTimestamp(prediction->Timestamp)
       );
이것으로 끝입니다. 홀로그램은 이제 사용자의 응시 방향 앞에 2미터인 위치를 "추적"합니다.
참고
이 예제에서는 추가 콘텐츠도 로드합니다. StationaryQuadRenderer.cpp를 참조하세요.
추적 손실 처리
디바이스가 세계에서 자신을 찾을 수 없는 경우 앱은 "손실 추적"을 경험합니다. Windows Mixed Reality 앱은 위치 추적 시스템에 대한 이러한 중단을 처리할 수 있어야 합니다. 기본 SpatialLocator에서 LocatabilityChanged 이벤트를 사용하여 이러한 중단을 관찰하고 응답을 만들 수 있습니다.
AppMain::SetHolographicSpace에서:
   // Be able to respond to changes in the positional tracking state.
   m_locatabilityChangedToken =
       m_locator->LocatabilityChanged +=
           ref new Windows::Foundation::TypedEventHandler<SpatialLocator^, Object^>(
               std::bind(&HolographicApp1Main::OnLocatabilityChanged, this, _1, _2)
               );
앱이 LocatabilityChanged 이벤트를 받으면 필요에 따라 동작을 변경할 수 있습니다. 예를 들어 PositionalTrackingInhibited 상태에서 앱은 정상 작업을 일시 중지하고 경고 메시지를 표시하는 태그를 따라 홀로그램 을 렌더링할 수 있습니다.
Windows Holographic 앱 템플릿에는 이미 만들어진 LocatabilityChanged 처리기가 함께 제공됩니다. 기본적으로 위치 추적을 사용할 수 없는 경우 디버그 콘솔에 경고가 표시됩니다. 이 처리기에 코드를 추가하여 앱에서 필요에 따라 응답을 제공할 수 있습니다.
AppMain.cpp에서:
   void HolographicApp1Main::OnLocatabilityChanged(SpatialLocator^ sender, Object^ args)
   {
       switch (sender->Locatability)
       {
       case SpatialLocatability::Unavailable:
           // Holograms cannot be rendered.
           {
               String^ message = L"Warning! Positional tracking is " +
                                           sender->Locatability.ToString() + L".\n";
               OutputDebugStringW(message->Data());
           }
           break;

       // In the following three cases, it is still possible to place holograms using a
       // SpatialLocatorAttachedFrameOfReference.
       case SpatialLocatability::PositionalTrackingActivating:
           // The system is preparing to use positional tracking.

       case SpatialLocatability::OrientationOnly:
           // Positional tracking has not been activated.

       case SpatialLocatability::PositionalTrackingInhibited:
           // Positional tracking is temporarily inhibited. User action may be required
           // in order to restore positional tracking.
           break;

       case SpatialLocatability::PositionalTrackingActive:
           // Positional tracking is active. World-locked content can be rendered.
           break;
       }
   }
공간 매핑
공간 매핑 API는 좌표계를 사용하여 표면 메시에 대한 모델 변환을 가져옵니다.