Tutorial: Enable users to unlock their account or reset passwords using Microsoft Entra self-service password reset
Microsoft Entra self-service password reset (SSPR) gives users the ability to change or reset their password, with no administrator or help desk involvement. If Microsoft Entra ID locks a user's account or they forget their password, they can follow prompts to unblock themselves and get back to work. This ability reduces help desk calls and loss of productivity when a user can't sign in to their device or an application. We recommend this video on How to enable and configure SSPR in Microsoft Entra ID. We also have a video for IT administrators on resolving the six most common end-user error messages with SSPR.
Important
This tutorial shows an administrator how to enable self-service password reset. If you're an end user already registered for self-service password reset and need to get back into your account, go to the Microsoft Online password reset page.
If your IT team hasn't enabled the ability to reset your own password, reach out to your helpdesk for additional assistance.
In this tutorial you learn how to:
- Enable self-service password reset for a group of Microsoft Entra users
- Set up authentication methods and registration options
- Test the SSPR process as a user
Important
In March 2023, we announced the deprecation of managing authentication methods in the legacy multifactor authentication and self-service password reset (SSPR) policies. Beginning September 30, 2025, authentication methods can't be managed in these legacy MFA and SSPR policies. We recommend customers use the manual migration control to migrate to the Authentication methods policy by the deprecation date.
Video tutorial
You can also follow along in a related video: How to enable and configure SSPR in Microsoft Entra ID.
Prerequisites
To finish this tutorial, you need the following resources and privileges:
- A working Microsoft Entra tenant with at least a Microsoft Entra ID P1 license is required for password reset. For more information about license requirements for password change and password reset in Microsoft Entra ID, see Licensing requirements for Microsoft Entra self-service password reset.
- An account with at least the Authentication Policy Administrator role.
- A non-administrator user with a password you know, like testuser. You'll test the end-user SSPR experience using this account in this tutorial.
- If you need to create a user, see Quickstart: Add new users to Microsoft Entra ID.
- A group that the non-administrator user is a member of, likes SSPR-Test-Group. You'll enable SSPR for this group in this tutorial.
- If you need to create a group, see Create a basic group and add members using Microsoft Entra ID.
Enable self-service password reset
Tip
Steps in this article might vary slightly based on the portal you start from.
Microsoft Entra ID lets you enable SSPR for None, Selected, or All users. This granular ability lets you choose a subset of users to test the SSPR registration process and workflow. When you're comfortable with the process and the time is right to communicate the requirements with a broader set of users, you can select a group of users to enable for SSPR. Or, you can enable SSPR for everyone in the Microsoft Entra tenant.
Note
Currently, you can only enable one Microsoft Entra group for SSPR using the Microsoft Entra admin center. As part of a wider deployment of SSPR, Microsoft Entra ID supports nested groups.
In this tutorial, set up SSPR for a set of users in a test group. Use the SSPR-Test-Group and provide your own Microsoft Entra group as needed:
Sign in to the Microsoft Entra admin center as at least an Authentication Policy Administrator.
Browse to Protection > Password reset from the menu on the left side.
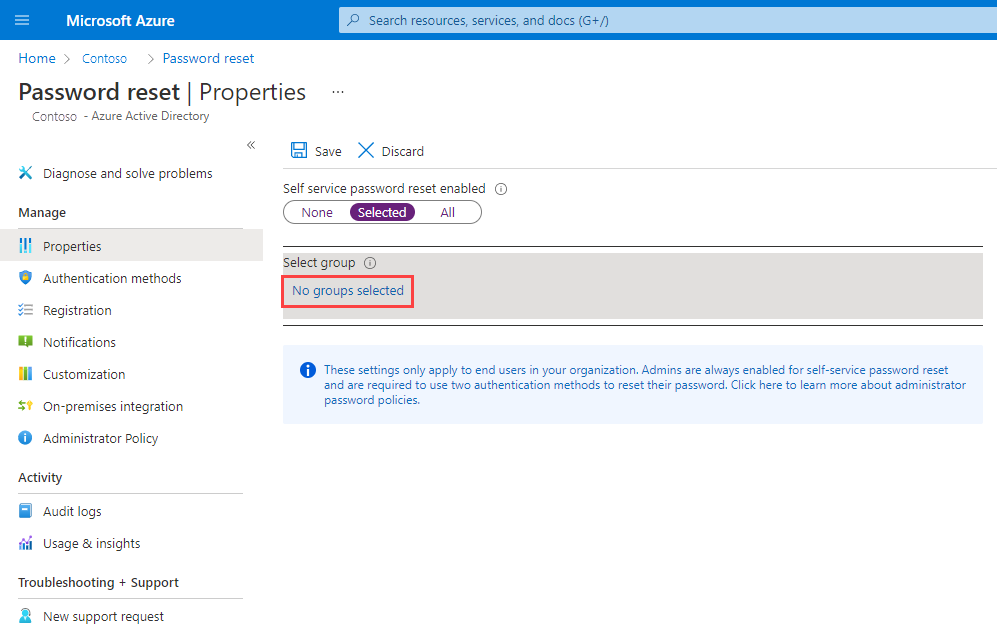
From the Properties page, under the option Self service password reset enabled, choose Selected.
If your group isn't visible, choose No groups selected, browse for and select your Microsoft Entra group, like SSPR-Test-Group, and then choose Select.
To enable SSPR for the select users, select Save.
Select authentication methods and registration options
When users need to unlock their account or reset their password, they're prompted for another confirmation method. This extra authentication factor makes sure that Microsoft Entra ID finished only approved SSPR events. You can choose which authentication methods to allow, based on the registration information the user provides.
From the menu on the left side of the Authentication methods page, set the Number of methods required to reset to 2.
To improve security, you can increase the number of authentication methods required for SSPR.
Choose the Methods available to users that your organization wants to allow. For this tutorial, check the boxes to enable the following methods:
- Mobile app notification
- Mobile app code
- Mobile phone
You can enable other authentication methods, like Office phone or Security questions, as needed to fit your business requirements.
To apply the authentication methods, select Save.
Before users can unlock their account or reset a password, they must register their contact information. Microsoft Entra ID uses this contact information for the different authentication methods set up in the previous steps.
An administrator can manually provide this contact information, or users can go to a registration portal to provide the information themselves. In this tutorial, set up Microsoft Entra ID to prompt the users for registration the next time they sign in.
From the menu on the left side of the Registration page, select Yes for Require users to register when signing in.
Set Number of days before users are asked to reconfirm their authentication information to 180.
It's important to keep the contact information up to date. If outdated contact information exists when an SSPR event starts, the user may not be able to unlock their account or reset their password.
To apply the registration settings, select Save.
Note
The interruption to request to register contact information during signing in, will only occur, if the conditions configured on the settings are met, and will only apply to users and admin accounts that are enabled to reset passwords using Microsoft Entra self-service password reset.
Set up notifications and customizations
To keep users informed about account activity, you can set up Microsoft Entra ID to send email notifications when an SSPR event happens. These notifications can cover both regular user accounts and admin accounts. For admin accounts, this notification provides another layer of awareness when a privileged administrator account password is reset using SSPR. Microsoft Entra ID can notify all Administrators when someone uses SSPR on an admin account.
From the menu on the left side of the Notifications page, set up the following options:
- Set Notify users on password resets? option to Yes.
- Set Notify all admins when other admins reset their password? to Yes.
To apply the notification preferences, select Save.
If users need more help with the SSPR process, you can customize the "Contact your administrator" link. The user can select this link in the SSPR registration process and when they unlock their account or resets their password. To make sure your users get the support needed, we recommend you provide a custom helpdesk email or URL.
- From the menu on the left side of the Customization page, set Customize helpdesk link to Yes.
- In the Custom helpdesk email or URL field, provide an email address or web page URL where your users can get more help from your organization, like https://support.contoso.com/
- To apply the custom link, select Save.
Test self-service password reset
With SSPR enabled and set up, test the SSPR process with a user that's part of the group you selected in the previous section, like Test-SSPR-Group. The following example uses the testuser account. Provide your own user account. It's part of the group you enabled for SSPR in the first section of this tutorial.
Note
When you test self-service password reset, use a non-administrator account. By default, Microsoft Entra ID enables self-service password reset for admins. They're required to use two authentication methods to reset their password. For more information, see Administrator reset policy differences.
To see the manual registration process, open a new browser window in InPrivate or incognito mode, and browse to https://aka.ms/ssprsetup. Microsoft Entra ID will direct users to this registration portal when they sign in next time.
Sign in with a non-administrator test user, like testuser, and register your authentication methods contact information.
Once finished, select the button marked Looks good and close the browser window.
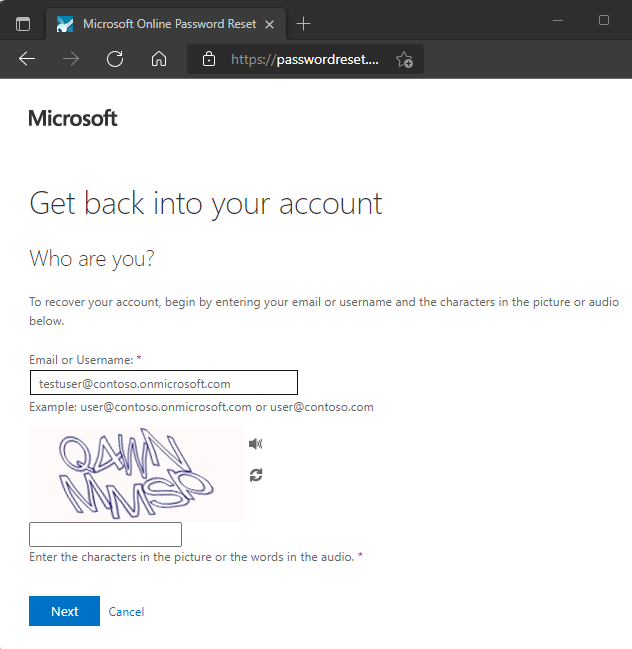
Open a new browser window in InPrivate or incognito mode, and browse to https://aka.ms/sspr.
Enter your non-administrator test users' account information, like testuser, the characters from the CAPTCHA, and then select Next.

Follow the verification steps to reset your password. When finished, you'll receive an email notification that your password was reset.
Clean up resources
In a later tutorial in this series, you'll set up password writeback. This feature writes password changes from Microsoft Entra SSPR back to an on-premises AD environment. If you want to continue with this tutorial series to set up password writeback, don't disable SSPR now.
If you no longer want to use the SSPR functionality you have set up as part of this tutorial, set the SSPR status to None using the following steps:
- Sign in to the Microsoft Entra admin center as at least an Authentication Policy Administrator.
- Browse to Protection > Password reset.
- From the Properties page, under the option Self service password reset enabled, select None.
- To apply the SSPR change, select Save.
FAQs
This section explains common questions from administrators and end-users who try SSPR:
Why aren't on-premises password policies displayed during SSPR?
At this time, Microsoft Entra Connect and cloud sync don't support sharing password policy details with the cloud. SSPR only displays the cloud password policy details, and can't show on-premises policies.
Why do federated users wait up to 2 minutes after they see Your password has been reset before they can use passwords that are synchronized from on-premises?
For federated users whose passwords are synchronized, the source of authority for the passwords is on-premises. As a result, SSPR updates only the on-premises passwords. Password hash synchronization back to Microsoft Entra ID is scheduled for every 2 minutes.
When a newly created user who is pre-populated with SSPR data such as phone and email visits the SSPR registration page, Don’t lose access to your account! appears as the title of the page. Why don't other users who have SSPR data pre-populated see the message?
A user who sees Don’t lose access to your account! is a member of SSPR/combined registration groups that are configured for the tenant. Users who don’t see Don’t lose access to your account! were not part of the SSPR/combined registration groups.
When some users go through SSPR process and reset their password, why don't they see the password strength indicator?
Users who don’t see weak/strong password strength have synchronized password writeback enabled. Since SSPR can’t determine the password policy of the customer’s on-premises environment, it cannot validate password strength or weakness.
Next steps
In this tutorial, you enabled Microsoft Entra self-service password reset for a selected group of users. You learned how to:
- Enable self-service password reset for a group of Microsoft Entra users
- Set up authentication methods and registration options
- Test the SSPR process as a user
