Create a new Git branch
Azure DevOps Services | Azure DevOps Server 2022 - Azure DevOps Server 2019
Visual Studio 2019 | Visual Studio 2022
The first commit in a new Git repo is the start of the main branch. As you work in the main branch, you make commits to record your work in that branch. Branching in Git occurs when you create a new line of development that diverges from a prior branch. You might choose to create a new branch to develop and test a new feature before adding it to your main branch. The recommended Git workflow is to use a new branch for every feature or bugfix. When you switch between branches, Git almost instantly switches the version of your repo files to match the branch you selected. Your commits are always saved to the current branch, and are isolated from commits in other branches.
For an overview of the Git workflow, see Azure Repos Git tutorial.
Prerequisites
| Category | Requirements |
|---|---|
| Project access | Member of a project. |
| Permissions | - View code in private projects: At least Basic access. - Clone or contribute to code in private projects: Member of the Contributors security group or corresponding permissions in the project. - Set branch or repository permissions: Manage permissions permissions for the branch or repository. - Change default branch: Edit policies permissions for the repository. - Import a repository: Member of the Project Administrators security group or Git project-level Create repository permission set to Allow. For more information, see Set Git repository permissions. |
| Services | Repos enabled. |
| Tools | Optional. Use az repos commands: Azure DevOps CLI. |
Note
In public projects, users with Stakeholder access have full access to Azure Repos, including viewing, cloning, and contributing to code.
| Category | Requirements |
|---|---|
| Project access | Member of a project. |
| Permissions | - View code: At least Basic access. - Clone or contribute to code: Member of the Contributors security group or corresponding permissions in the project. |
| Services | Repos enabled. |
Create a new branch
Note
Branch names can't contain ASCII control characters, such as spaces, tildes, and colons. It's common practice to use lowercase characters and to separate words with a hyphen. Forward slashes can be used to group branches. Branch name length shouldn't exceed 250 ASCII characters. To avoid ambiguity between branch names and commit hashes, don't use branch names that consist of 40 hexadecimal characters. For more information on branch naming, see git-check-ref-format and Git cross-platform compatibility.
- Browser
- Visual Studio 2022
- Visual Studio 2019 - Git menu
- Visual Studio 2019 - Team Explorer
- Git Command Line
You can create branches in Azure Repos Git repos, GitHub repos, or other hosted Git repos.
Azure Repos
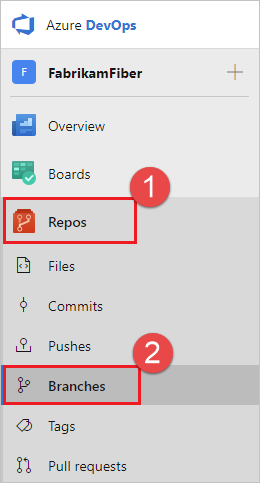
From your web browser, open the team project for your Azure DevOps organization, and then choose Repos > Branches to open the Branches view.

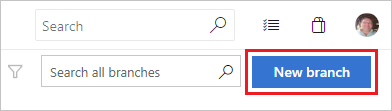
In the Branches view, choose New branch to launch the Create a branch dialog.

In the Create a branch dialog, enter a unique new branch name, select a base branch for your new branch, optionally link work items, and then choose Create.

Your new branch shows up in the branch list.

GitHub
From your web browser, navigate to the main page of your GitHub repo, select a base branch to launch the Switch branches/tags dialog, enter a unique new branch name, and then choose Create branch.

The main page of your repo now shows the files in your new branch.

View your repo's branches by selecting Repos > Branches while viewing your repo on the web.
Select New branch in the upper-right corner of the page.
In the Create a branch dialog box, enter a name for your new branch, select a branch to base the work off of, and associate any work items.

Select Create branch.
Tip
After you've created a remote branch, you can fetch it into your local Git repo. At the command prompt, run:
git fetch
git switch <remote branch name>


