Share your code in Git using Eclipse
Azure DevOps Services | Azure DevOps Server 2022 - Azure DevOps Server 2019
Share your Eclipse project with your team in an Azure DevOps Services/TFS Git repo.
Prerequisites
| Category | Requirements |
|---|---|
| Project access | Member of a project. |
| Permissions | - View code in private projects: At least Basic access. - Clone or contribute to code in private projects: Member of the Contributors security group or corresponding permissions in the project. - Set branch or repository permissions: Manage permissions permissions for the branch or repository. - Change default branch: Edit policies permissions for the repository. - Import a repository: Member of the Project Administrators security group or Git project-level Create repository permission set to Allow. For more information, see Set Git repository permissions. |
| Services | Repos enabled. |
| Tools | Optional. Use az repos commands: Azure DevOps CLI. |
Note
In public projects, users with Stakeholder access have full access to Azure Repos, including viewing, cloning, and contributing to code.
| Category | Requirements |
|---|---|
| Project access | Member of a project. |
| Permissions | - View code: At least Basic access. - Clone or contribute to code: Member of the Contributors security group or corresponding permissions in the project. |
| Services | Repos enabled. |
Use Team Explorer Everywhere
Team Explorer Everywhere is an open-source Eclipse plug-in to connect Eclipse to Azure DevOps Services or Team Foundation Server. If you're working with Azure DevOps Services/TFS and Eclipse, use this plugin to connect to your repos, builds, and work items.
Note
The Team Explorer Everywhere plug-in works with Eclipse versions 4.2 (Juno) - 4.6 (Neon).
Add the Team Explorer Everywhere view in Eclipse. Go to Window, Show View and select Other... Search for Team Explorer, select the Team Explorer view, and select OK.

Connect to Azure DevOps Services
In the Team Explorer Everywhere view, select Connect to VSTS or a Team Foundation Server .

If you know your Azure DevOps Services or Team Foundation Server account URL, select the Servers... button under Connect to a Team Foundation Server or Azure DevOps organization to add your TFS server or account to the drop-down list. If you don't know your account information for Azure DevOps Services, select Browse Visual Studio Services and select Next.

Either choice will prompt for your credentials before continuing further.
Select the project where you will share your code from the Project Selection dialog and select Finish.
Create a local Git repo for your Eclipse project
Before you can push your project to Azure Repos, you need to add it to a local Git repo.
Note
If your code is already in a local Git repo, you can skip this step.
With your project open in Eclipse, right-click the project name in Project Explorer and select Team, Share Project... Select Git and select Next.
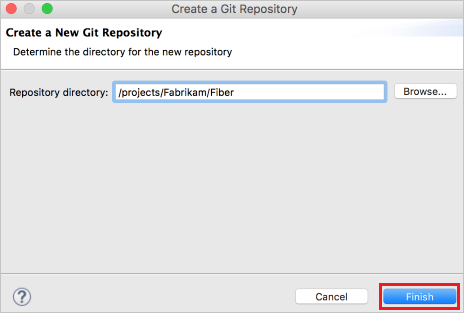
Select Create... from the Configure Git Repository window and choose a folder for your local Git repo. Select Finish.
Right-click your project in Project Explorer and select Team, Commit.... Stage your changes by dragging your files to the Staged Changes field, enter a commit message, then select Commit.

Push your project to your Azure DevOps Services/TFS repo
In Team Explorer Everywhere, select Git Repositories, then right-click the empty repo you want to push your Eclipse project to and select Copy Clone URL. If you don't have an empty Git repo created in Azure DevOps Services/TFS yet, you can create one using these instructions.

In Package Explorer, right-click your project and Select Team, Push Branch ... . Paste the clone URL from the clipboard into the URI field and select Next. Make sure Configure upstream for push and pull is selected in the next window and select Next.

Review the changes and select Finish in the Push Branch window.
Your project code is now in your Git repo.
Troubleshooting
What if the Git views for commit and push don't show up?
You can download EGit to use Git with Eclipse.