Designer Table Splitting
This walkthrough shows how to map multiple entity types to a single table by modifying a model with the Entity Framework Designer (EF Designer).
One reason you may want to use table splitting is delaying the loading of some properties when using lazy loading to load your objects. You can separate the properties that might contain very large amount of data into a separate entity and only load it when required.
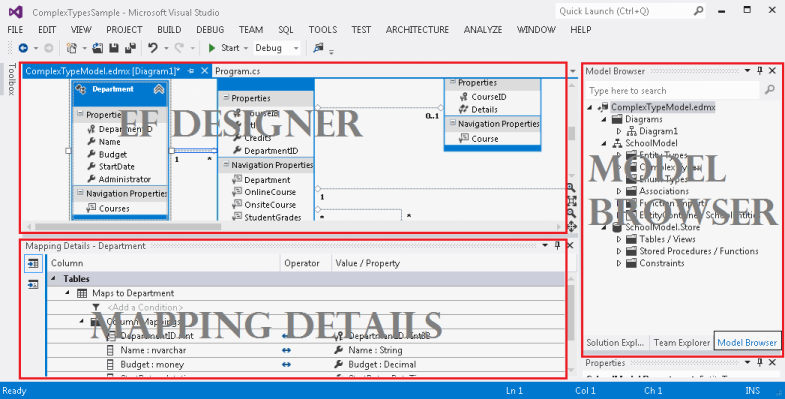
The following image shows the main windows that are used when working with the EF Designer.

Prerequisites
To complete this walkthrough, you will need:
- A recent version of Visual Studio.
- The School sample database.
Set up the Project
This walkthrough is using Visual Studio 2012.
- Open Visual Studio 2012.
- On the File menu, point to New, and then click Project.
- In the left pane, click Visual C#, and then select the Console Application template.
- Enter TableSplittingSample as the name of the project and click OK.
Create a Model based on the School Database
- Right-click the project name in Solution Explorer, point to Add, and then click New Item.
- Select Data from the left menu and then select ADO.NET Entity Data Model in the Templates pane.
- Enter TableSplittingModel.edmx for the file name, and then click Add.
- In the Choose Model Contents dialog box, select Generate from database, and then click Next.
- Click New Connection. In the Connection Properties dialog box, enter the server name (for example, (localdb)\mssqllocaldb), select the authentication method, type School for the database name, and then click OK. The Choose Your Data Connection dialog box is updated with your database connection setting.
- In the Choose Your Database Objects dialog box, unfold the Tables node and check the Person table. This will add the specified table to the School model.
- Click Finish.
The Entity Designer, which provides a design surface for editing your model, is displayed. All the objects that you selected in the Choose Your Database Objects dialog box are added to the model.
Map Two Entities to a Single Table
In this section you will split the Person entity into two entities and then map them to a single table.
Note
The Person entity does not contain any properties that may contain large amount of data; it is just used as an example.
- Right-click an empty area of the design surface, point to Add New, and click Entity. The New Entity dialog box appears.
- Type HireInfo for the Entity name and PersonID for the Key Property name.
- Click OK.
- A new entity type is created and displayed on the design surface.
- Select the HireDate property of the Person entity type and press Ctrl+X keys.
- Select the HireInfo entity and press Ctrl+V keys.
- Create an association between Person and HireInfo. To do this, right-click an empty area of the design surface, point to Add New, and click Association.
- The Add Association dialog box appears. The PersonHireInfo name is given by default.
- Specify multiplicity 1(One) on both ends of the relationship.
- Press OK.
The next step requires the Mapping Details window. If you cannot see this window, right-click the design surface and select Mapping Details.
Select the HireInfo entity type and click <Add a Table or View> in the Mapping Details window.
Select Person from the <Add a Table or View> field drop-down list. The list contains tables or views to which the selected entity can be mapped. The appropriate properties should be mapped by default.

Select the PersonHireInfo association on the design surface.
Right-click the association on the design surface and select Properties.
In the Properties window, select the Referential Constraints property and click the ellipses button.
Select Person from the Principal drop-down list.
Press OK.
Use the Model
- Paste the following code in the Main method.
    using (var context = new SchoolEntities())
    {
        Person person = new Person()
        {
            FirstName = "Kimberly",
            LastName = "Morgan",
            Discriminator = "Instructor",
        };

        person.HireInfo = new HireInfo()
        {
            HireDate = DateTime.Now
        };

        // Add the new person to the context.
        context.People.Add(person);

        // Insert a row into the Person table.
        context.SaveChanges();

        // Execute a query against the Person table.
        // The query returns columns that map to the Person entity.
        var existingPerson = context.People.FirstOrDefault();

        // Execute a query against the Person table.
        // The query returns columns that map to the Instructor entity.
        var hireInfo = existingPerson.HireInfo;

        Console.WriteLine("{0} was hired on {1}",
            existingPerson.LastName, hireInfo.HireDate);
    }
- Compile and run the application.
The following T-SQL statements were executed against the School database as a result of running this application.
The following INSERT was executed as a result of executing context.SaveChanges() and combines data from the Person and HireInfo entities

The following SELECT was executed as a result of executing context.People.FirstOrDefault() and selects just the columns mapped to Person

The following SELECT was executed as a result of accessing the navigation property existingPerson.Instructor and selects just the columns mapped to HireInfo

