Git integration and deployment for data pipelines (Preview)
Important
Git integration and deployment for data pipelines in Data Factory for Microsoft Fabric are currently in preview. This information relates to a prerelease product that may be substantially modified before it's released. Microsoft makes no warranties, expressed or implied, with respect to the information provided here.
In Fabric, continuous integration and development (CI/CD) features with Git Integration & deployment pipelines allow users to import/export workspace resources with individual updates, deviating from the Azure Data Factory model where whole factory updates using ARM template export methodology is preferred. This change in methodology allows customers to selectively choose which pipelines to update without pausing the whole factory. Both Git integration (bring-your-own Git) and deployment pipelines (built-in CI/CD) use the concept of associated a single workspace with a single environment. You need to map out different workspaces to your different environments such as dev, test, and production.
Create a new branch
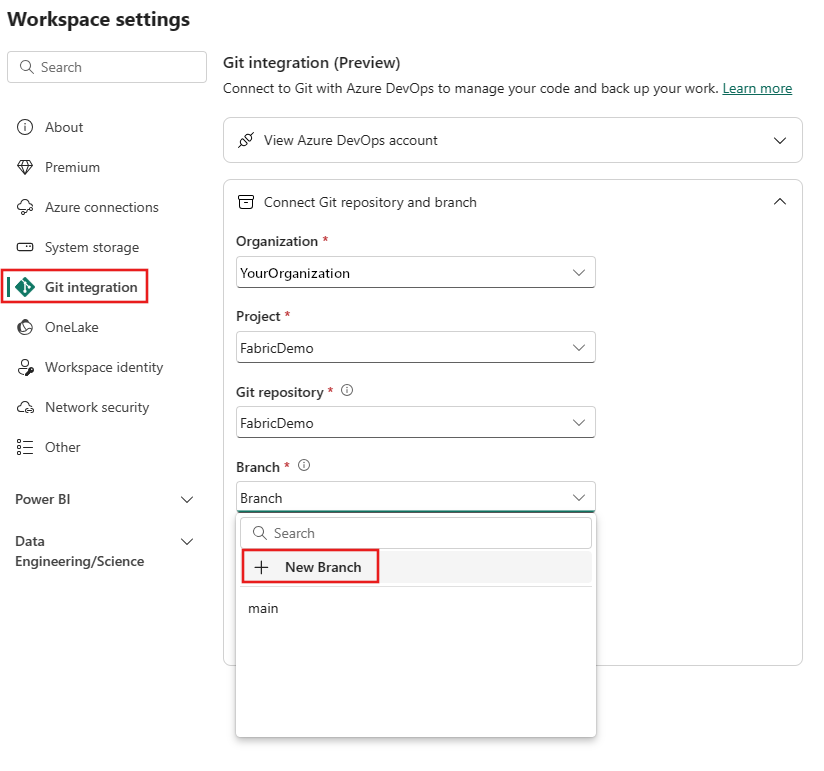
From the Fabric UI, go to New Branch and create a new development branch for your work. Refer to screenshots in the following sections for the Branch property.
Develop new pipelines from the new branch
Use this methodology to collaborate as a team on your data factory. Export the contents of your pipeline and apply changes accordingly. Refer to the steps in the following section to create a new branch and begin developing your pipeline changes there.
Steps for testing Git integration
Select your workspace from the left navigation bar and connect your workspace to your Git repository by selecting Workspace settings.

Select Git integration, then provide your organization, project, and Git repository. Under the Branch dropdown, select + New Branch.

From your workspace view, you see the status of the pipeline artifact as synced or uncommitted. If there is uncommitted work, select the Source control indicator button at the top of the view. Then you can choose which artifacts to sync, and whether to sync from your workspace to your repo or from your repo to your workspace.
Steps for testing deployment pipelines
As opposed to Git Integration, no manual set-up is required by the user, you can start using deployment pipelines directly from your existing workspace.
Select Workspaces on the app navigator on the left of the screen, and then select the Deployment pipelines icon.

After selecting Deployment pipelines, you see the deployment pipelines home page where you can start a new pipeline or manage existing pipelines.
From there, you can map your workspaces to your dev, test, and prod workspace environments.
Refer to general documentation on Fabric deployment pipelines.
Current limitations
- Deployment rules in Deployment Pipelines (built-in Fabric CI/CD) aren't yet supported.

