Azure DevOps Work Items Microsoft Graph connector
The Azure DevOps Microsoft Graph connector allows your organization to index work items in its instance of the Azure DevOps service. After you configure the connector and index content from Azure DevOps, end users can search for those items in Microsoft Search and Microsoft 365 Copilot.
This article is for anyone who configures, runs, and monitors an Azure DevOps Work Items Microsoft Graph connector. It supplements the general setup process and shows instructions that apply only to this connector.
Important
The Azure DevOps Work Items Microsoft Graph connector supports only the Azure DevOps cloud service. Azure DevOps Server 2019, TFS 2018, TFS 2017, TFS 2015, and TFS 2013 are not supported by this connector.
Before you get started
You must be the admin for your organization's Microsoft 365 tenant as well as the admin for your organization's Azure DevOps instance.
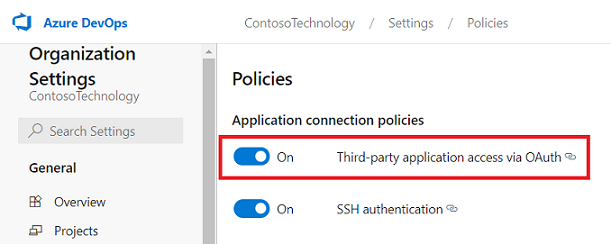
To allow the connector to connect to your Azure DevOps Organization, you must enable Third-party application access via OAuth. Refer Azure DevOps documentation to manage security policies to learn more.
You need the following permissions granted to the user account whose credentials are used during the connector configuration:
| Permission name | Permission type | Required for |
|---|---|---|
| View project-level information | Project permission | Crawling Azure DevOps Work Items. This permission is mandatory for the projects that need to be indexed. |
| View analytics | Project permission | Crawling Azure DevOps Work Items. This permission is mandatory for the projects that need to be indexed. |
| View work items in this node | Area path | Crawling Work Items in an area path. This permission is optional. Only those area paths are crawled for which the user account has permission. |
Important
The user account must have Basic access level. To learn more about access levels in Azure DevOps, read supported access levels.
Step 1: Add a connector in the Microsoft 365 admin center
Add Azure DevOps Work Items Microsoft Graph connector
See general setup instructions for more details.
Step 2: Name the connection
Follow the general setup instructions.
Step 3: Configure the connection settings
To authenticate and sync content from Azure DevOps, choose one of the two supported methods:
Important
- Microsoft Entra ID OAuth is in preview and available to select customers. This is the recommended OAuth mechanism.
- Azure DevOps OAuth is the legacy authentication mechanism, not being actively invested upon.
Microsoft Entra ID OAuth (Preview)
Ensure your ADO Organization is connected to Microsoft Entra
The Azure DevOps Graph connector only indexes content from an ADO organization connected with Microsoft Entra of your tenant. To ensure that your ADO organization is connected with Microsoft Entra account, use the following steps.
- Navigate to Azure DevOps and select the required organization.
- Select
Organization settings. - On the left navigation pane, select
Microsoft Entraunder the 'General' header. - Ensure that the organization is connected to your tenant's Microsoft Entra account.
Create an app on Microsoft Entra ID
- Go to the Azure portal and sign in with admin credentials for the tenant.
- Navigate to Microsoft Entra ID -> Manage -> App registrations from the navigation pane and select New registration.
- Provide a name for the app and select Register.
- Make a note of the Application (client) ID. This ID is used to grant the Microsoft Entra app access to projects in the ADO organization.
- Open API permissions from the navigation pane and select Add a permission.
- Select Azure DevOps and then Delegated permissions.
- Search for the following permissions and select Add permissions.
a. Identity (read)
b. Work Items (read)
c. Variable Groups (read)
d. Project and team (read)
e. Graph (read)
f. Analytics (read) - Select Grant admin consent for [TenantName] and confirm by selecting Yes.
- Check that the permissions are in the "Granted" state.
- Open Authentication from the navigation pane. Select
Add a platformand chooseWeb. Add one of the following URIs under "Redirect URIs":- For M365 Enterprise: https://gcs.office.com/v1.0/admin/oauth/callback
- For M365 Government: https://gcsgcc.office.com/v1.0/admin/oauth/callback
- Under Implicit grant and hybrid flows, check the option for
ID tokens (used for implicit and hybrid flows)and click Configure. - From the navigation pane, select Certificates and secrets under Manage.
- Select New Client secret and select an expiry period for the secret. Copy the generated secret (Value) and save it because it is not shown again.
- Use this Client secret and the application ID to configure the connector.
Grant the Microsoft Entra app access to projects in the ADO organization
You need to provide the Microsoft Entra app the necessary access to the projects which need to be indexed using the following steps:
- Navigate to Azure DevOps and select the required organization.
- Select
Organization settings. - On the left navigation pane, select
Usersunder the 'General' header. - Select
Add users. - Copy the Application (client) ID obtained from the app to "Users or Service Principals".
- Grant the
Basicaccess level and select the projects to allow access to index. Also add to theProject ReaderAzure DevOps group (or equivalent) to ensure access. De-select the option to send email invitation to users.
Azure DevOps OAuth
To connect to your Azure DevOps instance, you need your Azure DevOps organization name, its App ID, and client secret for OAuth authentication.
Register an app
Register an app in Azure DevOps so that the Microsoft Search app and Microsoft 365 Copilot can access the instance. To learn more, see Azure DevOps documentation on how to register an app.
The following table provides guidance on how to fill out the app registration form:
| Mandatory Fields | Description | Recommended value |
|---|---|---|
| Company name | The name of your company. | Use an appropriate value |
| Application name | A unique value that identifies the application that you're authorizing. | Microsoft Search |
| Application website | The URL of the application that requests access to your Azure DevOps instance during connector setup. (Required). | For M365 Enterprise: https://gcs.office.com/, For M365 Government: https://gcsgcc.office.com/ |
| Authorization callback URL | A required callback URL that the authorization server redirects to. | For M365 Enterprise: https://gcs.office.com/v1.0/admin/oauth/callback, For M365 Government: https://gcsgcc.office.com/v1.0/admin/oauth/callback |
| Authorized scopes | The scope of access for the application | Select the following scopes: Identity (read), work items (read), variable groups (read), project and team (read), Microsoft (read), analytics (read) |
Important
The authorized scopes that you select for the app should match the scopes exactly as listed above. If you omit one of the authorized scopes in the list or add another scope, the authorization will fail.
On registering the app, you get the App ID and Client Secret that is used to configure the connector.
Note
To revoke access to any app registered in Azure DevOps, go to User settings at the right top of your Azure DevOps instance. Select Profile and then select Authorizations in the Security section of the side pane. Hover over an authorized OAuth app to see the Revoke button at the corner of the app details.
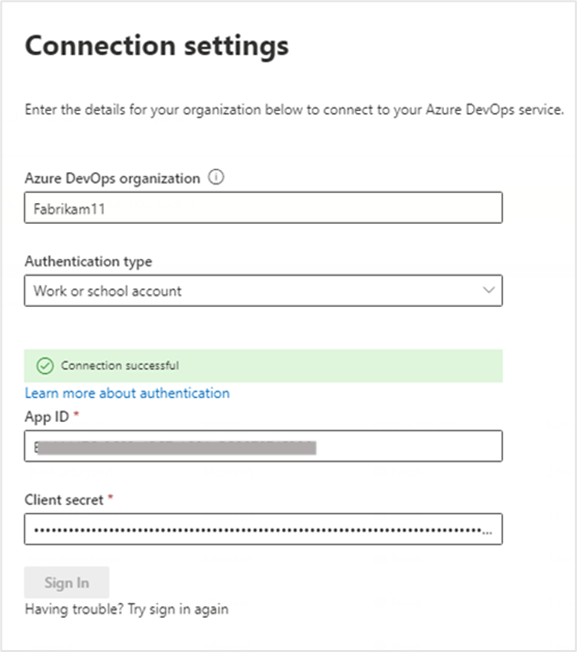
Connection settings
After registering the Microsoft Search app with Azure DevOps, you can complete the connection settings step. Enter your organization name, App ID, and Client secret.
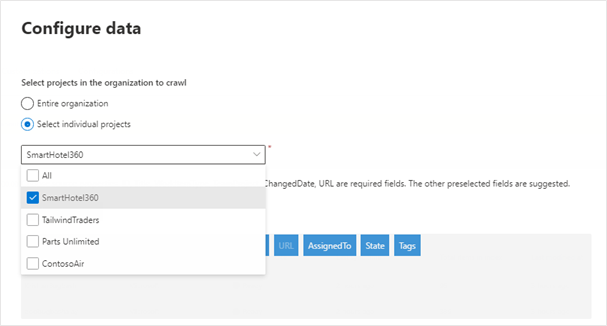
Configure data: select projects and fields
You can choose for the connection to index either the entire organization or specific projects.
If you choose to index the entire organization, items in all projects in the organization get indexed. New projects and items are indexed during the next crawl after they're created.
If you choose individual projects, only work items in the selected projects are indexed.
Note
Azure DevOps projects can be crawled after granting them the View project-level information and View analytics permissions.
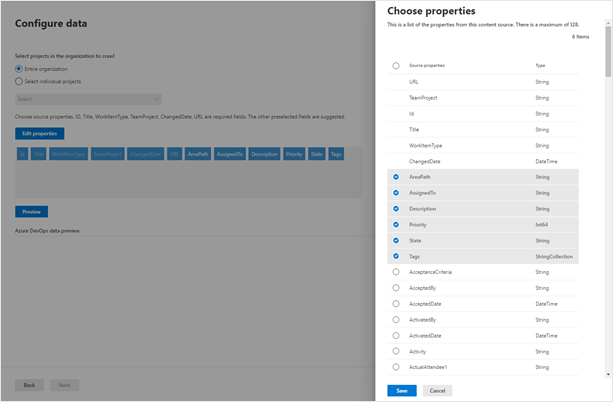
Next, select which fields you want the connection to index and preview data in these fields before proceeding.
Step 4: Manage search permissions
The Azure DevOps Work Items Microsoft Graph connector supports search permissions visible to Only people with access to this data source or Everyone. If you choose Only people with access to this data source, indexed data appears in the search results for users who have access to them based on permissions to users or groups at the Organization, Project or Area path level in Azure DevOps. If you choose Everyone, indexed data appears in the search results for all users.
Step 5: Assign property labels
Follow the general setup instructions.
Step 6: Manage schema
Follow the general setup instructions.
Step 7: Choose refresh settings
The Azure DevOps Work Items Microsoft Graph connector supports refresh schedules for both full and incremental crawls. The recommended schedule is one hour for an incremental crawl and one day for a full crawl.
Step 8: Review connection
Follow the general setup instructions.
Tip
Default result type
- The Azure DevOps Work Items Microsoft Graph connector automatically registers a result type once the connector is published. The result type uses a dynamically generated result layout based on the fields selected in step 3.
- You can manage the result type by navigating to Result types in the Microsoft 365 admin center. The default result type is named "
ConnectionIdDefault". For example, if your connection ID isAzureDevOps, your result layout is named: "AzureDevOpsDefault" - Also, you can choose to create your own result type if needed.
Troubleshooting
After publishing your connection, you can review the status under the Data sources tab in the admin center. To learn how to make updates and deletions, see Manage your connector. You can find troubleshooting steps for commonly seen issues here.
If you have issues or want to provide feedback, contact Microsoft Graph | Support.