Test different configurations
TFS 2017 | TFS 2015
Your users will probably install or run your app on a wide variety of configurations, such as different operating systems, web browsers, and other variations. You will want to run at least some of your tests in stages that have those different configurations.
Use your test plans to decide which tests you want to run on which configurations. You have to make sure that when you run your tests that you have set up your stages for the configurations that you need.
You might draw a schematic matrix of the combinations that you want to test:

Then you can:
- View available configurations and variables
- Create configurations and variables
- Assign the configurations to test plans and test suites
- Run tests with each of the configurations
- Track your test results for each configuration
Prerequisites
- You must connect to a project. If you don't have a project yet, create one.
- You must be added to a project. To get added, Add users to a project or team.
- To view or add test configurations, you must have Basic access or higher.
- To add test configurations, you must have the project-level Manage test configurations permission set to Allow. By default, this permission is granted to members of the Contributors and Project Administrator groups.
To learn more, see Manual test access and permissions.
Work with the TCM command-line tool
To exercise the TCM command-line tool, you must have the following in place:
Installed Visual Studio 2017 Professional or earlier version. You access TCM from the command prompt and the following directories:
%programfiles(x86)%\Microsoft Visual Studio\2017\Professional\Common7\IDE
%programfiles(x86)%\Microsoft Visual Studio\2017\Enterprise\Common7\IDE%programfiles(x86)%\Microsoft Visual Studio 14.0\Common7\IDETo run a TCM command, specify the
/collectionand/teamprojectparameters, and/loginas needed.Parameter Description /collection :CollectionURLRequired. Specifies the URI of the team project collection.The format for the URI is as follows:
- For Azure DevOps Services:http://dev.azure.com/OrganizationName
- For Azure DevOps Server:http://ServerName:Port/VirtualDirectoryName/CollectionName. If no virtual directory is used, then the format for the URI is as follows:http://ServerName:Port/CollectionName/teamproject: projectRequired. The name of the project that contains the test objects you want to clone or import automated tests into. /login: username,[password]Optional. Specifies the name and password of a valid Azure DevOps user and who has permissions to run the command. Use this option if your Windows credentials don't have the appropriate permissions, or you're using basic authentication, or you're not connected to a domain. You must be a valid member of the project(s) you want to access and have the required permissions based on the commands you run. To learn more, see Manual test access and permissions.
To clone or import test objects, you must have been granted the same access levels required to add test plans and test suites as described in Prerequisites.
View configurations and variables
You often want to see the configurations that are already available to run your tests.
You can view a list of test configurations and configuration variables from the Configurations page.
While in your project, select Test Plans > Configurations from the left navigation area. Here you'll see all of the test configurations and variables currently available for your test plans.

Select a configuration or variable to see more information about it in the window to the right.
Create configurations and variables
A test configuration is a combination of configuration variable values. Your configuration variables could be, for example, operating system, browser, CPU type, database. A configuration might be "Windows 8 + 32-bit CPU" or "Windows 10 + 64-bit CPU."
You must create the configuration variables first. Then combine multiple variable values to create a configuration.
Open the Configurations page in the Test Plans web portal, choose the
 icon, and select
New configuration variable.
Type a name for the variable, such as Browser, and type a value. Add as many values as you wish to the configuration variable, and then save it.

Repeat the steps to create any other configuration variables you need. For example, create a configuration variable named Operating system with the names of each operating system on which you want to test.

Choose the
 icon and select
New test configuration.
Type a name for the test configuration and add the configuration variables you created. Choose a value for each variable for this configuration.

Ensure Assign to new test plans is checked to make this the default configuration for all the new test plans you create.
Save your new test configuration.
Assign configurations to test plans and suites
You can assign configurations to a test plan, a test suite, or an individual test case. Configurations assigned to a test plan or test suite apply to all tests or suites within it.
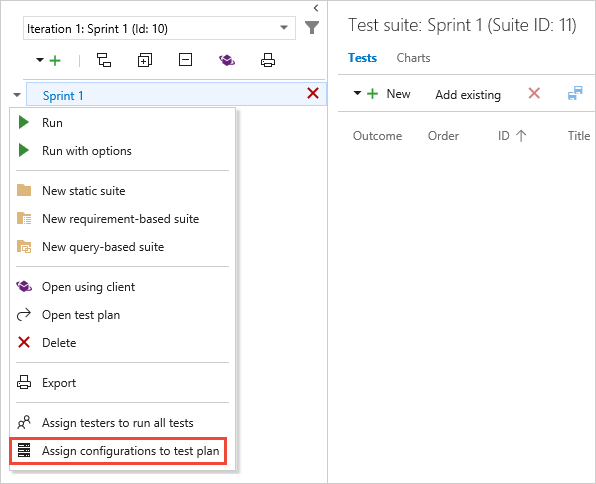
To assign a configuration to a test plan, in the Test plans page, open the shortcut menu for the plan and choose Assign configuration to test plan.

To assign a configuration to a test suite, open the shortcut menu for the suite and choose Assign configuration to test suite.

If you add multiple configurations to a test plan or suite, the tests cases are repeated in the plan or suite with each of the configurations you have assigned.

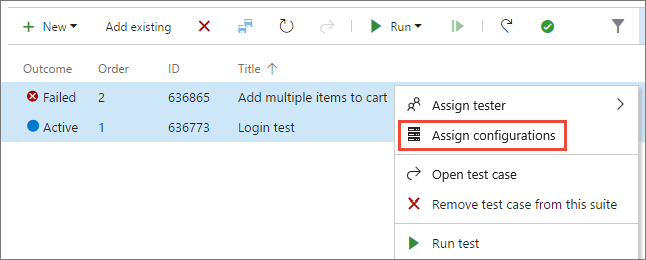
If necessary, override the default configuration assigned to a test case and assign the configuration you need. Select one or more test cases, open the shortcut menu, and choose Assign configurations.

Search for and select the configurations to assign to these test case(s).

Run tests with each configuration
Set up a testing platform for a particular configuration, such as testing the app using Google Chrome on Windows 10.
Select and run a test that has this configuration assigned.

As you run the test, a reminder of the required configuration in shown in the status bar of the Test Runner window.

Track test results for each configuration
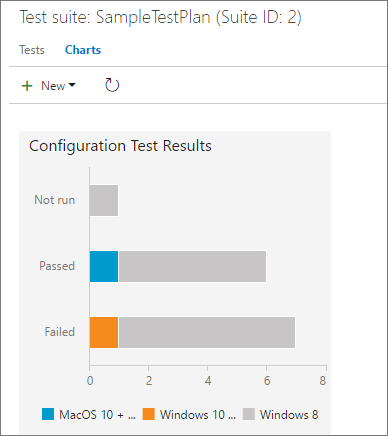
Open the Charts page for your test plan or test suite, choose New, and select New test result chart.

Choose the type of chart you require, select Configuration in the Group by list, and choose OK.

A chart is created that can help you track your tests based on configurations. You can pin this chart to your dashboard.

If you have a test case that appears in several test plans and test suites, you can set the different configurations for each of these. The same test case can have different configuration settings in different test suites and test plans.