Pastaba.
Prieigai prie šio puslapio reikalingas įgaliojimas. Galite bandyti prisijungti arba pakeisti katalogus.
Prieigai prie šio puslapio reikalingas įgaliojimas. Galite bandyti pakeisti katalogus.
Applies to:
SQL Server on Windows
This article describes how to uninstall a stand-alone instance of SQL Server. By following the steps in this article, you also prepare the system so that you can reinstall SQL Server.
To uninstall a Cumulative Update, see Uninstall a Cumulative Update from SQL Server.
Note
To uninstall a SQL Server failover cluster, use the Remove Node functionality provided by SQL Server Setup to remove each node individually. For more information, see Add or remove nodes in a failover cluster instance (Setup)
Considerations
To uninstall SQL Server, you must be a local administrator with permissions to log on as a service.
If your computer has the minimum required amount of physical memory, increase the size of the page file to two times the amount of physical memory. Insufficient virtual memory can result in an incomplete removal of SQL Server.
On a system with multiple instances of SQL Server, the SQL Server browser service is uninstalled only once the last instance of SQL Server is removed. The SQL Server Browser service can be removed manually using the same procedure as removing SQL Server.
Uninstalling SQL Server deletes
tempdbdata files that were added during the install process. Files with tempdb_mssql_*.ndf name pattern are deleted if they exist in the system database directory.
Prepare
Back up your data. Either create full backups of all databases, including system databases, or manually copy the .mdf and .ldf files to a separate location. The
masterdatabase contains all system level information for the server, such as logins, and schemas. Themsdbdatabase contains job information such as SQL Server agent jobs, backup history, and maintenance plans. For more information about system databases, see Back up and restore: System databases (SQL Server).The files that you must save include the following database files 1:
master.mdfmastlog.ldfmsdbdata.mdfmsdblog.ldfmodel.mdfmodellog.ldfmssqlsystemresource.mdfmssqlsystemresource.ldfReportServer[$InstanceName]data and log files 2ReportServer[$InstanceName]TempDBdata and log files 2
1 You can't back up the
tempdbsystem database.2 The ReportServer databases are included with SQL Server Reporting Services.
Stop all SQL Server services. We recommend that you stop all SQL Server services before you uninstall SQL Server components. Active connections can prevent successful uninstallation.
Use an account that has the appropriate permissions. Sign in to the server by using the SQL Server service account or by using an account that has equivalent permissions. For example, you can connect to the server by using an account that is a member of the local Administrators group.
Uninstall
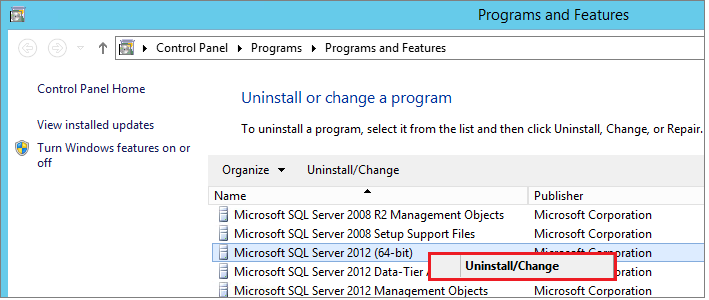
To uninstall SQL Server from Windows 10, Windows Server 2016, Windows Server 2019, and greater, follow these steps.
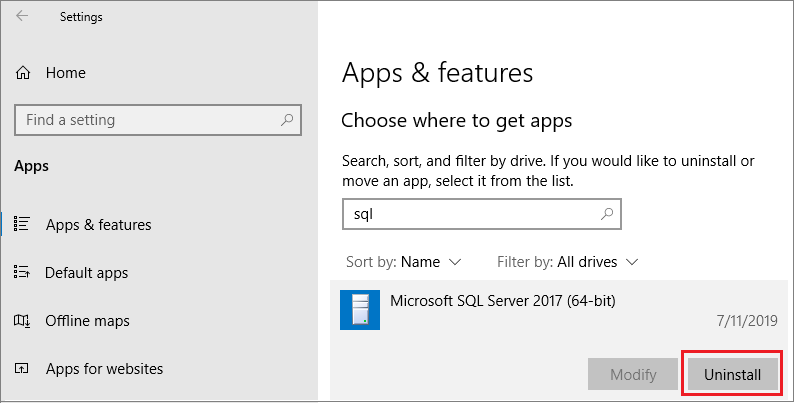
To begin the removal process, navigate to Settings from the Start menu. Depending on which version of Windows you installed, choose Apps, or Apps > Installed apps.
Search for
sqlin the search box.Select Microsoft SQL Server (Version) (Bit). For example,
Microsoft SQL Server 2017 (64-bit).Select Uninstall.

If you use a newer version of Windows, the user interface might look different.
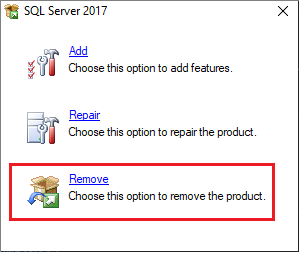
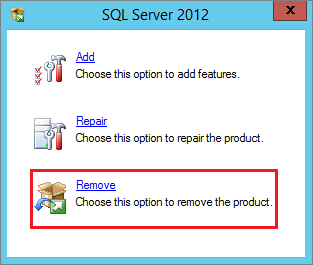
Select Remove on the SQL Server dialog pop-up to launch the Microsoft SQL Server installation wizard.

On the Select Instance page, use the dropdown list to specify an instance of SQL Server to remove, or specify the option to remove only the SQL Server shared features and management tools. To continue, select Next.
On the Select Features page, specify the features to remove from the specified instance of SQL Server.
On the Ready to Remove page, review the list of components and features that will be uninstalled. Select Remove to begin uninstalling
Refresh the Apps and Features window to verify the SQL Server instance was removed successfully, and determine which, if any, SQL Server components still exist. Remove these components from this window as well, if you so choose.
In the event of failure
If the removal process fails, review the SQL Server Setup log files to determine the root cause.

