GitHub Copilot for the Command Line
GitHub Copilot isn’t just for Integrated Development Environments(IDEs)—it’s now a powerful assistant in your terminal. GitHub Copilot CLI brings Copilot directly into the command line, where it can explain commands, suggest shell commands from natural language, and help you work safely and interactively with your files and projects.
Copilot CLI uses GitHub authentication and runs independently from GitHub CLI, though it uses your existing credentials. Whether you’re new to the command line or an experienced developer, Copilot CLI reduces guesswork and speeds up everyday workflows.
This unit covers:
- Installing and running GitHub Copilot CLI
- Interactive sessions in the terminal
- Slash commands and natural language input
- Configuration and options
Installing and launching Copilot CLI
Install via Homebrew on macOS and Linux:
brew install copilot-cli
Or use the official install script:
curl -fsSL https://gh.io/copilot-install | bash
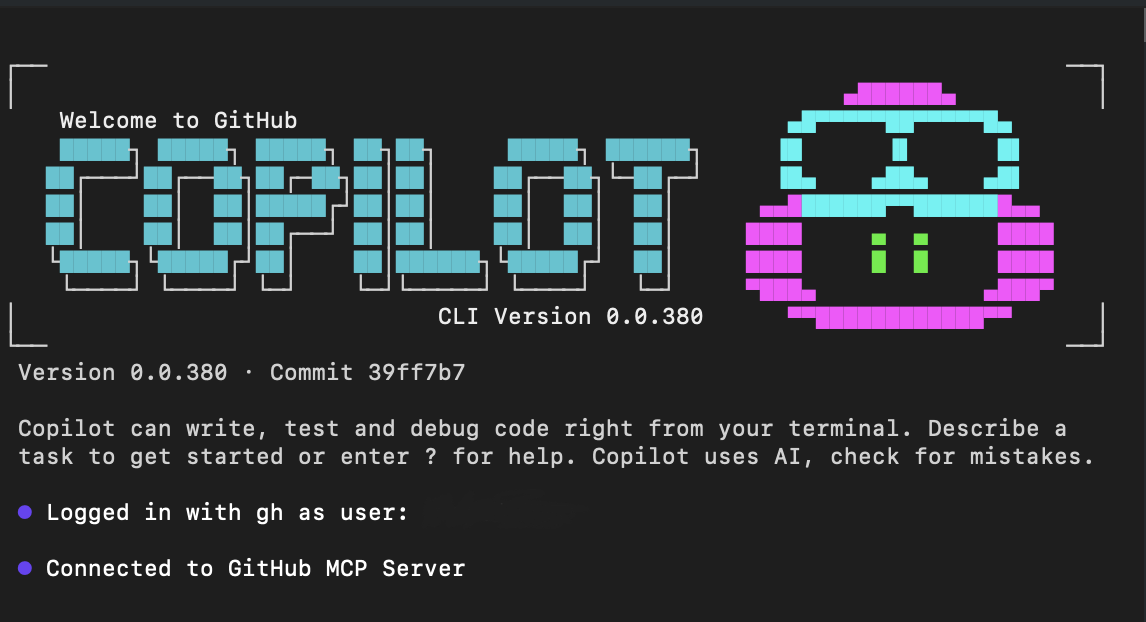
Launch Copilot CLI in interactive mode:
copilot
It displays see a welcome banner and a prompt:
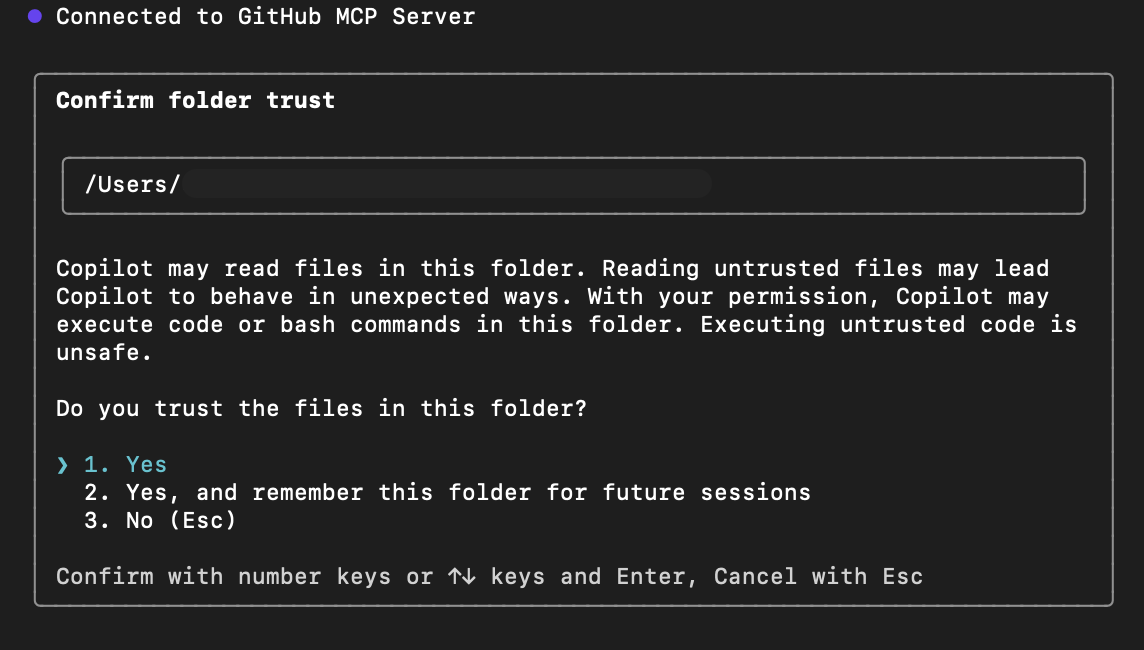
On first launch, Copilot asks whether you trust the files in the current folder. Copilot may read, modify, or execute files in this directory during the session, so only proceed in locations you trust.
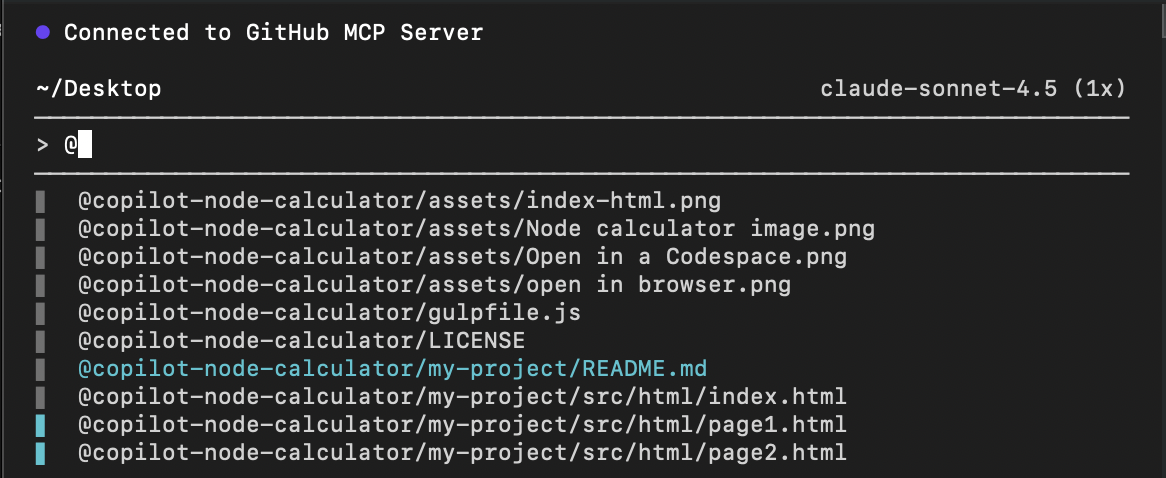
You can use the @ to select a specific file you want to work with as context.
Inside an interactive session, you can:
- Use slash commands (
/command) to control the session and configure Copilot CLI. - Type natural language prompts to explain, suggest, or revise commands.
For one-shot prompts without entering full interactive mode:
copilot -i "explain brew install git"
copilot -i "suggest find large files and delete them"
Common slash commands
Slash commands are explicit session-control commands. Here are the most common ones:
| Slash Command | Description |
|---|---|
/help |
Show available commands and options |
/explain <command> |
Ask Copilot to explain any shell command |
/suggest <task> |
Ask Copilot to suggest a shell command for a task |
/revise |
Revise the last suggestion based on your instructions |
/feedback |
Submit feedback on a response or suggestion |
/exit |
Exit interactive mode |
/model <model> |
Select which AI model to use |
/theme [auto|dark|light] |
Change terminal theme |
/skills |
Manage skills for enhanced capabilities |
/mcp |
Manage MCP server configuration |
/list-dirs |
Show allowed directories for file operations |
/reset-allowed-tools |
Reset allowed tools list |
Slash commands cannot be replaced with natural language prompts. They are the only way to control session settings and configuration.
Example workflows
1. Explain a command
> Explain what `git reset --hard HEAD` does
Copilot will provide a detailed explanation.
2. Suggest a command
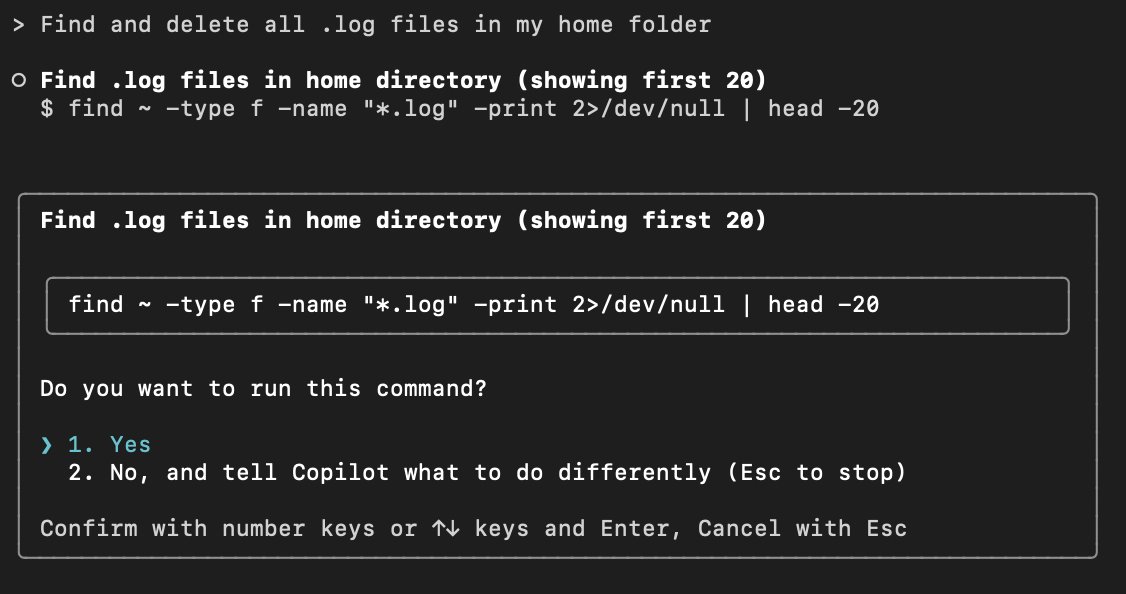
> Find and delete all .log files in my home folder
Copilot generates a command suggestion, and prompt you to execute it if you're satisfied with its suggestions.
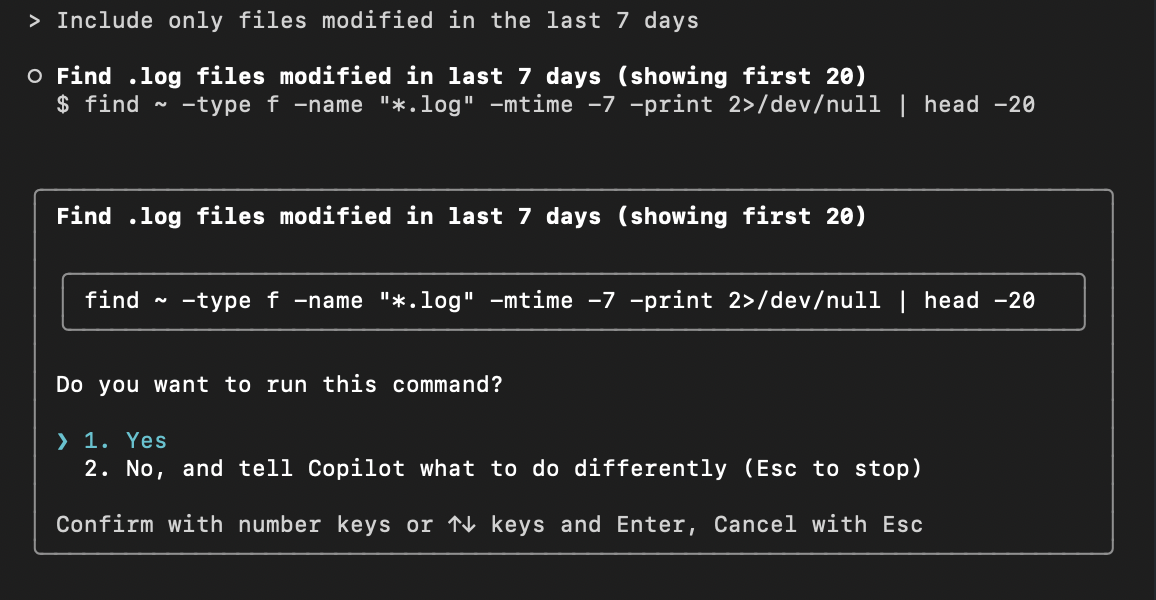
3. Revise a suggestion
After receiving a suggestion, you can type a follow-up prompt to revise the suggested command:
> Include only files modified in the last 7 days
4. Provide feedback
After a response or suggestion:
> /feedback
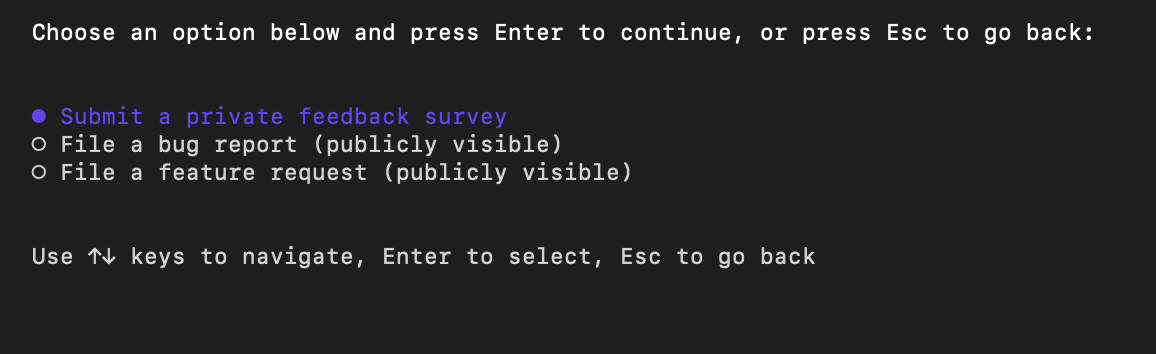
Copilot prompts you to choose the kind of feedback you want to send, then navigate you to the appropriate form to complete your feedback.
5. Exit interactive mode
> /exit
Configuration options
In Copilot CLI, configuration is handled via:
Slash commands inside interactive mode
/modelchoose AI model/themechange terminal theme/skillsmanage enhanced capabilities/reset-allowed-toolsreset tools/list-dirsview allowed directories/mcpMCP server settings
Copilot CLI configuration (non-interactive mode)
Copilot CLI configuration is managed through permission prompts, command-line flags, and local configuration files. These settings control what Copilot can access and do on your behalf.
Common configuration options include:
- Trusted directories – Control where Copilot can read, edit, and run files.
- Tool permissions – Allow or restrict Copilot from running shell commands or modifying files using flags like
--allow-toolor--deny-tool. - Path permissions – Control which directories Copilot can access.
- URL permissions – Manage which external domains Copilot can connect to.
Refer to the official GitHub Copilot CLI documentation for full configuration options.
Sandboxed execution environments
GitHub Copilot CLI supports sandboxed execution environments that help protect your system while allowing Copilot to perform tasks on your behalf.
Sandboxing isolates commands, file operations, and other activities from your primary development environment. Depending on your workflow, you can choose between local sandboxing and cloud sandboxing.
Local sandboxing
Local sandboxing allows Copilot to execute commands inside a restricted environment on your machine.
When enabled, Copilot's access to your filesystem, network connectivity, and operating system capabilities is limited, helping reduce the risk of unintended changes while still allowing you to benefit from agent-assisted workflows.
To enable local sandboxing during an interactive session:
/sandbox enable
After enabling sandboxing, commands executed by Copilot run within the sandboxed environment rather than directly on your host system.
Benefits of local sandboxing
| Benefit | Description |
|---|---|
| Improved security | Restricts access to sensitive system resources. |
| Safer experimentation | Allows you to test agent-driven workflows with reduced risk. |
| Local execution | Uses your machine's resources without requiring cloud infrastructure. |
| Greater control | Provides additional safeguards while using autonomous agents. |
Cloud sandboxing
Cloud sandboxing allows Copilot CLI sessions to run inside fully isolated Linux environments hosted by GitHub.
Unlike local sandboxing, cloud sandbox sessions execute entirely in GitHub-hosted infrastructure and remain separate from your local machine and from other sandbox sessions.
Cloud sandboxing is built on Azure Container Apps Sandboxes, with GitHub providing authentication, governance, policy enforcement, and billing integration.
To start a cloud sandbox session:
copilot --cloud
Once started, Copilot can run commands, modify files, execute tests, and perform development tasks inside the cloud environment rather than on your local device.
Benefits of cloud sandboxing
| Benefit | Description |
|---|---|
| Strong isolation | Workloads run separately from your local machine. |
| Device flexibility | Resume sessions from different devices. |
| Resource offloading | Uses cloud resources instead of local CPU and memory. |
| Parallel execution | Run multiple agent-driven tasks simultaneously. |
Continue sessions across devices
Because cloud sandbox sessions run in GitHub-hosted infrastructure, work is not tied to a specific computer.
This allows you to:
- Start a session on one device
- Resume the same session from another device
- Continue work without manually transferring files or recreating environments
This flexibility is especially useful for developers who work across multiple machines or locations.
Cloud sandbox session lifecycle
Cloud sandbox sessions can exist in three states:
| State | Description |
|---|---|
| Active | The session is running and available for interaction. |
| Stopped | The session is paused, but its state is preserved for future use. |
| Deleted | The session and all saved state are permanently removed. |
When a session is stopped, GitHub saves a snapshot of the environment, including files, environment variables, and in-progress work. Resuming the session restores the saved state so you can continue where you left off.
Authentication and access
Cloud sandboxes use the same authentication model as GitHub Copilot CLI.
If you can authenticate to GitHub Copilot CLI and have access to GitHub Copilot, no additional cloud provider configuration is required.
You do not need to:
- Manage API keys
- Configure cloud infrastructure
- Provision virtual machines
- Maintain container environments
Note
Organization or enterprise administrators must enable the Cloud Sandbox access policy before members can use cloud sandbox environments.
Local vs cloud sandboxing
| Feature | Local Sandbox | Cloud Sandbox |
|---|---|---|
| Execution location | Local machine | GitHub-hosted environment |
| Resource usage | Local resources | Cloud resources |
| Isolation level | Restricted local environment | Fully isolated cloud environment |
| Device independence | No | Yes |
| Parallel workloads | Limited by local hardware | Easily scalable |
When should you use sandboxing?
Consider using sandboxing when:
- Working with unfamiliar repositories
- Testing agent-generated commands
- Running autonomous workflows
- Performing potentially destructive operations
- Working across multiple devices
- Offloading compute-intensive development tasks
Sandboxing provides an additional layer of security and flexibility, allowing you to safely take advantage of GitHub Copilot CLI's agent capabilities.
Tips for effective use of Copilot CLI
- Use interactive mode (
copilot) for exploratory tasks. - Use one-shot mode (
copilot -i) for quick answers. - Natural language input works—you don’t always need slash commands.
- Always review commands before execution.
- Combine Copilot CLI with GitHub CLI (
gh) for repository and issue management. - Use slash commands when you want structured actions or feedback.