Pastaba.
Prieigai prie šio puslapio reikalingas įgaliojimas. Galite bandyti prisijungti arba pakeisti katalogus.
Prieigai prie šio puslapio reikalingas įgaliojimas. Galite bandyti pakeisti katalogus.
A token factory is an artificial intelligence (AI) model-serving system that generates text or code in response to application requests. When you run one locally, you can evaluate AI-assisted application scenarios without sending prompts to a hosted model service.
In this article, you deploy Qwen/Qwen3-Coder-30B-A3B-Instruct with vLLM on Windows Server 2025 and validate the resulting OpenAI-compatible endpoint. The tested configuration uses Ubuntu 24.04 on Windows Subsystem for Linux (WSL) 2 and one NVIDIA RTX PRO 6000 GPU. The procedure creates an endpoint that you operate manually for lab and test use; it doesn't configure production access, authentication, remote networking, or automatic startup.
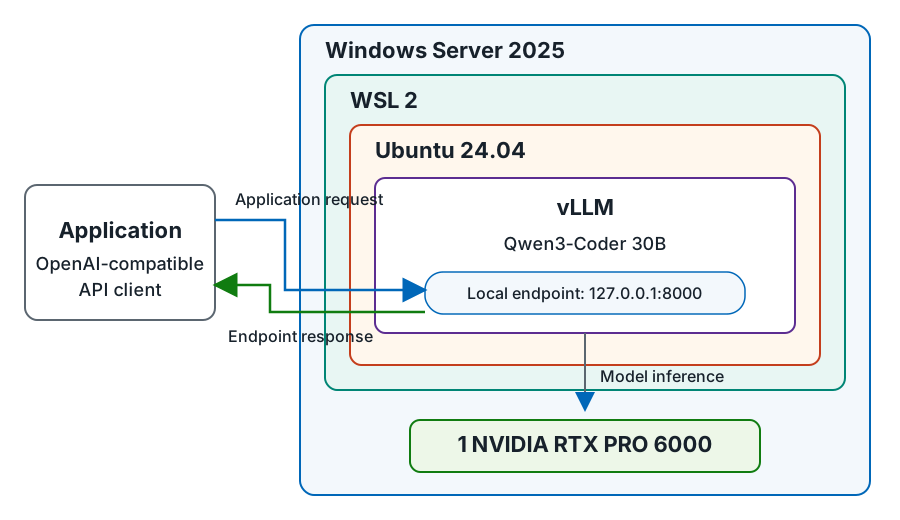
An OpenAI-compatible API client sends an application request to the local endpoint at 127.0.0.1:8000 and receives an endpoint response. The endpoint runs vLLM with Qwen3-Coder 30B inside Ubuntu 24.04, which runs inside WSL 2 on Windows Server 2025. vLLM sends model-inference work to one NVIDIA RTX PRO 6000 GPU.
Prerequisites
- Windows Server 2025 and an account with administrator rights.
- Completion of Install Linux Subsystem on Windows Server. Install Ubuntu 24.04 as
Ubuntu-24.04and configure it to use WSL 2. - One NVIDIA RTX PRO 6000 Blackwell GPU with 96 GB of GPU memory.
- An NVIDIA Windows driver that's compatible with CUDA 13.0. Install the driver on Windows, not in WSL.
- An account that can use
sudoin Ubuntu. - Internet access from Ubuntu to the Ubuntu, NVIDIA, Astral, PyTorch, vLLM, and Hugging Face resources that this procedure uses.
- Access to the
Qwen/Qwen3-Coder-30B-A3B-Instructmodel repository on Hugging Face, acceptance of any applicable license terms, and any credentials that the repository host requires. Complete any required authentication in Ubuntu before you start vLLM. Store credentials according to your organization's secret-handling policy.
Important
Don't install a Linux NVIDIA kernel driver, display driver, or driver metapackage in WSL. WSL uses the NVIDIA driver that Windows provides.
Verify the Windows Server host
Before you install the Linux components, confirm the operating system, WSL distribution, and GPU.
In PowerShell, confirm the Windows Server version:
Get-ComputerInfo -Property WindowsProductName, WindowsVersion, OsBuildNumber |
    Format-List
Ensure that
WindowsProductNameidentifies Windows Server 2025.Confirm that
Ubuntu-24.04uses WSL 2:wsl --list --verboseThe
Ubuntu-24.04entry must show version2.Show the installed GPU, GPU memory, and Windows driver version:
nvidia-smi --query-gpu=name,memory.total,driver_version --format=csvEnsure that the output lists one NVIDIA RTX PRO 6000 GPU with about 96 GB of memory. The reported memory can differ slightly from the nominal capacity.
Open the Ubuntu distribution.
wsl --distribution Ubuntu-24.04In Ubuntu, confirm the distribution version, verify
sudoaccess, and check available storage:grep PRETTY_NAME /etc/os-release sudo -v df -h "$HOME"Ensure that the operating system is Ubuntu 24.04. Review the available space for the home file system.
Run the remaining installation and serving commands in Ubuntu unless a step specifies PowerShell.
Install CUDA 13.0 and vLLM
This setup installs CUDA 13.0, Python 3.12, vLLM 0.30.0, and Transformers 5.15.0. For each setup task, choose Guided setup for smaller command groups or Quick setup for condensed command blocks.
Install CUDA 13.0
Update the Ubuntu package index and install the tools for configuring the NVIDIA package repository:
sudo apt-get update
sudo apt-get install -y --no-install-recommends curl ca-certificates
Download and install the NVIDIA CUDA repository keyring.
curl -fSL \
    https://developer.download.nvidia.com/compute/cuda/repos/wsl-ubuntu/x86_64/cuda-keyring_1.1-1_all.deb \
    -o /tmp/cuda-keyring.deb
sudo dpkg -i /tmp/cuda-keyring.deb
sudo apt-get update
Install the CUDA 13.0 toolkit components:
sudo apt-get install -y --no-install-recommends \
    cuda-nvcc-13-0 cuda-cccl-13-0 cuda-cudart-dev-13-0 cuda-crt-13-0 \
    cuda-nvrtc-dev-13-0 cuda-driver-dev-13-0 libcublas-dev-13-0 \
    libcurand-dev-13-0
The
cuda-driver-dev-13-0package provides development files. It doesn't install a Linux display driver.Set the CUDA environment variables for the current shell and verify the compiler.
export CUDA_HOME=/usr/local/cuda-13.0
export PATH="$CUDA_HOME/bin:/usr/lib/wsl/lib:$PATH"
nvcc --version
Confirm that the output identifies CUDA 13.0.
Install Python and vLLM
Install the Linux packages that the Python environment and vLLM require:
sudo apt-get install -y --no-install-recommends \
    build-essential python3.12-dev python3.12-venv \
    libnuma1 libtcmalloc-minimal4
Download the
uvinstallation script:curl -fSL https://astral.sh/uv/install.sh -o /tmp/install-uv.shReview
/tmp/install-uv.shaccording to your organization's software-installation policy.After reviewing the installer, run it, add
uvtoPATH, and create and activate a Python 3.12 environment:sh /tmp/install-uv.sh export PATH="$HOME/.local/bin:$PATH" uv venv --python 3.12 --python-preference only-system "$HOME/vllm-env" source "$HOME/vllm-env/bin/activate"Install the following vLLM and Transformers versions from the CUDA 13.0 package indexes:
uv pip install --python "$VIRTUAL_ENV/bin/python" \
    vllm==0.30.0 transformers==5.15.0 \
    --extra-index-url https://wheels.vllm.ai/0.30.0/cu130 \
    --extra-index-url https://download.pytorch.org/whl/cu130 \
    --index-strategy unsafe-first-match
If the command exits without an error, the installation succeeded.
Configure and start the model server
Start vLLM in the foreground to monitor its status and output.
In the Ubuntu shell, after you activate
vllm-env, set a persistent location for downloaded model files:export HF_HOME="$HOME/hf-cache"Start the endpoint.
vllm serve Qwen/Qwen3-Coder-30B-A3B-Instruct \
    --host 127.0.0.1 \
    --port 8000 \
    --max-model-len 32768
Keep the terminal open until vLLM reports that the server is ready.
The first start downloads the model files to HF_HOME and loads the model. The endpoint uses one GPU and limits the combined input and output context to 32,768 tokens. This limit leaves GPU memory available for runtime overhead and the key-value cache.
Important
This endpoint doesn't use authentication. Binding it to 127.0.0.1 limits network exposure, but it isn't an authentication boundary. Processes that can reach the WSL loopback endpoint can send requests. Use this configuration only on a trusted, access-controlled host. Don't expose the endpoint to a network without approved authentication, TLS, firewall, and access-control protections.
Model-serving parameters and settings
| Parameters | Default | When to use them |
|---|---|---|
--tensor-parallel-size 1 |
The default value is 1. | Use it to explicitly document single-GPU serving. |
--port 8000 |
The default port is 8000. | Use it when selecting a different port, and update all client URLs. |
--enable-auto-tool-choice |
Disabled by default. | Enables automatic tool selection for compatible agent applications. |
--tool-call-parser qwen3_coder |
Not set by default. | Selects the Qwen3-Coder tool-call parser for use with automatic tool choice. |
Validate the model server
Use PowerShell to list the models that the endpoint serves, and then verify that the selected Qwen model generates a response.
Leave the Ubuntu terminal that runs vLLM open.
Open a second PowerShell window and set the endpoint URL:
$inferenceBaseUrl = 'http://127.0.0.1:8000'List the models that the endpoint serves:
$models = Invoke-RestMethod `
    -Uri "$inferenceBaseUrl/v1/models" `
    -TimeoutSec 30 `
    -ErrorAction Stop
$models.data | Select-Object id
Confirm that the output contains
Qwen/Qwen3-Coder-30B-A3B-Instruct.Create a Chat Completions request:
$body = @{
    model = 'Qwen/Qwen3-Coder-30B-A3B-Instruct'
    messages = @(
        @{
            role = 'user'
            content = 'When is the last sunset in the Nordic region. Give a short answer.'
        }
    )
    max_tokens = 32
} | ConvertTo-Json -Depth 5
Send the request and show the generated content:
$response = Invoke-RestMethod `
    -Uri "$inferenceBaseUrl/v1/chat/completions" `
    -Method Post `
    -ContentType 'application/json' `
    -Body $body `
    -TimeoutSec 120 `
    -ErrorAction Stop

$response.choices[0].message.content
Confirm that the generated response is nonempty and relevant to the prompt. Model generation, rather than factual verification of the response, is the end-to-end test.