Piezīmes
Lai piekļūtu šai lapai, ir nepieciešama autorizācija. Varat mēģināt pierakstīties vai mainīt direktorijus.
Lai piekļūtu šai lapai, ir nepieciešama autorizācija. Varat mēģināt mainīt direktorijus.
In this tutorial, you create a simple utility library that contains a single string-handling method.
A class library defines types and methods that are called by an application. If the library targets .NET Standard 2.0, it can be called by any .NET implementation (including .NET Framework) that supports .NET Standard 2.0. If the library targets .NET 10, it can be called by any application that targets .NET 10. This tutorial shows how to target .NET 10.
When you create a class library, you can distribute it as a third-party component or as a bundled component with one or more applications.
Prerequisites
Visual Studio with the .NET desktop development workload installed. The .NET SDK is automatically installed when you select this workload.
For more information, see Install the .NET SDK with Visual Studio.
- The latest .NET SDK
- Visual Studio Code editor
- The C# DevKit
Installation instructions
On Windows, this WinGet configuration file to install all prerequisites. If you already have something installed, WinGet will skip that step.
- Download the file and double-click to run it.
- Read the license agreement, type y, and select Enter when prompted to accept.
- If you get a flashing User Account Control (UAC) prompt in your Taskbar, allow the installation to continue.
On other platforms, you need to install each of these components separately.
- Download the recommended installer from the .NET SDK download page and double-click to run it. The download page detects your platform and recommends the latest installer for your platform.
- Download the latest installer from the Visual Studio Code home page and double click to run it. That page also detects your platform and the link should be correct for your system.
- Click the "Install" button on the C# DevKit extension page. That opens Visual Studio code, and asks if you want to install or enable the extension. Select "install".
- A GitHub account to use GitHub Codespaces. If you don't already have one, you can create a free account at GitHub.com.
Create a solution
Start by creating a blank solution to hold the class library project. A Visual Studio solution serves as a container for one or more projects. Add related projects to the same solution.
To create the blank solution:
Start Visual Studio.
On the start window, choose Create a new project.
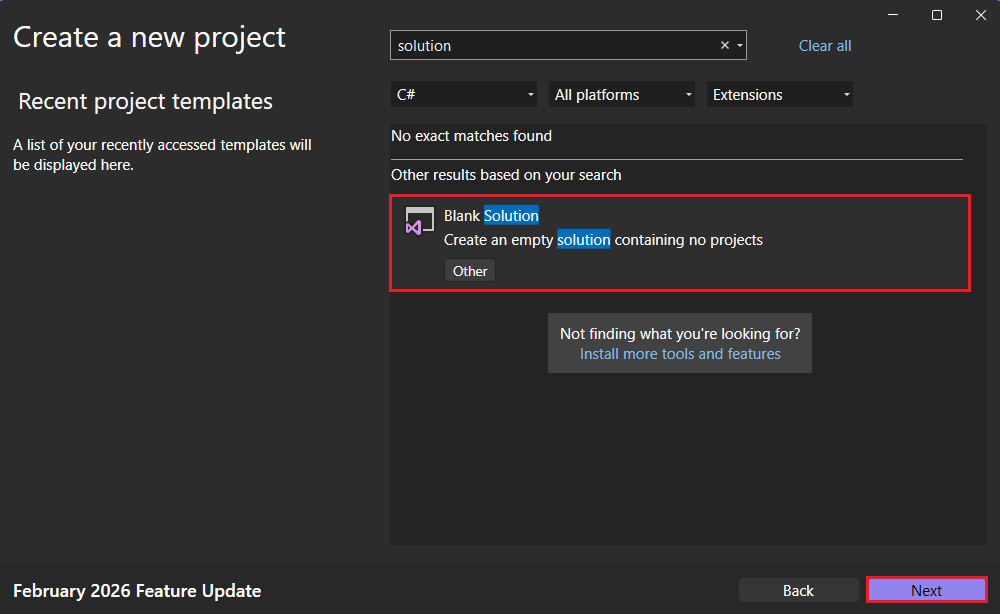
On the Create a new project page, enter solution in the search box. Choose the Blank Solution template, and then choose Next.
On the Configure your new project page, enter ClassLibraryProjects in the Solution name box. Then choose Create.
Start by creating a .NET class library project named "StringLibrary" and an associated solution. A solution serves as a container for one or more projects. You'll add additional, related projects to the same solution.
Start Visual Studio Code.
Go to the Explorer view and select Create .NET Project. Alternatively, you can bring up the Command Palette using Ctrl+Shift+P (Command+Shift+P on MacOS) and then type ".NET" and find and select the .NET: New Project command.
Choose the project template Class Library.
Then select the location where you would like the new project to be created: Create a folder named
ClassLibraryProjectsand select it.Name the project StringLibrary.
Select .sln as the solution file format.
Select Show all template options.
Next select .NET 10. Then select Create Project.
In the Do you trust the authors of the files in this folder? dialog, select Yes, I trust the authors. You can trust the authors because this folder only has files generated by .NET and added or modified by you.
Start by creating a GitHub Codespace with the tutorial environment, then create a .NET class library project.
Open a browser window and navigate to the tutorial codespace repository.
Select the green Code button, and then the Codespaces tab.
Select the
+sign or the green Create codespace on main button to create a new Codespace using this environment.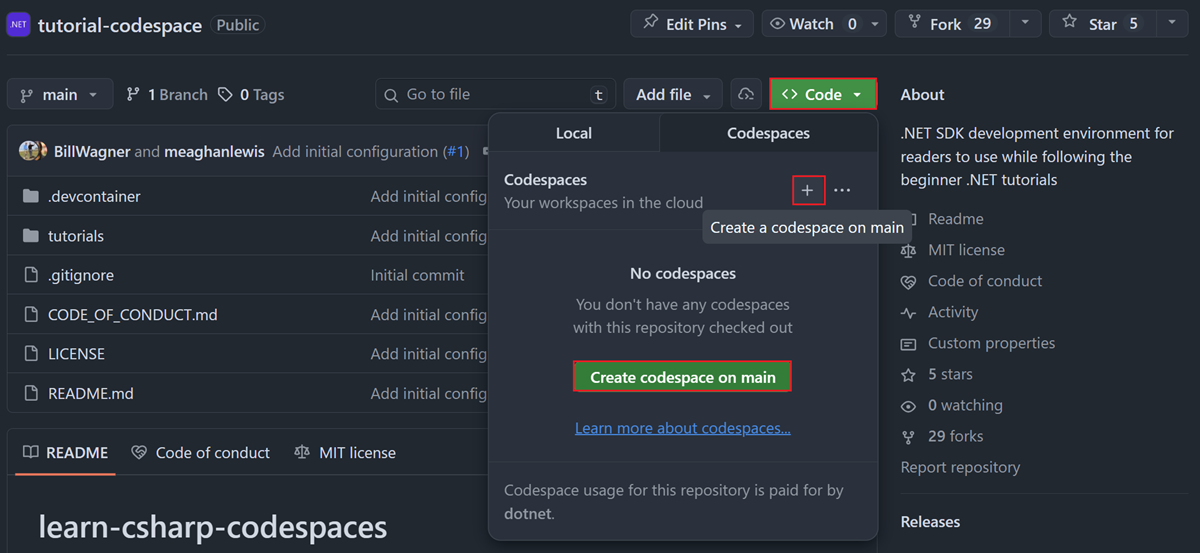
When your codespace loads, open the terminal and navigate to the tutorials folder:
cd tutorialsCreate a new class library project:
dotnet new classlib -n StringLibrary
Create a class library project
Add a new .NET class library project named StringLibrary to the solution.
Right-click on the solution in Solution Explorer and select Add > New Project.
On the Add a new project page, enter library in the search box. Choose C# or Visual Basic from the Language list, and then choose All platforms from the Platform list. Choose the Class Library template, and then choose Next.
On the Configure your new project page, enter StringLibrary in the Project name box, and then choose Next.
On the Additional information page, select .NET 10, and then choose Create.
Check to make sure that the library targets the correct version of .NET. Right-click on the library project in Solution Explorer, and then select Properties. The Target Framework text box shows that the project targets .NET 10.0.
If you're using Visual Basic, clear the text in the Default namespace text box.

For each project, Visual Basic automatically creates a namespace that corresponds to the project name. In this tutorial, you define a top-level namespace by using the
namespacekeyword in the code file.Replace the code in the code window for Class1.cs or Class1.vb with the following code, and save the file. If the language you want to use isn't shown, change the language selector at the top of the page.
namespace UtilityLibraries;

public static class StringLibrary
{
    public static bool StartsWithUpper(this string? str)
    {
        if (string.IsNullOrWhiteSpace(str))
            return false;

        return char.IsUpper(str[0]);
    }
}
Imports System.Runtime.CompilerServices Namespace UtilityLibraries Public Module StringLibrary <Extension> Public Function StartsWithUpper(str As String) As Boolean If String.IsNullOrWhiteSpace(str) Then Return False End If Dim ch As Char = str(0) Return Char.IsUpper(ch) End Function End Module End NamespaceThe class library,
UtilityLibraries.StringLibrary, contains a method namedStartsWithUpper. This method returns a Boolean value that indicates whether the current string instance begins with an uppercase character. The Unicode standard distinguishes uppercase characters from lowercase characters. The Char.IsUpper(Char) method returnstrueif a character is uppercase.StartsWithUpperis implemented as an extension method so that you can call it as if it were a member of the String class. The question mark (?) afterstringin the C# code indicates that the string may be null.On the menu bar, select Build > Build Solution or press Ctrl+Shift+B to verify that the project compiles without error.
The project is created and Class1.cs opens.
Replace the contents of Class1.cs with the following code:
namespace UtilityLibraries;

public static class StringLibrary
{
    public static bool StartsWithUpper(this string? str)
    {
        if (string.IsNullOrWhiteSpace(str))
            return false;

        return char.IsUpper(str[0]);
    }
}
The class library,
UtilityLibraries.StringLibrary, contains a method namedStartsWithUpper. This method returns a Boolean value that indicates whether the current string instance begins with an uppercase character. The Unicode standard distinguishes uppercase characters from lowercase characters. The Char.IsUpper(Char) method returnstrueif a character is uppercase.StartsWithUpperis implemented as an extension method so that you can call it as if it were a member of the String class.Save the file.
Expand Solution Explorer at the bottom of the Explorer view.
Right click the solution in Solution Explorer and select Build, or open the Command Palette and select .NET: Build to build the solution and verify that the project compiles without error.
The terminal output looks like the following example:
  Determining projects to restore...
  All projects are up-to-date for restore.
  StringLibrary -> C:\Projects\ClassLibraryProjects\StringLibrary\bin\Debug\net10.0\StringLibrary.dll
Build succeeded.
    0 Warning(s)
    0 Error(s)
Time Elapsed 00:00:02.78
Navigate to the StringLibrary folder:
cd StringLibraryOpen Class1.cs and replace its contents with the following code:
namespace UtilityLibraries;

public static class StringLibrary
{
    public static bool StartsWithUpper(this string? str)
    {
        if (string.IsNullOrWhiteSpace(str))
            return false;

        return char.IsUpper(str[0]);
    }
}
The class library,
UtilityLibraries.StringLibrary, contains a method namedStartsWithUpper. This method returns a Boolean value that indicates whether the current string instance begins with an uppercase character. The Unicode standard distinguishes uppercase characters from lowercase characters. The Char.IsUpper(Char) method returnstrueif a character is uppercase.StartsWithUpperis implemented as an extension method so that you can call it as if it were a member of the String class.Save the file and build the project:
dotnet buildThe build should succeed with no errors.
Add a console app to the solution
Add a console application that uses the class library. The app will prompt the user to enter a string and report whether the string begins with an uppercase character.
Add a new .NET console application named ShowCase to the solution.
Right-click on the solution in Solution Explorer and select Add > New Project.
On the Add a new project page, enter console in the search box. Choose C# or Visual Basic from the Language list, and then choose All platforms from the Platform list.
Choose the Console App template, and then choose Next.
On the Configure your new project page, enter ShowCase in the Project name box. Then choose Next.
On the Additional information page, select .NET 10 in the Framework box. Then choose Create.
In the code window for the Program.cs or Program.vb file, replace all of the code with the following code.
using System;
using UtilityLibraries;

int row = 0;

do
{
    if (row == 0 || row >= 25)
        ResetConsole();

    string? input = Console.ReadLine();
    if (string.IsNullOrWhiteSpace(input)) break;
    Console.WriteLine($"Input: {input} {"Begins with uppercase? ",30}: " +
                      $"{(input.StartsWithUpper() ? "Yes" : "No")}{Environment.NewLine}");
    row += 3;
} while (true);
return;

// Declare a ResetConsole local method
void ResetConsole()
{
    if (row > 0)
    {
        Console.WriteLine("Press any key to continue...");
        Console.ReadKey();
    }
    Console.Clear();
    Console.WriteLine($"{Environment.NewLine}Press <Enter> only to exit; otherwise, enter a string and press <Enter>:{Environment.NewLine}");
    row = 3;
}
Imports UtilityLibraries Module Program Dim row As Integer = 0 Sub Main() Do If row = 0 OrElse row >= 25 Then ResetConsole() Dim input As String = Console.ReadLine() If String.IsNullOrEmpty(input) Then Return Console.WriteLine($"Input: {input} {"Begins with uppercase? ",30}: " + $"{If(input.StartsWithUpper(), "Yes", "No")} {Environment.NewLine}") row += 3 Loop While True End Sub Private Sub ResetConsole() If row > 0 Then Console.WriteLine("Press any key to continue...") Console.ReadKey() End If Console.Clear() Console.WriteLine($"{Environment.NewLine}Press <Enter> only to exit; otherwise, enter a string and press <Enter>:{Environment.NewLine}") row = 3 End Sub End ModuleThe code uses the
rowvariable to maintain a count of the number of rows of data written to the console window. Whenever it's greater than or equal to 25, the code clears the console window and displays a message to the user.The program prompts the user to enter a string. It indicates whether the string starts with an uppercase character. If the user presses the Enter key without entering a string, the application ends, and the console window closes.
Right-click the solution in Solution Explorer and select New Project, or in the Command Palette select .NET: New Project.
Select Console App.
Give it the name ShowCase, select the default directory and select Create Project.
Open ShowCase/Program.cs and replace all of the code with the following code.
using System;
using UtilityLibraries;

int row = 0;

do
{
    if (row == 0 || row >= 25)
        ResetConsole();

    string? input = Console.ReadLine();
    if (string.IsNullOrWhiteSpace(input)) break;
    Console.WriteLine($"Input: {input} {"Begins with uppercase? ",30}: " +
                      $"{(input.StartsWithUpper() ? "Yes" : "No")}{Environment.NewLine}");
    row += 3;
} while (true);
return;

// Declare a ResetConsole local method
void ResetConsole()
{
    if (row > 0)
    {
        Console.WriteLine("Press any key to continue...");
        Console.ReadKey();
    }
    Console.Clear();
    Console.WriteLine($"{Environment.NewLine}Press <Enter> only to exit; otherwise, enter a string and press <Enter>:{Environment.NewLine}");
    row = 3;
}
The code uses the
rowvariable to maintain a count of the number of rows of data written to the console window. Whenever it's greater than or equal to 25, the code clears the console window and displays a message to the user.The program prompts the user to enter a string. It indicates whether the string starts with an uppercase character. If the user presses the Enter key without entering a string, the application ends, and the console window closes.
Save your changes.
Navigate back to the tutorials folder and create a new console app:
cd ..
dotnet new console -n ShowCase
Open ShowCase/Program.cs and replace all of the code with the following code:
using System;
using UtilityLibraries;

int row = 0;

do
{
    if (row == 0 || row >= 25)
        ResetConsole();

    string? input = Console.ReadLine();
    if (string.IsNullOrWhiteSpace(input)) break;
    Console.WriteLine($"Input: {input} {"Begins with uppercase? ",30}: " +
                      $"{(input.StartsWithUpper() ? "Yes" : "No")}{Environment.NewLine}");
    row += 3;
} while (true);
return;

// Declare a ResetConsole local method
void ResetConsole()
{
    if (row > 0)
    {
        Console.WriteLine("Press any key to continue...");
        Console.ReadKey();
    }
    Console.Clear();
    Console.WriteLine($"{Environment.NewLine}Press <Enter> only to exit; otherwise, enter a string and press <Enter>:{Environment.NewLine}");
    row = 3;
}
The code uses the
rowvariable to maintain a count of the number of rows of data written to the console window. Whenever it's greater than or equal to 25, the code clears the console window and displays a message to the user.The program prompts the user to enter a string. It indicates whether the string starts with an uppercase character. If the user presses the Enter key without entering a string, the application ends, and the console window closes.
Save your changes.
Add a project reference
Initially, the new console app project doesn't have access to the class library. To allow it to call methods in the class library, create a project reference to the class library project.
In Solution Explorer, right-click the
ShowCaseproject's Dependencies node, and select Add Project Reference.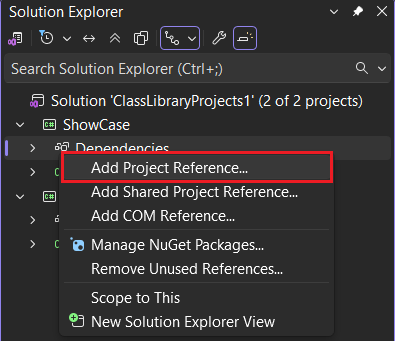
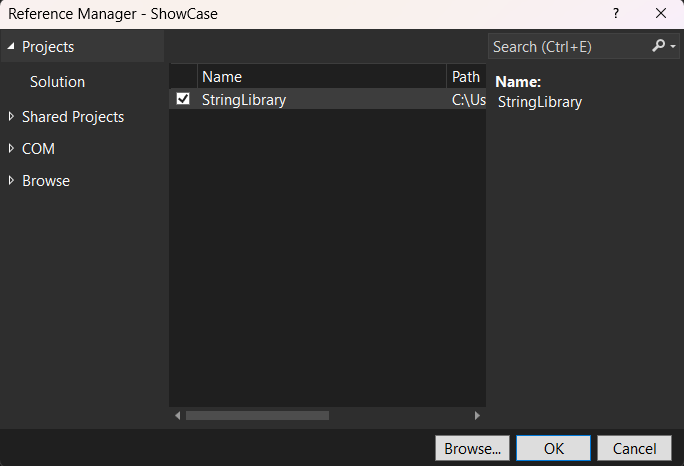
In the Reference Manager dialog, select the StringLibrary project, and select OK.
In Solution Explorer right click on the ShowCase project and select Add Project Reference.
Select StringLibrary.
Tip
Alternatively, add the following to ShowCase.csproj:
<ItemGroup>
  <ProjectReference Include="..\StringLibrary\StringLibrary.csproj" />
</ItemGroup>
Add a reference to the StringLibrary project from the ShowCase project:
cd ShowCase
dotnet add reference ../StringLibrary/StringLibrary.csproj
Run the app
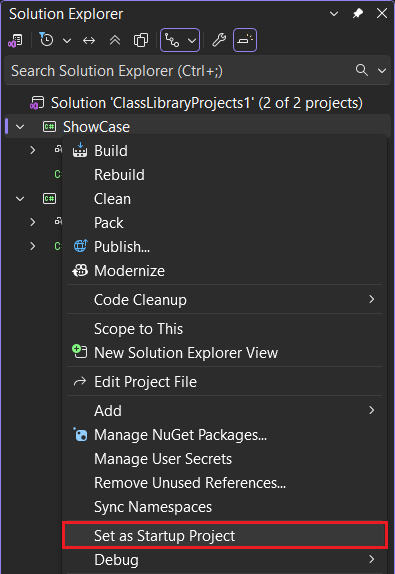
In Solution Explorer, right-click the ShowCase project and select Set as StartUp Project in the context menu.
Press Ctrl+F5 to compile and run the program without debugging.
Try out the program by entering strings and pressing Enter, then press Enter to exit.
Use the top menu bar to select Run > Run without debugging.
Select C#.
Select C#: ShowCase.
If you get an error that says no C# program is loaded, close the folder that you have open, and open the
ShowCasefolder. Then try running the app again.Try out the program by entering strings and pressing Enter, then press Enter to exit.
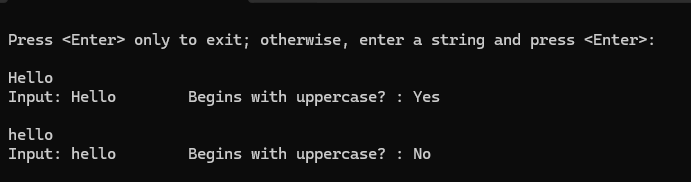
The terminal output looks like the following example:
Press <Enter> only to exit; otherwise, enter a string and press <Enter>:

A string that starts with an uppercase letter
Input: A string that starts with an uppercase letter
Begins with uppercase? : Yes

a string that starts with a lowercase letter
Input: a string that starts with a lowercase letter
Begins with uppercase? : No
Run the ShowCase app:
dotnet runTry out the program by entering strings and pressing Enter, then press Enter to exit.
The terminal output looks like the following example:
Press <Enter> only to exit; otherwise, enter a string and press <Enter>:

A string that starts with an uppercase letter
Input: A string that starts with an uppercase letter
Begins with uppercase? : Yes

a string that starts with a lowercase letter
Input: a string that starts with a lowercase letter
Begins with uppercase? : No
Additional resources
Cleanup resources
GitHub automatically deletes your Codespace after 30 days of inactivity. If you plan to explore more tutorials in this series, you can leave your Codespace provisioned. If you're ready to visit the .NET site to download the .NET SDK, you can delete your Codespace. To delete your Codespace, open a browser window and navigate to your Codespaces. You see a list of your codespaces in the window. Select the three dots (...) in the entry for the learn tutorial codespace. Then select "Delete".
Next steps
In this tutorial, you created a class library. In the next tutorial, you learn how to unit test the class library.
Or, you can skip automated unit testing and learn how to share the library by creating a NuGet package:
Or, learn how to publish a console app. If you publish the console app from the solution you created in this tutorial, the class library goes with it as a .dll file.
Sadarbojieties ar mums vietnē GitHub
Šī satura avotu var atrast vietnē GitHub, kur varat arī izveidot un pārskatīt problēmas un atgādāšanas pieprasījumus. Lai iegūtu papildinformāciju, skatiet mūsu līdzstrādnieku rokasgrāmatu.