Import or export an Azure SQL Database using private link
Applies to:
Azure SQL Database
This article explains how to import or export an Azure SQL Database using Private Link by using the Azure portal or Azure PowerShell with Allow Access to Azure Services set to OFF on the Azure SQL logical server.
Running Import or Export requires you to set Allow Access to Azure Services to ON, otherwise the Import or Export operation fails with an error. Often, users want to perform Import or Export using a private endpoint without requiring access to all Azure services.
Note
Import/export using private link for Azure SQL Database is currently in preview.
What is import/export private link?
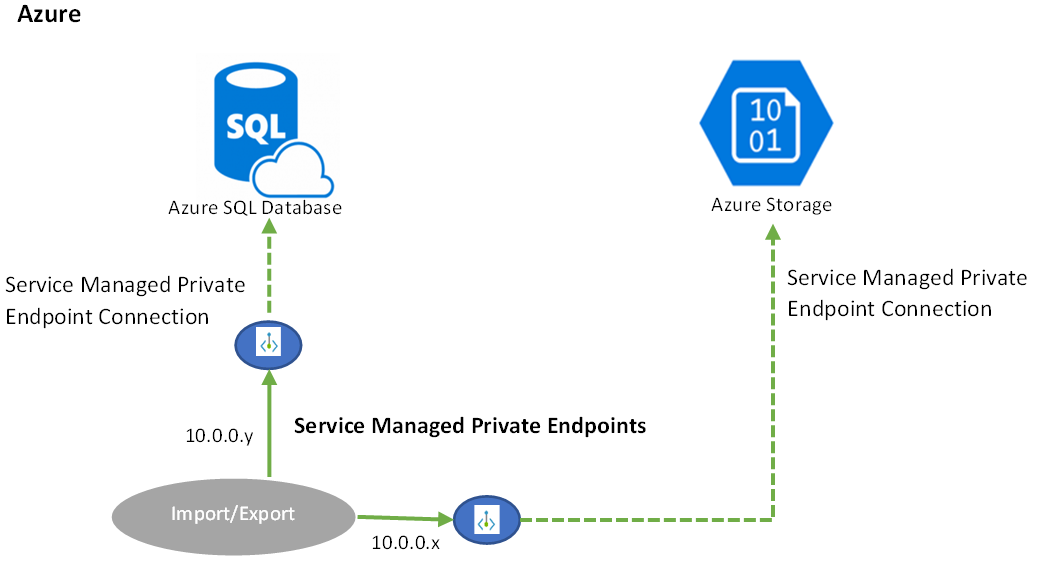
The database import/export private link is a service managed private endpoint created by Microsoft and that is exclusively used for all communications by the database import/export process, the Azure SQL database, and related Azure Storage services. A service managed private endpoint is a private IP address within a specific virtual network and subnet.
The private endpoint must be manually approved for both Azure SQL logical server and the Azure Blob storage, in separate steps, with details included in this tutorial.
Configure Import-Export Private Link using the Azure portal
Import/Export Private Link can be configured via Azure portal, PowerShell, or using REST API.
1. Configure Import/Export private link using the Azure portal
Create Import private link
- Go to the Overview page of the Azure SQL logical server into which you would like to import the database. Select Import database from toolbar.
- In the Import database page, select the Use private link option checkbox.

- Enter the storage account, authentication credentials, database details, and select OK.
Create Export private link
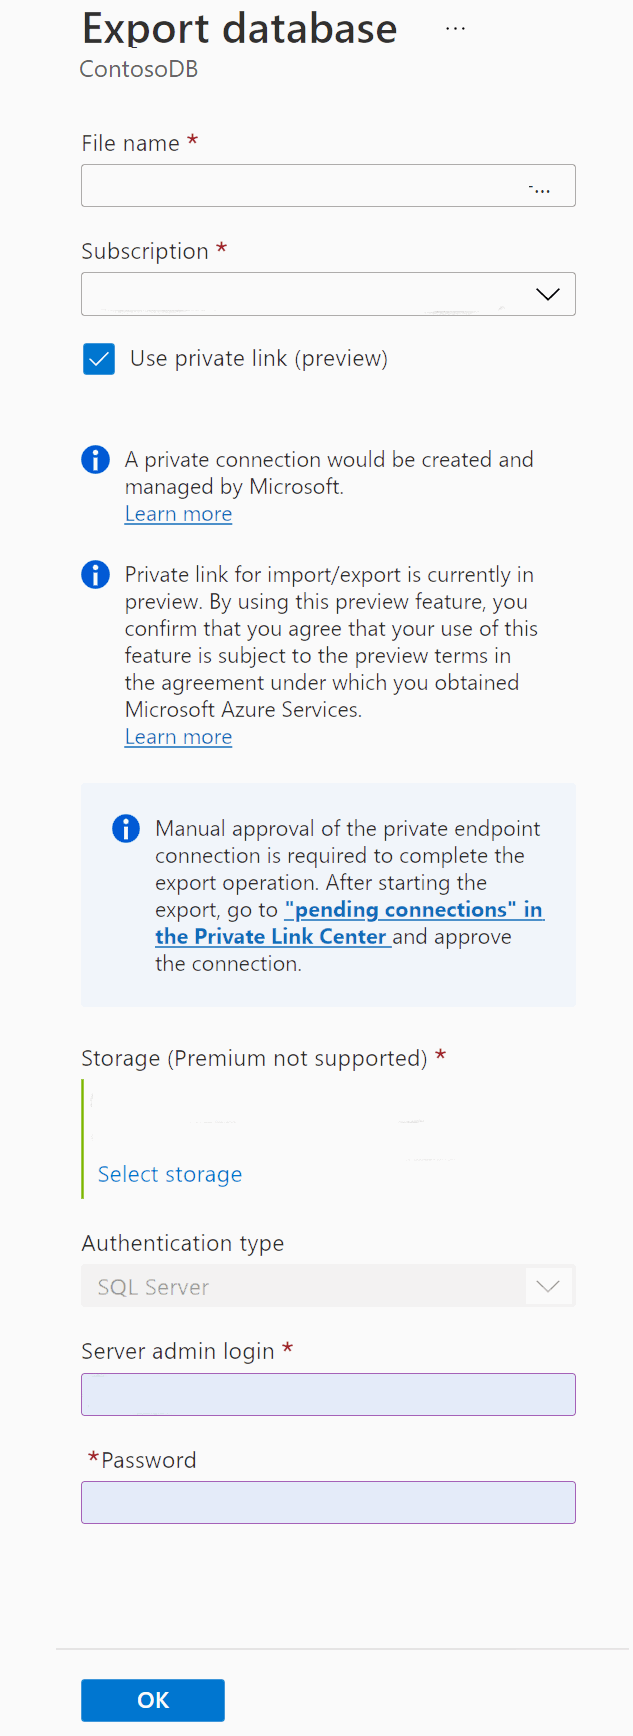
- Go to the Overview page of the Azure SQL database that you would like to export. Select Export from the toolbar.
- In the Export database page, select the Use private link option checkbox.

- Enter the storage account, authentication credentials, database details, and select OK.
2. Approve private link for Azure SQL logical server
The new private endpoint must be approved by the user in the Private Link Center or in the Azure SQL Database.
Option 1: Approve private endpoints in Private Link Center in Azure portal
- Go to Private Link Center in the Azure portal. In the Azure search box, search for "Private Link".
- Navigate to the Private endpoints page of the Private Link Center.
- Approve the private endpoints you created using the Import/Export service.
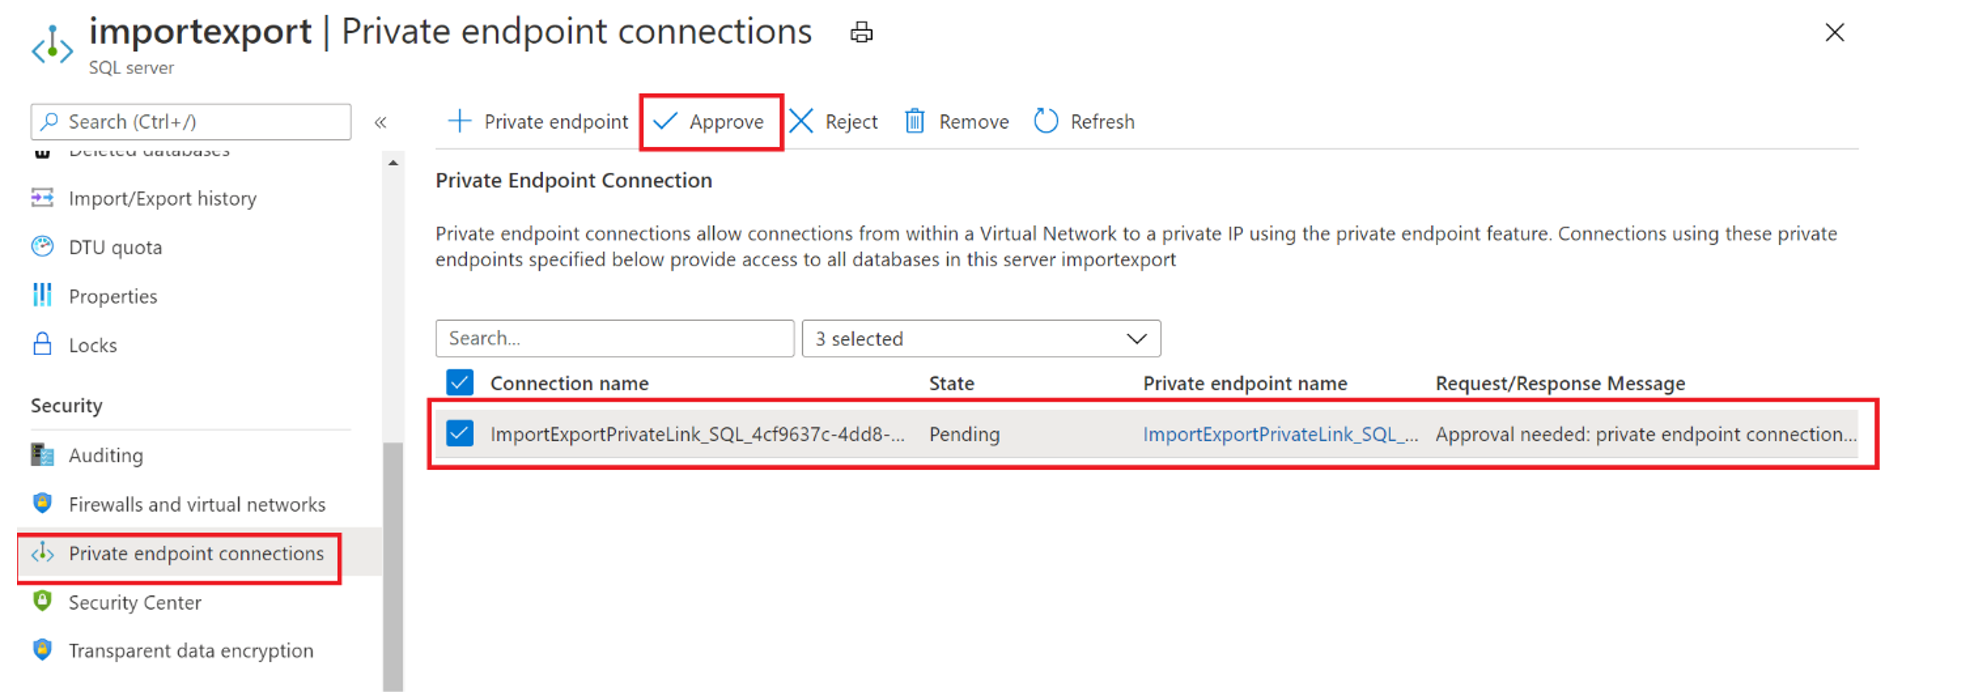
Option 2: Approve private endpoint connection on Azure SQL Database in Azure portal
Go to the Azure SQL logical server that hosts the database.
Navigate to the Networking page under Security
Select the Private access tab.
Select the private endpoint you want to approve.
Select Approve to approve the connection.
3. Approve private endpoint connection on Azure Storage
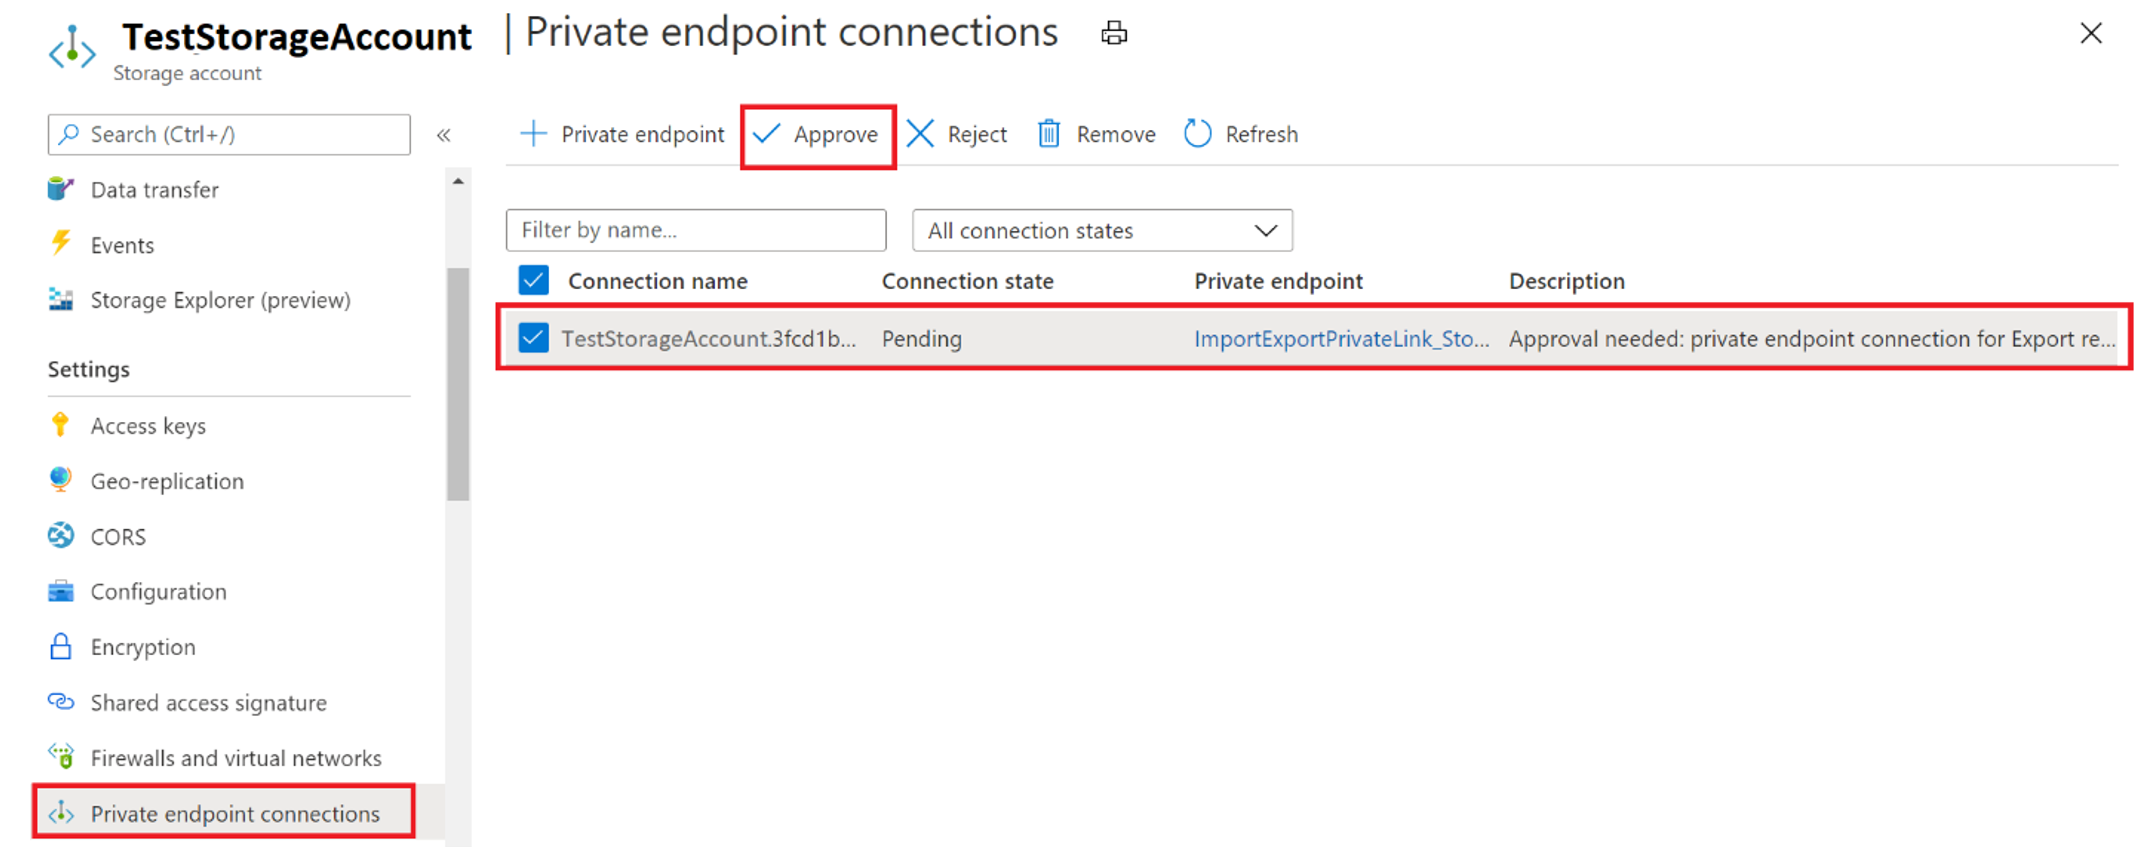
Approve the new private endpoint connection for the database import BACPAC file in Azure Storage.
- Go to the storage account that hosts the blob container where the BACPAC (
.bacpac) file exists. - Open the Private endpoint connections page in the Security menu.
- Select the private endpoint for the import/export service.
- Select Approve to approve the connection.
4. Check import/export status
- After the private endpoints are approved, both in the Azure SQL server and the Azure Storage account, the database import or export job will be kicked off. Until then, the jobs will be on hold.
- You can check the status of database import or export jobs in Import/Export History page under Data Management section in Azure SQL server page.

Configure import/export private link using PowerShell
Import a database using private link in PowerShell
Use the New-AzSqlDatabaseImport cmdlet to submit an import database request to Azure. Depending on database size, the import might take some time to complete. The DTU based provisioning model supports select database max size values for each tier. When importing a database use one of these supported values.
$importRequest = New-AzSqlDatabaseImport -ResourceGroupName "<resourceGroupName>" `
        -ServerName "<serverName>" -DatabaseName "<databaseName>" `
        -DatabaseMaxSizeBytes "<databaseSizeInBytes>" -StorageKeyType "StorageAccessKey" `
        -StorageKey $(Get-AzStorageAccountKey -ResourceGroupName $resourceGroupName `
                        -StorageAccountName "<storageAccountName>").Value[0]
        -StorageUri "https://myStorageAccount.blob.core.windows.net/importsample/sample.bacpac" `
        -Edition "Standard" -ServiceObjectiveName "P6" ` -UseNetworkIsolation $true `
        -StorageAccountResourceIdForPrivateLink "/subscriptions/<subscriptionId>/resourcegroups/<resource_group_name>/providers/Microsoft.Storage/storageAccounts/<storage_account_name>" `
         -SqlServerResourceIdForPrivateLink "/subscriptions/<subscriptionId>/resourceGroups/<resource_group_name>/providers/Microsoft.Sql/servers/<server_name>" `
        -AdministratorLogin "<userID>" `
        -AdministratorLoginPassword $(ConvertTo-SecureString -String "<password>" -AsPlainText -Force)
Export a database using private link in PowerShell
Use the New-AzSqlDatabaseExport cmdlet to submit an export database request to the Azure SQL Database service. Depending on the size of your database, the export operation might take some time to complete.
$exportRequest = New-AzSqlDatabaseExport -ResourceGroupName "<resourceGroupName>" `
        -ServerName "<serverName>" -DatabaseName "<databaseName>" `
        -StorageKeyType "StorageAccessKey" `
        -StorageKey $(Get-AzStorageAccountKey -ResourceGroupName $resourceGroupName `
                        -StorageAccountName "<storageAccountName>").Value[0]
        -StorageUri "https://myStorageAccount.blob.core.windows.net/importsample/sample.bacpac" `
        -UseNetworkIsolation $true `
        -StorageAccountResourceIdForPrivateLink "/subscriptions/<subscriptionId>/resourcegroups/<resource_group_name>/providers/Microsoft.Storage/storageAccounts/<storage_account_name>" `
         -SqlServerResourceIdForPrivateLink "/subscriptions/<subscriptionId>/resourceGroups/<resource_group_name>/providers/Microsoft.Sql/servers/<server_name>" `
        -AdministratorLogin "<userID>" `
        -AdministratorLoginPassword $(ConvertTo-SecureString -String "<password>" -AsPlainText -Force)
Create import/export private link using REST API
Existing APIs to perform Import and Export jobs have been enhanced to support Private Link. Refer to Import Database API.
Limitations
Currently, the private link for import/export has the following limitations:
To use Private Link with Import/Export, the user database and the Azure Storage blob container must be hosted on the same type of Azure Cloud. For example, either both in Azure Commercial or both on Azure Gov. Hosting across cloud types isn't supported.
Import or Export of a database from Azure SQL Managed Instance using PowerShell isn't currently supported.
Import/Export Private Link should not be used when the user Database or the Azure Storage account are protected by Resource locks.
Manual approval of the new private endpoint connection is required to complete the export operation. After starting the export, go to "pending connections" in the Private Link Center and approve the connections, which can take several minutes to appear.
Import using Private Link does not support specifying a backup storage redundancy while creating a new database and creates with the default geo-redundant backup storage redundancy. As a workaround, first create an empty database with desired backup storage redundancy using Azure portal or PowerShell and then import the BACPAC file into this empty database.
Import using REST API with private link can only be completed for an existing database since the API uses database extensions. As a workaround, create an empty database with the desired name, then call the Import REST API with private link.


