Notikumi
Veidojiet inteliģentas lietotnes
17. marts 23 - 21. marts 23
Pievienojieties meetup sērijai, lai kopā ar citiem izstrādātājiem un ekspertiem izveidotu mērogojamus AI risinājumus, kuru pamatā ir reālas lietošanas gadījumi.
Reģistrēties tūlītŠī pārlūkprogramma vairs netiek atbalstīta.
Jauniniet uz Microsoft Edge, lai izmantotu jaunāko līdzekļu, drošības atjauninājumu un tehniskā atbalsta sniegtās priekšrocības.
Azure DevOps Services | Azure DevOps Server 2022 - Azure DevOps Server 2019
Padoms
To import or update work items in bulk, you can use either the web portal or the CSV import feature, which is the recommended approach.
Save time with Microsoft Excel when you need to add or modify many work items, add links and attachments to multiple work items, and more. You can also use native Excel features to perform actions such as summing a column, copying and pasting rows, filling down data into cells, and more.
For information about connecting to Excel, see Connect Azure Boards to an Office client. For answers to specific questions about the integration of Excel and Azure DevOps, see FAQs: Work in Excel connected to Azure Boards.
Piezīme
macOS is not supported. Even with Visual Studio for Mac installed, connecting to Azure DevOps from Excel is not supported.
| Category | Requirements |
|---|---|
| Project access | Project member. |
| Access levels | At least Stakeholder access. |
| Permissions | - Member of the Contributors group. - View work items in this node and Edit work items in this node permissions set to Allow. By default, the Contributors group has this permission. For more information, see Set permissions and access for work tracking. |
| Tools | - Microsoft Excel 2010 or later, including Microsoft Office Excel 365. - Azure DevOps Office Integration 2019 (free). Install the Azure DevOps Office Integration plug-in by installing one of the latest editions of Visual Studio or the Azure DevOps Office Integration installer. The plug-in supports connection to Azure Boards and Azure DevOps Server from Excel. - Visual Studio 2015.1 or later or Team Foundation Server Office Integration 2015 Update 2 or later To use the Select User feature, download the free version of Visual Studio Community. This feature helps avoid data validation errors by misspelling user names and is useful when assigning user names from a large group of user accounts. |
| Category | Requirements |
|---|---|
| Project access | Project member. |
| Access levels | At least Stakeholder access. |
| Permissions | - Member of the Contributors group. - View work items in this node* and Edit work items in this node permissions set to Allow. By default, the Contributors group has this permission. For more information, see Set permissions and access for work tracking. |
| Tools | - Microsoft Excel 2010 or later, including Microsoft Office Excel 365. - Azure DevOps Office Integration 2019 (free). Install the plug-in by installing one of the latest editions of Visual Studio or the Azure DevOps Standalone Office Integration installer. The Azure DevOps Office Integration 2019 plug-in supports connection to Azure Boards and Azure DevOps from Excel, Project, and the PowerPoint-based storyboarding tool. - To use the Select User feature, install Visual Studio 2015.1 or later or Azure DevOps Office Integration 2019 or later. You can download the free version of Visual Studio Community. This feature helps avoid data validation errors by misspelling user names and is useful when assigning user names from a large group of user accounts. |
For more information, see Compatibility with Azure DevOps Server.
You can add, modify, publish, and refresh work items using any query type and list type.
Follow these best practices:
Query types:
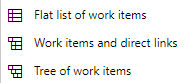
Azure Boards supports three query types, indicated by icons next to each query:
Direct links queries are imported as a flat list into Excel, as modifying multiple types of links isn't supported in Excel.
You can bulk add a nested list of work items, such as a work breakdown structure or hierarchical user stories. For example, you can add a nested list of tasks, subtasks, and bugs, or link tasks to product backlog items.
List types:
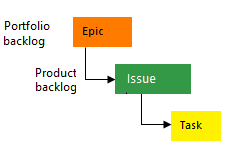
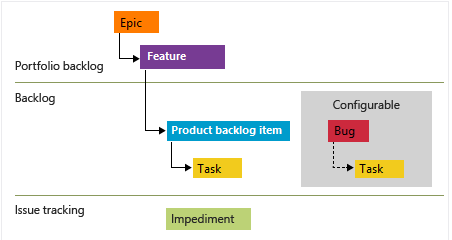
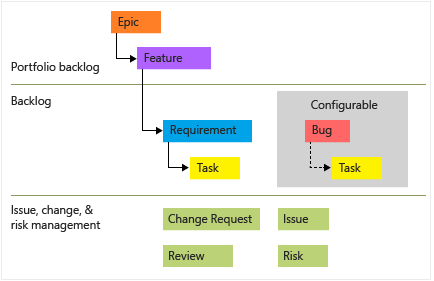
Parent-child links or other tree topology link types support creating a hierarchical backlog structure. The work item types that participate in the hierarchy differ with different processes and are shown in the following images.
Hierarchies
The following image shows the hierarchy for the Agile process backlog work item:
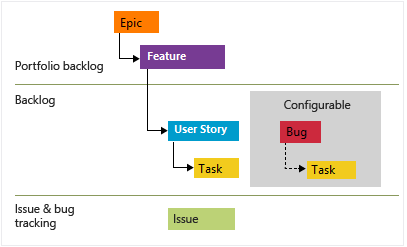
Each team can configure how they manage Bug work items at the same level as User Story or Task work items. Use the Working with bugs setting. For more information about using these work item types, see Agile process.
To import a hierarchical list, see Add or import a hierarchical list of work items later in this article.
You can open any query you defined in Azure Boards in Excel, including queries under My Queries and Shared Queries. However, if you plan to share the workbook with other team members, use a Shared Query. Other team members can't access workbooks or worksheets based on personal queries stored under your My Queries folder.
You can use most Excel features when you work with a list of work items.
Features:
Each worksheet in Excel can contain a different input list or query. However, all worksheets within the workbook must connect to the same project within an organization or project collection.
The following features behave differently when working with a worksheet connected to Azure Boards.
We recommend you publish and refresh your worksheet often to make sure your local work remains in sync with Azure Boards data store. For more information about Excel, see Basic Excel tasks .
You can sort work item flat lists using the Excel sort feature. But, if you're working from a tree list, you don't want to do any type of sort. Doing so changes the tree structure and as such, the links between work items.
If you want to use Excel to manage the order of your work items as they appear in a team backlog, you can do that by using the Stack Rank or Backlog Priority field (Agile or Scrum process). You can set values in these fields, publish your worksheet, and refresh your backlog. Your backlog items should appear reordered based on lowest to highest number. However, the next time the backlog is reordered from the backlog, the values you entered are subject to change.
To maintain a specific order of work items, consider adding a custom field to manage the sort order. You can then use this field within Excel to sort your flat list of work items. This option doesn't change the order in which work items appear in your backlog.
You can and can't do the following tasks from an Excel worksheet:
Can do:
Can't do:
Open Excel and connect to your Azure Boards project. Use one of the four methods provided in Connect Azure DevOps project to Excel.
Piezīme
When you connect to Azure Boards in the cloud, the Team Project Collection is automatically selected as there is only one collection associated with your Azure DevOps Services organization. When you connect to Azure Boards in an on-premises server, you choose the Team Project Collection prior to choosing the project.
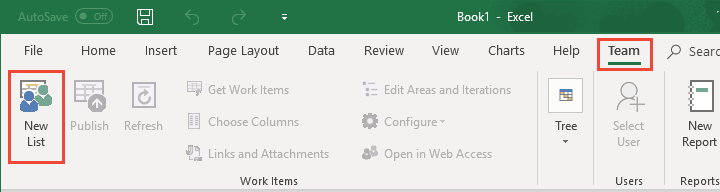
In Excel, start with a blank worksheet. If you don't see the Team ribbon (or the Team menu if you use Excel 2007), ensure that you installed the Azure DevOps Office Integration 2019 tool. For more information, see Azure DevOps Office integration issues.
Choose New List from the Team ribbon.
From the New List dialog, choose Input list.
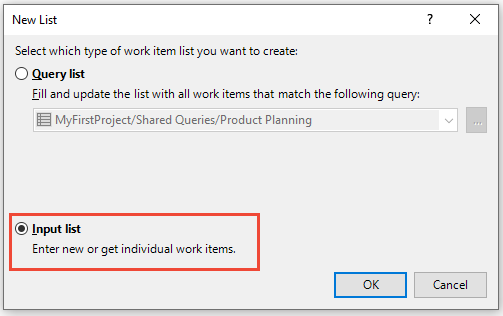
Your worksheet is now bound to your project as an input list (Query[None]), flat list.

Specify the titles of the work items you want to add and their work item type.
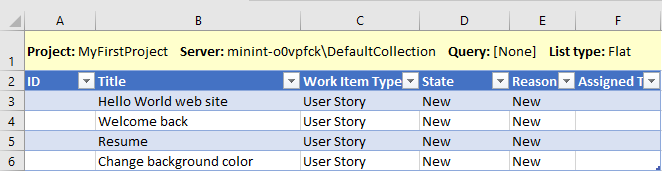
The State and Reason fields automatically populate with default values once your select the work item type.
Publish your worksheet.
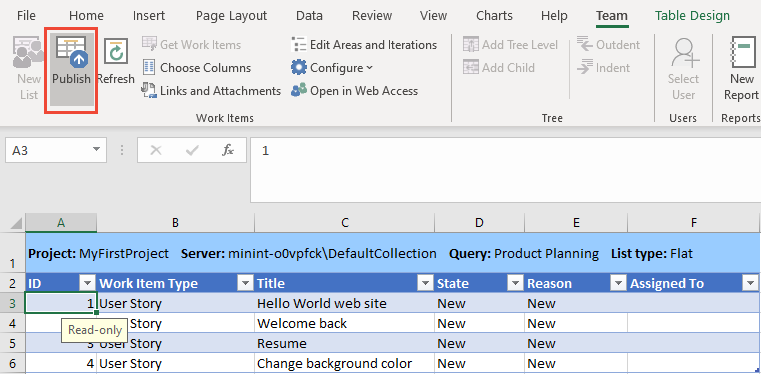
Make sure your cursor is in a cell that contains data. Otherwise, the Publish button might appear disabled.
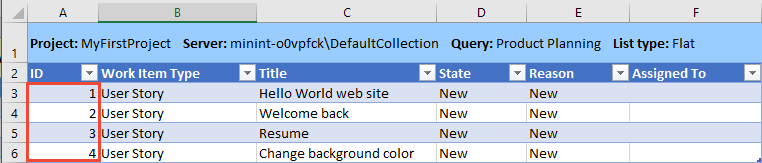
You work items now have ID numbers.
To assign values to other fields, open Choose Columns, add the fields, make the assignments, and publish your changes.
Padoms
When you add work items to a team backlog, ensure you specify the team's Area Path and Iteration Path. If you need to add Area Paths or Iteration Paths, select Edit Areas and Iterations. This link opens the Project settings page in a web browser. For more information, see Define area paths and assign to a team and Define Iteration Paths and configure team iterations.
To open a work item to add more information, Choose the work item you want to open and then choose Open in Web Access. Before you do, make sure you publish any changes you made.
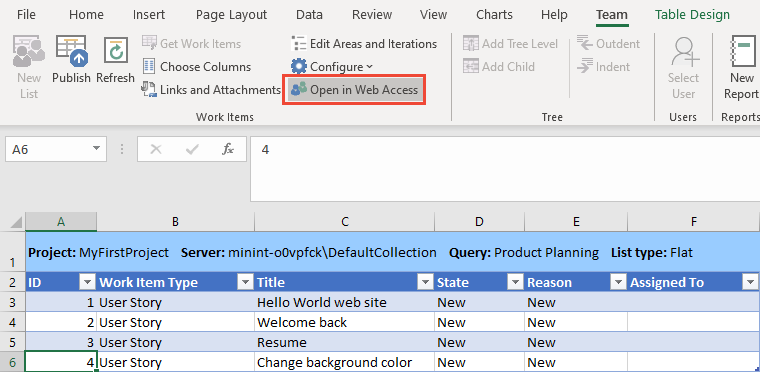
A web browser opens and displays the work item. If you make changes to the work item, immediately refresh your worksheet to capture the changes.
You can add a hierarchy of work items linked using parent-child links or other tree topology link type.
Svarīgi
Avoid sorting a tree list, as it can alter the hierarchical link relationships.
Starting from Step 5 from the previous procedure, convert your flat list, input list into a tree list. Choose a cell within the flat list and then select Add Tree Level.
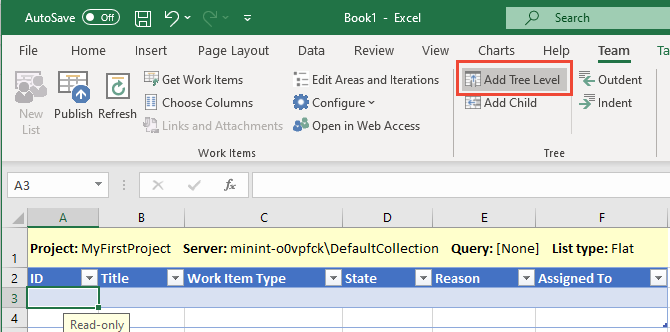
If the Add Tree Level is disabled, you're working from a query list. To convert your list to a tree list, you must first reconfigure your list to an input list.
Choose the link type to use when you're adding work items to a hierarchy, and then select Convert. The most usual choice is Parent-Child. You can only select from tree topology link types. For more information, see Link type topologies and restrictions.

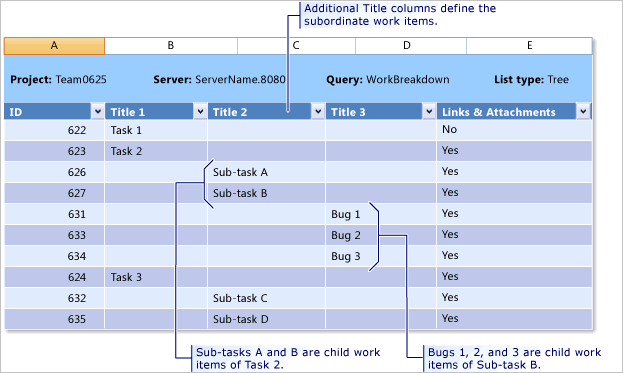
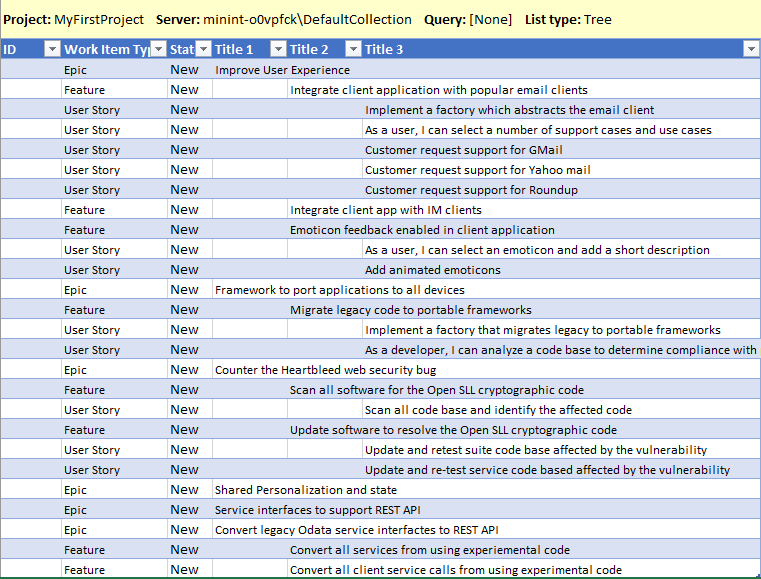
The List type changes to Tree and a second Title column appears.
To add more levels to the hierarchy, select Add Tree Level again. For example, if you want to add a hierarchy of Epics, Features, and User Stories, you want to have Title 1, Title 2, and Title 3 columns.
If you want to add tasks, add another tree level to have four title columns. To remove a column, see Remove a tree level.
Save your Excel file.
Enter the Work Item Type and Titles for the hierarchy you want to import. The State fields automatically fill in with default values once you select the work item type.
Publish your worksheet.

Make sure your cursor is in a cell that contains data. Otherwise, the Publish button might appear disabled.
IDs are now assigned to your work items. In the background, the link type you selected is used to link each work item in the hierarchy. Epics are linked to Features. Features are linked to User Stories.
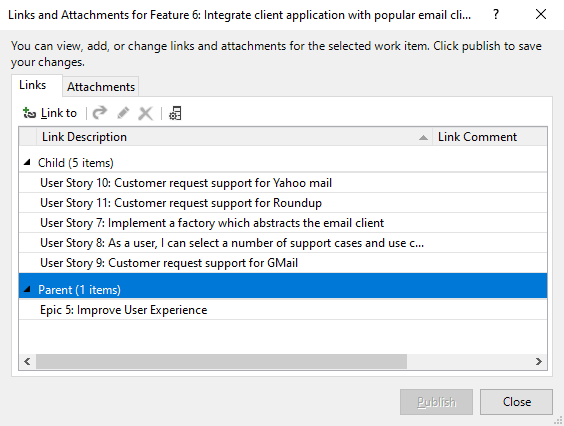
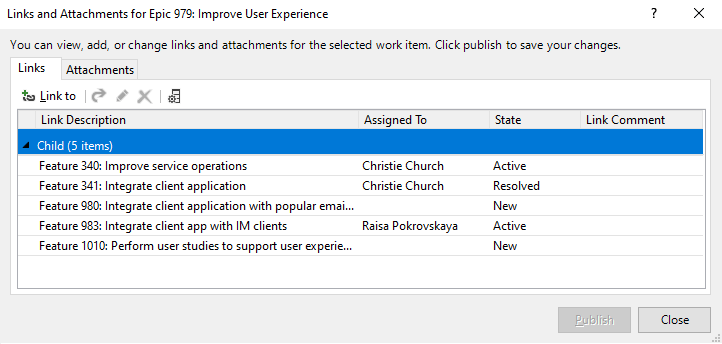
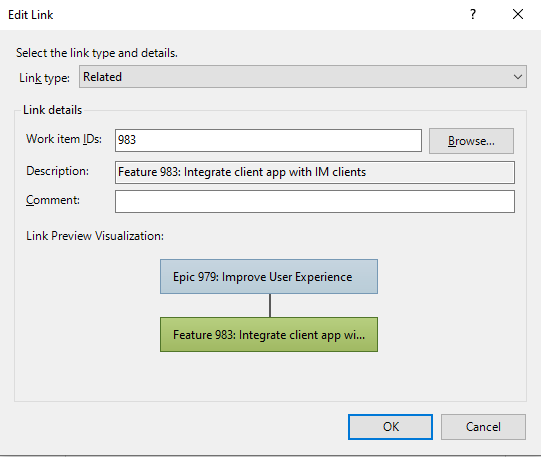
To check the links made, choose a work item and choose Links and Attachments.
For example, here we show the Child and Parent links created for a Feature that was imported.
To enter a row under a work item where you want to add a child, choose the row and then choose Add Child.

To assign values to other fields, open Choose Columns, add the fields, make the assignments, and publish your changes.
To change the hierarchy, cut and paste the entire row of a work item to place it under the new parent. When you publish the change, the old hierarchical links are deleted, and the new hierarchical links are created.
You can use the  or
or  indent/outdent icons to demote or promote a work item within the tree hierarchy. Ensure the header at the top of the column reads Title n; if it doesn't, add a tree level.
First, publish changes that you made to work items before you remove a tree level. Removing a tree level requires a refresh, which overwrites data in the work item list. You lose any data you didn't publish.
Next, delete any content under the tree-level Title number column you want to remove—the highest numbered column—. This column should be the highest numbered column in the tree.
Refresh your worksheet. The column containing empty values for the Title is removed.
You get an error message if you attempt to delete the column.
Excel uses the data in the Title columns to determine the pattern of links between work items. When you publish changes, any of the following conditions can result in an error, an invalid link, or a tree link being created between incorrect work items:
To resolve an error, see Resolve invalid links.
Additionally, a parent-child linked work item can only have one parent. You can't add the same work item task to two backlog items. Instead, define distinct work item tasks.
The easiest way to bulk update multiple work items is to create a query for the work items you want to update, and then open that query in Excel.
Padoms
Keep your work in sync with these tips:
 (Refresh) when you first open a saved worksheet to download the latest data from the data store.
 (Choose Columns) to enter data for additional fields.
From the web portal or Visual Studio, create the work item query that contains the work items you want to update. For more information, see Create and save managed queries with the query editor.
Open Excel and connect to your Azure Boards project. Use one of the four methods provided in Connect Azure DevOps project to Excel.
If you opened your query from the web portal or Visual Studio, you're done. Make any changes you want. Open Choose Columns, add fields, make assignments, and publish your changes.
If you start from Excel, open a blank worksheet. You can add a worksheet to an existing workbook, as long as you're choosing a query from the same project the workbook is bound to.
Choose New List from the Team ribbon.
From the New List dialog, choose Query list, and select the query you want from the drop-down menu.
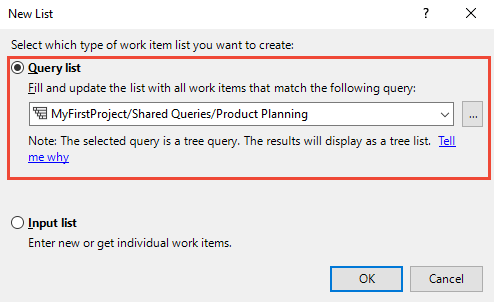
The icon next to each query indicates the query type. The first two query types, Flat list of work items and Work items and direct links are imported as flat list queries. Only the Tree of work items queries import as a tree list.
With the work items imported to Excel, make the modifications you want and publish your changes.
If you're working with a tree list, see also the information provided in Import a hierarchical list of work items.
If the Tree group commands aren't available, your worksheet is configured as a flat or query list. To enable the Tree group commands, convert the list to either an input list or a list based on a tree query. For more information, see the next section on Change your list type or query.
You can change the work items listed in your worksheet. Specifically, you can:
You can change your flat list to a tree list. However, if your list is a query list, you need to reconfigure it first. If the Tree group commands are disabled, it indicates a flat or query list.

To convert your query list to an input list, follow these steps.
Publish your changes.
On the Team ribbon, choose Configure, List.

Choose Refresh work items only and then Apply.
This choice changes the query list to an input list.
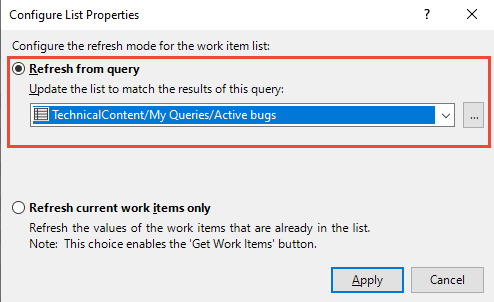
To convert from an input list to a query list, choose Refresh from query, select the query, and then Apply.
If you're working from a query, modify your query to contain the work items you want. Then refresh your list. The other work items appear in your list.
If you're working with an input list, complete these steps.
From the Team ribbon, choose Get Work Items.
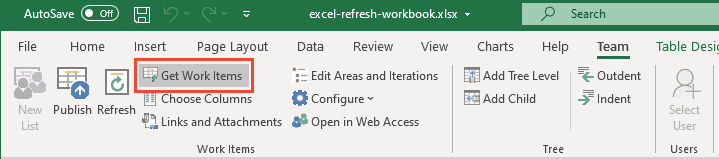
Choose the method you want from the three options available.
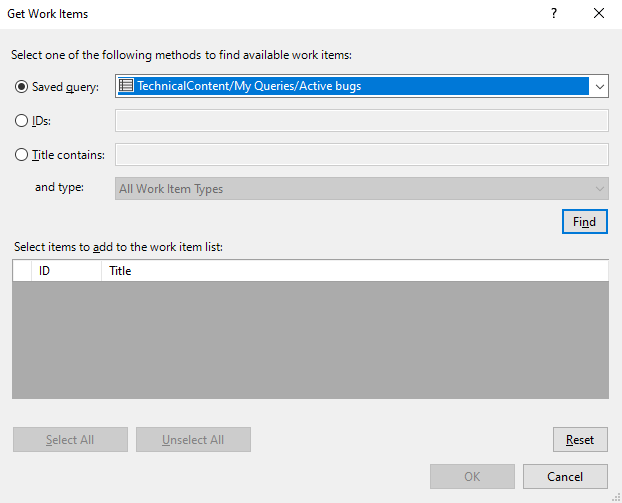
If the work items are defined in another project, then first select the Project. Then, make your selections:
Piezīme
To minimize the time required to run the query, narrow the filter criteria of the search.
Choose Find.
Only those work items defined for the selected project and specified work item type are listed. To sort on a column field, choose the column Title.
In the list of returned work items, select the check-box of one or more work items.
If you start your worksheet with a New List, you see only a set of default field columns. You can add columns using the Choose Columns on the Team ribbon.
If you start your worksheet from an existing query, you see all the column fields defined for the query. From there, you can add columns using the Choose Columns. However, your additions don't modify the underlying query.
To assign values to other fields, choose Column Options to add the fields of interest.

Once the fields appear in the worksheet, assign values and publish your updates. When working with identity fields, ones that accept user accounts, see the next section, Select user accounts.
Save your worksheet.
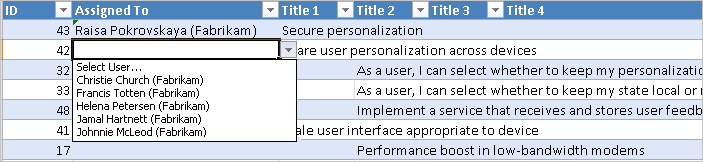
Use the Select User feature to find user accounts and assign values to person-named fields. This feature also provides access to the most recently used (MRU) values. If your team has hundreds or thousands of user accounts, this feature is especially useful.
Padoms
Without the Select User feature, you must enter user names exactly as they are in the database, or you'll receive data validation errors when you try to publish.
If you don't have the latest version of Visual Studio (2015.1 or later version, get it now. You need the latest update to access the Select User feature.
Choose an identity or person-named field to activate the Select User feature in the Team ribbon.

An identity or person-named field contains a user identity. These fields are typically synchronized with a user account database, such as Microsoft Entra ID, Active Directory, or a Workgroup.
Begin entering the name of the user account and the Assign User dialog automatically filters the results until you can select the account of interest.
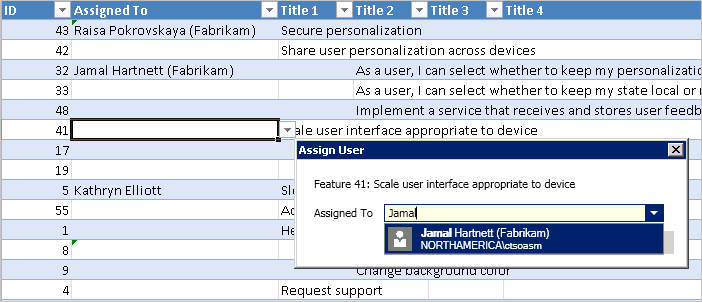
Enter a letter to jump to names starting with that letter. Only user names are recognized; account aliases aren't. As you select user names, Excel remembers your recent selections, allowing you to choose user accounts directly from the field.
You can complete many actions from the Links tab of the Links and Attachments dialog. Specifically, you can:
For more information on linking work items, see Link user stories, issues, bugs, and other work items.
You can't use the Links and Attachments dialog to bulk update work item links. To bulk update tree-topology link types, use a tree list instead.
To link a work item to other work items, choose the work item and then choose Links and Attachments. From the Links tab, choose Link to and then choose the Link Type and work item you want to link to. Choose OK and then Publish.

When you're done, select Close to dismiss the dialog.
To link several work items to the same work item, multi-select them by using Ctrl-select for consecutive rows, or Shift-select for nonconsecutive rows.
In the Add link dialog, you can open a secondary dialog to select one or more work items to link to. If you plan to find and list work items using a saved query, first define the query.
In the Add link dialog, select Browse (Visual Studio) to open the following dialog.
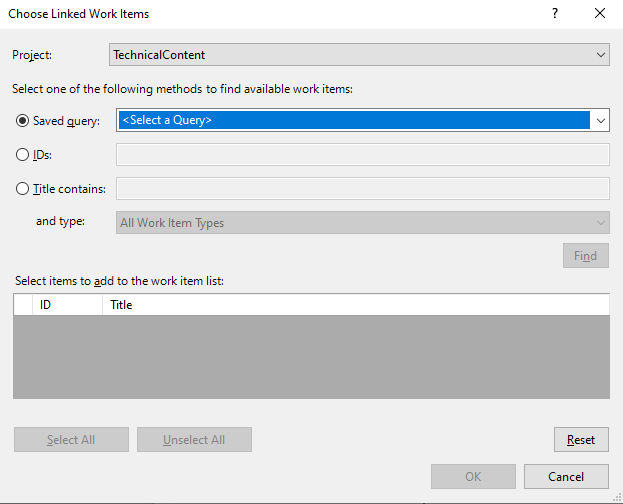
The Choose Linked Work Items dialog works in the same way as the Get Work Items dialog. For more information, see Add existing work items to your worksheet described earlier in this article.
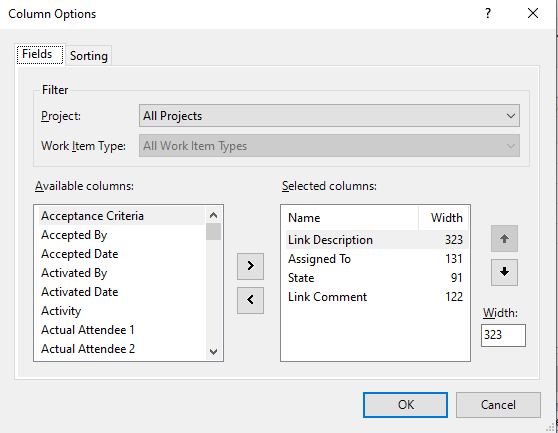
From the Links tab, choose the ![]() Columns icon, and add the fields you want displayed. Here we add the Assigned to and State fields.
Columns icon, and add the fields you want displayed. Here we add the Assigned to and State fields.
To reorder the links, choose the field to sort the list on that field.
This dialog works in the same way as the Get Work Items dialog. See Add existing work items to your worksheet described earlier in this article.
From the Links tab, choose the linked work item, right-select to open the context menu, and choose Open Linked Item.

The work item opens in your web portal.
You can edit any listed link, including changing the link type and the linked work items.
Choose the link and choose the ![]() Edit icon.
Edit icon.
Change the link type as needed.
To change the work item linked to, enter the ID of the work item, or choose Browse to find the work item to link to.
The Choose Linked Work Items dialog works in the same way as the Get Work Items dialog. For more information, see Add existing work items to your worksheet described earlier in this article.
Open the work item, then select Links and Attachments > Attachments.
Choose the file you want to attach, then select OK > Publish.
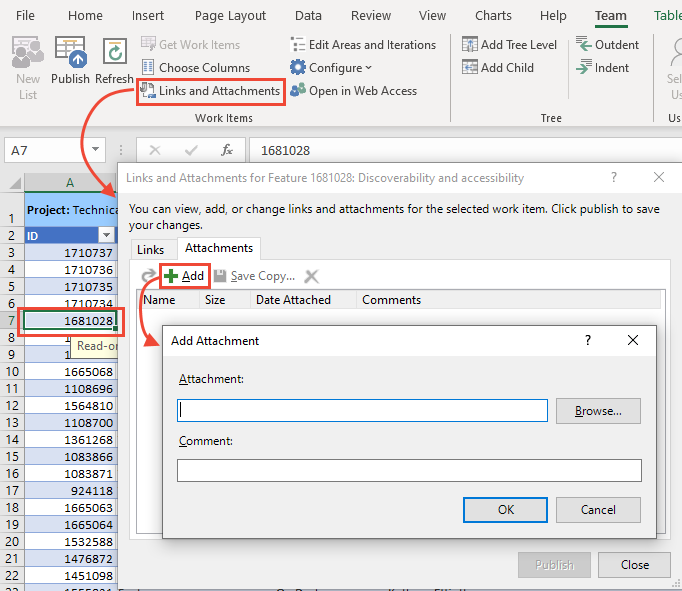
When you're done, select Close.
Optional: To add one or more same attachments to several work items, multi-select them by using Ctrl-select for consecutive rows, or Shift-select for nonconsecutive rows.
You can create a report or chart from the web portal for flat-list queries. See Track progress by creating status and trend query-based charts.
Svarīgi
You can create an Excel report using New Report only from an on-premises Azure DevOps Server. These reports require your project's collection to be configured to support SQL Server Analytics Server.
Select New Report.

For more information, see Create Excel reports from a work item query.
To resolve publishing errors that might arise when you're working in Excel, see one of the following articles:
Notikumi
Veidojiet inteliģentas lietotnes
17. marts 23 - 21. marts 23
Pievienojieties meetup sērijai, lai kopā ar citiem izstrādātājiem un ekspertiem izveidotu mērogojamus AI risinājumus, kuru pamatā ir reālas lietošanas gadījumi.
Reģistrēties tūlītApmācība
Mācību ceļš
Use advance techniques in canvas apps to perform custom updates and optimization - Training
Use advance techniques in canvas apps to perform custom updates and optimization
Dokumentācija
Import, update, and export bulk work items with CSV files - Azure Boards
Learn how to import, update, and export work items in bulk from a CSV formatted file in Azure Boards.
Work in Excel connected to Azure Boards FAQs - Azure Boards
Learn answers to frequently asked questions about Excel and Azure Boards.
Connect Azure Boards to an Office client to track your work - Azure Boards
Learn how to connect to Excel to integrate and track your work in Azure Boards or Azure DevOps Server.