Expedite work using swimlanes
Azure DevOps Services | Azure DevOps Server 2022 - Azure DevOps Server 2019
Your board helps you visualize the flow of work as it moves from defined to completed. When you add swimlanes, you can also visualize the status of work that supports different service-level classes. You can create a swimlane to represent any other dimension that supports your tracking needs.
Prerequisites
- To configure team settings, you must be added to the Team Administrator role or be a member of the Project Administrators security group. To get added, see Add a team administrator or Change project-level permissions.
- You must be assigned Basic access or higher to exercise all backlog and board features. Users with Stakeholder access can only edit work items on the board and add existing tags to a work item. Stakeholders can't add work items or update fields displayed on cards. For more information, see About access levels.
- To configure team settings, you must be added to the Team Administrator role or be a member of the Project Administrators security group. To get added, see Add a team administrator or Change project-level permissions.
- You must be assigned Basic access or higher to exercise all backlog and board features. Users with Stakeholder access can only edit work items on the board and add existing tags to a work item. Stakeholders can't do the following tasks. For more information, see About access levels.
- Add work items to a board
- Drag-and-drop work items to update status or reorder cards
- Update fields displayed on cards
Types of swimlanes
You can use up to 50 swimlanes to sort work on your board to track items that you differentiate as follows:
- High priority items
- Service-level class
- Date-driven requirement
- Dependency for or from another team
- Blocked items
- Technical debt or other engineering work that's not a specific user story
Track work in swimlanes
You can drag items into a swimlane, and also reorder them within the lane.
Tip
- Enter
oto expand all swimlanes anduto collapse all swimlanes. To move the focus up or down, enter the↑↓up/down arrows. For more information, see Keyboard shortcuts. - When you have many swimlanes or cards on your board, you may encounter slow performance when dragging a card. We recommend that you use swimlanes in conjunction with card styles, tags, and board filters to manage your work items. If you have a lot of cards in the default lane, place that lane lower on the board to enhance performance when dragging a card to another swimlane.

Note
The default lane appears unlabeled on the board. You can rename it to anything you like, but, you can't delete it or apply rules.
You can also focus on a single swimlane by collapsing all other lanes.

Important
Work items that appear on more than one team's board can yield results that don't meet your expectations because each team can customize its board columns and swimlanes. The values assigned to Board Column, Board Column Done, and Board Lane fields might differ from what you expect when another team updates the work item from a different board. For more information, see Add, review, and update work items in Azure Boards.
Add or remove a swimlane
Which swimlanes support your tracking needs? Once you identify a few, add them to your board.
Open your board. If you're not a team admin, get added as one. Only team and project administrators can customize the board.
Choose
 Configure board settings to configure the board.
Choose Swimlanes, choose Add swimlane, and then enter the name of the swimlane you want to add. For example, here we enter Expedite. You can optionally select the more actions icon
 to insert a new swimlane above or below another swimlane.
Note
The following images show the user interface that displays when the New Boards Hub preview feature is enabled. Some features are only available when the New Boards Hub is enabled as described in Key concepts and work item tasks in Azure Boards. For example, the ability to choose the swimlane color is only supported when the New Boards Hub feature is enabled. To enable it, see Manage or enable features.

To set the color of the swimlane, choose a color from the drop-down menu. To reset the swimlane to the default, choose
 Reset to default color.
To reorder a swimlane, choose the up or down menu selector
 to move it up or down. To remove a swimlane, choose
  the trash bin icon, but first move all items out of the lane.
When you're done with your changes, choose Save.
Open your board. If you're not a team admin, get added as one. Only team and project admins can customize the board.
Choose the
gear icon to configure the board and set general team settings.
Choose Swimlanes and then choose the
 plus icon and enter the name of the swimlane you want to add.
The default lane appears unlabeled on the board. You can rename it to anything you like, however, you can't delete it. Also, you can rename it directly from the board.
To reorder your swimlanes, grab the lane and move it up or down.

If you need to delete a swimlane, first move all items out of the lane. Then open the Settings dialog, choose the
 actions icon and select Remove.
When you're done with your changes, choose Save.
Set up swimlane rules
Swimlane rules are similar to style rules, but instead they allow you to set up conditions on your board to automatically move work items into specific lanes. For example, you can set up a lane for each person on your team. When you assign the work item, it gets placed into that lane.
Swimlane rules get executed in order, so once the rule is met, it executes and moves on to the next work item. For example, Lane 1 has a rule that says "where priority = 1" and Lane 2 has a rule that says "where priority = 2". If the work item is set to priority = 1, it gets moved into Lane 1.
The following limits apply to swimlanes:
- Up to five rules per lane
- Max of 25 rules total
- Only
ANDrules are supported
Complete the following steps to set up swimlane rules for your board.
From your board, choose the
 gear icon to Configure board settings.
Select Swimlanes, select the swimlane or + Add swimlane, and then select + Add criteria.

Choose from the dropdown menus for each of the following entries: Field, Operator, and Value, and then choose Save. For more information, see the examples in the next section.

Tip
You can't assign rules to the Default lane, but you can optionally rename it.
When your board refreshes, your work items are listed within the appropriate swimlane.
Examples of swimlane rules
The following examples show some of the ways you can use and set up swimlane rules.
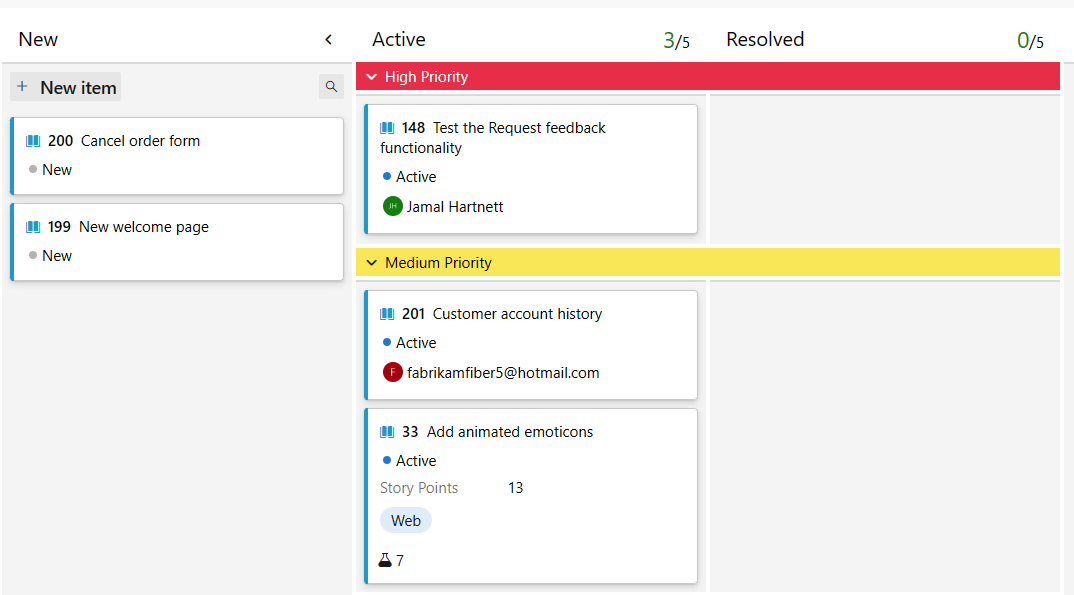
Track priority. We created rules for the
Work Item TypeandPriorityfields, so work items automatically go into the appropriate swimlane.Settings

Board results
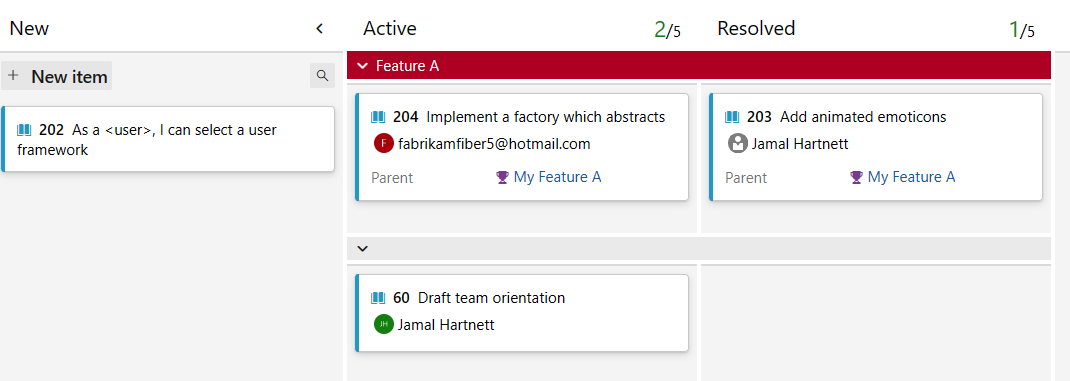
Track the parents of your work items. We created rules for the
Work item typefield, so you can quickly see parents (features) and children (user stories and bugs) in their own swimlanes on the board.Settings

Board results
Track each person's work on your team. We created rules for the
Assigned tofield, so that when you assign a work item, it goes into that user's lane.Settings

Board results

Query for work items based on swimlane
You can track which work items get added to a board swimlane by creating a query and using the Board Lane field.
Next steps
Related articles
REST API resources
To programmatically interact with the board and other team settings, see the REST API, Boards reference.
Atsauksmes
Drīzumā: 2024. gada laikā mēs pakāpeniski pārtrauksim izmantot “GitHub problēmas” kā atsauksmju par saturu mehānismu un aizstāsim to ar jaunu atsauksmju sistēmu. Papildinformāciju skatiet: https://aka.ms/ContentUserFeedback.
Iesniegt un skatīt atsauksmes par