Use Azure Pipelines to build and push container images to registries
Raksts
Azure DevOps Services | Azure DevOps Server 2022 | Azure DevOps Server 2020
This article guides you through the setup and configuration for using Azure Pipelines to build and push a Docker image to an Azure Container Registry, Docker Hub, and Google Artifact Registry. Additionally, it details the use of the System.AccessToken for secure authentication within your pipeline.
This article guides you through the setup and configuration for using Azure Pipelines to build and push a Docker image to a Docker Hub and Google Artifact Registry. Additionally, it details the use of the System.AccessToken for secure authentication within your pipeline.
You learn how to create a YAML pipeline to build and push a Docker image to a container registry. The Docker@2 task is used to build and push the image to the container registry.
Prerequisites
An Azure DevOps project.
A container registry (Docker Hub, Google Artifact Registry, or Azure Container Registry).
A GitHub repository with a Dockerfile. If you don't have one, you can use the sample repository In your browser, go the sample repository then fork it to your GitHub account.
Docker. If using a self-hosted agent, ensure Docker is installed and the Docker engine running with elevated privileges. Microsoft-hosted agents have Docker preinstalled.
An Azure DevOps project.
A container registry (Docker Hub or Google Artifact Registry).
A GitHub repository with a Dockerfile. If you don't have one, you can use the sample repository In your browser, go the sample repository then fork it to your GitHub account.
Docker. If using a self-hosted agent, ensure Docker is installed and the Docker engine running with elevated privileges. Microsoft-hosted agents have Docker preinstalled.
Create a Docker service connection
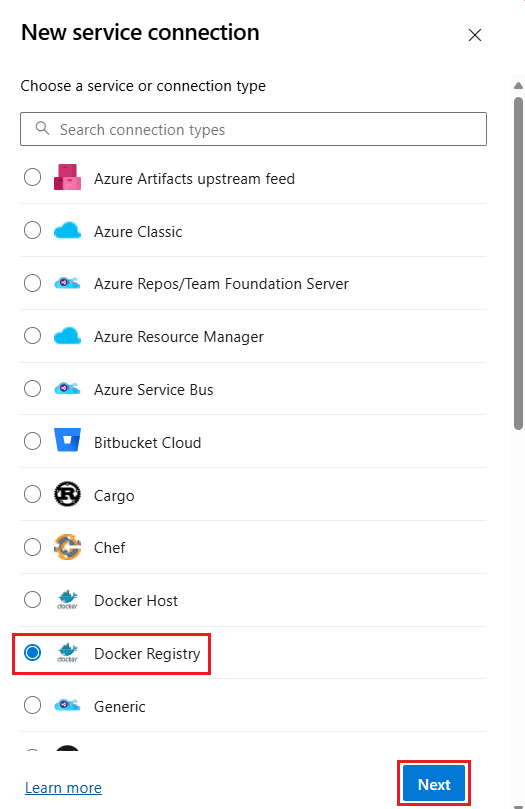
Before pushing container images to a registry, you need to create a service connection in Azure DevOps. This service connection stores the credentials required to securely authenticate with the container registry. Go to the Service connections page in your Azure DevOps project to create a new service connection and select the Docker Registry connection type.
There are different processes to create a service connection for a Docker Hub and a Google Artifact Registry.
Choose the Docker Hub option under Docker registry service connection and provide your username and password to create a Docker service connection.
Choose the Azure Container Registry option under Docker registry service connection and provide the information required by the authentication method you choose.
You can also create your pipeline using the Docker template to build and push an image to Azure Container Registry. This template automatically creates a service connection and a YAML pipeline for you. For more information, see Use Docker YAML to build and push images to Azure Container Registry.
Pushing a Docker image to Azure Container Registry isn't supported in Azure DevOps Server.
To create a Docker service connection associated with Google Artifact Registry:
Open your project in the Google Cloud Platform (GCP) Console and then open Cloud Shell
To save time typing your project ID and Compute Engine zone options, set default configuration values by running the following commands:
gcloud config set project [PROJECT_NAME]
gcloud config set compute/zone [ZONE]
Replace [PROJECT_NAME] with the name of your GCP project and replace [ZONE] with the name of the zone that you're going to use for creating resources. If you're unsure about which zone to pick, use us-central1-a. For example:
gcloud config set project azure-pipelines-test-project-12345
gcloud config set compute/zone us-central1-a
Enable the Artifact Registry API for your project:
The Docker@2 task is designed to streamline the process of building, pushing, and managing Docker images within your Azure Pipelines. This task supports a wide range of Docker commands, including build, push, login, logout, start, stop, and run.
The following steps outline how to create a YAML pipeline that uses the Docker@2 task to build and push the image.
Navigate to your Azure DevOps project and select Pipelines from the left-hand menu.
Select New pipeline to create a new pipeline.
Select GitHub or GitHub Enterprise Server as the location for your source code.
If you haven't already, authorize Azure Pipelines to connect to your GitHub Enterprise Server account.
Select Connect to GitHub Enterprise Server.
Enter your account details, and then select Verify and save.
Select your repository.
If you're redirected to GitHub
Select the Starter pipeline template to create a basic pipeline configuration.
Replace the contents of azure-pipelines.yml with the following code.
Based on whether you're deploying a Linux or Windows app, make sure to respectively set vmImage to either ubuntu-latest or windows-latest. If you're using a self-hosted agent, set vmImage to the name of the pool that contains the self-hosted agent with Docker capability. You can add the demands: docker property to ensure an agent with Docker installed is selected.
Replace <docker connection> with the name of the Docker service connection you created earlier.
Replace <target repository name> with the name of the repository in the container registry where you want to push the image. For example, <your-docker-hub-username>/<repository-name>.
When you save the azure-pipelines.yml file to your repository, you're prompted to add a commit message. Enter a message, and then select Save and run.
When using self-hosted agents, be sure that Docker is installed on the agent's host, and the Docker engine/daemon is running with elevated privileges.
To build the image, Docker must be installed on the agent's host and the Docker engine/daemon must be running with elevated privileges. Use the following steps to create your pipeline using the YAML pipeline editor.
Go to your collection and create a project.
In your project, select Pipelines.
Select Create Pipeline.
Select GitHub Enterprise Server as the location for your source code.
If you haven't already, authorize Azure Pipelines to connect to your GitHub Enterprise Server account.
Select Connect to GitHub Enterprise Server.
Enter your account details, and then select Verify and save.
Select your repository.
If you're redirected to GitHub to install the Azure Pipelines app, select Approve and install.
To configure your pipeline, select the Build a Docker image template.
In the YAML pipeline editor, replace the contents of the YAML file with the following code. Replace the pool name with the name of the pool that contains your self-hosted agent with Docker capability.
Based on whether you're deploying a Linux or Windows app, make sure to respectively set vmImage to either ubuntu-latest or windows-latest.
Replace <target repository name> with the name of the repository in the container registry where you want to push the image. For example, <your-docker-hub-username>/<repository-name>.
Replace <docker connection> with the name of the Docker service connection you created earlier.
The Docker@2 task is used to build and push the image to the container registry.
The Docker@2 task is designed to streamline the process of building, pushing, and managing Docker images within your Azure Pipelines. This task supports a wide range of Docker commands, including build, push, login, logout, start, stop, and run.
The following steps outline how to create a YAML pipeline that uses the Docker@2 task to build and push the image.
Navigate to your Azure DevOps project and select Pipelines from the left-hand menu.
Select New pipeline to create a new pipeline.
Select GitHub or GitHub Enterprise Server as the location for your source code.
If you haven't already, authorize Azure Pipelines to connect to your GitHub Enterprise Server account.
Select Connect to GitHub Enterprise Server.
Enter your account details, and then select Verify and save.
Select your repository.
Select the Starter pipeline template to create a basic pipeline configuration.
Replace the contents of azure-pipelines.yml with the following code.
Based on whether you're deploying a Linux or Windows app, make sure to respectively set vmImage to either ubuntu-latest or windows-latest. If you're using a self-hosted agent, set vmImage to the name of the pool that contains the self-hosted agent with Docker capability. You can add the demands: docker property to ensure an agent with Docker installed is selected.
Replace <docker connection> with the name of the Docker service connection you created earlier.
Replace <target repository name> with the name of the repository in the container registry where you want to push the image. For example, myregistry.azurecr.io/myimage.
When you save the azure-pipelines.yml file to your repository, you're prompted to add a commit message. Enter a message, and then select Save and run.
When using self-hosted agents, be sure that Docker is installed on the agent's host, and the Docker engine/daemon is running with elevated privileges.
Pushing docker imaged to Azure Container Registry isn't supported in Azure DevOps Server.
The Docker@2 task is designed to streamline the process of building, pushing, and managing Docker images within your Azure Pipelines. This task supports a wide range of Docker commands, including build, push, login, logout, start, stop, and run.
The following steps outline how to create a YAML pipeline that uses the Docker@2 task to build and push the image.
Navigate to your Azure DevOps project and select Pipelines from the left-hand menu.
Select New pipeline to create a new pipeline.
Select GitHub or GitHub Enterprise Server as the location for your source code.
If you haven't already, authorize Azure Pipelines to connect to your GitHub Enterprise Server account.
Select Connect to GitHub Enterprise Server.
Enter your account details, and then select Verify and save.
Select your repository.
Select the Starter pipeline template to create a basic pipeline configuration.
Replace the contents of azure-pipelines.yml with the following code.
Based on whether you're deploying a Linux or Windows app, make sure to respectively set vmImage to either ubuntu-latest or windows-latest. If you're using a self-hosted agent, set vmImage to the name of the pool that contains the self-hosted agent with Docker capability. You can add the demands: docker property to ensure an agent with Docker installed is selected.
Replace <docker connection> with the name of the Docker service connection you created earlier.
Replace <target repository name> with the name of the repository in the container registry where you want to push the image. For example, <your-project-id>/<your-image-name>.
When you save the azure-pipelines.yml file to your repository, you're prompted to add a commit message. Enter a message, and then select Save and run.
When using self-hosted agents, be sure that Docker is installed on the agent's host, and the Docker engine/daemon is running with elevated privileges.
To build the image, Docker must be installed on the agent's host and the Docker engine/daemon must be running with elevated privileges. Use the following steps to create your pipeline using the YAML pipeline editor.
Go to your collection and create a project.
In your project, select Pipelines.
Select Create Pipeline.
Select GitHub Enterprise Server as the location for your source code.
If you haven't already, authorize Azure Pipelines to connect to your GitHub Enterprise Server account.
Select Connect to GitHub Enterprise Server.
Enter your account details, and then select Verify and save.
Select your repository.
To configure your pipeline, select the Build a Docker image template.
In the YAML pipeline editor, replace the contents of the YAML file with the following code. Replace the pool name with the name of the pool that contains your self-hosted agent with Docker capability.
Based on whether you're deploying a Linux or Windows app, make sure to respectively set vmImage to either ubuntu-latest or windows-latest.
Replace <target repository name> with the name of the repository in the container registry where you want to push the image. For example, <your-project-id>/<your-image-name>.
Replace <docker connection> with the name of the Docker service connection you created earlier.
On the Save and run page, select Save and run again.
You can watch the pipeline run and view the logs to see the Docker image being built and pushed to the container registry.
Using System.AccessToken for Authentication in Docker@2 Task
You can authenticate with a container registry using the System.AccessToken provided by Azure DevOps. This token allows secure access to resources within your pipeline without exposing sensitive credentials.
The following YAML pipeline example, the Docker@2 task is used to sign in to the container registry and push the Docker image. The System.AccessToken is set as an environment variable to authenticate the Docker commands.
Replace <docker connection> with your Docker registry service connection name.
Replace <your repository> with the name of your Docker repository.