Notikumi
Veidojiet inteliģentas lietotnes
17. marts 23 - 21. marts 23
Pievienojieties meetup sērijai, lai kopā ar citiem izstrādātājiem un ekspertiem izveidotu mērogojamus AI risinājumus, kuru pamatā ir reālas lietošanas gadījumi.
Reģistrēties tūlītŠī pārlūkprogramma vairs netiek atbalstīta.
Jauniniet uz Microsoft Edge, lai izmantotu jaunāko līdzekļu, drošības atjauninājumu un tehniskā atbalsta sniegtās priekšrocības.
Azure DevOps Services | Azure DevOps Server 2022 - Azure DevOps Server 2019
Azure Pipelines security controls access to pipelines and their resources through a hierarchy of security groups and users. This system governs resources like release pipelines, task groups, agent pools, and service connections, though external to pipelines. Upon creation, pipelines and resources inherit project-level permissions from predefined security groups and users, affecting all project pipelines.
Administrators typically have unrestricted access, contributors oversee resources, and readers have view-only permissions, with user roles determining group assignments. For more information, see About pipeline security roles.
| Security area | Prerequisites |
|---|---|
| Pipelines security | - To manage project collection groups, be a member of the Project Collection Administrators group. - To manage project level users and groups, be a member of an administrator group or have Administer build permissions. |
| Agent pool security | - To manage agent pool security at the organization, collection, or project level, be a member of the Project Collection Administrators group or have the Administrator role for agent pools. - To manage agent pool security at the object level, have the Administrator role for the agent pool. |
| Deployment group security | - To manage project-level deployment group security, be a member of an administrator group or be assigned an administrator role. - To manage security for individual deployment groups, have an administrator role. |
| Environment security | - To manage project-level environment security, be a member of an administrator group or assigned an administrator role. - To manage object-level security for individual environments, have an administrator role. |
| Library security | - To manage library security, be a member of an administrator group or assigned an administrator role. - To manage security for individual library assets, e an administrator or have the appropriate role. |
| Release pipeline security | - To manage release pipeline security, be a member of an administrator group or have Administer release permissions. - Have a release pipeline. |
| Service connection security | - To manage service connection security, be a member of the Project Administrators group or have an administrator role. - To manage security at the project level, be a member of the Project Administrators group or have the Administrator role for service connections. - To manage security at the object level, have the Administrator role for the service connection. |
| Task group security | To manage task group security, be a member of an administrator group or have Administer task group permissions. - Have a task group. |
Pipeline security follows a hierarchical model of user and group permissions. Project-level permissions are inherited at the object level by all pipelines in the project. You can change inherited and default user and group permissions for all pipelines at the project- and object-levels. You can't change the permissions set by the system.
The following table shows the default security groups for pipelines:
| Group | Description |
|---|---|
| Build Administrators | Administer build permissions and manage pipelines and builds. |
| Contributors | Manage pipelines and builds, but not build queues. This group includes all team members. |
| Project Administrators | Administer build permissions and manage pipelines and builds. |
| Readers | View pipeline and builds. |
| Project Collection Administrators | Administer build permissions and manage pipelines and builds. |
| Project Collection Build Administrators | Administer build permissions and manage pipelines and builds. |
| Project Collection Build Service Accounts | Manage builds. |
| Project Collection Test Service Accounts | View pipelines and builds. |
The system automatically creates the <project name> Build Service (collection name) user, a member of the Project Collection Build Service Accounts group. This user executes build services within the project.
Depending on the resources you use in your pipelines, your pipeline could include other built-in users. For instance, if you're using a GitHub repository for your source code, a GitHub user is included.
The following table shows default permissions for security groups:
| Task | Readers | Contributors | Build Admins | Project Admins |
|---|---|---|---|---|
| View builds | ✔️ | ✔️ | ✔️ | ✔️ |
| View build pipeline | ✔️ | ✔️ | ✔️ | ✔️ |
| Administer build permissions | ✔️ | ✔️ | ||
| Delete or edit build pipeline | ✔️ | ✔️ | ✔️ | |
| Delete or destroy builds | ✔️ | ✔️ | ✔️ | |
| Edit build quality | ✔️ | ✔️ | ✔️ | |
| Manage build qualities | ✔️ | ✔️ | ||
| Manage build queue | ✔️ | ✔️ | ||
| Override check-in validation by build | ✔️ | |||
| Queue builds | ✔️ | ✔️ | ✔️ | |
| Retain indefinitely | ✔️ | ✔️ | ✔️ | |
| Stop builds | ✔️ | ✔️ | ✔️ | |
| Update build information | ✔️ | ✔️ | ✔️ |
| Task | Readers | Contributors | Build Admins | Project Admins |
|---|---|---|---|---|
| View builds | ✔️ | ✔️ | ✔️ | ✔️ |
| View build pipeline | ✔️ | ✔️ | ✔️ | ✔️ |
| Administer build permissions | ✔️ | ✔️ | ||
| Create build pipeline | ✔️ | ✔️ | ✔️ | |
| Delete or edit build pipeline | ✔️ | ✔️ | ✔️ | |
| Delete or destroy builds | ✔️ | ✔️ | ||
| Edit build quality | ✔️ | ✔️ | ✔️ | |
| Manage build qualities | ✔️ | ✔️ | ||
| Manage build queue | ✔️ | ✔️ | ||
| Override check-in validation by build | ✔️ | |||
| Queue builds | ✔️ | ✔️ | ✔️ | |
| Retain indefinitely | ✔️ | ✔️ | ✔️ | |
| Stop builds | ✔️ | ✔️ | ||
| Update build information | ✔️ |
For a description of pipeline permissions, see Pipeline or Build permissions.
To manage project-level permissions for users and groups across all build pipelines in your project, do the following steps:
From your project, select Pipelines.

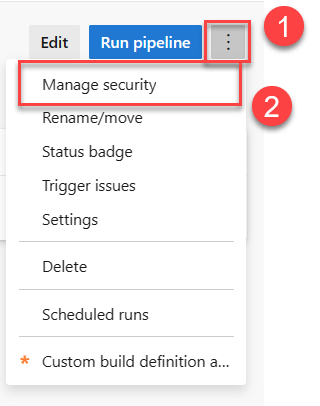
Select More actions ![]() and select Manage security.
and select Manage security.
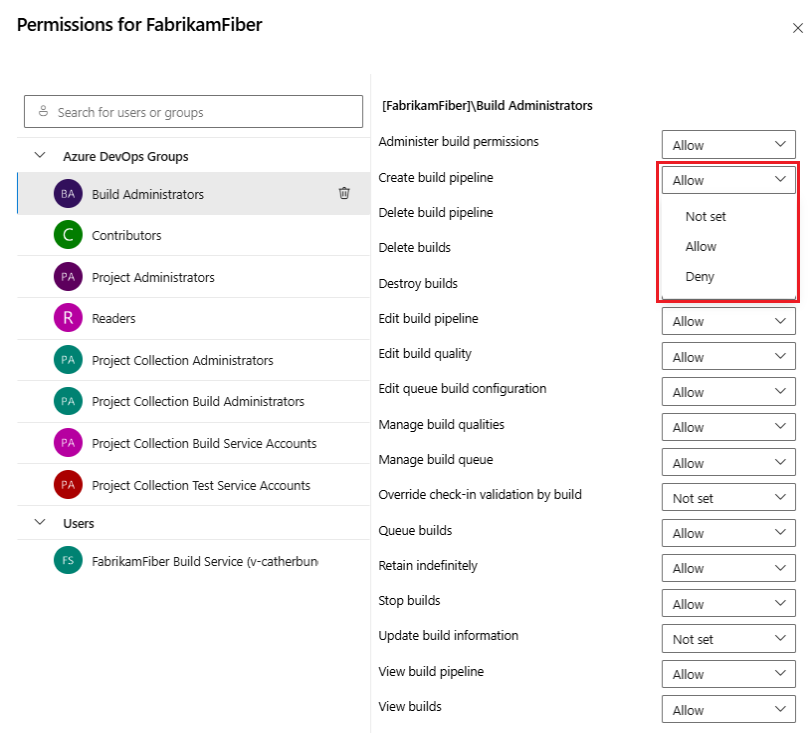
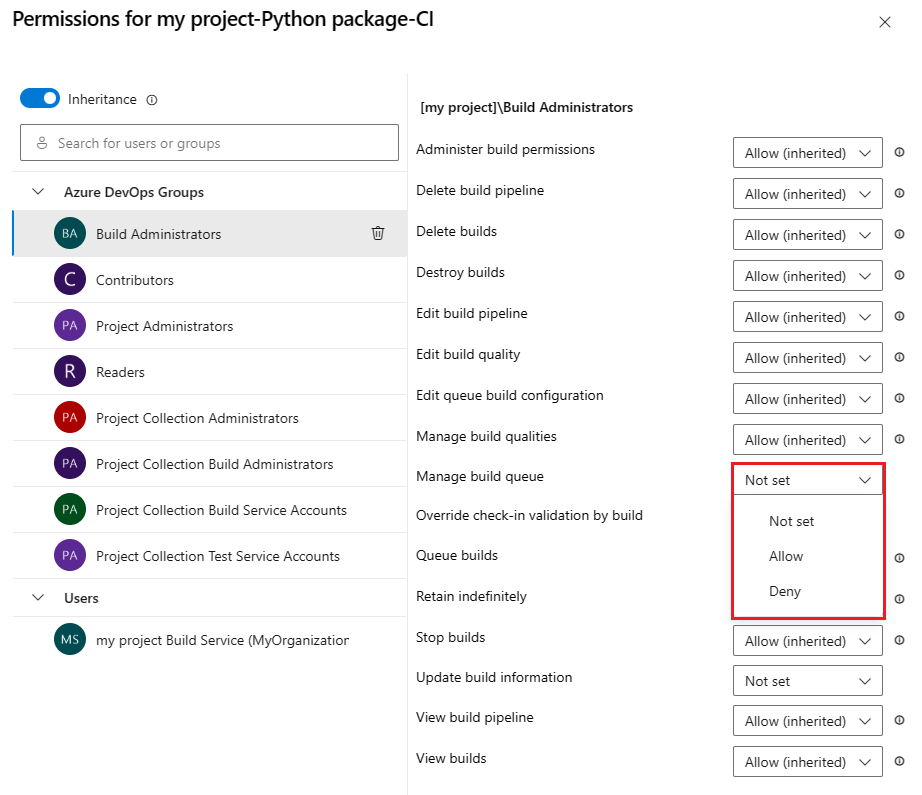
Select users or groups and set permissions to Allow, Deny, or Not set.

Repeat the previous step to change the permissions for more groups and users.
Close permissions dialog to save the changes.
To manage project-level permissions for users and groups across all build pipelines in your project, do the following steps:
From your project, select Pipelines.
Select More actions ![]() and select Manage security.
and select Manage security.
Select users or groups and set permissions to Allow, Deny, or Not set.
Repeat the previous step to change the permissions for more groups and users.
Close permissions dialog to save the changes.
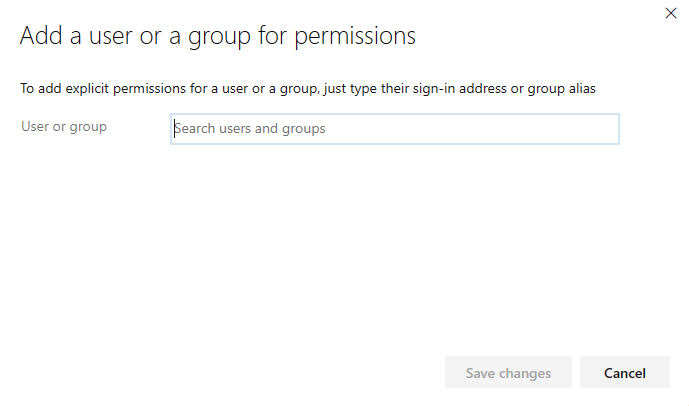
To add users and groups that aren't listed in the permissions dialog, do the following steps:
When you open the security dialog again, the user or group is listed.
To delete a user from the permissions list, do the following steps:
Select the user or group.
Select Remove and clear explicit permissions.

When you're done, close the dialog to save your changes.
To manage project-level permissions for users and groups across all build pipelines in your project, do the following steps:
From your project, select Pipelines.
Select More actions ![]() and select Manage security.
and select Manage security.
To add users or groups that aren't listed in the permissions dialog, select Add, enter the user or group, and select Save changes.
Select a user or group and set the permissions.
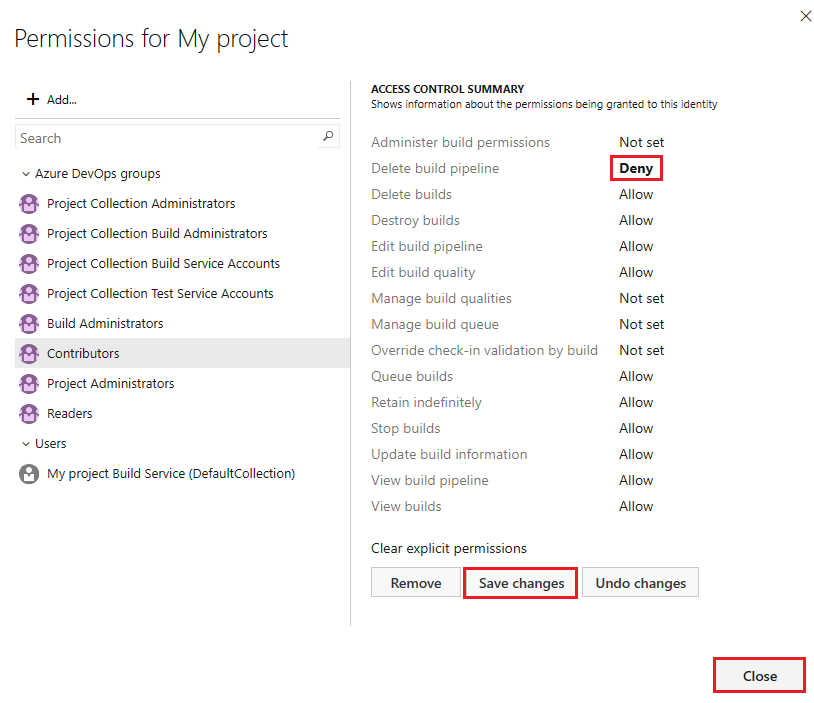
Repeat the previous step to change the permissions for more groups and users.
Select Save changes or you can select Undo changes to undo the changes.
To remove a user or group from the list, select the user or group and select Remove.
Select Close.
Your project-level pipelines permissions are set.
To manage project-level permissions for users and groups across all build pipelines in your project, do the following steps:
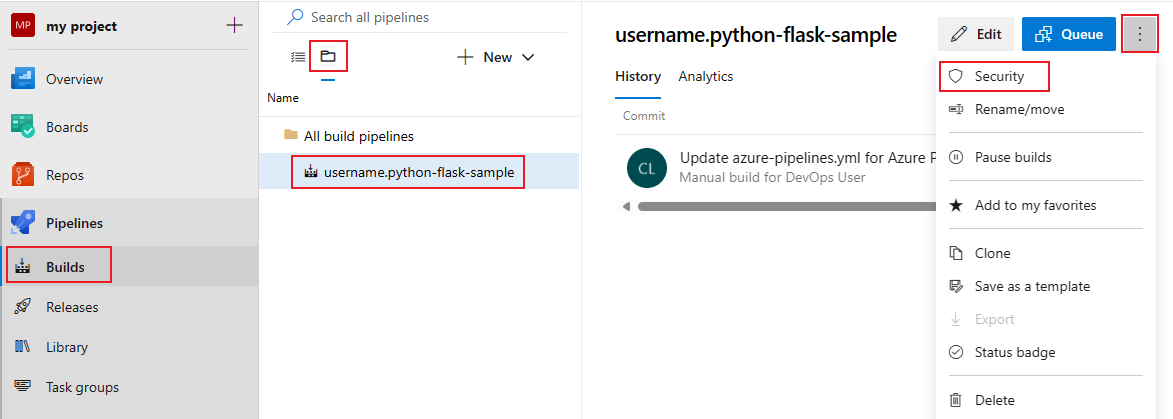
From your project, select Builds.
Select the folders icon and select the All build pipelines folder.
Select More actions ![]() > Security.
> Security.

To add users or groups that aren't listed in the permissions dialog, select Add, enter the user or group, and select Save changes.
Select a user or group and set the permissions.
Select Save changes or Undo changes, if necessary.
Repeat the previous step to change the permissions for more groups and users.
To remove a user or group from the list, select the user or group, and then Remove.
Select Close.
By default, object-level permissions for individual pipelines are inherited from the project-level permissions. You can override the inherited project-level permissions.
You can set the permissions to Allow, Deny, or to Not set if the permission isn't inherited. If inheritance is enabled, you can change an explicitly set permission back to the inherited value.
To manage permissions for a pipeline, do the following steps:
From your project, select Pipelines .
Select a pipeline, then select More actions ![]() and select Manage security.
and select Manage security.
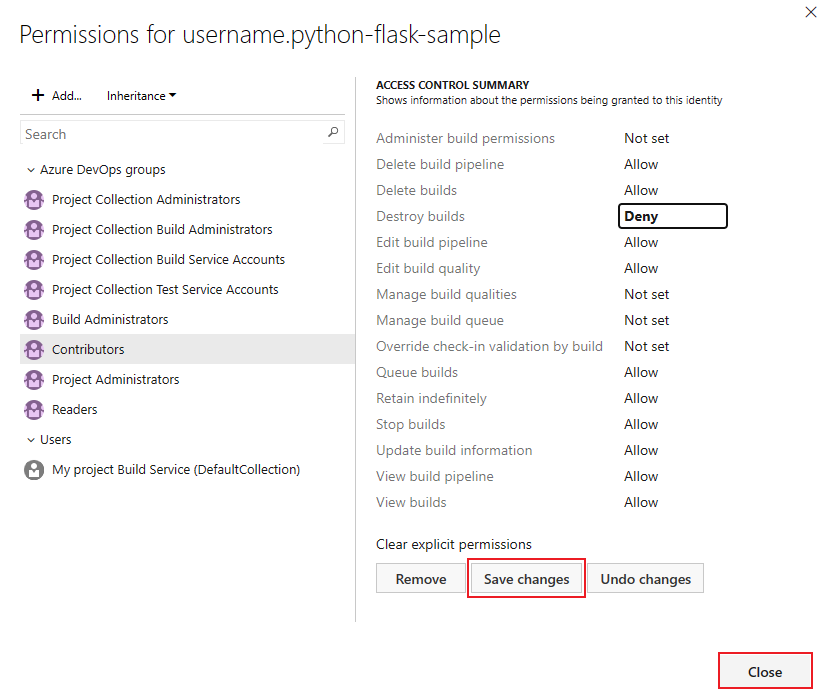
Select a user or group and set the permissions.
Repeat the previous step to change the permissions for more groups and users.
When you're finished, close the dialog to save your changes.
To add users and groups that aren't listed in the permissions dialog, do the following steps:
When you open the security dialog again, the user or group is listed.
Inherited users and groups can't be removed unless inheritance is disabled. To remove users or groups from a pipeline's permissions, do the following steps:
Select the user or group.
Select Remove and clear explicit permissions.
When you're done, close the dialog to save your changes.
By default, object-level permissions for individual pipelines inherit the project-level permissions. You can override the inherited permissions.
You can set the permissions to Allow, Deny, or to Not set if the permission isn't inherited. If inheritance is enabled, you can change an explicitly set permission back to the inherited value.
To set permissions for an individual pipeline, do the following steps:
From your project, select Pipelines .
Select a pipeline, then select More actions ![]() and select Manage security.
and select Manage security.
To add users or groups that aren't listed in the permissions dialog, select Add, enter the user or group, and select Save changes.
Select users and groups and set the permissions.
Select Save changes or *Undo changes, if necessary.

To remove a user or group, select the user or group and select Remove. You can't remove inherited users or groups unless inheritance is disabled.
Select Close when you're finished.
When you explicitly set an inherited user or group permission, inheritance is disabled for that specific permission. To restore inheritance, set the permission to Not set. Select Clear explicit permissions to reset all explicitly set permissions to their inherited settings. To disable inheritance for all user and group permissions, turn off the Inheritance setting. Upon re-enabling inheritance, the permissions for all users and groups revert to their project-level settings.
Object-level permissions for individual pipelines inherit the project-level permissions by default. You can override these inherited permissions for an individual pipeline.
You can set the permissions to Allow, Deny, or to Not set if the permission isn't inherited. If inheritance is enabled, you can change an explicitly set permission back to the inherited value.
To set object-level permissions for a pipeline, do the following steps:
From your project, select the Builds from the menu.
Select the folders icon and select the All build pipelines folder.
Select More actions ![]() > Security.
> Security.
To add users or groups that aren't listed in the permissions dialog, select Add, enter the user or group, and select Save changes.
Select a user or group and set the permissions.
You can select more users and groups to change their permissions.
Select Save changes or you can select Undo changes to undo the changes.
To remove a user or group, select the user or group and select Remove. Inherited users and groups can't be removed unless inheritance is disabled.
Select Close when you're finished.
When you explicitly set an inherited user or group permission, inheritance is disabled for that specific permission. To restore inheritance, set the permission to Not set. Select Clear explicit permissions to reset all explicitly set permissions to their inherited settings. To disable inheritance for all user and group permissions, turn off the Inheritance setting. When you reenable inheritance, the permissions for all users and groups revert to their project-level settings.
A deployment group is a pool of physical or virtual target machines that have agents installed. Deployment groups are only available with classic release pipelines. You can create deployment groups in the following circumstances:
Individual deployment groups inherit the security roles from the project-level assignments. You can override the project-level assignments for a user or group. To remove an inherited user or group, or lower the privilege level of an inherited role, you must disable inheritance.
When a deployment group gets shared with another project, a separate deployment group, which inherits its security roles, is created in the other project. If sharing is disabled, the deployment group is removed from the other project.
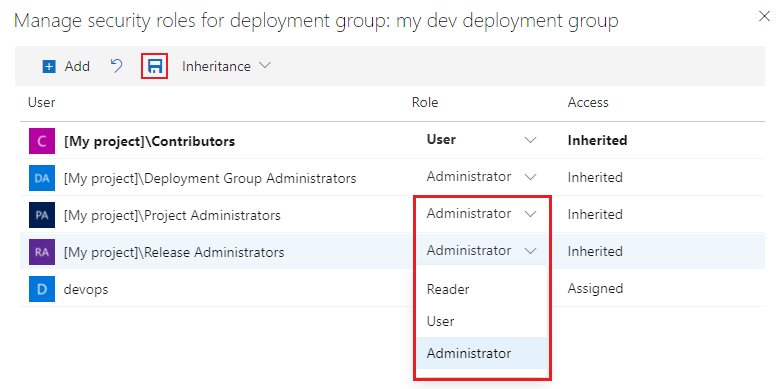
The following table shows security roles for deployment groups:
| Role | Description |
|---|---|
| Reader | Can only view deployment groups. |
| Creator | Can create deployment groups. This role is a project-level role only. |
| User | Can view and use deployment groups. |
| Service Account | Can view agents, create sessions, and listen for jobs. This role is a collection- or organization-level role only. |
| Administrator | Can administer, manage, view, and use deployment groups. |
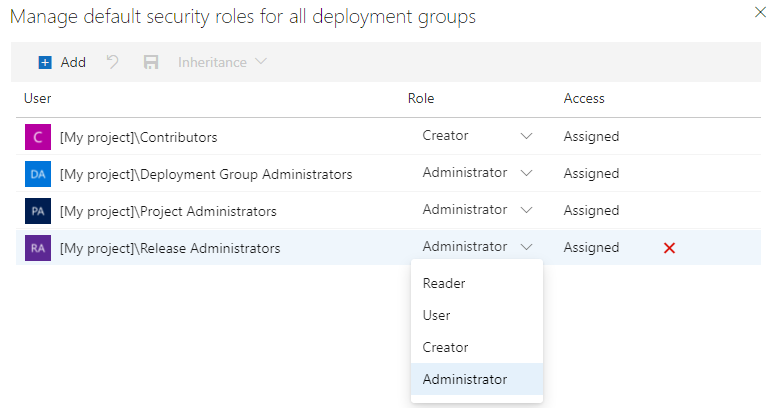
The following table shows default user and group role assignments:
| Group | Role |
|---|---|
| [project name]\Contributors | Creator (project-level), Reader (object-level) |
| [project name]\Deployment Group Administrators | Administrator |
| [project name]\Project Administrators | Administrator |
| [project name]\Release Administrators | Administrator |
Do the following steps to set project-level security roles for all deployment groups:
From your project, select Deployment groups under Pipelines.
Select Security.

Set roles for users and groups.
To remove a user or group, select the user or group and select Delete ![]() .
.
Select Save changes ![]() to save your changes or Reset changes
to save your changes or Reset changes ![]() to revert unsaved changes.
to revert unsaved changes.
Do the following steps to add project users or groups that aren't listed in the security dialog:
Do the following steps to set security roles for an individual deployment group:
From your project, select Deployment groups under Pipelines.
Select a deployment group under Groups.
Select Security.

Set roles for users and groups. To lower the privilege level of an inherited role, disable inheritance.
To remove a user or group, select the user or group and select Delete ![]() . Inherited users and groups can't be removed unless inheritance is disabled.
. Inherited users and groups can't be removed unless inheritance is disabled.
Select Save changes ![]() to save your changes or Reset changes
to save your changes or Reset changes ![]() to revert unsaved changes.
to revert unsaved changes.
When you explicitly set a role, the inheritance for that user or group is turned off. To disable inheritance for all users and groups, turn off the Inheritance setting. When you re-enable inheritance, the roles for all users and groups revert to their project-level assignments.
Do the following steps to add project users or groups that aren't listed in the security dialog:
Environments bundle deployment targets for YAML pipelines but aren't compatible with classic pipelines. All environments inherit, security roles, assigned at the project level to default users and groups. You can customize these settings for individual environments, including removing inherited users or groups and adjusting privilege levels, by disabling inheritance. Additionally, you can manage pipeline access for each environment.
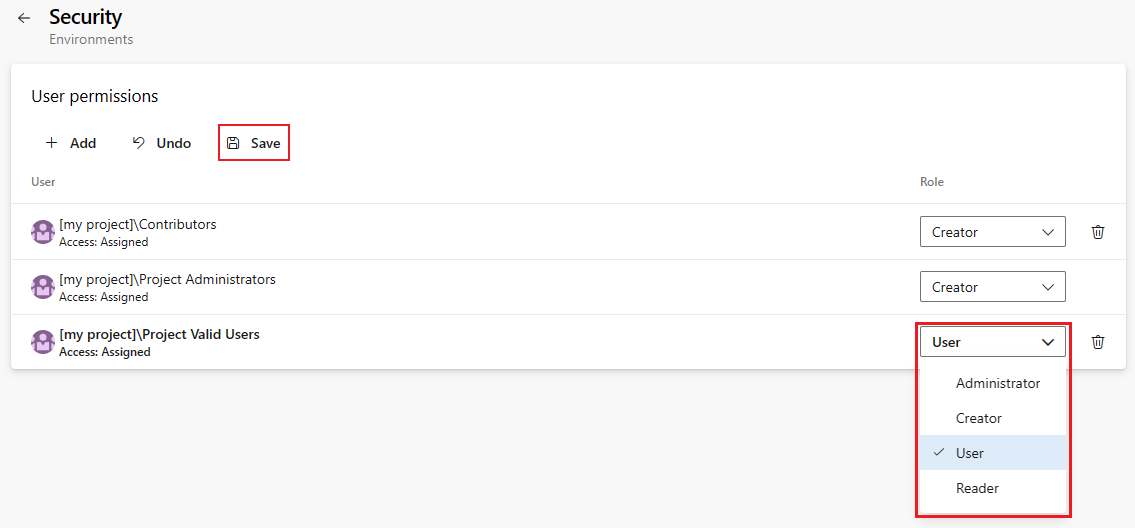
The following table shows security roles for environments:
| Role | Description |
|---|---|
| Creator | Can create environments in the project. It only applies to project-level security. Contributors are automatically assigned this role. |
| Reader | Can view the environment. |
| User | Can use the environment when creating or editing YAML pipelines. |
| Administrator | Can administer permissions, create, manage, view and use environments. The creator of an environment is granted the administrator role for that environment. Administrators can also open access to an environment for all pipelines in the project. |
The following table shows default user and group role assignments:
| Group | Role |
|---|---|
| [project name]\Contributors | Creator (project-level) Reader (object-level) |
| [project name]\Project Administrators | Creator |
| [project name]\Project Valid Users | Reader |
The individual who creates an environment is automatically given the Administrator role for that specific environment. This role assignment is permanent and can't be changed.
To set project-level security roles for all environments, do the following steps:
From your project, Environments under Pipelines.
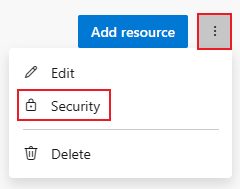
Select More actions ![]() and select Security.
and select Security.

Set roles for user and groups to Administrator, Creator, User, or Reader.
To remove a user or group, select the user or group and select Delete ![]() .
.
Select Save to save your changes or Undo to revert unsaved changes.
To add project users or groups that aren't listed in the security dialog, do the following steps:
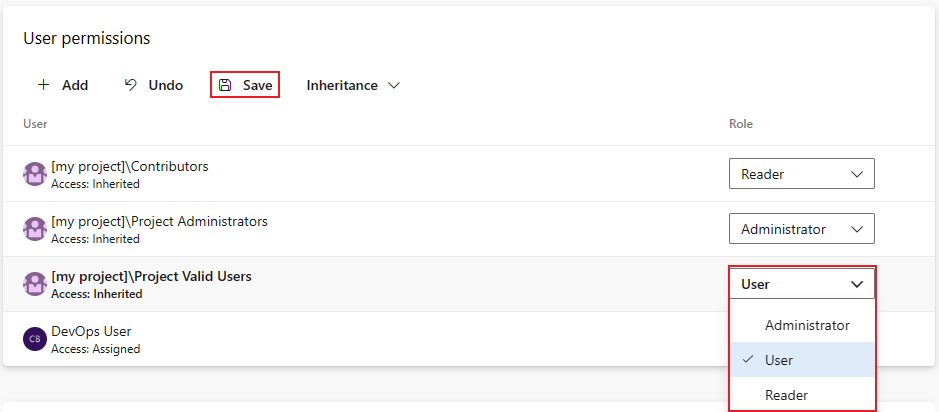
By default, object-level security roles inherit from project-level settings. But, you can customize these settings for individual environments, including removing inherited users or groups and adjusting privilege levels, by disabling inheritance. Additionally, you can manage pipeline access for each environment.
To set user and group security roles for an environment, do the following steps:
From your project, select Environments under Pipelines.
Select an environment.
Select More actions ![]() and select Security.
and select Security.
Set roles for user and groups to Administrator, User, or Reader.
To remove a user or group, select the user or group and select Delete ![]() . Inherited users and groups can't be removed unless inheritance is disabled.
. Inherited users and groups can't be removed unless inheritance is disabled.
Select Save to save your changes or Undo to revert unsaved changes.
Setting a role explicitly for a user or group disables their inheritance. To halt inheritance for everyone, deactivate the Inheritance option. Reactivating inheritance resets all users and groups to their original project-level role assignments.
To add project users or groups that aren't listed in the security dialog, do the following steps:
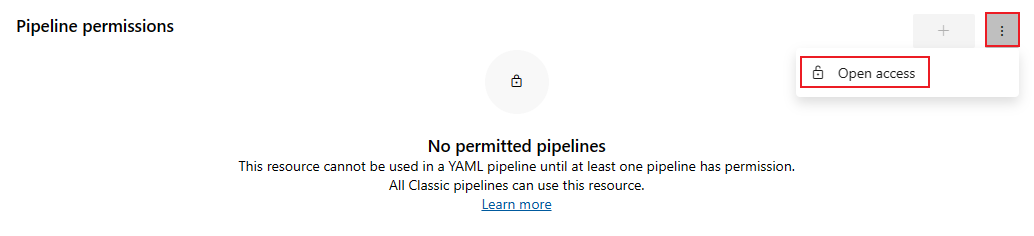
Pipeline permissions can be set to Open access to allow access to all pipelines in a project or restricted access to specific pipelines. Only Project administrators can set pipeline permissions to Open access.
To set open access to all pipeline in a project, do the following steps:
Select More actions ![]() and select Open access.
and select Open access.
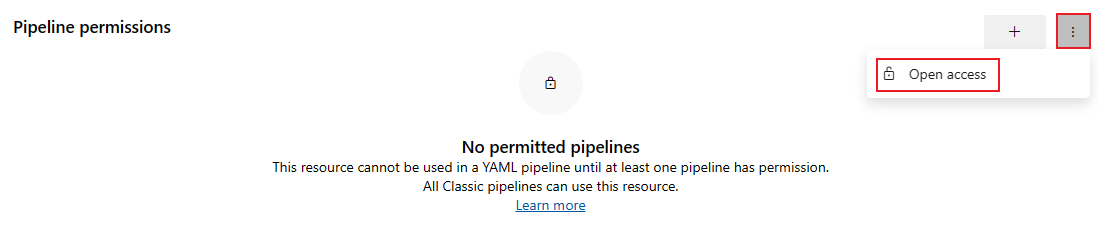
Select Open access on the confirmation dialog.
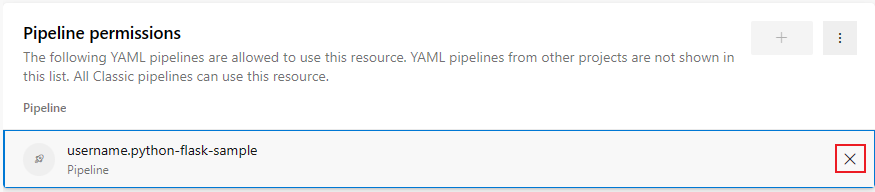
To restrict access and manage pipeline access, do the following steps:
Select Restrict access.
Select Add pipeline ![]() and select a pipeline from the dropdown menu.
and select a pipeline from the dropdown menu.
To remove a pipeline, select the pipeline and select the Revoke access icon.
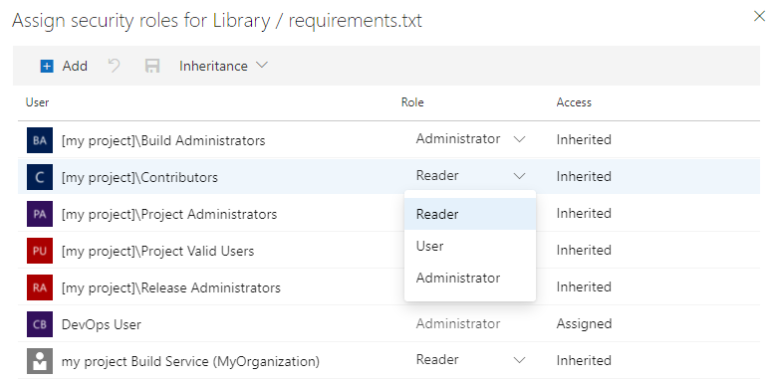
The library facilitates asset sharing, like variable groups and secure files, across build and release pipelines. It employs a unified security model, allowing role assignments for asset management, creation, and usage. These roles, once set at the library level, automatically apply to all contained assets but can be individually adjusted.
| Role | Description |
|---|---|
| Administrator | Edit, delete, and manage security for library assets. The creator of an asset is automatically assigned this role for the asset. |
| Creator | Create library assets. |
| Reader | Read library assets. |
| User | Consume library assets in pipelines. |
The following table shows default roles:
| Group | Role |
|---|---|
| [project name]\Project Administrators | Administrator |
| [project name]\Build Administrators | Administrator |
| [project name]\Project Valid Users | Reader |
| [project name]\Contributors | Creator (project-level) Reader (object-level) |
| [project name]\Release Administrators | Administrator |
| project name Build Service (collection or organization name) | Reader |
For individual library assets, the creator is automatically assigned the Administrator role.
To manage access for all library assets, such as variable groups and secure files, do the following steps:
From your project, select Pipelines > Library.
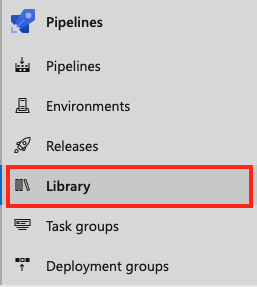
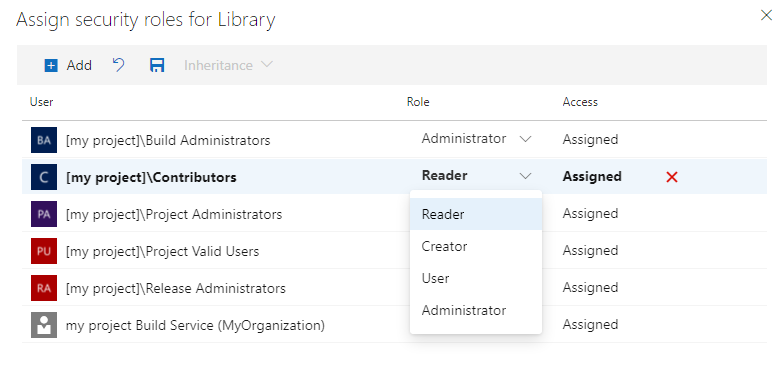
Select Security.

Select a user or group and change the role to Reader, User, Creator, or Administrator.
To remove a user or group, select the user or group and select Delete ![]() .
.
Select Save changes ![]() to save your changes or Reset changes
to save your changes or Reset changes ![]() to revert unsaved changes.
to revert unsaved changes.
To add project users or groups that aren't listed in the security dialog, do the following steps:
You can manage access for all library assets, such as variable groups and secure files, from the project-level library security settings.
Security roles for Secure files are inherited from the project-level library role assignments by default. You can override these assignments for an individual file. To remove an inherited user or group, or lower the privilege level of an inherited role, you must disable inheritance.
The creator of the secure file is automatically assigned the Administrator role for that file, which can't be changed.
To set permissions for a secure file, do the following steps:
When you explicitly set a role, the inheritance for that user or group is turned off. To disable inheritance for all users and groups, turn off the Inheritance setting. When you re-enable inheritance, the roles for all users and groups revert to their project-level assignments.
To add project users or groups that aren't listed in the security dialog, do the following steps:
Security roles for variable groups are inherited from the project-level library role assignments by default. You can override these assignments for an individual variable group. To remove an inherited user or group, or lower the privilege level of an inherited role, you must disable inheritance.
The creator of the variable group is automatically assigned the Administrator role for that group, which can't be changed.
To set access for a variable group, do the following steps:

When you explicitly set a role, the inheritance for that user or group is turned off. To disable inheritance for all users and groups, turn off the Inheritance setting. When you re-enable inheritance, the roles for all users and groups revert to their project-level assignments.
To add project users or groups that aren't listed in the security dialog, do the following steps:
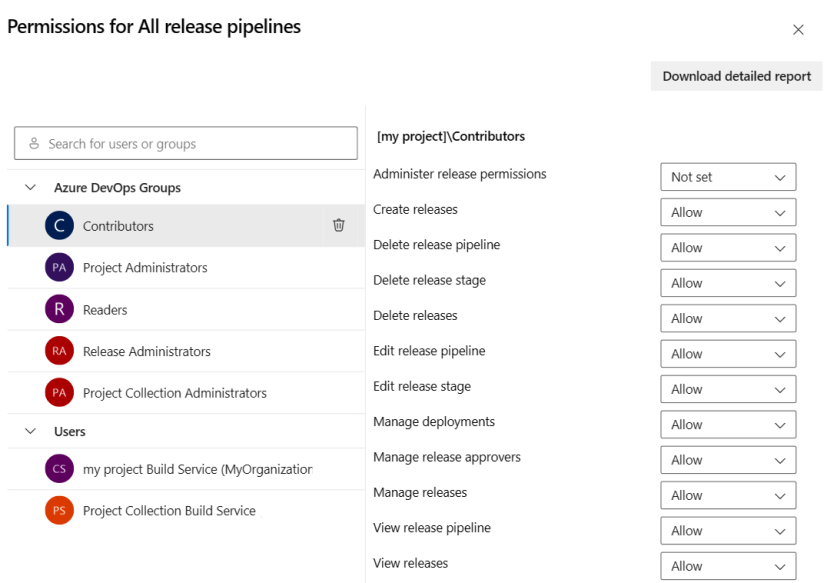
Once you create a release pipeline, you can set project-level permissions for all release pipelines and object-level permissions for individual release pipelines and stages. You can also set permissions for release stages, which are a subset of permissions inherited from the object-level release pipeline permissions.
The following table shows the permission hierarchy for release pipelines:
The following table shows default user and group roles:
| Group | Role |
|---|---|
| Contributors | All permissions except Administer release permissions. |
| Project Administrators | All permissions. |
| Readers | Can view pipelines and releases. |
| Release Administrators | All permissions. |
| Project Collection Administrators | All permissions. |
| <project name> Build Service(<organization/collection name>) | Can view pipelines and releases. |
| Project Collection Build Server (<organization/collection name>) | Can view pipelines and releases. |
For permission descriptions, see Permissions and groups.
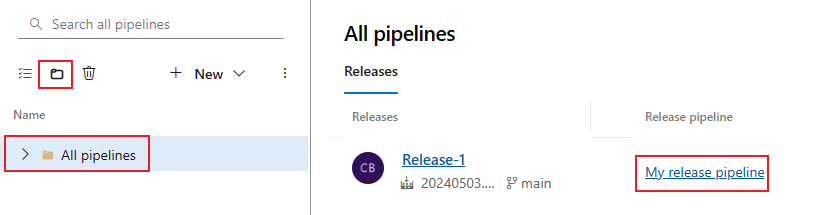
To update permissions for all releases, do the following steps:
1.From your project, select Pipelines > Releases.
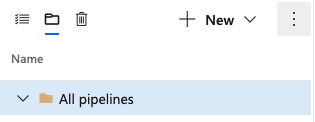
Select the file view icon.

Select the All pipelines folder.
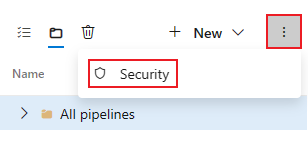
Select More actions ![]() and select Security.
and select Security.
Select users and groups to and change their permissions.
When you're done, close the dialog to save your changes.
To add users and groups that aren't listed in the permissions dialog, do the following steps:
When you open the security dialog again, the user or group is listed.
To delete a user from the permissions list, do the following steps:
From your project permissions page, select the user or group.
Select Remove and clear explicit permissions.
When you're done, close the dialog to save your changes.
To set permissions for all releases, do the following steps:
From your project, select Pipelines > Releases.
Select the file view icon.
Select the All pipelines folder.
Select More actions ![]() and select Security.
and select Security.
To add users or groups that aren't listed in the permissions dialog, select Add, enter the user or group, and select Save changes.
Select a user and group and set the permission to Allow, Deny or Not set, then select Save changes or Undo changes.
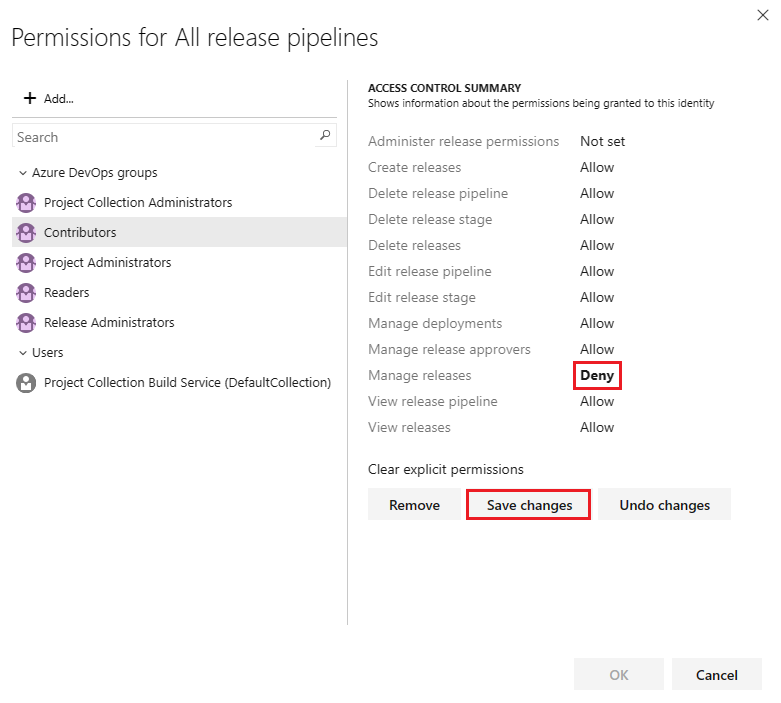
Repeat the previous step for each user or group to modify their permissions.
When you're finished, close the dialog.
By default, the object-level permissions for individual release pipelines are inherited from the project-level release pipeline permissions. You can override these inherited permissions for a specific release pipeline.
To override permissions for a release, do the following steps:
From your project, select Pipelines > Releases.
Select the file view icon![]() .
.
Select the release pipeline you want to modify, and then select More actions ![]() > Security.
> Security.
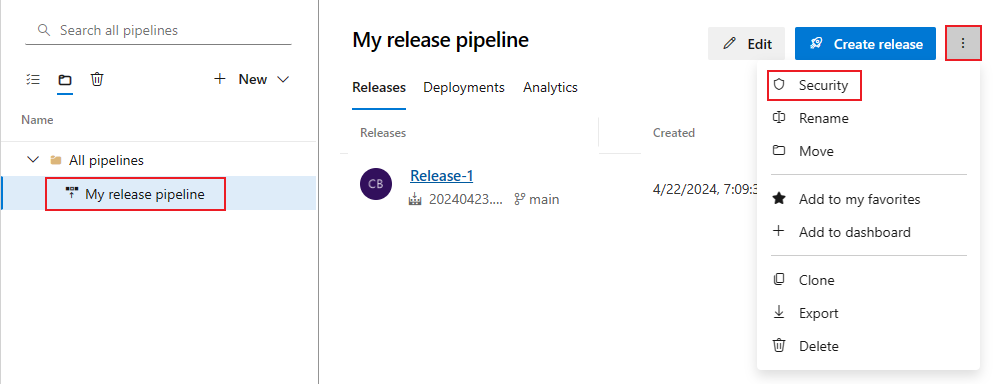
Select users or groups to set their permissions to Allow, Deny or Not set.

When you're finished, close the dialog to save your changes.
When you explicitly set an inherited user or group permission, inheritance is disabled for that specific permission. To restore inheritance, set the permission to Not set. To disable inheritance for all user and group permissions, turn off the Inheritance setting. Upon re-enabling inheritance, the permissions for all users and groups revert to their project-level settings.
To add users and groups that aren't listed in the permissions dialog, do the following steps:
When you open the security dialog again, the user or group is listed.
Users and groups can be removed from a release pipeline. Inherited users and groups can't be removed unless inheritance is disabled. To remove release pipeline permissions for users or groups, do the following steps:
Select the user or group.
Select Remove and clear explicit permissions.
When you're done, close the dialog to save your changes.
You can set the permissions to Allow, Deny, or to Not set if the permission isn't inherited. If inheritance is enabled, you can change an explicitly set permission back to the inherited value.
From your project, select Pipelines > Releases.
Select the file view icon![]() .
.
Select the release pipeline you want to modify, select More actions![]() , and select Security.
, and select Security.
To add users or groups that aren't listed in the permissions dialog, select Add, enter the user or group, and select Save changes.
Select a user and group and set the permission to Allow, Deny, or Not set, or the inherited value (for example, Allow (inherited)).
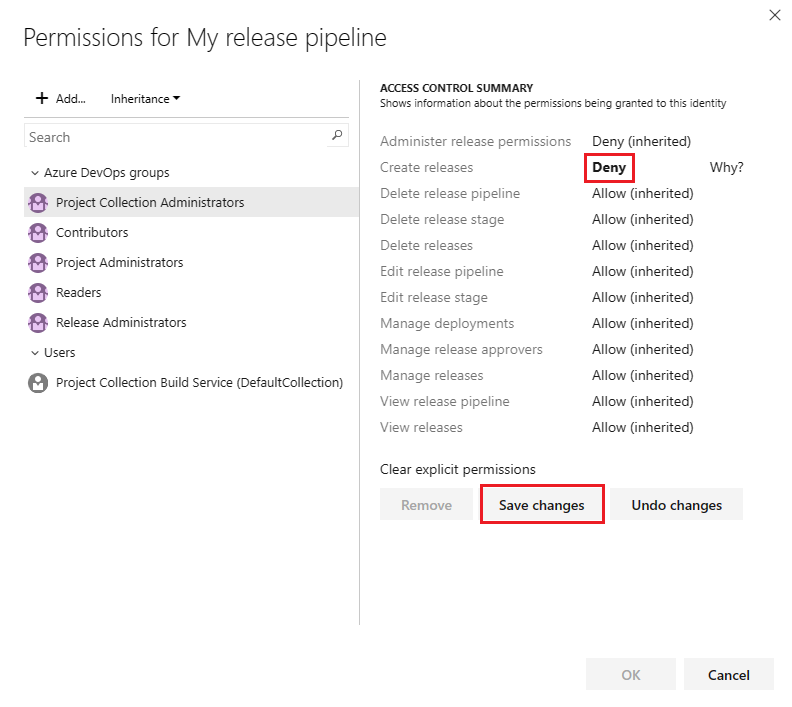
Select Save changes or you can select Undo changes to undo the changes. You must save the changes to apply the permissions before selecting another user or group.
To remove a user or group, select the user or group and select Remove. Inherited users and groups can't be removed unless inheritance is disabled.
Select OK when you're finished.
When you explicitly set an inherited user or group permission, inheritance is disabled for that specific permission. To restore inheritance, set the permission to Not set. Select Clear explicit permissions to reset all explicitly set permissions to their inherited settings. To disable inheritance for all user and group permissions, turn off the Inheritance setting. Upon re-enabling inheritance, the permissions for all users and groups revert to their project-level settings.
Stage permissions are a subset of permissions that are inherited from the object-level release pipeline permissions.
To set permissions for a stage, do the following steps:
From your project, select Pipelines > Releases.
Select the file view icon ![]() and select All pipelines.
and select All pipelines.
Select the release pipeline you want to modify from All pipelines
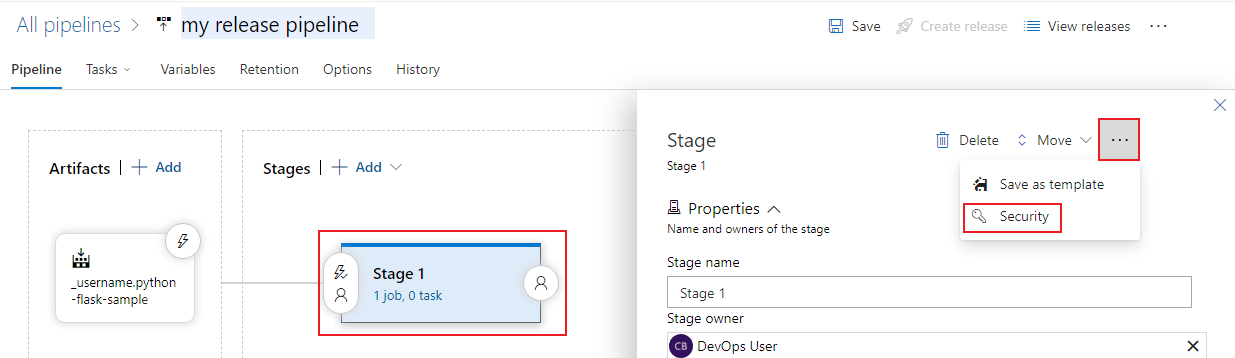
Select the stage you want to modify.
Select the More options icon ![]() and select Security.
and select Security.
To add users or groups that aren't listed in the permissions dialog, select Add, enter the user or group, and select Save changes.
Select users and groups to set their permissions to Allow, Deny or Not set.
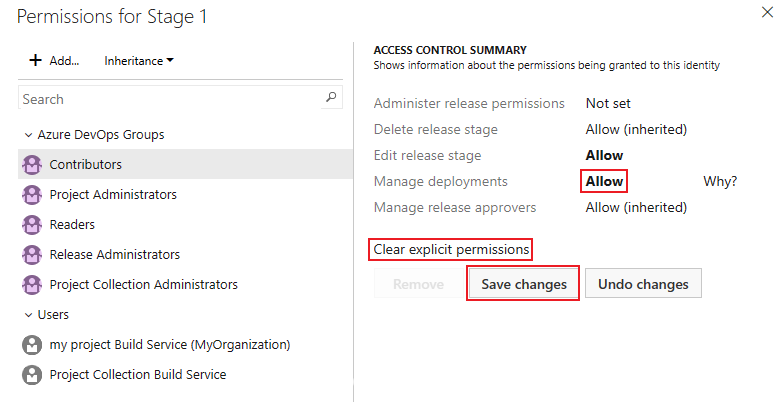
Select Save changes or you can select Undo changes to undo the changes. You must save the changes to apply the permissions before selecting another user or group.
You can select more users and groups to change their permissions.
To remove a user or group, select the user or group and select Remove. Inherited users and groups can't be removed unless inheritance is disabled.
Select OK when you're finished.
When you explicitly set an inherited user or group permission, inheritance is disabled for that specific permission. To restore inheritance, set the permission to Not set. Select Clear explicit permissions to reset all explicitly set permissions to their inherited settings. To disable inheritance for all user and group permissions, turn off the Inheritance setting. Upon re-enabling inheritance, the permissions for all users and groups revert to their project-level settings.
Service connections are used to connect to external and remote services. You can set service connection security for:
The following table show service connection roles:
| Role | Purpose |
|---|---|
| Reader | Can view service connections. |
| User | Can use service connections in classic and YAML build and release pipelines. |
| Creator | Can create a service connection in the project. This role is a project-level role only. |
| Administrator | Can use the service connection and manage roles for other users and groups. |
The following table shows default security roles for service connections:
| Group | Role |
|---|---|
| [project name]\Endpoint Administrators | Administrator |
| [project name]\Endpoint Creators | Creator |
The user who creates the service connection is automatically assigned the Administrator role for that service connection.
The following table show service connection roles:
| Role | Purpose |
|---|---|
| User | Can use service connections in classic and YAML build and release pipelines. |
| Administrator | Can use the service connection and manage roles for other users and groups. |
By default, the [project]/\Endpoint Administrators group is assigned the Administrator role for all service connections in the project. The user who creates the service connection is automatically assigned the Administrator role for that service connection.
For more information, see Service connections.
For more information, see Service connections.
To manage security roles for all service connections, do the following steps:
From your project, select Project settings ![]() .
.
Select Service connections under Pipelines.
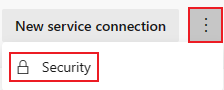
Select More actions ![]() and select Security.
and select Security.
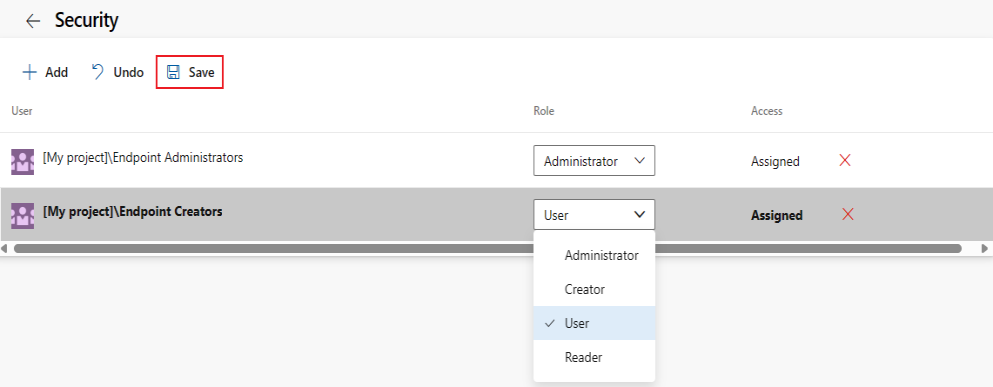
To change a role, select a user or group, and select a role from the dropdown menu.
To remove a user or group, select the user or group and select Delete ![]() .
.
Select Save to save your changes or Undo to revert unsaved changes.
To add project users or groups that aren't listed in the security dialog, do the following steps:
You can set security roles for users and groups, as well as pipeline and project access, to the service connection. Individual service connections inherit the project-level role assignments for users and groups by default.
To open the security dialog for an individual service connection, do the following steps:
You can override the inherited roles for users and groups. Inheritance must be disabled to remove an inherited user or group or to lower the privilege level of an inherited role.
To manage security roles for an individual service connection, do the following steps:
In the User permissions section of the Security dialog, select Project to manage project-level users and groups, or Organization to manage organization- or collection-level users and groups.
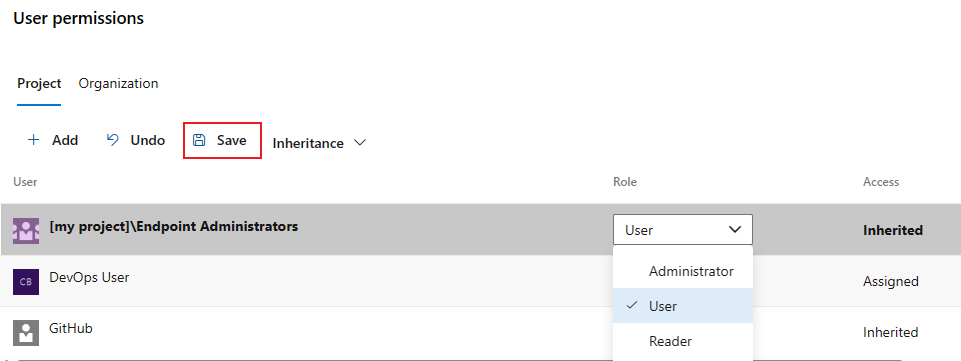
Select users and groups and change their roles. To lower the privilege level of an inherited role, inheritance must be disabled.
To remove a user or group, select the user or group and select Delete ![]() . Inherited users and groups can't be removed unless inheritance is disabled.
. Inherited users and groups can't be removed unless inheritance is disabled.
Select Save to save your changes or Undo to revert unsaved changes.
When you explicitly set a role, the inheritance for that user or group is turned off. To disable inheritance for all users and groups, turn off the Inheritance setting. When you re-enable inheritance, the roles for all users and groups revert to their project-level assignments.
To add project users or groups that aren't listed in the security dialog:
You can set the pipeline permissions to Open access, allowing all pipelines to use the service connection, or you can restrict access to specific pipelines.
When the pipeline permissions are set to Open access, you can limit access by selecting the Restrict access option.

To add pipelines to the restricted service connection, select Add pipeline ![]() and select a pipeline from the dropdown menu.
and select a pipeline from the dropdown menu.
To change a service connection from restricted to open access, select More actions ![]() and then Open access.
and then Open access.
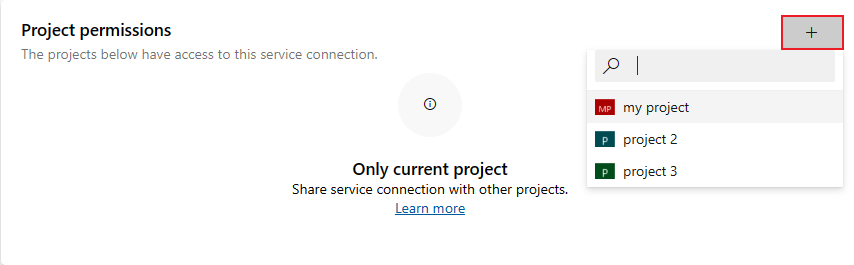
You can share a service connection across multiple projects. Project permissions control which projects can use the service connection. By default, service connections aren't shared with any other projects.
Access is restricted to the current project by default. To grant access to other projects in the organization or collection, select Add projects.
To set the security role for users and groups for individual connections, do the following steps:
From your project, select Project settings ![]() .
.
Select Service connections under Pipelines.
Select a service connection.

Select a user or group and change the role to User or Administrator. To lower the privilege level of an inherited role, inheritance must be disabled for the service connection.
Select Save changes ![]() to save your changes or Reset changes
to save your changes or Reset changes ![]() to revert unsaved changes.
to revert unsaved changes.
When you explicitly set a role, the inheritance for that user or group is turned off. To disable inheritance for all users and groups, turn off the Inheritance setting. When you re-enable inheritance, the roles for all users and groups revert to their project-level assignments.
To add project users or groups that aren't listed in the security dialog, do the following steps:
To remove a user or group from the list, select the user or group and select Delete ![]() . Inherited users and groups can't be removed unless inheritance is disabled.
. Inherited users and groups can't be removed unless inheritance is disabled.
If you're having trouble with permissions and service connections, see Troubleshoot Azure Resource Manager service connections.
The permissions for task groups follow a hierarchical model. By default, all task groups inherit the project-level permissions. Once a task group is created, you can modify the project-level permissions and the object-level permissions for individual task groups.
The following table show permissions for task groups:
| Permission | Description |
|---|---|
| Administer task group permissions | Can add and remove users or groups to task group security. |
| Delete task group | Can delete a task group. |
| Edit task group | Can create, modify, or delete a task group. |
The following table shows default permissions for security groups:
| Task | Readers | Contributors | Build Admins | Project Admins | Release Admins |
|---|---|---|---|---|---|
| Administer task group permissions | ✔️ | ✔️ | ✔️ | ||
| Delete task group | ✔️ | ✔️ | ✔️ | ||
| Edit task group | ✔️ | ✔️ | ✔️ | ✔️ |
The creator of a task group has all permissions to the task group.
Piezīme
Task groups aren't supported in YAML pipelines, but templates are. For more information, see YAML schema reference.
To set permissions for project-level task groups, do the following steps:
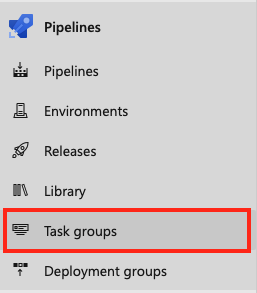
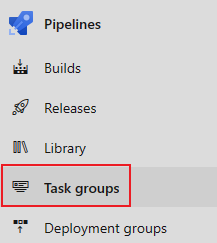
From your project, select Pipelines > Task groups.
Select Security.

Select users and groups to set their permissions to Allow, Deny, or Not set.
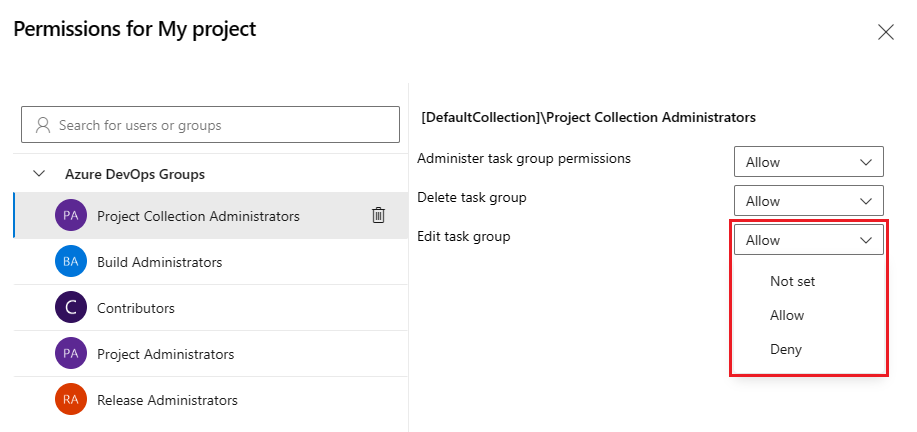
When you're done, close the dialog to save your changes.
To add users and groups that aren't listed in the permissions dialog, do the following steps:
When you open the security dialog again, the user or group is listed.
To remove a user from the permissions list, do the following steps:
Select the user or group.
Select Remove and clear explicit permissions.
When you're done, close the dialog to save your changes.
To set permissions for project-level task groups, do the following steps:
From your project, select Pipelines > Task groups.
Select Security.
To add users or groups that aren't listed in the permissions dialog, select Add, enter the user or group, and select Save changes.
Select a user or group to set the permissions to Allow, Deny or Not set.
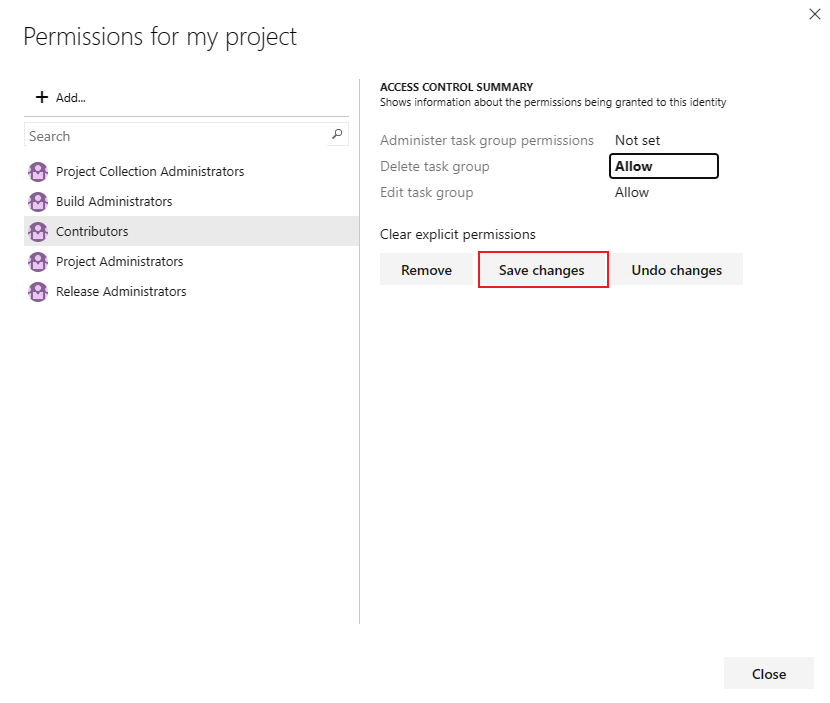
Select Save changes or you can select Undo changes to undo the changes. You must save the changes to apply the permissions before selecting another user or group.
You can select more users and groups to change their permissions.
Select Close when you're finished.
To set permissions for individual task groups, do the following steps:
From your project, select Pipelines > Task groups.
Select a task group.
Select More commands ![]() and select Security.
and select Security.
Select users and groups to set their permissions to Allow, Deny, or Not set.
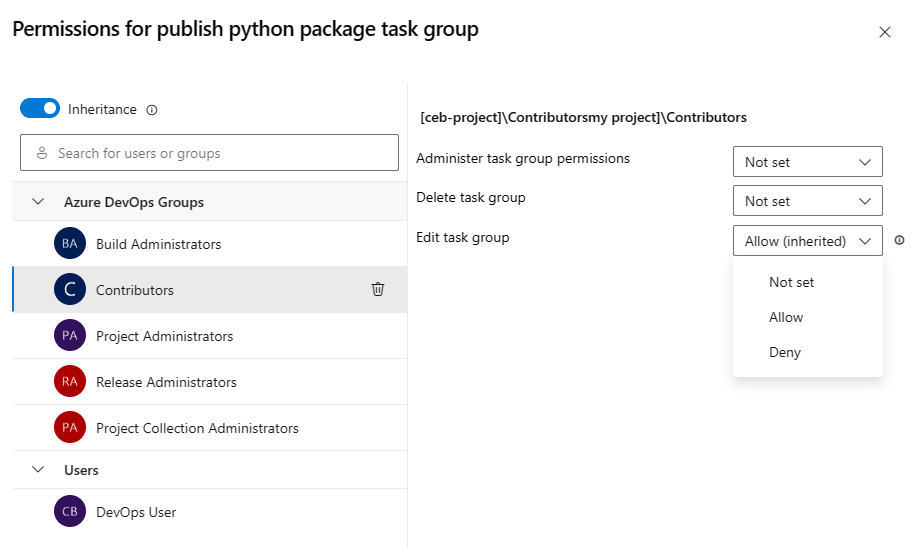
When you're done, close the dialog to save your changes.
When a permission for an inherited user or group is explicitly set, inheritance is disabled for that specific permission. Change the permission to Not set to restore inheritance. To disable inheritance for all user and group permissions, turn off the Inheritance setting. Upon re-enabling inheritance, the settings for all permissions revert to the project level.
To add users and groups that aren't listed in the permissions dialog, do the following steps:
When you open the security dialog again, the user or group is listed.
Users and groups can be removed from the task group. Inherited users and groups can't be removed unless inheritance is disabled.
Select the user or group.
Select Remove and clear explicit permissions.
When you're done, close the dialog to save your changes.
You can set the permissions to Allow, Deny, or to Not set if the permission isn't inherited. If inheritance is enabled, you can change an explicitly set permission back to the inherited value.
To set permissions for individual task groups, do the following steps:
From your project, select Pipelines > Task groups.
Select a task group.
Select More commands ![]() and select Security.
and select Security.
Select users and groups to set their permissions to Allow, Deny, or Not set.
When you're done, close the dialog to save your changes.
When a permission for an inherited user or group is explicitly set, inheritance is disabled for that specific permission. Change the permission to Not set to restore inheritance. To disable inheritance for all user and group permissions, turn off the Inheritance setting. Upon re-enabling inheritance, the settings for all permissions revert to the project level.
To add users and groups that aren't listed in the permissions dialog, do the following steps:
When you open the security dialog again, the user or group is listed.
Users and groups can be removed from the task group. Inherited users and groups can't be removed unless inheritance is disabled.
Select the user or group.
Select Remove and clear explicit permissions.
When you're done, close the dialog to save your changes.
You can set the permissions to Allow, Deny, or to Not set if the permission isn't inherited. If inheritance is enabled, you can change an explicitly set permission back to the inherited value.
To set permissions for a task group, do the following steps:
From your project, select Pipelines > Task groups.
Select a task group.
Select More commands ![]() > Security.
> Security.
To add users or groups that aren't listed in the permissions dialog, select Add, enter the user or group, and select Save changes.
Select users and groups to set their permissions to Allow, Deny or Not set.

Select Save changes or you can select Undo changes to undo the changes. You must save the changes to apply the permissions before selecting another user or group.
You can select more users and groups to change their permissions.
To remove a user or group, select the user or group and select Remove. Inherited users and groups can't be removed unless inheritance is disabled.
Select OK when you're finished.
When a permission for an inherited user or group is explicitly set, inheritance is disabled for that specific permission. Change the permission to Not set to restore inheritance. Select Clear explicit permissions to reset all explicitly set permissions to their inherited settings. To disable inheritance for all user and group permissions, turn off the Inheritance setting. Upon re-enabling inheritance, the settings for all permissions revert to the project level.
Agent pools are a collection of agents that you use to run build and release jobs.
You can create agent pools with either organization scope or project scope. Organization-scoped agent pools are accessible to all existing or new projects in the organization, and by default, each organization has two agent pools: Azure Pipelines and Default. These default pools are accessible by all projects in the organization.
Project-scoped agent pools are created at the project level and are accessible only to that project.
From the organization settings, you can manage the organization-level security settings for all agent pools in the organization, and for individual agent pools. Both organization- and project-level security roles can be managed from the project settings.
You can create agent pools with either collection scope or project scope. Collection scoped agent pools are accessible to all existing or new projects in the collection, and by default, each collection has two agent pools: Azure Pipelines and Default. These default pools are accessible by all projects in the collection.
Project-scoped agent pools are created at the project level and are accessible only to that project.
From the collection settings, you can manage the collection-level security settings for all agent pools in the collection, and for individual agent pools. Both collection- and project-level security roles can be managed at the object level from the project settings.
Use predefined security roles to manage security for agent pools.
The following table shows security roles for agent pools:
| Role | Purpose |
|---|---|
| Reader | Can view agent pools. |
| User | Can use agent pools in classic and YAML build and release pipelines. |
| Creator | Can create agent pools in the project. This role is a project-level role only. |
| Service Account | Can view agents, create sessions, and listen for jobs from the agent pool. This role is set at the organization/collection level only. |
| Administrator | Can manage and use agent pools and manage roles for other users and groups. |
The following table shows default project and object security roles for agent pools:
| Group | Role |
|---|---|
| [project name]\Project Administrators | Administrator |
| [project name]\Build Administrators | Administrator |
| [project name]\Project Valid Users | Reader |
| [project name]\Release Administrators | Administrator |
| The user who created the agent pool | Administrator |
Before you can add a principal, such as a service principal, in the Security settings of an agent pool, add it as a user in your organization.
You can manage collection-level users and groups for all agent pools in the organization or for individual project-scoped agent pools. The security roles for agent pools are Reader, Service Account, and Administrator. The User and Creator roles aren't available at the organization level.
By default, no users or groups have explicit roles for all pools at the organization level. You can add organization-level users and groups and manage security roles for all agent pools in the organization.
To manage security roles for all agent pools in the organization, do the following steps:
Go to Organization settings :![]() and select Agent pools.
and select Agent pools.
Select Security.

To add users and groups:
1: To create a new pipeline, you need Create build pipeline permissions. To add permission, open the security settings for all pipelines and verify that Create build pipeline is set to Allow for your security group.
To remove a user or group from the list, select the user or group and select Delete ![]() .
.
To change a security role, select the user or group and select the role from the dropdown list.
Select Save changes ![]() to save your changes or Reset changes
to save your changes or Reset changes ![]() to revert unsaved changes.
to revert unsaved changes.
Close the dialog.
Individual agent pools inherit the organization-level security assignments. The Default and Azure Pipelines agent pools include the Project Valid Users group for each project in the organization.
Agent pools created at the project-level are automatically assigned the [<project name>]\Project Valid Users group and the creator of the agent pool. The creator can't be deleted or modified. Any organization-level users and groups that are added from the project settings are listed here.
You can add and remove organization-level users and groups and set security roles for an individual agent pool. The security roles at this level are Reader, Service Account, and Administrator.
To manage security roles for all agent pools in the collection, do the following steps:

You can manage collection-level users and groups for all agent pools in the collection or at the object-level for project-scoped agent pools. The security roles for agent pools are, Reader, Service Account, and Administrator. The User and Creator roles aren't available at the collection level.
By default, no users or groups have explicit roles for all pools in the collection. You can add collection-level users and groups and manage security roles for all agent pools in the collection.
To manage security roles for all agent pools in the collection, do the following steps:
Go to Collection settings :![]() and select Agent pools.
and select Agent pools.
Select Security.
To add users and groups:
Select Add
Enter a user or group and select it from the search results.
Repeat the previous step to add more users and groups.
Select a role and select Add.
To remove a user or group from the list, select the user or group and select Delete ![]() . Inheritance must be turned off or the user or group must not be inherited from the project-level security settings.
. Inheritance must be turned off or the user or group must not be inherited from the project-level security settings.
To change a security role, select the user or group and select the role from the dropdown list.
Select Save changes ![]() to save your changes or Reset changes
to save your changes or Reset changes ![]() to revert unsaved changes.
to revert unsaved changes.

Close the dialog.
Individual agent pools inherit the collection-level security assignments. The Default and Azure Pipelines agent pools include the Project Valid Users group for each project in the collection.
Agent pools created at the project-level are automatically assigned the [<project name>]\Project Valid Users group and the creator of the agent pool. The creator can't be deleted or modified. Any collection-level users and groups that are added from the project settings are listed here.
You can add and remove collection-level users and groups and set security roles for an individual agent pool. The security roles at this level are Reader, Service Account, and Administrator. To lower the privilege level of an inherited role, inheritance must be disabled.
To manage security roles for all agent pools in the collection, do the following steps:
Go to Collection settings :![]() and select Agent pools.
and select Agent pools.
Select an agent pool.
Select Security.
To add users and groups:
Select Add
Enter a user or group and select it from the search results.
Repeat the previous step to add more users and groups.
Select a role and select Add.
To remove a user or group, select the user or group and select Delete ![]() .
.
To change a security role, select the user or group and select the role from the dropdown list.
Select Save changes ![]() to save your changes or Reset changes
to save your changes or Reset changes ![]() to revert unsaved changes.
to revert unsaved changes.
Close the dialog.
You can manage collection-level users and groups for all agent pools in the collection or at the object level, specifically for project-scoped agent pools. The security roles for agent pools are Reader, Service Account, and Administrator. The User and Creator roles aren't available at the collection level.
By default, no users or groups have explicit roles for all pools in the collection. You can add collection-level users and groups and manage security roles for all agent pools in the collection.
To manage security roles for all agent pools in the collection, do the following steps:
Go to Collection settings :![]() and select Agent pools.
and select Agent pools.
Select All agent pools.
To add users and groups:
Select Add
Enter a user or group and select it from the search results.
Repeat the previous step to add more users and groups.
Select a role and select Add.
To remove a user or group from the list, select the user or group and select Delete ![]() .
.
To change a security role, select the user or group and select the role from the dropdown list.
Select Save changes ![]() to save your changes or Reset changes
to save your changes or Reset changes ![]() to revert unsaved changes.
to revert unsaved changes.
Individual agent pools inherit their user and group roles from the collection-level assignments by default.
You can add and remove users and groups and set security roles for an individual agent pool. To remove an inherited user or group, or to lower the privilege level of an inherited role, you must disable inheritance.
The security roles at this level are Reader, Service Account, and Administrator.
To manage security roles for all agent pools in the collection, do the following steps:
Go to Collection settings :![]() and select Agent pools.
and select Agent pools.
Select an agent pool.
Select the Roles tab.
To add users and groups:
Select Add
Enter a user or group and select it from the search results.
Repeat the previous step to add more users and groups.
Select a role and select Add.
To remove a user or group from the list, select the user or group and select Delete ![]() .
.
To change a security role, select the user or group and select the role from the dropdown list.
Select Save changes ![]() to save your changes or Reset changes
to save your changes or Reset changes ![]() to revert unsaved changes.
to revert unsaved changes.
To set project-level security roles for all agent pools, do the following steps:
From your project, select Project settings ![]() and select Agent pools.
and select Agent pools.
Select Security.

Select a user or group and set the role to Reader, User, Creator, or Administrator.

To remove a user or group, select the user or group and select Delete ![]() .
.
Select Save changes ![]() to save your changes or Reset changes
to save your changes or Reset changes ![]() to revert unsaved changes.
to revert unsaved changes.
To add project users or groups that aren't listed in the security dialog:
Select Add.
Enter the user or group in the search bar, then select the user or group from the search result. You can add multiple users and groups.
Select the Role.
Select Add to save the changes.
You can override project-level user and group role assignments and set pipeline permissions for an individual agent pool. To remove an inherited user or group, or lower the privilege level of an inherited role, you must disable inheritance.
To open the security dialog:
From your project, select Project settings ![]() and select Agent pools.
and select Agent pools.
Select an agent pool.
Select Security.
To set pipeline permissions for an individual agent pool:
Select Restrict permission. This option is only available if the pool isn't restricted to specific pipelines.

Select Add pipeline ![]() .
.
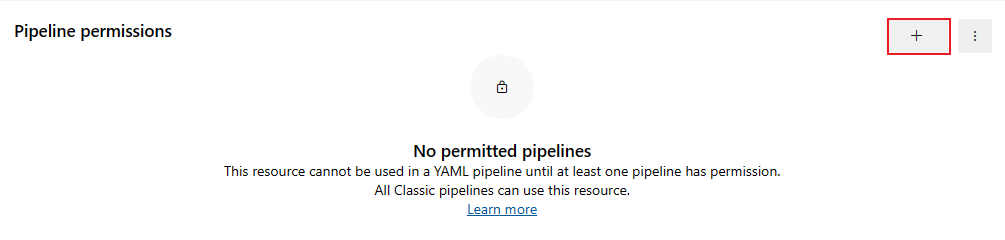
Select the pipeline you want to add to the agent pool from the dropdown menu.
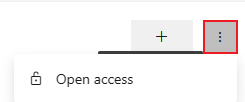
To open access to all pipelines, select More actions ![]() , then select Open access.
, then select Open access.
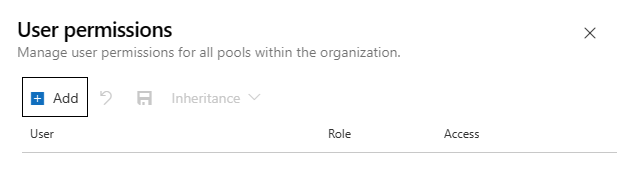
From the User permissions section of the security dialog:
Select a user or group and set the role to Reader, User, or Administrator.

To remove a user or group, select the user or group and select Delete ![]() . Inherited users and groups can't be removed unless inheritance is disabled.
. Inherited users and groups can't be removed unless inheritance is disabled.
Select Save changes ![]() to save your changes or Reset changes
to save your changes or Reset changes ![]() to revert unsaved changes.
to revert unsaved changes.
When you explicitly set a role, the inheritance for that user or group is turned off. To disable inheritance for all users and groups, turn off the Inheritance setting. When you re-enable inheritance, the roles for all users and groups revert to their project-level assignments.
To add project users or groups that aren't listed in the security dialog, do the following steps:
Select Add.
Enter the user or group in the search bar, then select the user or group from the search result. You can add multiple users and groups.
Select the Role.
Select Add to save the changes.
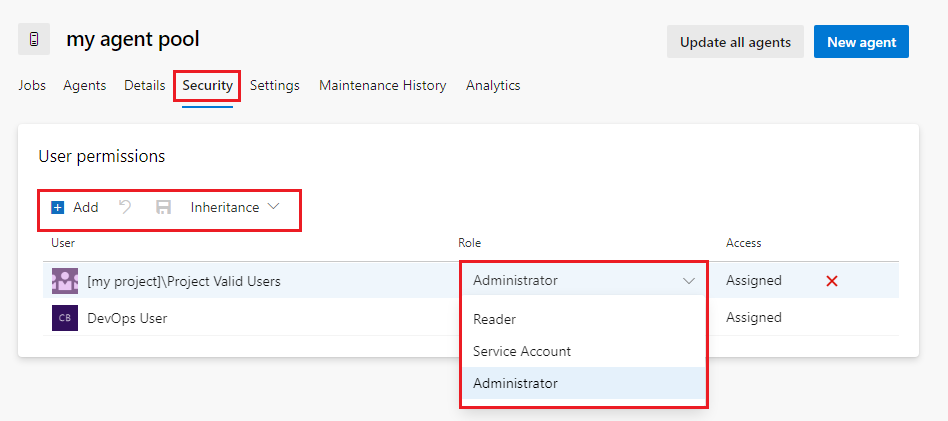
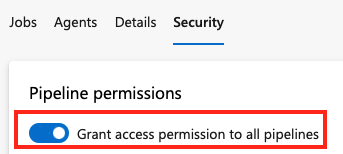
To set pipeline and user security roles and pipeline permissions for an individual agent pool, do the following steps.
Go to your agent pool and select Security.
Use the Grant access permissions to all pipelines switch to enable or disable permissions to all pipelines in the project:
To set object-level user and group roles for an agent pool:
From the User permissions section of the security dialog:
Select a user or group and set the role to Reader, User, or Administrator.
To remove a user or group, select the user or group and select Delete ![]() . Inherited users and groups can't be removed unless inheritance is disabled.
. Inherited users and groups can't be removed unless inheritance is disabled.
Select Save changes ![]() to save your changes or Reset changes
to save your changes or Reset changes ![]() to revert unsaved changes.
to revert unsaved changes.
When you explicitly set a role, the inheritance for that user or group is turned off. To disable inheritance for all users and groups, turn off the Inheritance setting. When you re-enable inheritance, the roles for all users and groups revert to their project-level assignments.
To add project users or groups that aren't listed in the security dialog, do the following steps:
Select Add.
Enter the user or group in the search bar, then select the user or group from the search result. You can add multiple users and groups.
Select the Role.
Select Add to save the changes.
Notikumi
Veidojiet inteliģentas lietotnes
17. marts 23 - 21. marts 23
Pievienojieties meetup sērijai, lai kopā ar citiem izstrādātājiem un ekspertiem izveidotu mērogojamus AI risinājumus, kuru pamatā ir reālas lietošanas gadījumi.
Reģistrēties tūlītApmācība