Notikumi
Power BI DataViz pasaules čempionāts
14. febr. 16 - 31. marts 16
Ar 4 iespējām piedalīties, jūs varētu laimēt konferences paketi un iekļūt LIVE Grand Finale Lasvegasā
Uzzināt vairākŠī pārlūkprogramma vairs netiek atbalstīta.
Jauniniet uz Microsoft Edge, lai izmantotu jaunāko līdzekļu, drošības atjauninājumu un tehniskā atbalsta sniegtās priekšrocības.
This article explains how you can personalize the app and covers the following subjects:
The User options page contains several system-wide settings for the current user. These options are available to all users, even users who aren't given any access to personalization. To open the User options page, select the Settings button on the navigation bar, and then select User options. The User options page has four tabs that contain various user settings:
In addition to changing your user settings, you can also view and delete your usage data and personalizations from the User options page. To see your usage data, select Usage data on the Action Pane. On the Personalization tab, you can view and manage the personal changes that you made to pages in the system. On this tab, you can also reset feature callouts (the pop-up windows that introduce new system features). You are then alerted again about previously encountered features.
At the restricted personalization access level, user actions that are associated with typical page usage are automatically saved by the app and restored the next time that you visit the page. No explicit save action is required.
Here's a list of the actions that fall under typical page usage and are covered by restricted personalization access:
At the full personalization access level, users have access to all the personalization capabilities that the app provides. Because different people and companies have different needs when they interact with the app, especially in terms of utilized fields, personalization provides tools that let users and organizations tailor the way that information is ordered and interacted with in the app. These capabilities are key to providing simplified, optimized experiences in the app that are tailored to you and your organization.
For pages with saved views, an explicit save is required to persist any user changes to the user experience for the current view. For pages without saved views, these changes are saved automatically.
The following sections cover the extent of personalization capabilities that are available to users at the full personalization access level. Here are some of these capabilities:
Shortcut menus provide one way to change a page's interface so that it better meets your requirements or the requirements of your organization. (A shortcut menu is also known as a right-click menu or a context menu.)
Some of the most typical and important changes that can be made to a page are available directly as options on a shortcut menu. For example, if you want to add or hide columns in a grid, just right-click a column header, and then select Insert columns or Hide this column.
Additionally, the most basic types of personalizations are available by right-clicking an element and then selecting Personalize. Not all elements on your page can be personalized. When you use this personalization method, the element's property window appears.
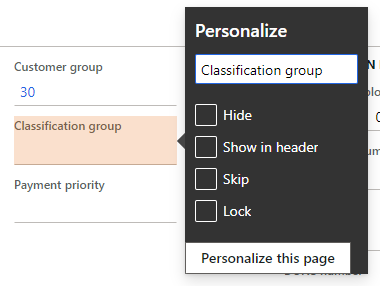
You can use the property window to personalize an element in the following ways:
The property window might include other personalization capabilities, depending on the element. For example, the property window for a tile might let you promote that tile to a dashboard, and property windows for elements on the default dashboard might let you create a new custom workspace.
If you want to make multiple changes to a page, or changes that aren't available through other mechanisms (for example, if you want to reorder elements), you can use the Personalization toolbar. To open the Personalization toolbar, follow one of these steps:
[ ]
]
When the Personalization toolbar is open, the underlying page is read-only (in other words, you can't edit data), but it's still interactive. Specifically, you can expand or collapse the Related information pane, switch tabs, and expand or collapse sections, just as you would usually perform those actions on the page. To apply a personalization to a collapsible section or tab (for example, to hide a FastTab), you just have to select the button that appears next to that section or tab when it gains keyboard focus or when you hover over it.
The following tools are available on the Personalization toolbar:
Use the Select tool to select and change the properties of an element. To use this tool, select the Select button on the toolbar, and then select the desired element. The element's property window appears, where you can change any of the properties of that element. You can repeat the process for other elements that can be personalized on the page. Some personalization properties might not be available in some scenarios. For example, you can't lock a field that is required.
Use the Hide tool to hide an element on the page. To use this tool, select the Hide button on the toolbar, and then select the element to hide. When you use the Hide tool, all elements that are currently hidden are made visible, but they're shown in a shaded container. You can then make an element visible by selecting it. To see how the page looks when elements are hidden, switch to another personalization tool or close the personalization toolbar.
Use the Add fields tool to add fields to your page. When you use this tool, you can only add fields that are part of the page definition. For information about how to create new fields that aren't part of the current page definition, see Create and work with custom fields. After you select the Add fields button on the toolbar, you must first select the grid or section where you want to add a field. A dialog shows the list of fields that are related to the selected grid or section. In the dialog, select one or more fields to add from either the Recommended fields or All fields list. After you select the desired fields, select Update. To remove a field that you previously added, repeat the process, but clear the selection of the field in the dialog.
The Recommended fields list shows fields that were previously added by other users in your organization. This list of fields is updated based on the recurrence frequency of the Recommendation batch job. A similar experience exists when adding new filter fields using the Filter pane on a page.
Use the Move tool to move an element to a different location in the current group of elements. You can't move an element outside its parent group. To use this tool, select the Move button on the toolbar, and then select the element to move. When you select an element, the app determines the locations where the element is allowed to be moved. These locations are known as drop zones. As you drag the element around in the current group, each drop zone is shown as a colored, bold line next to the area where the element can be dropped.
Use the Skip tool to remove an element from the page's keyboard tab sequence. When you select the Skip button on the toolbar, all elements that are currently skipped are shown in a shaded container. You can interactively remove or add fields to the tab sequence.
Use the Show in header tool when you want a field to appear in the FastTab's summary section. When you select the Show in header button on the toolbar, all fields that are selected as summary fields are shown in a shaded container. You can interactively add fields to the FastTab summary and remove fields from the summary by selecting the fields.
Use the Require tool to designate an element as required for data entry. When you select the Require button on the toolbar, all elements that are personalized to make them required are shown in a shaded container. You can then make them not required again.
Use the Lock tool to mark an element as either editable or noneditable. When you select the Lock button on the toolbar, all elements that are currently noneditable are shown in a shaded container. You can then make them editable again. Some fields are required and can't be made noneditable. A padlock symbol appears next to those fields.
Use the Add an app from Power Apps tool to embed an app that was created by using Microsoft Power Apps into the page. This option is available only when the Saved views feature is turned off.
Use the Add an app button to embed an app into the page. This app can either be an app created from Microsoft Power Apps or a [third-party](embed-website.md] app.
Use the Clear tool to reset the page to its default state. This action applies to the current view for pages that support saved views and to all personalizations on the current page for pages that don't support saved views. You can't undo this action, so only use this tool if you're sure that you want to reset the view or page.
Use the Import tool to load a personalization from a file that you or someone else previously created. The imported personalizations then become a view on the page. If the view already exists, you have the option to skip the import, replace the current view that has the same name, or rename the imported view.
Use the Export tool to save the current view for the page to a file with which you can share your personalizations with other users. Users can then import the file that contains your personalizations for the page.
Select the Close button to close the Personalization toolbar and return the page to its previous interactive state.
When you use the Personalization toolbar, you must explicitly save personalizations to a view for them to be persisted.
In some cases, when you select a tool, a padlock symbol appears next to an element. This symbol indicates that you can't modify the element properties that are related to the selected tool, because changes to those properties can prevent the page from working correctly.
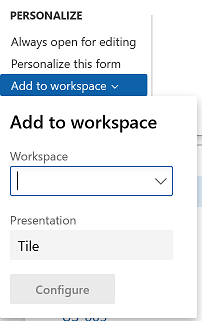
For some pages that include lists, the Add to workspace personalization feature is available in the Personalize group on the Options tab of the Action Pane. This feature lets you push relevant information from the current list to a specific workspace. The information that appears in the workspace can be based on either the whole list, or a filtered and sorted version of the list. You can also specify whether the information appears in the workspace as a list, a summary tile that can show the number of items in the list, or a link.
Piezīme
If the Saved views feature is turned on, the content that you push to a workspace is directly linked to a view. The view's query is used to retrieve data into the workspace, and the corresponding tile or link in the workspace opens the page to that view, so that the view's query and personalizations are applied to it. If the view is updated, the corresponding workspace elements will be adjusted to the new view definition.
[ ]
]
Piezīme
If the Saved views for workspaces feature is enabled, when you configure your list, tile, or link you also have to select the workspace view to which you want to add the element. The available workspace views appear in the Workspace options section of each Configure dialog.
After you add a list, tile, or link to a workspace, you can open that workspace and rearrange the elements within it as you want.
Some workspaces contain count tiles (that is, tiles that have numbers on them), and you might want those tiles to appear on your dashboard too. In a workspace, right-click a count tile, select Personalize, and then, in the tile's property window, select Pin to dashboard. The next time that you open and refresh the dashboard, the count will appear below the navigation tile for that workspace. You can select that count to go directly to the data that it represents.
Users can modify the size of any non-KPI tile via personalization. In a workspace, right-click a tile, and then select Personalize. In the tile's property window, select the desired size from the Tile size options. After you select a size, the tile size adjusts immediately. If the Saved views support for workspaces feature is enabled, you can save this personalization to a workspace view.
The dashboard is often the first page that you see when you open the app. It can be personalized like any other page in the system, by using the same mechanisms that are described earlier in this article.
One unique personalization capability that is available on the dashboard is the ability to add tiles.
After you personalize a page, there are a few methods that you can use to share your personalizations with other users. In the following list, the methods are arranged in order from most recommended to least recommended.
If the page supports saved views, the best way to share personalizations with other users is to publish the view to users who have one or more security roles. For more information, see Publishing views.
If the page doesn't support views, the recommended way to share personalizations is to copy them between users. This method is available only to privileged users (for example, system administrators) who can look up a specific user's personalization in the system (including the users' personal views) and copy the configuration to other users.
To copy personalizations between users, follow these steps.
Go System administration > Setup > Personalization.
To copy personal views, follow these steps.
To copy personalizations on pages that don't support views, follow these steps.
Another way to share personalizations is via export and import. Individual users, or an admin who acts on their behalf, can use this method to export their personalizations or views, and then give the exported file to other users to import. Alternatively, users can give their exported personalizations to a user who has admin privileges, and that user can then use the Personalization administration page to apply the personalization file to many users at the same time.
Svarīgi
As personalizations persist across updates, re-importing all personalizations after a service update or at any other time is unnecessary and highly discouraged.
In general, you can export one of your own views or personalizations by opening the appropriate page, opening the Personalization toolbar, and then selecting Export. For more information about the toolbar, see the Personalization toolbar. Alternatively, you can go to Settings > User options > Personalization to view a list of all your personalizations in the system. From there, you can select the views or personalizations to export, and then select Export.
Additionally, admins can export other users' personalizations by following these steps.
To import a view or personalization, you can just open the Personalization toolbar and select Import. Additionally, admins can import a file and immediately give it to one or more users.
If saved views are enabled, follow these steps.
Go to System administration > Setup > Personalization.
On the Action Pane, select Import views > User views.
Select the import mode:
Select Browse, and find and select the personalization to import.
Select Next.
If you selected Select specific users in step 3, select the users to import the personalization to.
Select Import.
Resolve conflicts as required.
The Personalization page is the central hub for managing personalizations at an organizational level. For more information, see Managing views globally.
Personalization data doesn't need to be cleared or reset when moving to a new version of the product. Personalizations and saved views data continue to work across updates. Exceptions include changes to the form itself that invalidate a personalization (such as a removed control) or changes to the form's base query that changes its data source subtree so that it no longer matches the data source subtree associated with the view query.
When you personalize the setup of inventory dimensions on a page, consider the settings that have been created by using the Display dimension option. For example, you use personalization to hide a column for the Batch number inventory dimension, but the column appears the next time that the page is opened. This behavior occurs because the Dimension display settings control the inventory dimension columns that are shown. The Dimension display settings apply across all pages and override any personalized setup of inventory dimension fields on individual pages.
Therefore, in the preceding example, if you don't want the column for the Batch number inventory dimension to appear on a page, you must clear that dimension as part of the Display dimensions option for that page.
Notikumi
Power BI DataViz pasaules čempionāts
14. febr. 16 - 31. marts 16
Ar 4 iespējām piedalīties, jūs varētu laimēt konferences paketi un iekļūt LIVE Grand Finale Lasvegasā
Uzzināt vairākApmācība
Modulis
Personalize Finance and Operations Apps - Training
Learn how to personalize finance and operations apps to empower employees and enforce UI for staff.