Cross-Platform App Case Study: Tasky
Tasky Portable is a simple to-do list application. This document discusses how it was designed and built, following the guidance of the Building Cross-Platform Applications document. The discussion covers the following areas:
Design Process
It is advisable to create a of road-map for what you want to achieve before you start coding. This is especially true for cross-platform development, where you are building functionality that will be exposed in multiple ways. Starting with a clear idea of what you're building saves time and effort later in the development cycle.
Requirements
The first step in designing an application is to identify desired features. These can be high-level goals or detailed use cases. Tasky has straightforward functional requirements:
- View a list of tasks
- Add, edit and delete tasks
- Set a task’s status to ‘done’
You should consider your use of platform-specific features. Can Tasky take advantage of iOS geofencing or Windows Phone Live Tiles? Even if you don't use platform-specific features in the first version, you should plan ahead to make sure your business & data layers can accommodate them.
User Interface Design
Start with a high-level design that can be implemented across the target
platforms. Take care to note platform-specfic UI constraints. For example, a TabBarController in iOS can display more than five buttons, whereas the Windows Phone equivalent can display up to four.
Draw the screen-flow using the tool of your choice (paper works).
Data Model
Knowing what data needs to be stored will help determine which persistence mechanism to use. See Cross-Platform Data Access for information about the available storage mechanisms and help deciding between them. For this project, we'll be using SQLite.NET.
Tasky needs to store three properties for each 'TaskItem':
- Name – String
- Notes – String
- Done – Boolean
Core Functionality
Consider the API that the user interface will need to consume to meet the requirements. A to-do list requires the following functions:
- List all tasks – to display the main screen list of all available tasks
- Get one task – when a task row is touched
- Save one task – when a task is edited
- Delete one task – when a task is deleted
- Create empty task – when a new task is created
To achieve code reuse, this API should be implemented once in the Portable Class Library.
Implementation
Once the application design has been agreed upon, consider how it might be implemented as a cross-platform application. This will become the application’s architecture. Following the guidance in the Building Cross-Platform Applications document, the application code should be broken down into the following parts:
- Common Code – a common project that contains re-useable code to store the task data; expose a Model class and an API to manage the saving and loading of data.
- Platform-specific Code – platform-specific projects that implement a native UI for each operating system, utilizing the common code as the ‘back end’.
These two parts are described in the following sections.
Common (PCL) Code
Tasky Portable uses the Portable Class Library strategy for sharing common code. See the Sharing Code Options document for a description of code-sharing options.
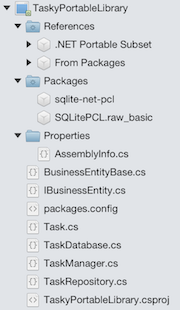
All common code, including the data access layer, database code and contracts, is placed in the library project.
The complete PCL project is illustrated below. All of the code in the portable library is compatible with each targeted platform. When deployed, each native app will reference that library.
The class diagram below shows the classes grouped by layer. The SQLiteConnection class is boilerplate code from the Sqlite-NET package. The rest of the classes are custom code for Tasky. The TaskItemManager and TaskItem classes represent the API that is
exposed to the platform-specific applications.
Using namespaces to separate the layers helps to manage references between
each layer. The platform-specific projects should only need to include a using statement for the Business Layer. The Data Access Layer and
Data Layer should be encapsulated by the API that is exposed by TaskItemManager in the Business Layer.
References
Portable class libraries need to be usable across multiple platforms, each with varying levels of support for platform and framework features. Because of that, there are limitations on which packages and framework libraries can be used. For example, Xamarin.iOS does not support the c# dynamic keyword, so a portable class library can't use any package that depends on dynamic code, even though such code would work on Android. Visual Studio for Mac will prevent you from adding incompatible packages and references, but you'll want to keep limitations in mind to avoid surprises later on.
Note: You'll see that your projects reference framework libraries that you haven't used. These references are included as part of the Xamarin project templates. When apps are compiled, the linking process will remove unreferenced code, so
even though System.Xml has been referenced, it will not be included
in the final application because we are not using any Xml functions.
Data Layer (DL)
The Data Layer contains the code that does the physical storage of data – whether to a database, flat files or other mechanism. The Tasky data layer consists of two parts: the SQLite-NET library and the custom code added to wire it up.
Tasky relies on the Sqlite-net NuGet package (published by Frank Krueger) to embed SQLite-NET code that provides an Object-Relational Mapping
(ORM) database interface. The TaskItemDatabase class inherits from SQLiteConnection and
adds the required Create, Read, Update, Delete (CRUD) methods to read and write
data to SQLite. It is a simple boilerplate implementation of generic CRUD
methods that could be re-used in other projects.
The TaskItemDatabase is a singleton, ensuring that all access occurs
against the same instance. A lock is used to prevent concurrent access from
multiple threads.
SQLite on Windows Phone
While iOS and Android both ship with SQLite as part of the operating system, Windows Phone does not include a compatible database engine. To share code across all three platforms a Windows phone-native version of SQLite is required. See Working with a Local Database for more information about setting up your Windows Phone project for Sqlite.
Using an Interface to Generalize Data Access
The Data Layer takes a dependency on BL.Contracts.IBusinessIdentity so that it can implement abstract
data access methods that require a primary key. Any Business Layer class that
implements the interface can then be persisted in the Data Layer.
The interface just specifies an integer property to act as the primary key:
public interface IBusinessEntity {
    int ID { get; set; }
}
The base class implements the interface and adds the SQLite-NET attributes to mark it as an auto-incrementing primary key. Any class in the Business Layer that implements this base class can then be persisted in the Data Layer:
public abstract class BusinessEntityBase : IBusinessEntity {
    public BusinessEntityBase () {}
    [PrimaryKey, AutoIncrement]
    public int ID { get; set; }
}
An example of the generic methods in the Data Layer that use the interface is
this GetItem<T> method:
public T GetItem<T> (int id) where T : BL.Contracts.IBusinessEntity, new ()
{
    lock (locker) {
        return Table<T>().FirstOrDefault(x => x.ID == id);
    }
}
Locking to prevent Concurrent Access
A lock is implemented within the TaskItemDatabase
class to prevent concurrent access to the database. This is to ensure concurrent
access from different threads is serialized (otherwise a UI component might
attempt to read the database at the same time a background thread is updating
it). An example of how the lock is implemented is shown here:
static object locker = new object ();
public IEnumerable<T> GetItems<T> () where T : BL.Contracts.IBusinessEntity, new ()
{
    lock (locker) {
        return (from i in Table<T> () select i).ToList ();
    }
}
public T GetItem<T> (int id) where T : BL.Contracts.IBusinessEntity, new ()
{
    lock (locker) {
        return Table<T>().FirstOrDefault(x => x.ID == id);
    }
}
Most of the Data Layer code could be re-used in other projects. The only
application-specific code in the layer is the CreateTable<TaskItem> call in the TaskItemDatabase
constructor.
Data Access Layer (DAL)
The TaskItemRepository class encapsulates the data storage mechanism
with a strongly-typed API that allows TaskItem objects to be created,
deleted, retrieved and updated.
Using Conditional Compilation
The class uses conditional compilation to set the file location - this is an example of implementing Platform Divergence. The property that returns the path compiles to different code on each platform. The code and platform-specific compiler directives are shown here:
public static string DatabaseFilePath {
    get {
        var sqliteFilename = "TaskDB.db3";
#if SILVERLIGHT
        // Windows Phone expects a local path, not absolute
        var path = sqliteFilename;
#else
#if __ANDROID__
        // Just use whatever directory SpecialFolder.Personal returns
        string libraryPath = Environment.GetFolderPath(Environment.SpecialFolder.Personal); ;
#else
        // we need to put in /Library/ on iOS5.1+ to meet Apple's iCloud terms
        // (they don't want non-user-generated data in Documents)
        string documentsPath = Environment.GetFolderPath (Environment.SpecialFolder.Personal); // Documents folder
        string libraryPath = Path.Combine (documentsPath, "..", "Library"); // Library folder
#endif
        var path = Path.Combine (libraryPath, sqliteFilename);
                #endif
                return path;
    }
}
Depending on the platform, the output will be “<app path>/Library/TaskDB.db3” for iOS, “<app path>/Documents/TaskDB.db3” for Android or just “TaskDB.db3” for Windows Phone.
Business Layer (BL)
The Business Layer implements the Model classes and a Façade to manage them.
In Tasky the Model is the TaskItem class and TaskItemManager implements the Façade pattern to provide an API for
managing TaskItems.
Façade
TaskItemManager wraps the DAL.TaskItemRepository to provide the Get, Save
and Delete methods that will be referenced by the Application and UI Layers.
Business rules and logic would be placed here if required – for example any validation rules that must be satisfied before an object is saved.
API for Platform-Specific Code
Once the common code has been written, the user interface must be built to
collect and display the data exposed by it. The TaskItemManager class
implements the Façade pattern to provide a simple API for the application code
to access.
The code written in each platform-specific project will generally be
tightly coupled to the native SDK of that device, and only access the common
code using the API defined by the TaskItemManager. This includes the
methods and business classes it exposes, such as TaskItem.
Images are not shared across platforms but added independently to each project. This is important because each platform handles images differently, using different file names, directories and resolutions.
The remaining sections discuss the platform-specific implementation details of the Tasky UI.
iOS App
There are only a handful of classes required to implement the iOS Tasky application using the common PCL project to store and retrieve data. The complete iOS Xamarin.iOS project is shown below:
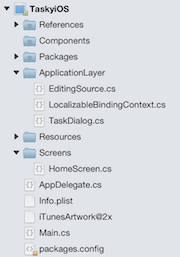
The classes are shown in this diagram, grouped into layers.
References
The iOS app references the platform-specific SDK libraries – eg. Xamarin.iOS and MonoTouch.Dialog-1.
It must also reference the TaskyPortableLibrary PCL project.
The references list is shown here:
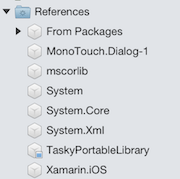
The Application Layer and User Interface Layer are implemented in this project using these references.
Application Layer (AL)
The Application Layer contains platform-specific classes required to ‘bind’ the objects exposed by the PCL to the UI. The iOS-specific application has two classes to help display tasks:
- EditingSource – This class is used to bind lists of tasks to the user interface. Because
MonoTouch.Dialogwas used for the Task list, we need to implement this helper to enable swipe-to-delete functionality in theUITableView. Swipe-to-delete is common on iOS, but not Android or Windows Phone, so the iOS specific project is the only one that implements it. - TaskDialog – This class is used to bind a single task to the UI. It uses the
MonoTouch.DialogReflection API to ‘wrap’ theTaskItemobject with a class that contains the correct attributes to allow the input screen to be correctly formatted.
The TaskDialog class uses MonoTouch.Dialog attributes to create a screen based on a class’s properties. The class looks like this:
public class TaskDialog {
    public TaskDialog (TaskItem task)
    {
        Name = task.Name;
        Notes = task.Notes;
        Done = task.Done;
    }
    [Entry("task name")]
    public string Name { get; set; }
    [Entry("other task info")]
    public string Notes { get; set; }
    [Entry("Done")]
    public bool Done { get; set; }
    [Section ("")]
    [OnTap ("SaveTask")]    // method in HomeScreen
    [Alignment (UITextAlignment.Center)]
    public string Save;
    [Section ("")]
    [OnTap ("DeleteTask")]  // method in HomeScreen
    [Alignment (UITextAlignment.Center)]
    public string Delete;
}
Notice the OnTap attributes require a method name – these
methods must exist in the class where the MonoTouch.Dialog.BindingContext is created (in this case, the HomeScreen class discussed in the next section).
User Interface Layer (UI)
The User Interface Layer consists of the following classes:
- AppDelegate – Contains calls to the Appearance API to style the fonts and colors used in the application. Tasky is a simple application so there are no other initialization tasks running in
FinishedLaunching. - Screens – subclasses of
UIViewControllerthat define each screen and its behavior. Screens tie together the UI with Application Layer classes and the common API (TaskItemManager). In this example the screens are created in code, but they could have been designed using Xcode’s Interface Builder or the storyboard designer. - Images – Visual elements are an important part of every application. Tasky has splash screen and icon images, which for iOS must be supplied in regular and Retina resolution.
Home Screen
The Home Screen is a MonoTouch.Dialog
screen that displays a list of tasks from the SQLite database. It inherits from DialogViewController and implements code to set the Root to contain
a collection of TaskItem objects for display.
The two main methods related to displaying and interacting with the task list are:
- PopulateTable – Uses the Business Layer’s
TaskManager.GetTasksmethod to retrieve a collection ofTaskItemobjects to display. - Selected – When a row is touched, displays the task in a new screen.
Task Details Screen
Task Details is an input screen that allows tasks to be edited or deleted.
Tasky uses MonoTouch.Dialog’s Reflection API to display the screen, so there is no UIViewController implementation. Instead, the HomeScreen class instantiates and displays a DialogViewController using the TaskDialog class from
the Application Layer.
This screenshot shows an empty screen that demonstrates the Entry attribute setting the watermark text in the Name and Notes fields:
The functionality of the Task Details screen (such as
saving or deleting a task) must be implemented in the HomeScreen
class, because this is where the MonoTouch.Dialog.BindingContext is
created. The following HomeScreen methods support the Task Details
screen:
- ShowTaskDetails – Creates a
MonoTouch.Dialog.BindingContextto render a screen. It creates the input screen using reflection to retrieve property names and types from theTaskDialogclass. Additional information, such as the watermark text for the input boxes, is implemented with attributes on the properties. - SaveTask – This method is referenced in the
TaskDialogclass via anOnTapattribute. It is called when Save is pressed, and uses aMonoTouch.Dialog.BindingContextto retrieve the user-entered data before saving the changes usingTaskItemManager. - DeleteTask – This method is referenced in the
TaskDialogclass via anOnTapattribute. It usesTaskItemManagerto delete the data using the primary key (ID property).
Android App
The complete Xamarin.Android project is pictured below:
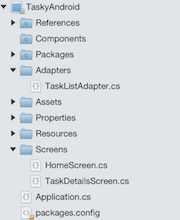
The class diagram, with classes grouped by layer:
References
The Android app project must reference the platform-specific Xamarin.Android assembly to access classes from the Android SDK.
It must also reference the PCL project (eg. TaskyPortableLibrary) to access the common data and business layer code.
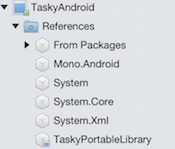
Application Layer (AL)
Similar to the iOS version we looked at earlier, the Application Layer in the Android version contains platform-specific classes required to ‘bind’ the objects exposed by the Core to the UI.
TaskListAdapter – to display a List<T> of objects
we need to implement an adapter to display custom
objects in a ListView. The adapter controls which layout is used for each item
in the list – in this case the code uses an Android built-in layout SimpleListItemChecked.
User Interface (UI)
The Android app’s User Interface Layer is a combination of code and XML markup.
- Resources/Layout – screen layouts and the row cell design implemented as AXML files. The AXML can be written by hand, or laid-out visually using the Xamarin UI Designer for Android.
- Resources/Drawable – images (icons) and custom button.
- Screens – Activity subclasses that define each screen and its behavior. Ties together the UI with Application Layer classes and the common API (
TaskItemManager).
Home Screen
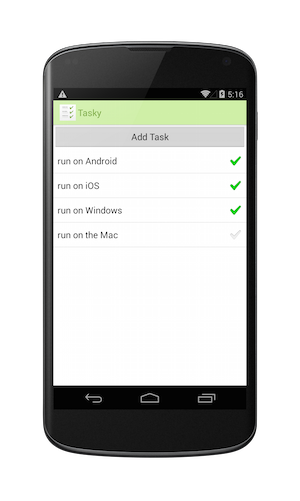
The Home Screen consists of an Activity subclass HomeScreen and
the HomeScreen.axml file which defines the layout (position of the
button and task list). The screen looks like this:
The Home Screen code defines the handlers for clicking the button and
clicking items in the list, as well as populating the list in the OnResume method (so that it reflects changes made in the Task
Details Screen). Data is loaded using the Business Layer’s TaskItemManager and the TaskListAdapter from the
Application Layer.
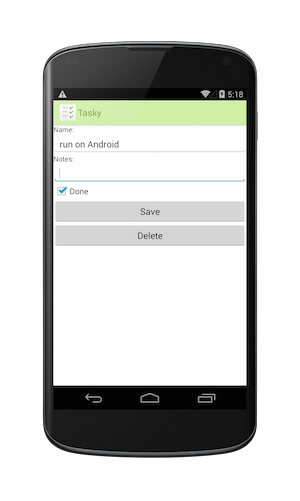
Task Details Screen
The Task Details Screen also consists of an Activity subclass and an AXML
layout file. The layout determines the location of the input controls and the C#
class defines the behavior to load and save TaskItem objects.
All references to the PCL library are through the TaskItemManager class.
Windows Phone App
The complete Windows Phone project:
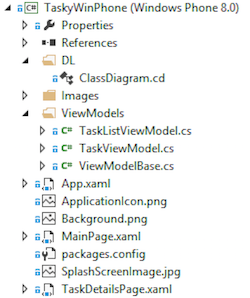
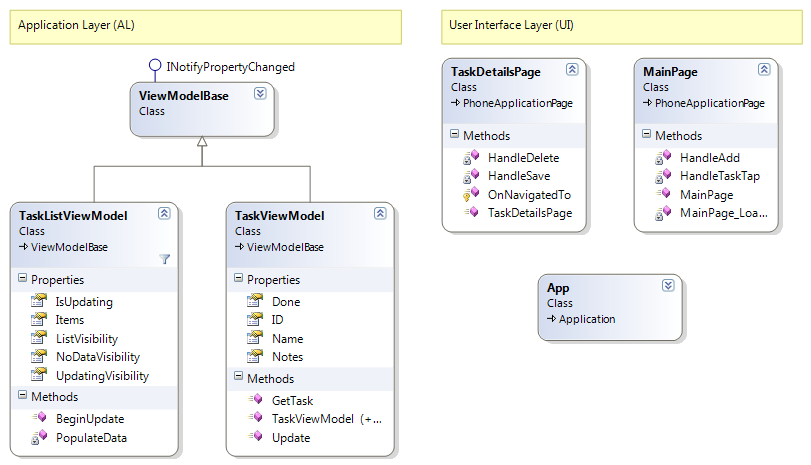
The diagram below presents the classes grouped into layers:
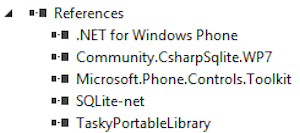
References
The platform-specific project must reference the required platform-specific
libraries (such as Microsoft.Phone and System.Windows)
to create a valid Windows Phone application.
It must also reference the PCL project (eg. TaskyPortableLibrary) to
utilize the TaskItem class and database.
Application Layer (AL)
Again, as with the iOS and Android versions, the application layer consists of the non-visual elements that help to bind data to the user interface.
ViewModels
ViewModels wrap data from the PCL ( TaskItemManager) and presents it
in way that can be consumed by Silverlight/XAML data binding. This is an example
of platform-specific behavior (as discussed in the Cross-Platform Applications
document).
User Interface (UI)
XAML has a unique data-binding capability that can be declared in markup and reduce the amount of code required to display objects:
- Pages – XAML files and their codebehind define the user interface and reference the ViewModels and the PCL project to display and collect data.
- Images – Splash screen, background and icon images are a key part of the user interface.
MainPage
The MainPage class uses the TaskListViewModel to display data
using XAML’s data-binding features. The page’s DataContext is
set to the view model, which is populated asynchronously. The {Binding} syntax in the XAML determines how the data is
displayed.
TaskDetailsPage
Each task is displayed by binding the TaskViewModel to the XAML
defined in the TaskDetailsPage.xaml. The task data is retrieved via the TaskItemManager in the Business Layer.
Results
The resulting applications look like this on each platform:
iOS
The application uses iOS-standard user interface design, such as the
‘add’ button being positioned in the navigation bar and using the built-in plus (+) icon. It also uses the default
UINavigationController ‘back’ button behavior and supports
‘swipe-to-delete’ in the table.
Android
The Android app uses built-in controls including the built-in layout for rows that require a ‘tick’ displayed. The hardware/system back behavior is supported in addition to an on-screen back button.
Windows Phone
The Windows Phone app uses the standard layout, populating the app bar at the bottom of the screen instead of a nav bar at the top.
Summary
This document has provided a detailed explanation of how the principles of layered application design have been applied to a simple application to facilitate code re-use across three mobile platforms: iOS, Android and Windows Phone.
It has described the process used to design the application layers and discussed what code & functionality has been implemented in each layer.
The code can be downloaded from github.


