Nota
Capaian ke halaman ini memerlukan kebenaran. Anda boleh cuba mendaftar masuk atau menukar direktori.
Capaian ke halaman ini memerlukan kebenaran. Anda boleh cuba menukar direktori.
Webhooks are simple HTTP callbacks that provide event notifications when something happens in a web service. In Azure Logic Apps and Power Automate you can use webhooks as triggers. A logic app or flow listens for this trigger and performs an action whenever the trigger fires. This tutorial demonstrates how to use a webhook as a trigger via a custom connector defined with an OpenAPI specification.
Note
This article uses GitHub as an example of a service that can send notifications via webhooks, but you can extend the techniques demonstrated here to any service that allows webhooks.
Prerequisites
- One of the following subscriptions:
- Azure, if you're using Logic Apps
- Power Automate
- Basic experience building logic apps or cloud flows, and creating custom connectors from OpenAPI definitions.
- If you're using Logic Apps, first create an Azure Logic Apps custom connector.
- Basic understanding of webhooks.
- Basic understanding of the OpenAPI Specification (formerly known as Swagger).
- A GitHub account.
- The sample OpenAPI definition for this tutorial. If you don't have it already, download it to use in the steps that follow. Otherwise, you need to create a custom OpenAPI definition for your webhook.
Enable authentication in GitHub
A web service API that sends a webhook request to Logic Apps or Power Automate typically uses some form of authentication, and GitHub is no exception. GitHub supports several types of authentication. This tutorial uses GitHub fine-grained personal access tokens.
Go to GitHub and sign in if you haven't already.
In the upper right, select your profile picture, and then, in the menu, select Settings.
In the menu on the left, select Developer settings.
Under Personal access tokens, select Fine-grained tokens.
Select the Generate new token button, then confirm your password if requested.
Enter a Token name and Description for the token.
Under Expiration, select an expiration date for the token.
Under Repository access, select Only select repositories, and select the repository you want to give access to.
Under Permissions, select Add permissions > Webhooks > Read and write.
Select the Generate token button.
Make note of your new token. You need to use this token later when adding your webhook connector as a trigger.
Important
You can't access this token again. Copy and paste it somewhere to use later in the tutorial.
Define the webhook in the OpenAPI definition
You implement webhooks in Logic Apps and Power Automate as part of a custom connector. To create the connector, you need to provide an OpenAPI definition that defines the shape of the webhook. This tutorial uses a downloaded sample OpenAPI definition for GitHub webhooks.
If you want to create a trigger but you don't have an OpenAPI definition to work from, use the triggers UI in the custom connector wizard to define webhook triggers.
The sample OpenAPI definition contains three parts that are critical to making the webhook work:
- Creating the webhook
- Defining the incoming hook request from the web service API (in this tutorial example, GitHub)
- Deleting the webhook
The connector uses this OpenAPI definition to understand how to create, receive from, and delete webhooks for the GitHub repository.
Create the webhook
The connector uses the web service API (In our example, the GitHub REST API) to create the webhook on the web service side by sending an HTTP POST request to the appropriate webhook creation endpoint for the web service (/repos/{owner}/{repo}/hooks in the case of GitHub).
When you create a new logic app or flow using the connector, the connector sends a POST request to the web service's create webhook endpoint as defined in the connector's OpenAPI definition. It also sends a POST request to this URL if you modify the logic app or flow trigger. In the following sample OpenAPI path configuration, the post property contains the schema of the create webhook request to send to the GitHub REST API.
"/repos/{owner}/{repo}/hooks": {
    "x-ms-notification-content": {
        "description": "Details for Webhook",
        "schema": {
            "$ref": "#/definitions/WebhookPushResponse"
        }
    },
    "post": {
        "description": "Creates a GitHub webhook",
        "summary": "Triggers when a PUSH event occurs",
        "operationId": "webhook-trigger",
        "x-ms-trigger": "single",
        "parameters": [
            {
            "name": "owner",
            "in": "path",
            "description": "Name of the owner of targeted repository",
            "required": true,
            "type": "string"
            },
            {
            "name": "repo",
            "in": "path",
            "description": "Name of the repository",
            "required": true,
            "type": "string"
            },
            {
            "name": "Request body of webhook",
            "in": "body",
            "description": "This is the request body of the Webhook",
            "schema": {
                "$ref": "#/definitions/WebhookRequestBody"
            }
            }
        ],
        "responses": {
            "201": {
            "description": "Created",
            "schema": {
                "$ref": "#/definitions/WebhookCreationResponse"
                }
            }
        }
    }
},
Important
The "x-ms-trigger": "single" property is a schema extension that tells Logic Apps and Power Automate to display this webhook in the list of available triggers in the designer. Be sure to include it.
Define the incoming hook request from the API
Define the shape of the incoming hook request (the notification from GitHub to Logic Apps or Power Automate) in the custom x-ms-notification-content property, as shown in the previous sample. The request doesn't need to contain the entire contents of the request, just the portions you want to use in your logic app or flow.
Delete the webhook
Include a definition for how to delete the webhook in the OpenAPI definition. Logic Apps and Power Automate try to delete the existing webhook if you update the trigger, or if you delete the logic app or flow.
"/repos/{owner}/{repo}/hooks/{hook_Id}": {
    "delete": {
        "description": "Deletes a Github webhook",
        "operationId": "DeleteTrigger",
        "parameters": [
            {
                "name": "owner",
                "in": "path",
                "description": "Name of the owner of targeted repository",
                "required": true,
                "type": "string"
            },
            {
                "name": "repo",
                "in": "path",
                "description": "Name of the repository",
                "required": true,
                "type": "string"
            },
            {
                "name": "hook_Id",
                "in": "path",
                "description": "ID of the webhook being deleted",
                "required": true,
                "type": "string"
            }
        ]
    }
},
No header is included for the delete webhook call. The delete webhook call uses the same connection as the connector.
Important
To enable Logic Apps or Power Automate to delete a webhook, the web service's API must include a Location HTTP header in the 201 response when the webhook is created. The Location header should contain the path to the webhook that's used with the HTTP DELETE method. For example, the Location header included in GitHub's response follows this format: https://api.github.com/repos/<user name>/<repo name>/hooks/<hook ID>.
Import the OpenAPI definition
Start by importing the OpenAPI definition for Logic Apps, or for Power Automate.
Import the OpenAPI definition for Logic Apps
Go to the Azure portal and open the Logic Apps connector you created earlier in Create an Azure Logic Apps custom connector.
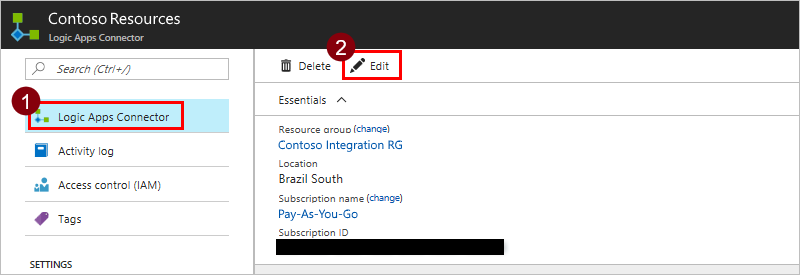
In your connector's menu, select Logic Apps Connector, and then select Edit.
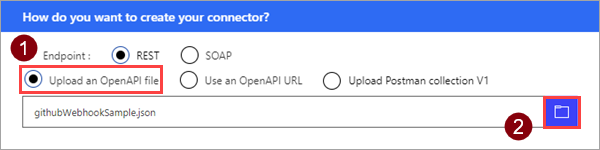
Under General, select Upload an OpenAPI file, and then go to the sample OpenAPI file that you downloaded.
Import the OpenAPI definition for Power Automate
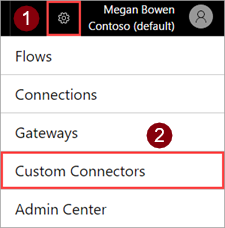
In the upper right corner, select the gear icon, then select Custom connectors.
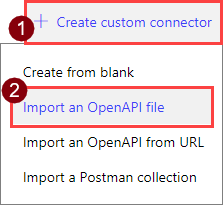
Select Create custom connector, then select Import a Postman collection.
Enter a name for the custom connector, go to the sample OpenAPI file that you downloaded, and select Connect.
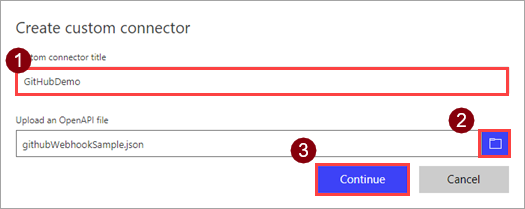
Parameter Value Custom connector title "GitHubDemo"
Finish creating the custom connector
On the General page, select Continue.
On the Security page, under Authentication type, select Basic authentication.
In the Basic authentication section, for the label fields, enter the text User name and Password. These labels appear when you use the trigger in a logic app or flow.
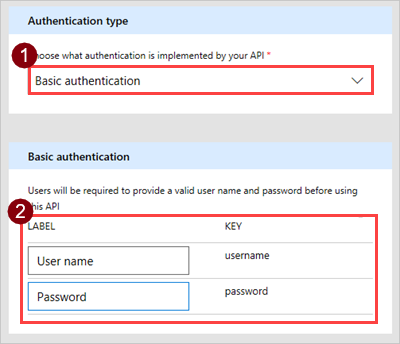
At the top of the wizard, ensure the name is set to "GitHubDemo", and then choose Create connector.
You're now ready to use the trigger in a logic app or flow, or you can read on about how to create triggers from the UI.
Create webhook triggers from the UI
In this section, you learn how to create a trigger in the UI without having any trigger definitions in your OpenAPI definition. Start with a baseline OpenAPI definition, or start from scratch in the custom connector wizard.
On the General page, make sure you specify a description and URL.
Parameter Value Description "GitHub is a social source code repository." URL "api.github.com" On the Security page, configure basic authentication like you did in the previous section.
On the Definition page, choose New trigger, and fill out the description for your trigger. In this example, you are creating a trigger that fires when a pull request is made to a repository.
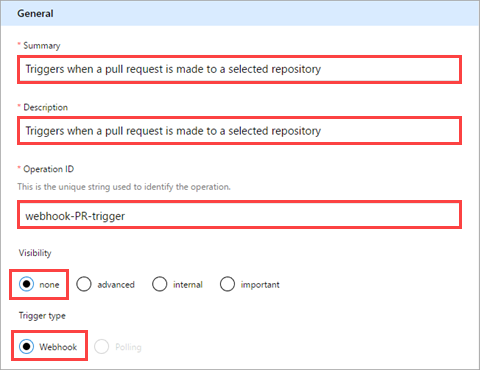
Parameter Value Summary "Triggers when a pull request is made to a selected repository" Description "Triggers when a pull request is made to a selected repository" Operation ID "webhook-PR-trigger" Visibility "none" (see below for more information) Trigger type "Webhook" The Visibility property for operations and parameters in a logic app or flow has the following options:
- none: displayed normally in the logic app or flow
- advanced: hidden under an additional menu
- internal: hidden from the user
- important: always shown to the user first
The Request area displays information based on the HTTP request for the action. Choose Import from sample.

Define the request for the webhook trigger, and then select Import. We provide a sample for you to import (in the following section). For more information, see the GitHub API reference. Logic Apps and Power Automate automatically add standard
content-typeand security headers, so you don't need to define those while importing from a sample.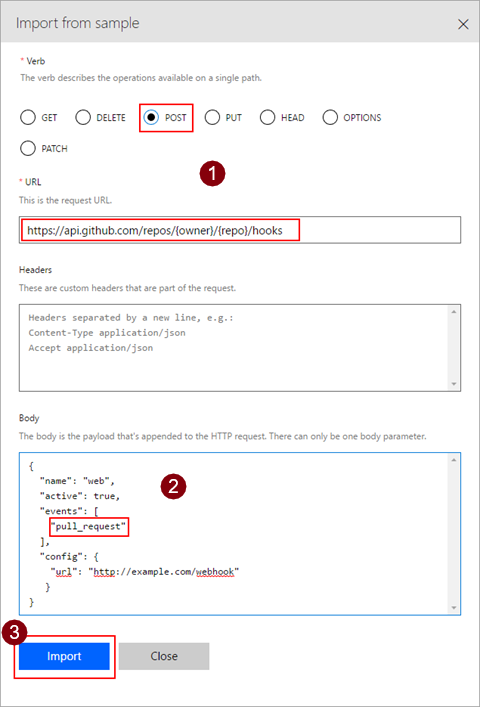
Parameter Value Verb "POST" URL "https://api.github.com/repos/{owner}/{repo}/hooks" Body See below { "name": "web", "active": true, "events": [ "pull_request" ], "config": { "url": "http://example.com/webhook" } }The Response area displays information based on the HTTP response for the action. Select Add default response.
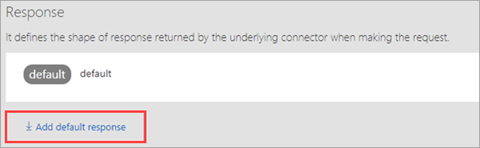
Define the response for the webhook trigger, and then select Import. Again, we provide a sample for you to import. For more information, see the GitHub API reference.
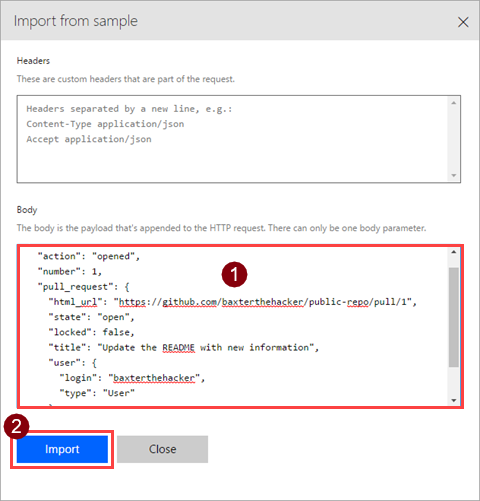
{
  "action": "opened",
  "number": 1,
  "pull_request": {
    "html_url": "https://github.com/baxterthehacker/public-repo/pull/1",
    "state": "open",
    "locked": false,
    "title": "Update the README with new information",
    "user": {
      "login": "baxterthehacker",
      "type": "User"
    }
  }
}
In the Trigger configuration area, select the parameter that should receive the callback URL value from GitHub. This parameter is the
urlproperty in theconfigobject.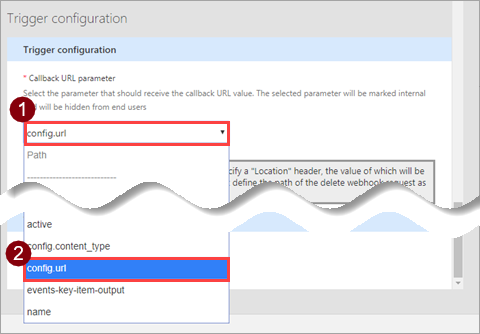
At the top of the wizard, enter a name, and then choose Create connector.
Use the webhook as a trigger
After you configure everything, use the webhook through the custom connector in a logic app or flow. Next, create a flow that sends an email whenever your GitHub repo receives a git push.
In https://make.powerautomate.com/, at the top of the page, select My flows.
Select Create from blank.

In the designer for Power Automate, search for the custom connector you registered earlier.
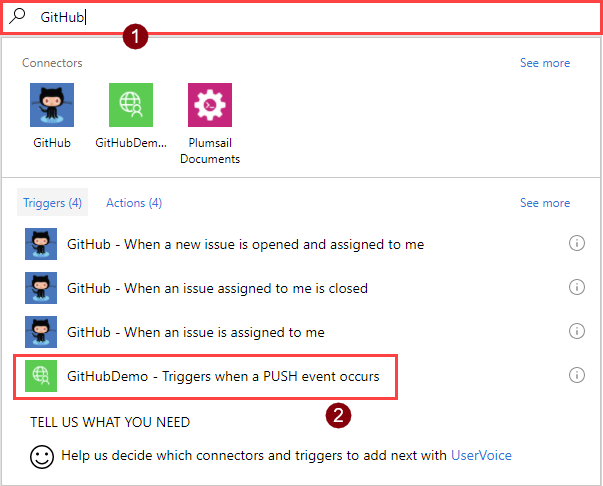
Select the item in the list to use it as a trigger.
Since this is the first time you used this custom connector, connect to it. Enter connection information, and then select Create.
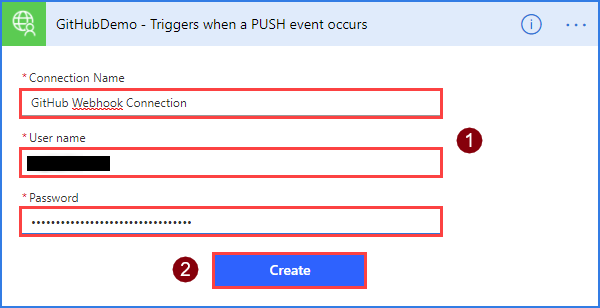
Parameter Value Connection name A descriptive name User name Your GitHub username Password The personal access token you created earlier Enter details about the repo you want to monitor. You might recognize the fields from the WebhookRequestBody object in the OpenAPI file.
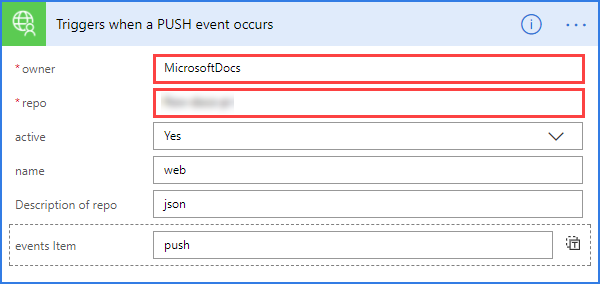
Parameter Value owner The owner of the repo to monitor repo The repo to monitor Important
Use a repo that your account has rights to. The easiest way to do this is to use your own repo.
Select New step > Add an action.
Search for and select the Send an email (V2) action.
Enter text in the Body field and the other fields, using values from the dynamic content dialog box. Values come from the WebhookPushResponse object in the OpenAPI file.
At the top of the page, give the flow a name and choose Create flow.

Verification and troubleshooting
To verify everything is set up correctly, select My flows, and then select the information icon next to the new flow to view the run history:
- You should already see at least one Succeeded run from the webhook creation. This run indicates that the webhook was created successfully on the GitHub side.
- If the run failed, review the run details to see why it failed. If the failure was due to a
404 Not Foundresponse, your GitHub account likely doesn't have the correct permissions to create a webhook on the repo you used.
Summary
If you configured everything correctly, you receive push notifications in the Power Automate mobile app whenever a git push occurs on the GitHub repository you selected. By using the preceding process, you can use any webhook-capable service as a trigger in your flows.
Next steps
Provide feedback
We greatly appreciate feedback on issues with our connector platform, or new feature ideas. To provide feedback, go to Submit issues or get help with connectors and select your feedback type.