Nota
L-aċċess għal din il-paġna jeħtieġ l-awtorizzazzjoni. Tista’ tipprova tidħol jew tibdel id-direttorji.
L-aċċess għal din il-paġna jeħtieġ l-awtorizzazzjoni. Tista’ tipprova tibdel id-direttorji.
In this quickstart, you create Python sender and receiver applications that send and receive messages by using the WebSocket protocol. The applications use Hybrid Connections feature of Azure Relay. To learn about Azure Relay in general, see Azure Relay.
In this quickstart, you take the following steps:
- Create a Relay namespace by using the Azure portal.
- Create a hybrid connection in that namespace by using the Azure portal.
- Generate a config.json properties file to store connection details
- Develop a relaylib.py for helper functions (SAS tokens, URLs)
- Write a server (listener) script to receive messages.
- Write a client (sender) script to send messages.
- Execute the server (listener) script and optionally the client (sender) script.
- Python. Ensure that you're running Python 3.10+
- An Azure subscription. If you don't have one, create a free account before you begin.
Sign in to the Azure portal.
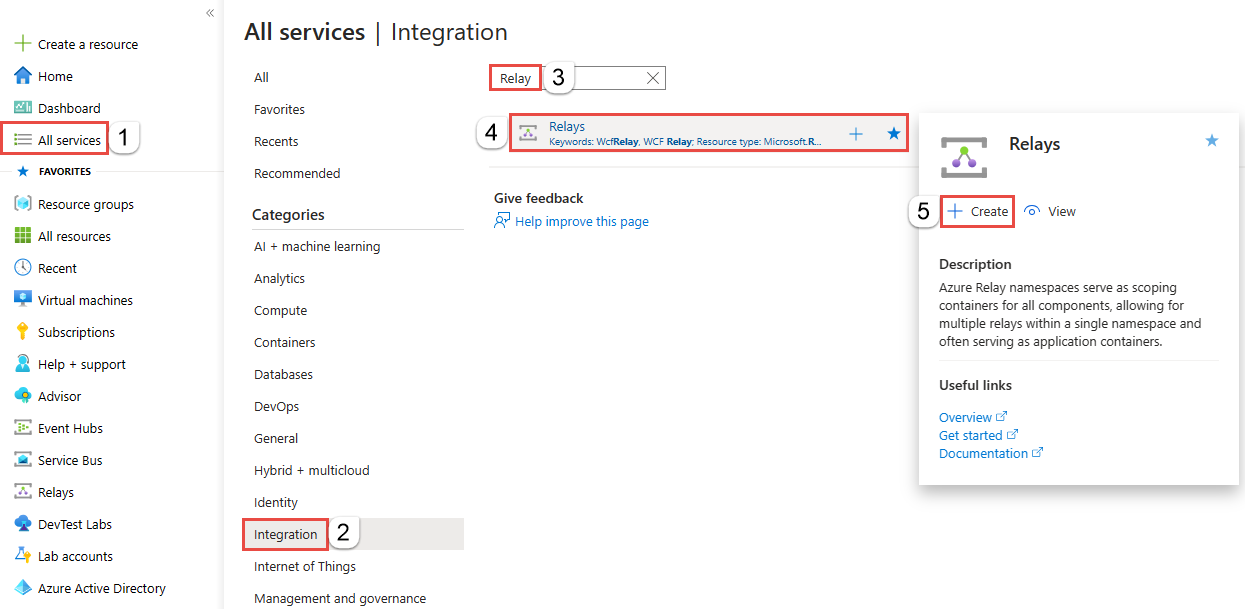
Select All services on the left menu. Select Integration, search for Relays, move the mouse over Relays, and then select Create.
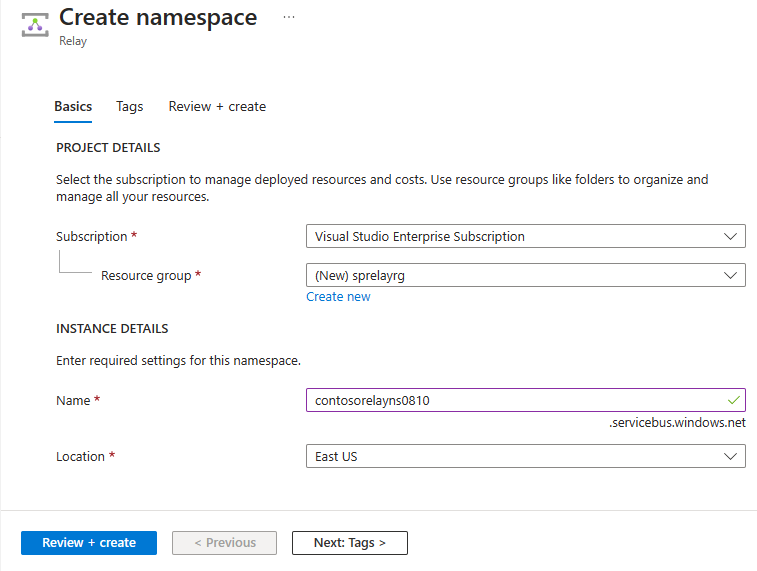
On the Create namespace page, follow these steps:
Choose an Azure subscription in which to create the namespace.
For Resource group, choose an existing resource group in which to place the namespace, or create a new one.
Enter a name for the Relay namespace.
Select the region in which your namespace should be hosted.
Select Review + create at the bottom of the page.
On the Review + create page, select Create.
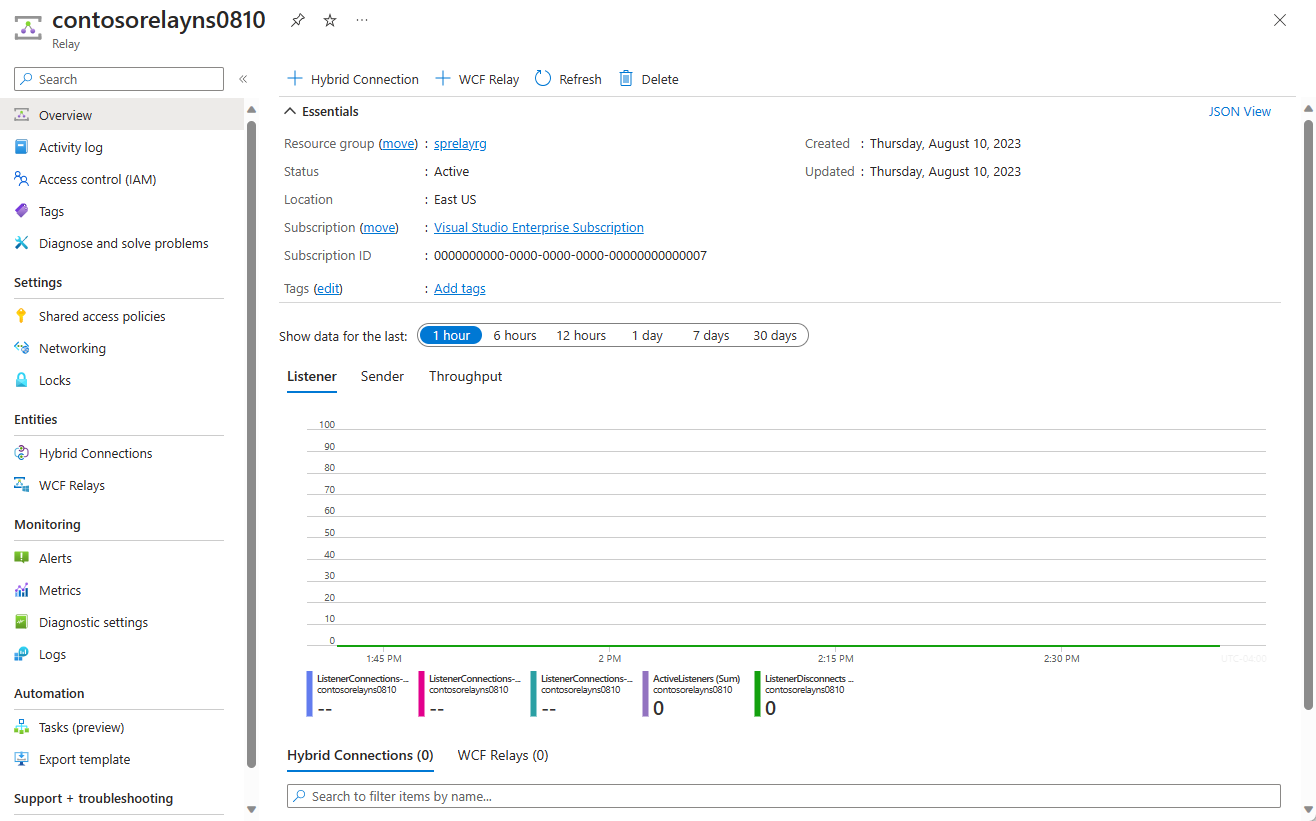
After a few minutes, you see the Relay page for the namespace.
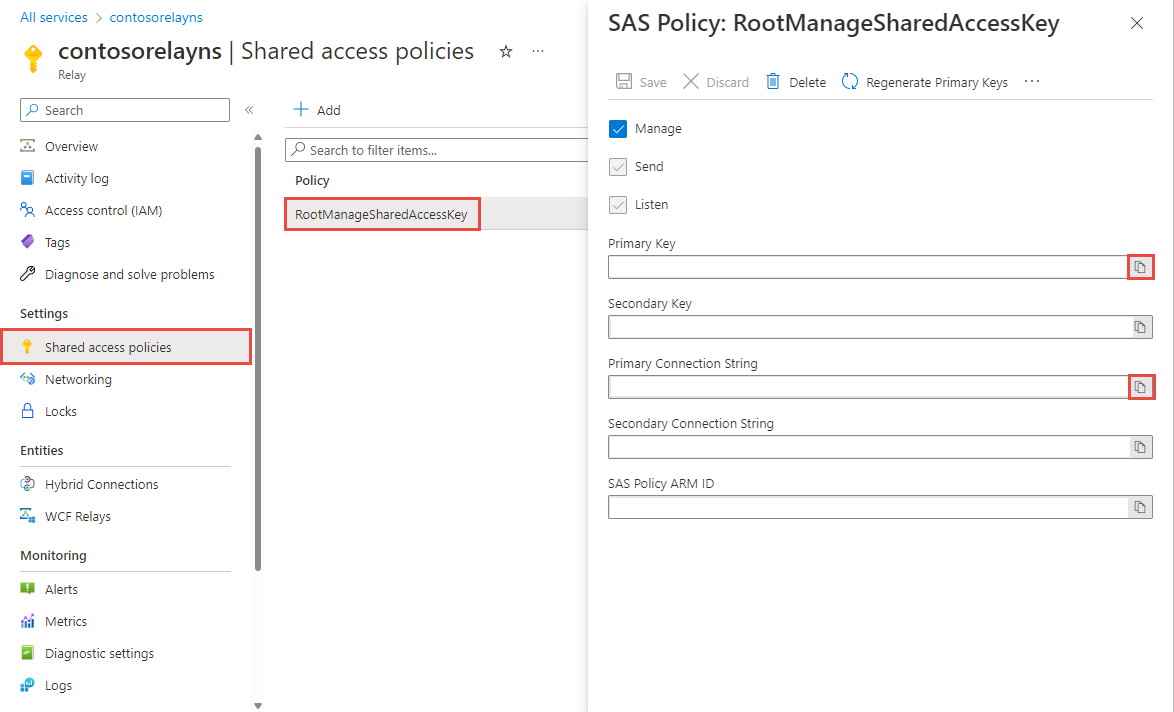
On the Relay page, select Shared access policies on the left menu.
On the Shared access policies page, select RootManageSharedAccessKey.
Under SAS Policy: RootManageSharedAccessKey, select the Copy button next to Primary Connection String. This action copies the connection string to your clipboard for later use. Paste this value into Notepad or some other temporary location.
Repeat the preceding step to copy and paste the value of Primary key to a temporary location for later use.
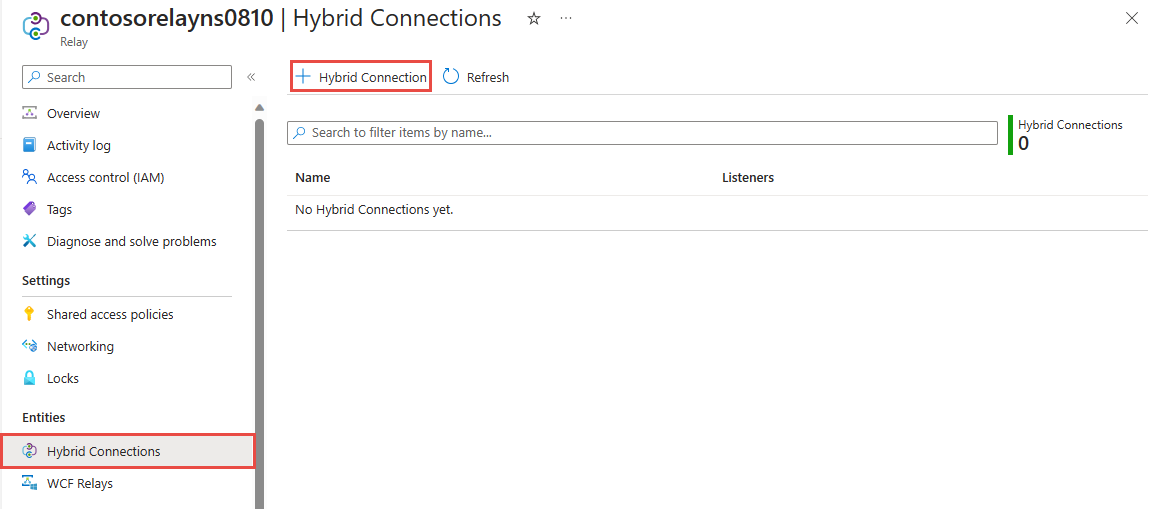
On the Relay page for your namespace, follow these steps to create a hybrid connection.
On the left menu, Under Entities, select Hybrid Connections, and then select + Hybrid Connection.
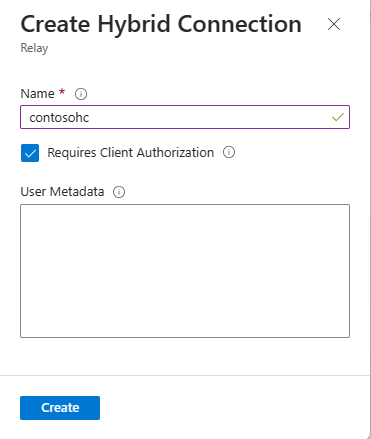
On the Create Hybrid Connection page, enter a name for the hybrid connection, and select Create.
To listen and receive messages from the Relay, write a Python WebSocket Server script.
If you disabled the "Requires Client Authorization" option when creating the Relay, you can send requests to the Hybrid Connections URL with any browser. For accessing protected endpoints, you need to create and pass a SAS Token, which is shown here.
Here's a simple Python script that demonstrates sending requests to a Hybrid Connections URL with SAS Tokens utilizing WebSockets.
Install the following Python libraries using pip before running the server application
asyncio,json,logging,websocketsThese libraries can be installed using the following command:
pip install <package name>Generate a
config.jsonfile to store your connection details{ "namespace": "HYBRID_CONNECTION_NAMESPACE", "path": "HYBRID_CONNECTION_ENTITY_NAME", "keyrule": "SHARED_ACCESS_KEY_NAME", "key": "SHARED_ACCESS_PRIMARY_KEY" }Replace the placeholders in brackets with the values you obtained when you created the hybrid connection.
namespace- The Relay namespace. Be sure to use the fully qualified namespace name; for example,{namespace}.servicebus.windows.net.path- The name of the hybrid connection.keyrule- Name of your Shared Access Policies key, which isRootManageSharedAccessKeyby default.key- The primary key of the namespace you saved earlier.
Generate a helper function file for helper functions
The following file is used as
relaylib.pyand have helper functions for WebSocket URL generation and SAS tokensCreate a Python Script
This script provides helper functions for applications utilizing Azure Relay Hybrid Connections. These functions likely assist with tasks like generating SAS tokens and establishing WebSocket connections for secure communication.
Dependencies
Install the following Python libraries using pip before generating the helper function script:
base64,hashlib,hmac,math,time,urllibThese libraries can be installed using the following command:
pip install <package name>Write the helper function script
Here's what your
relaylib.pyfile should look like:import base64 import hashlib import hmac import math import time import urllib # Function which generates the HMAC-SHA256 of a given message def hmac_sha256(key, msg): hash_obj = hmac.new(key=key, msg=msg, digestmod=hashlib._hashlib.openssl_sha256) return hash_obj.digest() # Function to create a WebSocket URL for listening for a server application def createListenUrl(serviceNamespace, entityPath, token = None): url = 'wss://' + serviceNamespace + '/$hc/' + entityPath + '?sb-hc-action=listen&sb-hc-id=123456' if token is not None: url = url + '&sb-hc-token=' + urllib.parse.quote(token) return url # Function which creates the url for the client application def createSendUrl(serviceNamespace, entityPath, token = None): url = 'wss://' + serviceNamespace + '/$hc/' + entityPath + '?sb-hc-action=connect&sb-hc-id=123456' if token is not None: url = url + '&sb-hc-token=' + urllib.parse.quote(token) return url # Function which creates the Service Bus SAS token. def createSasToken(serviceNamespace, entityPath, sasKeyName, sasKey): uri = "http://" + serviceNamespace + "/" + entityPath encodedResourceUri = urllib.parse.quote(uri, safe = '') # Define the token validity period in seconds (48 hours in this case) tokenValidTimeInSeconds = 60 * 60 * 48 unixSeconds = math.floor(time.time()) expiryInSeconds = unixSeconds + tokenValidTimeInSeconds # Create the plain signature string by combining the encoded URI and the expiry time plainSignature = encodedResourceUri + "\n" + str(expiryInSeconds) # Encode the SAS key and the plain signature as bytes sasKeyBytes = sasKey.encode("utf-8") plainSignatureBytes = plainSignature.encode("utf-8") hashBytes = hmac_sha256(sasKeyBytes, plainSignatureBytes) base64HashValue = base64.b64encode(hashBytes) # Construct the SAS token string token = "SharedAccessSignature sr=" + encodedResourceUri + "&sig=" + urllib.parse.quote(base64HashValue) + "&se=" + str(expiryInSeconds) + "&skn=" + sasKeyName return token
Ensure your dependency
config.jsonandrelaylib.pyare available in your pathHere's what your
listener.pyfile should look like:import asyncio import json import logging import relaylib import websockets async def run_application(config): serviceNamespace = config["namespace"] entityPath = config["path"] sasKeyName = config["keyrule"] sasKey = config["key"] serviceNamespace += ".servicebus.windows.net" # Configure logging logging.basicConfig(level=logging.INFO) # Enable DEBUG/INFO logging as appropriate try: logging.debug("Generating SAS Token for: %s", serviceNamespace) token = relaylib.createSasToken(serviceNamespace, entityPath, sasKeyName, sasKey) logging.debug("Generating WebSocket URI") wssUri = relaylib.createListenUrl(serviceNamespace, entityPath, token) async with websockets.connect(wssUri) as websocket: logging.info("Listening for messages on Azure Relay WebSocket...") while True: message = await websocket.recv() logging.info("Received message: %s", message) except KeyboardInterrupt: logging.info("Exiting listener.") if __name__ == "__main__": # Load configuration from JSON file with open("config.json") as config_file: config = json.load(config_file) asyncio.run(run_application(config))
To send messages to the Relay, you can use any HTTP or WebSocket client, the sample included is a python implementation.
Ensure your dependency
config.jsonandrelaylib.pyare available in your pathHere's what your
sender.pyfile should look like:import asyncio import json import logging import relaylib import websockets async def run_application(message, config): service_namespace = config["namespace"] entity_path = config["path"] sas_key_name = config["keyrule"] sas_key = config["key"] service_namespace += ".servicebus.windows.net" # Configure logging logging.basicConfig(level=logging.DEBUG) # Enable debug logging token = relaylib.createSasToken(service_namespace, entity_path, sas_key_name, sas_key) logging.debug("Token: %s", token) wss_uri = relaylib.createSendUrl(service_namespace, entity_path, token) logging.debug("WssURI: %s", wss_uri) try: async with websockets.connect(wss_uri) as websocket: logging.info("Sending message to Azure Relay WebSocket...") await websocket.send(json.dumps({"message": message})) logging.info("Message sent: %s", message) except Exception as e: logging.error("An error occurred: %s", str(e)) if __name__ == "__main__": # Load configuration from JSON file with open("config.json") as config_file: config = json.load(config_file) asyncio.run(run_application("This is a message to Azure Relay Hybrid Connections!", config))
Nota
The sample code in this article uses a connection string to authenticate to an Azure Relay namespace to keep the tutorial simple. We recommend that you use Microsoft Entra ID authentication in production environments, rather than using connection strings or shared access signatures, which can be more easily compromised. For detailed information and sample code for using the Microsoft Entra ID authentication, see Authenticate and authorize an application with Microsoft Entra ID to access Azure Relay entities and Authenticate a managed identity with Microsoft Entra ID to access Azure Relay resources.
- Run the server application: from a command prompt type
python3 listener.py. - Run the client application: from a command prompt type
python3 sender.py.
Congratulations, you have created an end-to-end Hybrid Connections application using Python!
In this quickstart, you created Python client and server applications that used WebSockets to send and receive messages. The Hybrid Connections feature of Azure Relay also supports using HTTP to send and receive messages. To learn how to use HTTP with Azure Relay Hybrid Connections, see the HTTP quickstart.
In this quickstart, you used Python to create client and server applications. To learn how to write client and server applications using .NET Framework, see the .NET HTTP quickstart or the .NET HTTP quickstart.