Tutorial: Build a Serverless API with TypeScript and MongoDB
In this tutorial, you'll learn how to create a serverless API using Azure Functions and TypeScript to store data in MongoDB. We'll guide you through deploying your application to Azure, making it accessible via a public HTTP endpoint.
Prerequisites
Install the following software:
- Create a free Azure subscription
- Install Node.js LTS. Select a version supported by Azure Functions.
- TypeScript latest version.
- Azurite installed globally for local development storage
- Azure Functions Core Tools latest version installed globally for local development.
- Install Visual Studio Code and use the following extensions:
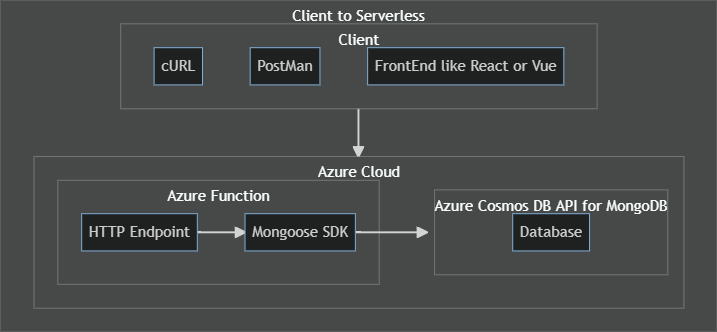
Solution Architecture
The solution uses an Azure Functions app to receive the data, which is then sent to Azure Cosmos DB from the Mongoose SDK.
Open the development environment
In a terminal or command prompt, create a new folder on your local system to use as the root of the Azure functions project.
mkdir <YOUR-NEW_FOLDER-NAME>Change into the new folder.
cd <YOUR-NEW_FOLDER-NAME>Open this folder in Visual Studio Code.
code .
Sign in to Azure in Visual Studio Code
- Open the Command palette.
- Search for and select
Azure: Sign in. Complete the step to authenticate to Azure.
Create an Azure resource group
A resource group is a region-based collection of resources. By creating a resource group, then creating resources in that group, at the end of the tutorial, you can delete the resource group without having to delete each resource individually.
In Visual Studio Code, open the Azure explorer by selecting the Azure icon in the primary side bar or use the keyboard shortcut (Shift + Alt + A).
Find your subscription under Resources and select the + icon then select Create Resource Group.
Use the following table to complete the prompts:
Prompt Value Enter the name of the new resource group. azure-tutorialSelect a location for your new resources. Select a geographical region close to you.
Create the local Functions app
Create a local Azure Functions (serverless) application that contains an HTTP trigger function.
In Visual Studio Code, open the command palette (Ctrl + Shift + P).
Search for and select Azure Functions: Create New Project .
Use the following table to finish creating the local Azure Function project:
Prompt Value Notes Select the folder that will contain your function project Select the current (default) folder. Select a language TypeScript Select a TypeScript programming model Model V4 Select a template for your project's first function HTTP Trigger API is invoked with an HTTP request. Provide a function name blogpostsAPI route is /api/blogpostsWhen Visual Studio Code creates of the project, view your API code in the
./src/functions/blogposts.tsfile.import { app, HttpRequest, HttpResponseInit, InvocationContext } from "@azure/functions"; export async function blogposts(request: HttpRequest, context: InvocationContext): Promise<HttpResponseInit> { context.log(`Http function processed request for url "${request.url}"`); const name = request.query.get('name') || await request.text() || 'world'; return { body: `Hello, ${name}!` }; }; app.http('blogposts', { methods: ['GET', 'POST'], authLevel: 'anonymous', handler: blogposts });This code is standard boilerplate in the new v4 programming model. It isn't meant to indicate the only way to write an API layer with POST and GET.
Replace the previous code with the following code to allow only GET requests to return all blog posts.
import { app, HttpRequest, HttpResponseInit, InvocationContext } from "@azure/functions";

// curl --location 'http://localhost:7071/api/blogposts' --verbose
export async function getBlogPosts(request: HttpRequest, context: InvocationContext): Promise<HttpResponseInit> {
    context.log(`Http function getBlogPosts processed request for url "${request.url}"`);

    // Empty array for now ... will fix later
    const blogposts = [];

    return {
        status: 200,
        jsonBody: {
            blogposts
        }
    };
};

app.get('getBlogPosts', {
    route: "blogposts",
    authLevel: 'anonymous',
    handler: getBlogPosts
});
There are several Azure Functions Node.js v4 programming model changes to this code that you should note:
- The function name of
getBlobPosts, indicating that it's a GET request, will help you isolate the function in the logs. - The
routeproperty is set toblogposts, which is part of the default API route provided,/api/blogposts. - The
methodsproperty has been removed and is unnecessary because theappobject's use ofgetindicates this is a GET request.
- The function name of
Start Azurite local storage emulator
Developing functions on your local computer requires either a Storage emulator (free) or an Azure Storage account (paid).
In a separate terminal, start the Azurite local storage emulator.
azurite --silent --location ./azurite --debug ./azurite/debug.logThis is required to run the Azure Functions locally using a local Azure Storage emulator.
Update the local storage emulator is specified in the
local.settings.jsonfile with the AzureWebJobsStorage property to a value ofUseDevelopmentStorage=true.{ "IsEncrypted": false, "Values": { "AzureWebJobsStorage": "UseDevelopmentStorage=true", "FUNCTIONS_WORKER_RUNTIME": "node", "AzureWebJobsFeatureFlags": "EnableWorkerIndexing" } }
Run the local serverless function
Run the Azure Functions project locally to test it before deploying to Azure.
In Visual Studio Code, set a break point on the
returnstatement, at the end of the getBlogPosts function.In Visual Studio Code, press F5 to launch the debugger and attach to the Azure Functions host. Enable public and private endpoints if you're prompted.
You could also use the Debug > Start Debugging menu command.
Output appears in the Terminal panel.
In Visual Studio Code, open the Azure explorer by selecting the Azure icon in the primary side bar or use the keyboard shortcut (Shift + Alt + A).
In the Workspace section, find and expand the Local Project -> Functions -> getBlogPosts.
Right-click the function name, getBlogPosts, then select Copy Function Url.
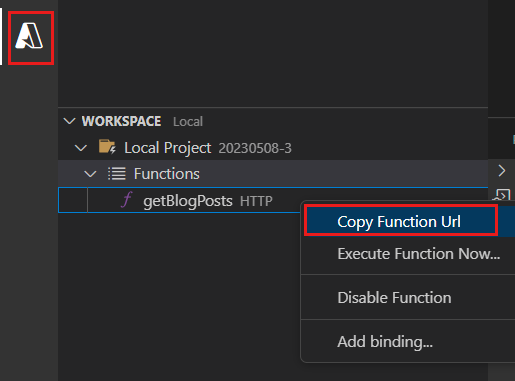
In your browser, paste and submit the URL.
Alternatively, you can use the following cURL command in the terminal:
curl http://localhost:7071/api/blogposts --verboseWhen the debugger stops in Visual Studio Code, you can see the empty blogposts in the Variables->Local window. Allow the debugging to continue past that break point by pressing F5 again.
The response of an empty array of blog posts is returned as:
{
    "blogposts": []
}
In VS Code, stop the debugger, Shift + F5.

Create the Azure Function app in Visual Studio Code
In this section, you create a function app cloud resource and related resources in your Azure subscription.
In Visual Studio Code, open the command palette (Ctrl + Shift + P).
Search for and select Azure Functions: Create Function App in Azure (Advanced) .
Provide the following information at the prompts:
Prompt Selection Select subscription Select your billing subscription. Enter a globally unique name for the function app Type a name that is valid in a URL path, such as first-function. Postpend 3 characters to make the URL globally unique. The name you type is validated to make sure that it's unique in Azure Functions.Select a hosting plan Choose Consumption. Select a location for new resources Select a geographical location near you. Select a runtime stack Choose the latest LTS version. Select an OS Choose Linux. Select a hosting plan Choose Consumption. Select a resource group for new resources Select the resource group you created in the previous step. Select a storage account Select Create a new storage account and accept the default name. Select an Application Insights resource for your app. Select Create new Application Insights resource and accept the default name. Wait until the notification confirms the app has been created.
Deploy the Azure Function app to Azure in Visual Studio Code
Important
Deploying to an existing function app always overwrites the contents of that app in Azure.
- Choose the Azure icon in the Activity bar, then in the Resources area, right-click your function app resource and select the Deploy to Function App.
- If you're asked if you're sure you want to deploy, select Deploy.
- After deployment completes, a notification displays with severals options. Select View Output to view the results. If you miss the notification, select the bell icon in the lower right corner to see it again.
Run the remote serverless function
In Visual Studio Code, open the Azure explorer by selecting the Azure icon in the primary side bar or use the keyboard shortcut (Shift + Alt + A).
In the Resources section, expand your Azure Function app resource. Right-click the function name and select Copy Function Url.
Paste the URL into a browser. The same empty array is returned as when you ran the function locally.
{"blogposts":[]}
Add Azure Cosmos DB for MongoDB API integration
Azure Cosmos DB provides a MongoDB API to provide a familiar integration point.
In Visual Studio Code, open the Azure explorer by selecting the Azure icon in the primary side bar or use the keyboard shortcut (Shift + Alt + A).
In the Resources section, select the + then select Create Database Server. Use the following table to complete the prompts to create a new Azure Cosmos DB resource.
Prompt Value Notes Select an Azure Database Server Azure Cosmos DB for MongoDB API Provide an Azure Cosmos DB account name. cosmosdb-mongodb-databasePostpend three characters to create a unique name. The name becomes part of the API's URL. Select a capacity model. ServerlessSelect MongoDB version. Select latest version. Select a resource group for new resources. Select the resource group you created in the previous step. Select the resource group you created in a previous section. Wait until the resource is created. You can see the status in the Azure section of the results pane.
Install mongoose dependency
In a Visual Studio Code terminal, Ctrl + Shift + `, then install the npm package:
npm install mongoose
Add mongoose code for blog posts
In Visual Studio Code, create a subdirectory named lib at
./src/, create a file named./database.tsand copy the following code into it.import { Schema, Document, createConnection, ConnectOptions, model, set } from 'mongoose'; const connectionString = process.env.MONGODB_URI; console.log('connectionString', connectionString); const connection = createConnection(connectionString, { useNewUrlParser: true, useUnifiedTopology: true, autoIndex: true } as ConnectOptions); export interface IBlogPost { author: string title: string body: string } export interface IBlogPostDocument extends IBlogPost, Document { id: string created: Date } const BlogPostSchema = new Schema({ id: Schema.Types.ObjectId, author: String, title: String, body: String, created: { type: Date, default: Date.now } }); BlogPostSchema.set('toJSON', { transform: function (doc, ret, options) { ret.id = ret._id; delete ret._id; delete ret.__v; } }); export const BlogPost = model<IBlogPostDocument>('BlogPost', BlogPostSchema); connection.model('BlogPost', BlogPostSchema); export default connection;In Visual Studio Code, open the
./src/functions/blogpostsfile and replace the entire file's code with the following:import { app, HttpRequest, HttpResponseInit, InvocationContext } from "@azure/functions"; import connection from '../lib/database'; // curl --location 'http://localhost:7071/api/blogposts' --verbose export async function getBlogPosts(request: HttpRequest, context: InvocationContext): Promise<HttpResponseInit> { context.log(`Http function getBlogPosts processed request for url "${request.url}"`); const blogposts = await connection.model('BlogPost').find({}); return { status: 200, jsonBody: { blogposts } }; }; app.get('getBlogPosts', { route: "blogposts", authLevel: 'anonymous', handler: getBlogPosts });
Add connection string to local app
In Visual Studio Code's Azure explorer, select the Azure Cosmos DB section and expand to right-click select your new resource.
Select Copy connection string.
In Visual Studio Code, use the File explorer to open
./local.settings.json.Add a new property called
MONGODB_URIand paste the value of your connection string.{ "IsEncrypted": false, "Values": { "AzureWebJobsStorage": "", "FUNCTIONS_WORKER_RUNTIME": "node", "AzureWebJobsFeatureFlags": "EnableWorkerIndexing", "MONGODB_URI": "mongodb://...." } }The secrets in the
./local.settings.jsonfile:- Isn't deployed to Azure because its included in the
./.funcignorefile. - Isn't checked into source control because its included in the
./.gitignorefile.
- Isn't deployed to Azure because its included in the
Add connection string to remote app
- In Visual Studio Code, open the Azure explorer by selecting the Azure icon in the primary side bar or use the keyboard shortcut (Shift + Alt + A).
- In the Resources section, find your Azure Cosmos DB instance. Right-click the resource and select Copy Connection String.
- In the same Resources section, find your Function App and expand the node.
- Right-click on Application Settings and select Add New Setting.
- Enter the app setting name,
MONGODB_URIand select Enter. - Paste the value you copied and press enter.
Add APIs for create, update, and delete of blog posts
In Visual Studio Code, use the command palette to find and select Azure Functions: Create function.
Select HTTP trigger and name it
blogpost(singular).Copy the following code into the file.
import { app, HttpRequest, HttpResponseInit, InvocationContext } from "@azure/functions";
import connection, { IBlogPost, IBlogPostDocument }  from '../lib/database';

// curl -X POST --location 'http://localhost:7071/api/blogpost' --header 'Content-Type: application/json' --data '{"author":"john","title":"my first post", "body":"learn serverless node.js"}' --verbose
export async function addBlogPost(request: HttpRequest, context: InvocationContext): Promise<HttpResponseInit> {
    context.log(`Http function addBlogPost processed request for url "${request.url}"`);

    const body = await request.json() as IBlogPost;

    const blogPostResult = await connection.model('BlogPost').create({
        author: body?.author,
        title: body?.title,
        body: body?.body
    });

    return {
        status: 200,
        jsonBody: {
            blogPostResult
        }
    };
};

// curl -X PUT --location 'http://localhost:7071/api/blogpost/64568e727f7d11e09eab473c' --header 'Content-Type: application/json' --data '{"author":"john jones","title":"my first serverless post", "body":"Learn serverless Node.js with Azure Functions"}' --verbose
export async function updateBlogPost(request: HttpRequest, context: InvocationContext): Promise<HttpResponseInit> {
    context.log(`Http function updateBlogPost processed request for url "${request.url}"`);

    const body = await request.json() as IBlogPost;
    const id = request.params.id;

    const blogPostResult = await connection.model('BlogPost').updateOne({ _id: id }, {
        author: body?.author,
        title: body?.title,
        body: body?.body
    });

    if(blogPostResult.matchedCount === 0) {
        return {
            status: 404,
            jsonBody: {
                message: 'Blog post not found'
            }
        };
    }

    return {
        status: 200,
        jsonBody: {
            blogPostResult
        }
    };
};

// curl --location 'http://localhost:7071/api/blogpost/6456597918547e37d515bda3' --verbose
export async function getBlogPost(request: HttpRequest, context: InvocationContext): Promise<HttpResponseInit> {
    context.log(`Http function getBlogPosts processed request for url "${request.url}"`);

    console.log('request.params.id', request.params.id)
    const id = request.params.id;

    const blogPost = await connection.model('BlogPost').findOne({ _id: id });

    if(!blogPost) {
        return {
            status: 404,
            jsonBody: {
                message: 'Blog post not found'
            }
        };
    }

    return {
        status: 200,
        jsonBody: {
            blogPost
        }
    };
};

// curl --location 'http://localhost:7071/api/blogpost/6456597918547e37d515bda3' --request DELETE --header 'Content-Type: application/json' --verbose
export async function deleteBlogPost(request: HttpRequest, context: InvocationContext): Promise<HttpResponseInit> {
    context.log(`Http function deleteBlogPost processed request for url "${request.url}"`);

    const id = request.params.id;

    const blogPostResult = await connection.model('BlogPost').deleteOne({ _id: id });

    if(blogPostResult.deletedCount === 0) {
        return {
            status: 404,
            jsonBody: {
                message: 'Blog post not found'
            }
        };
    }

    return {
        status: 200,
        jsonBody: {
            blogPostResult
        }
    };
};

app.get('getBlogPost', {
    route: "blogpost/{id}",
    authLevel: 'anonymous',
    handler: getBlogPost
});

app.post('postBlogPost', {
    route: "blogpost",
    authLevel: 'anonymous',
    handler: addBlogPost
});

app.put('putBlogPost', {
    route: "blogpost/{id}",
    authLevel: 'anonymous',
    handler: updateBlogPost
});

app.deleteRequest('deleteBlogPost', {
    route: "blogpost/{id}",
    authLevel: 'anonymous',
    handler: deleteBlogPost
});
Start the local function with the debugger again. The following APIs are available:
deleteBlogPost: [DELETE] http://localhost:7071/api/blogpost/{id}
getBlogPost: [GET] http://localhost:7071/api/blogpost/{id}
getBlogPosts: [GET] http://localhost:7071/api/blogposts
postBlogPost: [POST] http://localhost:7071/api/blogpost
putBlogPost: [PUT] http://localhost:7071/api/blogpost/{id}
Use the
blogpost(singular) API from a cURL command to add a few blog posts.curl -X POST --location 'http://localhost:7071/api/blogpost' --header 'Content-Type: application/json' --data '{"author":"john","title":"my first post", "body":"learn serverless node.js"}' --verboseUse the
blogposts(plural) API from a cURL command to get the blog posts.curl http://localhost:7071/api/blogposts --verboseThe response includes the JSON array of a single blog post:
:[{"author":"john","title":"my first post","body":"learn serverless node.js","created":"2024-07-11T21:30:41.688Z","id":"66904f0148b2e4d8a2b9971e"}]}.
View all data with Visual Studio Code extension for Azure Cosmos DB
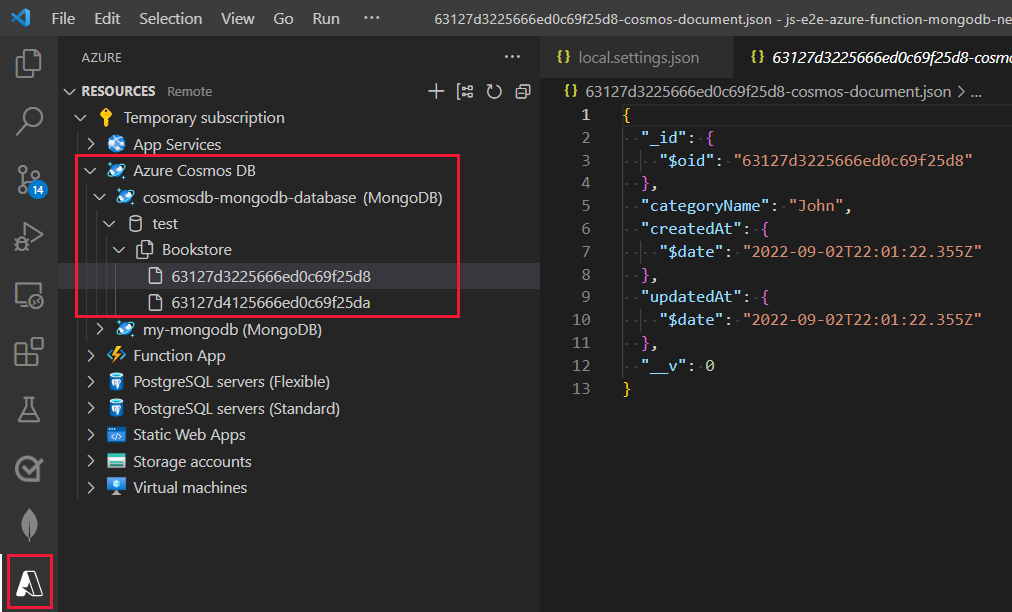
In Visual Studio Code, open the Azure explorer by selecting the Azure icon in the primary side bar or use the keyboard shortcut (Shift + Alt + A).
In the Resources section, right-click your Azure Cosmos DB database and select Refresh.
Expand the test database and blogposts collection node's to view the documents.
Select one of the items listed to view the data in the Azure Cosmos DB instance.
Redeploy the function app to include database code
- In Visual Studio Code, open the Azure explorer by selecting the Azure icon in the primary side bar or use the keyboard shortcut (Shift + Alt + A).
- In the Resources section, right-click your Azure Function app and select Deploy to Function App.
- In the pop-up asking if you're sure you want to deploy, select Deploy.
- Wait until deployment completes before continuing.
Use cloud-based Azure Function
- Still in the Azure Explorer, in the Functions area, selects and expands your function then the Functions node, which lists the APIs
- Right-click on one of the APIs and select Copy Function Url.
- Edit the previous cURL commands to use the remote URL instead of the local URL. Run the commands to test the remote API.
Query your Azure Function logs
To search the logs, use the Azure portal.
In Visual Studio Code, select the Azure Explorer, then under Functions, right-click on your function app, then select Open in Portal.
This opens the Azure portal to your Azure Function.
From Settings, select Application Insights, then select View Application Insights data.
This link takes you to your separate metrics resource created for you when you created your Azure Function with Visual Studio Code.
From the Monitoring section, select Logs. Close any pop-up windows by selecting the X in the top-right corner of the pop-up to close it.
In the New Query 1 pane, on the Tables tab, double-click the traces table.
This enters the Kusto query,
tracesinto the query window.Change the query mode from Simple mode to KQL mode.
Edit the query to search for the custom logs:
traces
| where message startswith "***"
Select Run.
If the log doesn't display any results, it may be because there's a few minute delay between the HTTP request to the Azure Function and the log availability in Kusto. Wait a few minutes and run the query again.
You didn't need to do anything extra to get this logging information:
- The code used the
context.logfunction provided by the Function framework. By usingcontext, instead ofconsole, your logging can be filtered to the specific individual function. This is useful if your Function app has many functions. - The Function app added Application Insights for you.
- The Kusto Query tool is included in the Azure portal.
- You can select
tracesinstead of having to learn to write a Kusto query to get even the minimum information from your logs.
- The code used the
Source code available
Full source code for this Azure Function app:
Clean up resources
Because you used a single resource group, you can delete all resources by deleting the resource group.
- In Visual Studio Code, open the Azure explorer by selecting the Azure icon in the primary side bar or use the keyboard shortcut (Shift + Alt + A).
- Search for and select Azure: Group by resource group.
- Right-click select your resource group and select Delete Resource Group.
- Enter the resource group name to confirm the deletion.
Next step
Feedback
Disponibbli dalwaqt: Matul l-2024 se nkunu qed inwaqqfu gradwalment Problemi GitHub bħala l-mekkaniżmu ta’ feedback għall-kontenut u se nibdluh b’sistema ġdida ta’ feedback. Għal aktar informazzjoni, ara: https://aka.ms/ContentUserFeedback.
Issottometti u ara feedback għal