Nota
L-aċċess għal din il-paġna jeħtieġ l-awtorizzazzjoni. Tista’ tipprova tidħol jew tibdel id-direttorji.
L-aċċess għal din il-paġna jeħtieġ l-awtorizzazzjoni. Tista’ tipprova tibdel id-direttorji.
Note
The Retail Interest Group by Dynamics 365 Commerce has moved from Yammer to Viva Engage. If you don't have access to the new Viva Engage community, fill out this form (https://aka.ms/JoinD365commerceVivaEngageCommunity) to be added and stay engaged in the latest discussions.
This article describes tile list modules and explains how to add them to site pages in Microsoft Dynamics 365 Commerce.
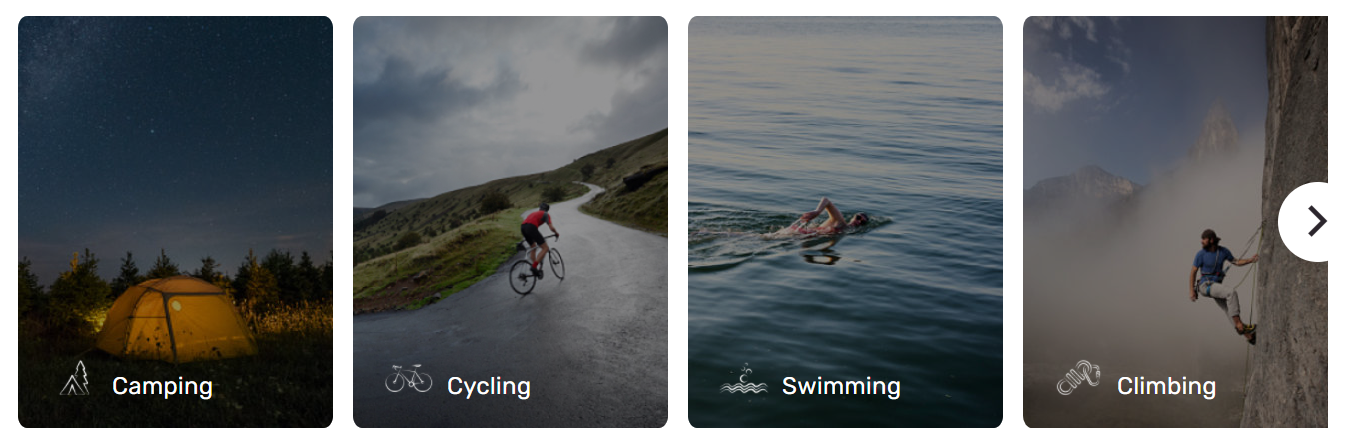
A tile list module is a collection of tiles in a carousel. Use it to market product categories or product brands through images and text. For example, a retailer can add a tile list module to the home page of an e-commerce site to promote all the top-selling categories.
Data from the content management system (CMS) drives the tile list module. It doesn't depend on any other modules or data from Commerce headquarters. Add the tile list module to any site page where a retailer wants to market or promote something (for example products, categories, or brands).
The following illustration shows an example of a tile list module and tile modules on the Adventure Works home page.
Important
The tile list module is available as of the Dynamics 365 Commerce version 10.0.20 release. The tile list module is showcased in the Adventure Works theme.
Tile list modules and themes
The tile list module can support various layouts and styles, based on a theme. For example, in the Adventure Works theme, tiles show an animation effect when site users hover over them. Each theme can contain more properties for the tile list and tile modules. Theme developers can also build extra layouts for the tile list and tile modules.
Tile list module properties
| Property name | Values | Description |
|---|---|---|
| Heading | Heading text and heading tag | A text heading for the tile list module. |
Tile module properties
| Property name | Values | Description |
|---|---|---|
| Image | Image file | Use an image to showcase a product or a category. You can upload the image to the Media Library in Commerce site builder, or use an existing image. |
| Heading | Heading text and heading tag (H1, H2, H3, H4, H5, or H6) | By default, the H2 heading tag is used for the heading, but you can change the tag to meet accessibility requirements. |
| Paragraph | Paragraph text | The module supports paragraph text in rich text format. It supports some basic rich text capabilities, such as hyperlinks, and bold, underlined, and italic text. Some of these capabilities can be overridden by the page theme that you apply to the module. |
| Link | Link text, link URL, Accessible Rich Internet Applications (ARIA) label, and Open link in new tab | Modules support one or more "call to action" links. If you add a link, you need link text, a URL, and an ARIA label. Make ARIA labels descriptive to meet accessibility requirements. You can configure links so that they open in a new tab. |
| Tile link | Link text, link URL, ARIA label, and Open link in new tab selector | Use this property to define a "call to action" link. If you add a link, you need link text, a URL, and an ARIA label. Make ARIA labels descriptive to meet accessibility requirements. You can configure links so that they open in a new tab. |
| Icon | Image | In addition to a product or category image, add an icon symbol. The icon symbol image appears above the product or category image. |
Add a tile list module to a new page
To add a tile list module to a new page and set the required properties in Commerce site builder, follow these steps:
- Go to Templates, and open the marketing template for your site's home page (or create a new marketing template).
- In the Main slot of the default page, select the ellipsis (...), and then select Add module.
- In the Select modules dialog box, select the Tile list module, and then select OK.
- Select Save, select Finish editing to check in the template, and then select Publish to publish it.
- Go to Pages, and open the site's home page (or create a new home page by using the marketing template).
- In the Main slot of the default page, select the ellipsis button (...), and then select Add module.
- In the Select modules dialog box, select the Tile list module, and then select OK.
- In the property pane of the tile list module, add a heading.
- In the Tile list slot, select the ellipsis button (...), and then select Add module.
- In the Select modules dialog box, select the Tile module module, and then select OK.
- In the property pane of the tile module, add an image, a heading, and an icon symbol image.
- Add and configure more tile modules as you require.
- Select Save, and then select Preview to preview the page.
- Select Finish editing to check in the template, and then select Publish to publish it.