Manage Azure Stack Hub storage accounts
Learn how to manage Azure Stack Hub storage accounts. Find, recover, and reclaim storage capacity based on business needs.
Find a storage account
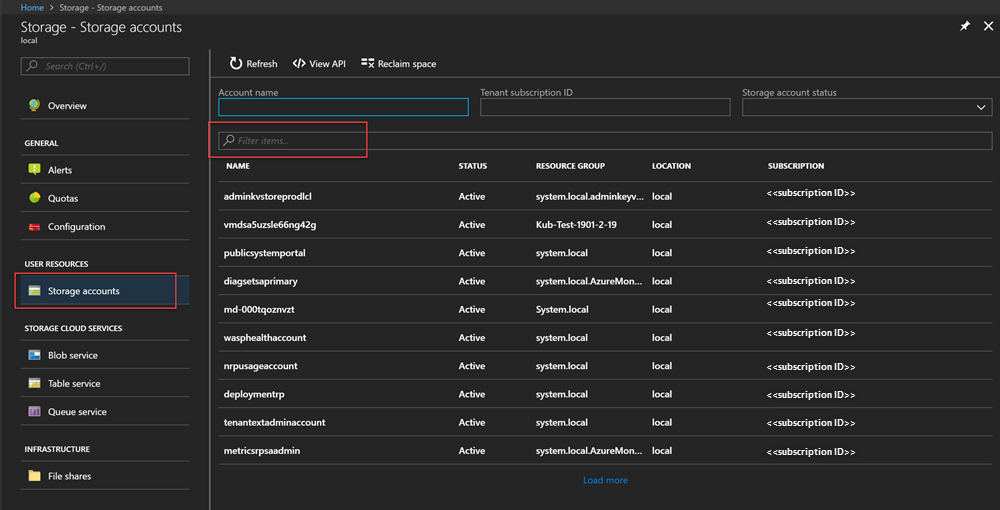
The list of storage accounts in the region can be viewed in Azure Stack Hub by following these steps:
Sign in to the administrator portal
https://adminportal.local.azurestack.external.Select All services > Storage > Storage accounts.

By default, the first 10 accounts are displayed. You can choose to fetch more by clicking the Load more link at the bottom of the list.
OR
If you're interested in a particular storage account - you can filter and fetch the relevant accounts only.
To filter for accounts:
Select Filter at the top of the pane.
On the Filter pane, it allows you to specify account name, subscription ID, or status to fine-tune the list of storage accounts to be displayed. Use them as appropriate.
As you type, the list will automatically apply the filter.

To reset the filter: select Filter, clear out the selections and update.
The search text box (on the top of the storage accounts list pane) lets you highlight the selected text in the list of accounts. You can use this when the full name or ID isn't easily available.
You can use free text here to help find the account you're interested in.

Look at account details
Once you've located the accounts you're interested in viewing, you can select the particular account to view certain details. A new pane opens with the account details. These details include the kind of account, creation time, location, and so on.

Recover a deleted account
You may be in a situation where you need to recover a deleted account.
In Azure Stack Hub, there's a simple way to do that:
Browse to the storage accounts list. For more information, see Find a storage account at the top of this article.
Locate that particular account in the list. You may need to filter.
Check the state of the account. It should say Deleted.
Select the account, which opens the account details pane.
On top of this pane, locate the Recover button and select it.
Select Yes to confirm.

The recovery is now in process. Wait for an indication that it was successful. You can also select the "bell" icon at the top of the portal to view progress indications.

Once the recovered account is successfully synchronized, it can be used again.
Some Gotchas
Your deleted account shows state as out of retention.
Out of retention means that the deleted account has exceeded the retention period and may not be recoverable.
Your deleted account doesn't show in the accounts list.
You account may not show in the account list when the deleted account has already been garbage collected. In this case, it can't be recovered. For more information, see Reclaim capacity in this article.
Set the retention period
The retention period setting allows a cloud operator to specify a time period in days (between 0 and 9999 days) during which any deleted account can potentially be recovered. The default retention period is set to 0 days. Setting the value to "0" means that any deleted account is immediately out of retention and marked for periodic garbage collection.
To change the retention period:
Sign in to the administrator portal
https://adminportal.local.azurestack.external.Select All services > Region management under Administration.
Select Resources providers > Storage > Settings. Your path is Home > region - Resource providers > Storage.
Select Configuration then edit the retention period value.
Set the number of days and then save it.
This value is immediately effective and is set for your entire region.

Reclaim capacity
One of the side effects of having a retention period is that a deleted account continues to consume capacity until it comes out of the retention period. As a cloud operator, you may need a way to reclaim the deleted account space even though the retention period hasn't yet expired.
You can reclaim capacity using either the portal or PowerShell.
To reclaim capacity using the portal:
Navigate to the storage accounts pane. See Find a storage account.
Select Reclaim space at the top of the pane.
Read the message and then select OK.

Wait for success notification. See the bell icon on the portal.

Refresh the Storage accounts page. The deleted accounts are no longer shown in the list because they've been purged.
You can also use PowerShell to explicitly override the retention period and immediately reclaim capacity.
To reclaim capacity using PowerShell:
- Confirm that you have Azure PowerShell installed and configured. If not,
use the following instructions:
- To install the latest Azure PowerShell version and associate it with your Azure subscription, see How to install and configure Azure PowerShell. For more information about Azure Resource Manager cmdlets, see Using Azure PowerShell with Azure Resource Manager.
- Run the following cmdlets:
Note
If you run these cmdlets, you permanently delete the account and its contents. It's not recoverable. Use this with care.
    $farm_name = (Get-AzsStorageFarm)[0].name
    Start-AzsReclaimStorageCapacity -FarmName $farm_name
For more information, see Azure Stack Hub PowerShell documentation.
Next steps
- For information on managing permissions, see Set access permissions using role-based access control.
- For information on managing storage capacity for Azure Stack Hub, see Manage storage capacity for Azure Stack Hub.