Multistep web tests
You can monitor a recorded sequence of URLs and interactions with a website via multistep web tests. This article walks you through the process of creating a multistep web test with Visual Studio Enterprise.
Important
Multistep web tests have been deprecated. We recommend using TrackAvailability() to submit custom availability tests instead of multistep web tests. With TrackAvailability() and custom availability tests, you can run tests on any compute you want and use C# to easily author new tests.
Multistep web tests are categorized as classic tests and can be found under Add Classic Test on the Availability pane.
Note
Multistep web tests aren't supported in the Azure Government cloud.
Multistep web test alternative
Multistep web tests depend on Visual Studio web test files. It was announced that Visual Studio 2019 will be the last version with web test functionality. Although no new features will be added, web test functionality in Visual Studio 2019 is still currently supported and will continue to be supported during the support lifecycle of the product.
We recommend using TrackAvailability to submit custom availability tests instead of multistep web tests. This option is the long-term supported solution for multi-request or authentication test scenarios. With TrackAvailability() and custom availability tests, you can run tests on any compute you want and use C# to easily author new tests.
Prerequisites
You need:
- Visual Studio 2017 Enterprise or greater.
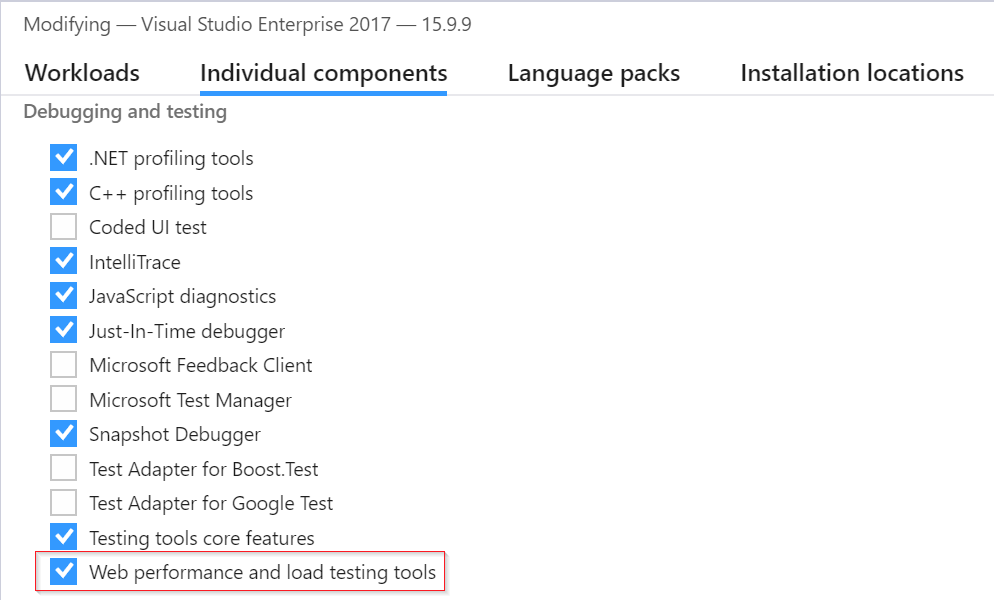
- Visual Studio web performance and load testing tools.
To locate the testing tools prerequisite, select Visual Studio Installer > Individual components > Debugging and testing > Web performance and load testing tools.
Note
Multistep web tests have extra costs associated with them. To learn more, see the official pricing guide.
Important
Multi-step web test rely on the DNS infrastructure of the public internet to resolve the domain names of the tested endpoints. If you're using private DNS, you must ensure that the public domain name servers can resolve every domain name of your test. When that's not possible, you can use custom TrackAvailability tests instead.
Record a multistep web test
Warning
We no longer recommend using the multistep recorder. The recorder was developed for static HTML pages with basic interactions. It doesn't provide a functional experience for modern webpages.
For guidance on how to create Visual Studio web tests, see the official Visual Studio 2019 documentation.
Upload the web test
- In the Application Insights portal on the Availability pane, select Add Classic test. Then select Multi-step as the SKU.
- Upload your multistep web test.
- Set the test locations, frequency, and alert parameters.
- Select Create.
Frequency and location
| Setting | Description |
|---|---|
| Test frequency | Sets how often the test is run from each test location. With a default frequency of five minutes and five test locations, your site is tested on average every minute. |
| Test locations | The places from where our servers send web requests to your URL. Our minimum number of recommended test locations is five to ensure that you can distinguish problems in your website from network issues. You can select up to 16 locations. |
Success criteria
| Setting | Description |
|---|---|
| Test timeout | Decrease this value to be alerted about slow responses. The test is counted as a failure if the responses from your site haven't been received within this period. If you selected Parse dependent requests, all the images, style files, scripts, and other dependent resources must have been received within this period. |
| HTTP response | The returned status code that's counted as a success. The code 200 indicates that a normal webpage has been returned. |
| Content match | A string, like "Welcome!" We test that an exact case-sensitive match occurs in every response. It must be a plain string, without wildcards. Don't forget that if your page content changes, you might have to update it. Only English characters are supported with content match. |
Alerts
| Setting | Description |
|---|---|
| Near real time (preview) | We recommend using near real time alerts. Configuring this type of alert is done after your availability test is created. |
| Alert location threshold | We recommend a minimum of 3/5 locations. The optimal relationship between alert location threshold and the number of test locations is alert location threshold = number of test locations - 2, with a minimum of five test locations. |
Configuration
Follow these configuration steps.
Plug time and random numbers into your test
Suppose you're testing a tool that gets time-dependent data, such as stock prices, from an external feed. When you record your web test, you have to use specific times, but you set them as parameters of the test, StartTime and EndTime.
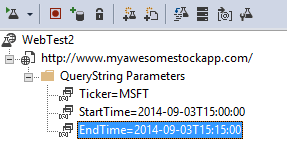
When you run the test, you want EndTime always to be the present time. StartTime should be 15 minutes prior.
The Web Test Date Time Plug-in provides the way to handle parameter times.
Add a Web Test Plug-in for each variable parameter value you want. On the web test toolbar, select Add Web Test Plug-in.
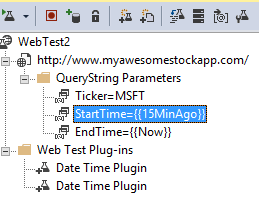
In this example, we use two instances of the Date Time Plug-in. One instance is for "15 minutes ago" and another is for "now."
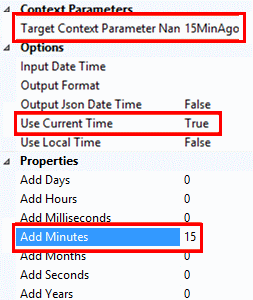
Open the properties of each plug-in. Give it a name and set it to use the current time. For one of them, set Add Minutes = -15.
In the web test parameters, use
{{plug-in name}}to reference a plug-in name.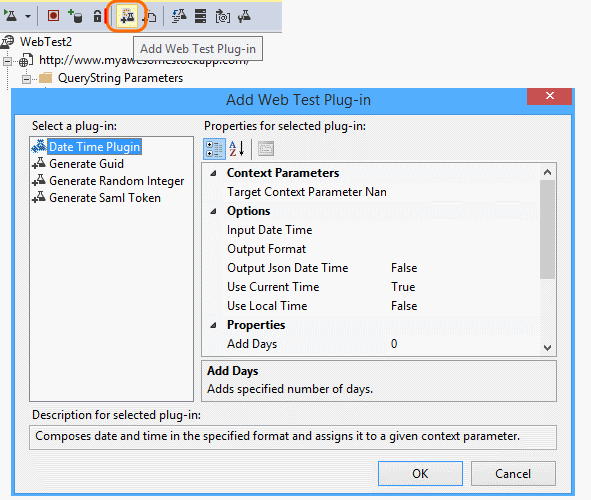
Now, upload your test to the portal. It will use dynamic values on every run of the test.
Consider sign-in
If your users sign in to your app, you have various options for simulating sign-in so that you can test pages behind the sign-in. The approach you use depends on the type of security provided by the app.
In all cases, create an account in your application only for testing. If possible, restrict the permissions of this test account so that there's no possibility of the web tests affecting real users.
Simple username and password
Record a web test in the usual way. Delete cookies first.
SAML authentication
| Property name | Description |
|---|---|
| Audience URI | The audience URI for the SAML token. This URI is for the Access Control service, including the Access Control namespace and host name. |
| Certificate password | The password for the client certificate, which will grant access to the embedded private key. |
| Client certificate | The client certificate value with private key in Base64-encoded format. |
| Name identifier | The name identifier for the token. |
| Not after | The timespan for which the token will be valid. The default is 5 minutes. |
| Not before | The timespan for which a token created in the past will be valid (to address time skews). The default is (negative) 5 minutes. |
| Target context parameter name | The context parameter that will receive the generated assertion. |
Client secret
If your app has a sign-in route that involves a client secret, use that route. Azure Active Directory (Azure AD) is an example of a service that provides a client secret sign-in. In Azure AD, the client secret is the app key.
Here's a sample web test of an Azure web app using an app key.
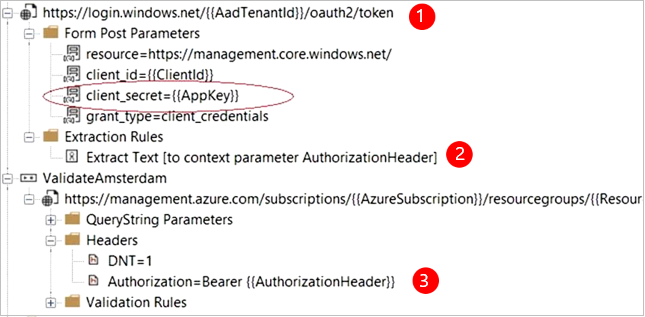
- Get a token from Azure AD by using the client secret (the app key).
- Extract a bearer token from the response.
- Call the API by using the bearer token in the authorization header.
- Make sure that the web test is an actual client. That is, that it has its own app in Azure AD. Use its client ID and app key. Your service under test also has its own app in Azure AD. The app ID URI of this app is reflected in the web test in the resource field.
Open authentication
An example of open authentication is the act of signing in with your Microsoft or Google account. Many apps that use OAuth provide the client secret alternative, so your first tactic should be to investigate that possibility.
If your test must sign in by using OAuth, the general approach is:
- Use a tool such as Fiddler to examine the traffic between your web browser, the authentication site, and your app.
- Perform two or more sign-ins using different machines or browsers, or at long intervals (to allow tokens to expire).
- By comparing different sessions, identify the token passed back from the authenticating site that's then passed to your app server after sign-in.
- Record a web test by using Visual Studio.
- Parameterize the tokens. Set the parameter when the token is returned from the authenticator, and use it in the query to the site. (Visual Studio attempts to parameterize the test, but doesn't correctly parameterize the tokens.)
Troubleshooting
For troubleshooting help, see the dedicated troubleshooting article.