Obs!
Tilgang til denne siden krever autorisasjon. Du kan prøve å logge på eller endre kataloger.
Tilgang til denne siden krever autorisasjon. Du kan prøve å endre kataloger.
Applies to:
Azure SQL Database
Azure SQL Managed Instance
Azure Synapse Analytics
Data Discovery & Classification is built into Azure SQL Database, Azure SQL Managed Instance, and Azure Synapse Analytics. It provides basic capabilities for discovering, classifying, labeling, and reporting the sensitive data in your databases.
Your most sensitive data might include business, financial, healthcare, or personal information. It can serve as infrastructure for:
- Helping to meet standards for data privacy and requirements for regulatory compliance.
- Various security scenarios, such as monitoring (auditing) access to sensitive data.
- Controlling access to and hardening the security of databases that contain highly sensitive data.
Note
For information about SQL Server on-premises, see SQL Data Discovery & Classification.
Tip
Label-based access protection using Microsoft Purview Information Protection policies is now in preview. For more information, see Enabling access control for sensitive data using Microsoft Purview Information Protection policies (public preview).
What is Data Discovery & Classification?
Data Discovery & Classification currently supports the following capabilities:
Discovery and recommendations: The classification engine scans your database and identifies columns that contain potentially sensitive data. It then provides you with an easy way to review and apply recommended classification via the Azure portal.
Labeling: You can apply sensitivity-classification labels persistently to columns by using new metadata attributes that have been added to the SQL Server database engine. This metadata can then be used for sensitivity-based auditing scenarios.
Query result-set sensitivity: The sensitivity of a query result set is calculated in real time for auditing purposes.
Visibility: You can view the database-classification state in a detailed dashboard in the Azure portal. Also, you can download a report in Excel format to use for compliance and auditing purposes and other needs.
Discover, classify, and label sensitive columns
This section describes the steps for:
- Discovering, classifying, and labeling columns that contain sensitive data in your database.
- Viewing the current classification state of your database and exporting reports.
The classification includes two metadata attributes:
- Labels: The main classification attributes, used to define the sensitivity level of the data stored in the column.
- Information types: Attributes that provide more granular information about the type of data stored in the column.
Information Protection policy
Azure SQL offers both SQL Information Protection policy and Microsoft Information Protection policy in data classification, and you can choose either of these two policies based on your requirement.
SQL Information Protection policy
Data Discovery & Classification comes with a built-in set of sensitivity labels and information types with discovery logic which is native to the SQL logical server. You can continue using the protection labels available in the default policy file, or you can customize this taxonomy. You can define a set and ranking of classification constructs specifically for your environment.
Define and customize your classification taxonomy
You define and customize of your classification taxonomy in one central place for your entire Azure organization. That location is in Microsoft Defender for Cloud, as part of your security policy. Only someone with administrative rights on the organization's root management group can do this task.
As part of policy management, you can define custom labels, rank them, and associate them with a selected set of information types. You can also add your own custom information types and configure them with string patterns. The patterns are added to the discovery logic for identifying this type of data in your databases.
For more information, see Customize the SQL information protection policy in Microsoft Defender for Cloud (Preview).
After the organization-wide policy has been defined, you can continue classifying individual databases by using your customized policy.
Classify database in SQL Information Protection policy mode
Note
The below example uses Azure SQL Database, but you should select the appropriate product that you want to configure Data Discovery & Classification.
Go to the Azure portal.
Go to Data Discovery & Classification under the Security heading in your Azure SQL Database pane. The Overview tab includes a summary of the current classification state of the database. The summary includes a detailed list of all classified columns, which you can also filter to show only specific schema parts, information types, and labels. If you haven't classified any columns yet, skip to step 4.

To download a report in Excel format, select Export in the top menu of the pane.
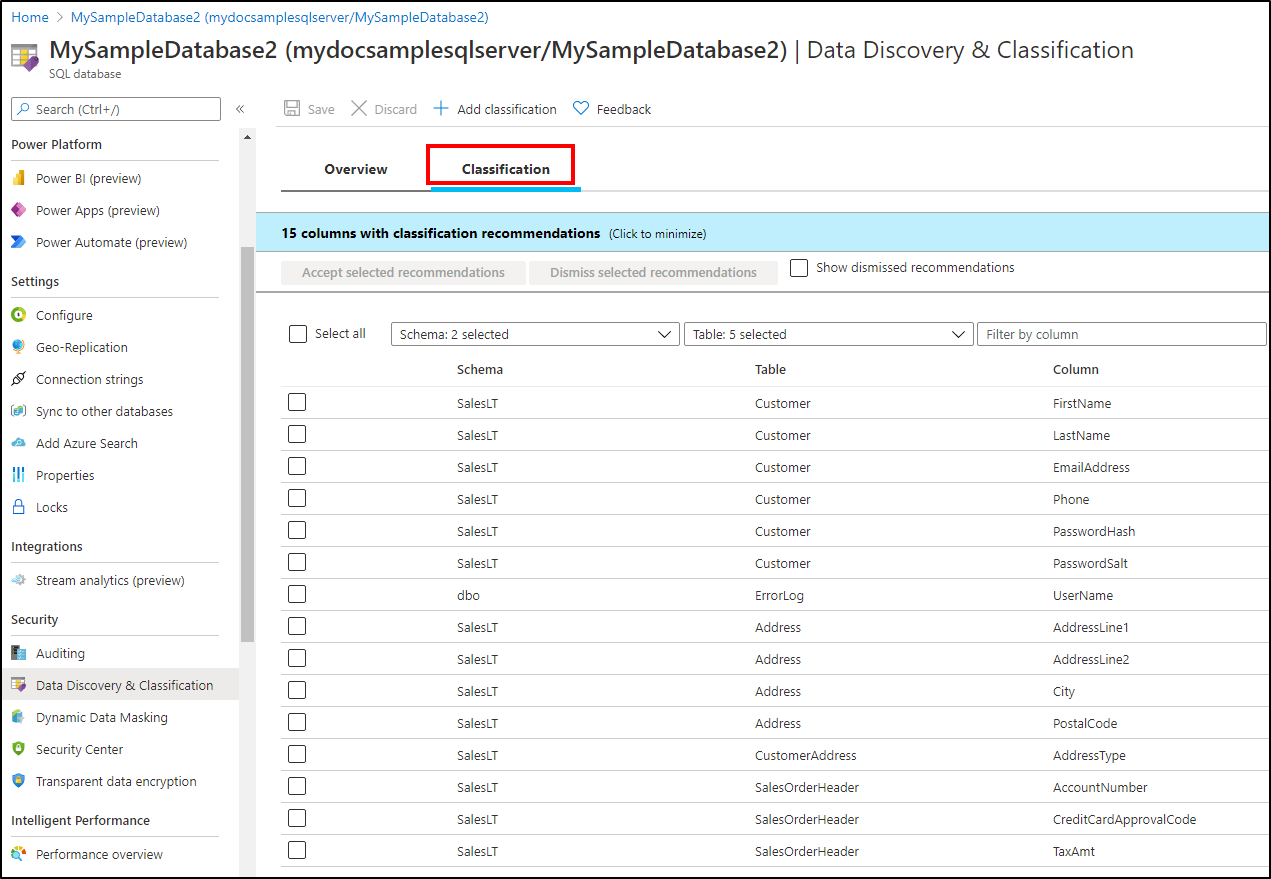
To begin classifying your data, select the Classification tab on the Data Discovery & Classification page.
The classification engine scans your database for columns containing potentially sensitive data and provides a list of recommended column classifications.
View and apply classification recommendations:
To view the list of recommended column classifications, select the recommendations panel at the bottom of the pane.
To accept a recommendation for a specific column, select the check box in the left column of the relevant row. To mark all recommendations as accepted, select the leftmost check box in the recommendations table header.
To apply the selected recommendations, select Accept selected recommendations.
Note
The recommendation engine, which does automatic data discovery and provides sensitive column recommendations, is disabled when Microsoft Purview Information Protection policy mode is used.
You can also classify columns manually, as an alternative or in addition to the recommendation-based classification:
Select Add classification in the top menu of the pane.
In the context window that opens, select the schema, table, and column that you want to classify, and the information type and sensitivity label.
Select Add classification at the bottom of the context window.
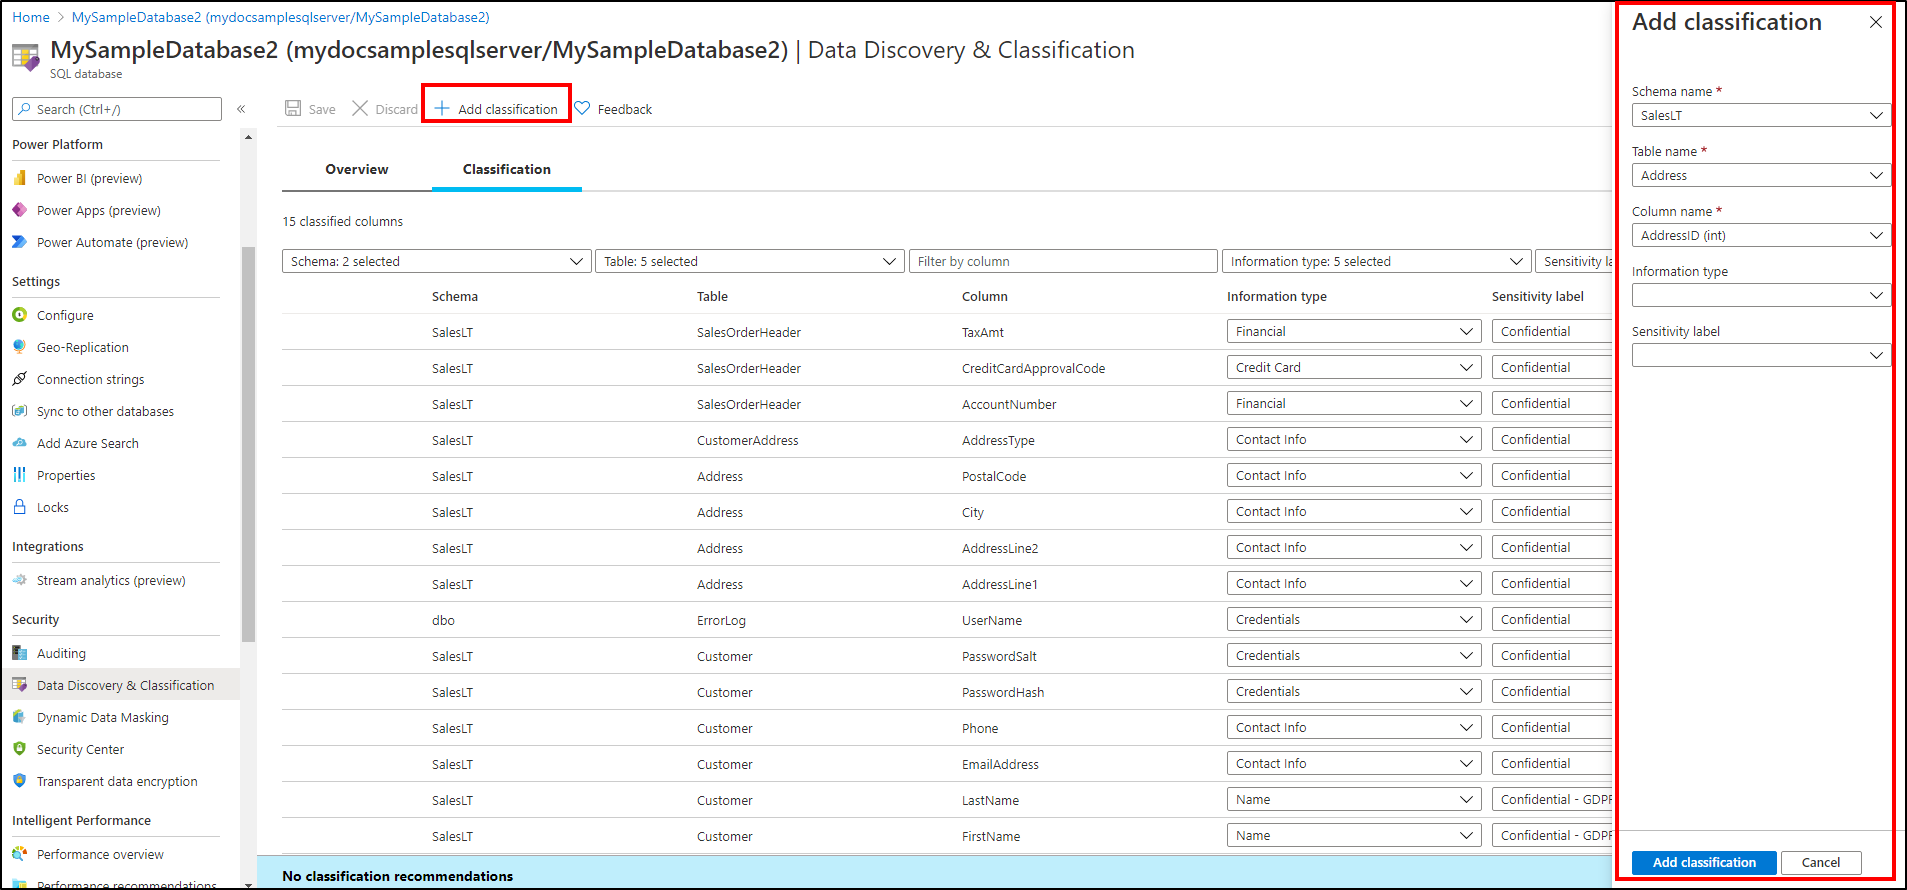
To complete your classification and persistently label (tag) the database columns with the new classification metadata, select Save in the Classification page.
Microsoft Purview Information Protection policy
Note
Microsoft Information Protection (MIP) has been rebranded as Microsoft Purview Information Protection. Both "MIP" and "Microsoft Purview Information Protection" are used interchangeably in this document, but refer to the same concept.
Microsoft Purview Information Protection labels provide a simple and uniform way for users to classify sensitive data uniformly across different Microsoft applications. MIP sensitivity labels are created and managed in the Microsoft Purview compliance portal. To learn how to create and publish MIP sensitive labels in Microsoft Purview compliance portal, see Create and publish sensitivity labels.
Prerequisites to switch to Microsoft Purview Information Protection policy
- Setting/changing information protection policy in Azure SQL Database sets the respective information protection policy for all databases under the tenant. The user or persona must have tenant wide Security Admin permission to change the information protection policy from SQL Information Protection policy to MIP policy, or vice versa.
- The user or persona having tenant wide Security Admin permission can apply policy at the tenant root management group level. For more information, see Grant tenant-wide permissions to yourself.
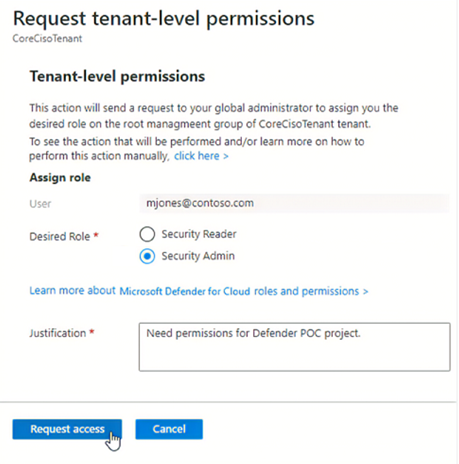
- Your tenant has an active Microsoft 365 subscription and you have labels published for the current user. For more information, see Create and configure sensitivity labels and their policies.
Classify database in Microsoft Purview Information Protection policy mode
Go to the Azure portal.
Navigate to your database in Azure SQL Database
Go to Data Discovery & Classification under the Security heading in your database pane.
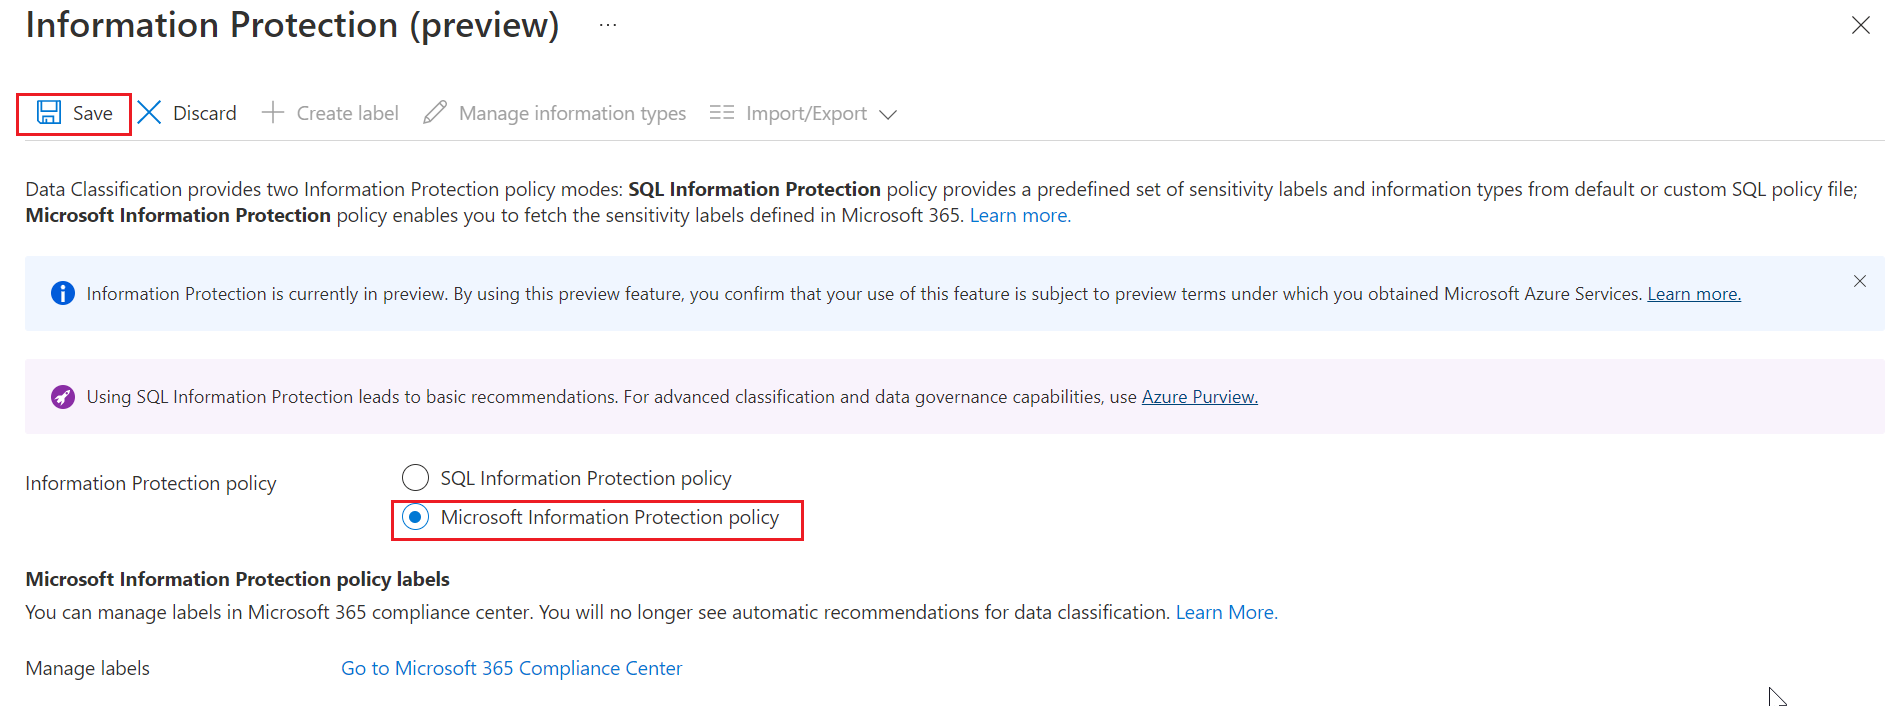
To select Microsoft Information Protection policy, select the Overview tab, and select Configure.
Select Microsoft Information Protection policy in the Information Protection policy options, and select Save.
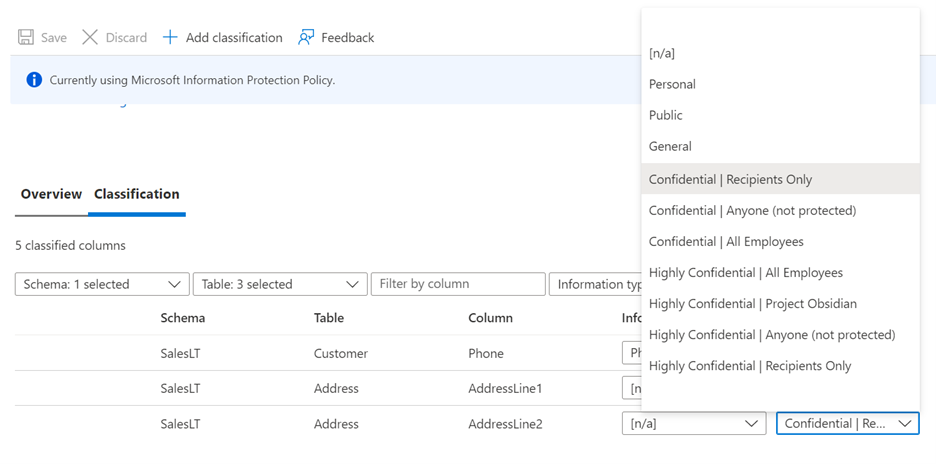
If you go to the Classification tab, or select Add classification, you'll now see Microsoft 365 sensitivity labels appear in the Sensitivity label dropdown.

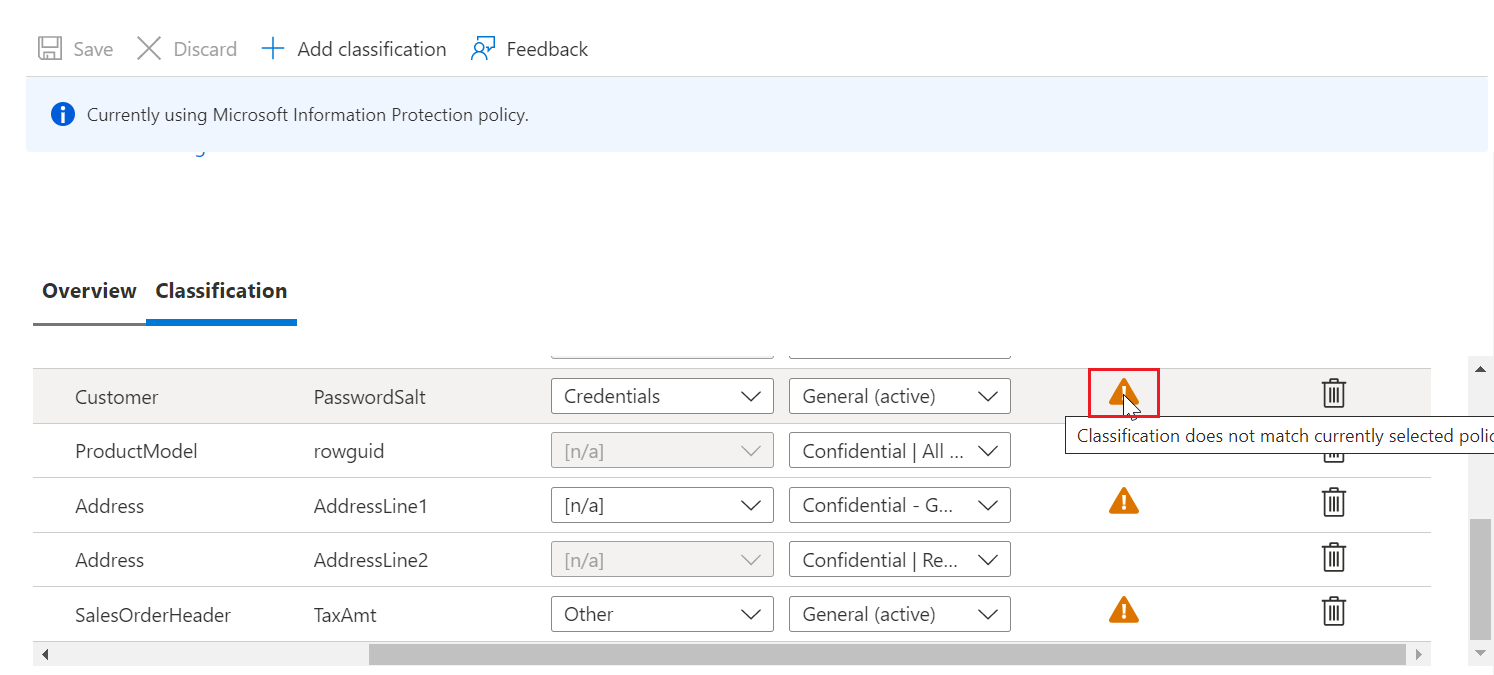
Information type is
[n/a]while you are in MIP policy mode and automatic data discovery & recommendations remain disabled.A warning icon may appear against an already classified column if the column was classified using a different Information Protection policy than the currently active policy. For example, if the column was classified with a label using SQL Information Protection policy earlier and now you are in Microsoft Information Protection policy mode. you'll see a warning icon against that specific column. This warning icon doesn't indicate any problem, but is used only for information purposes.
Enabling access control for sensitive data using Microsoft Purview Information Protection policies (public preview)
Azure SQL Database supports the ability to enforce access control on the columns with sensitive data that have been labeled using Microsoft Purview Information Protection (MIP) sensitivity labels using Microsoft Purview Information Protection access policies.
Access policies in Purview enable organizations to protect sensitive data across their data sources. They enable personas like enterprise security/compliance admins to configure and enforce access control actions on sensitive data in their databases, ensuring that sensitive data can't be accessed by unauthorized users for a particular sensitivity label. Purview access policies are enforced at column level granularity for Azure SQL database, thus protecting sensitive data without blocking access to non-sensitive data columns in the database tables.
To configure and enforce Purview access policies, the user is required to have a valid Microsoft 365 license, and the database must be registered in the Purview Data Map and scanned, so that MIP sensitivity labels get assigned by Purview to the database columns containing sensitive data. Once sensitivity labels are assigned, the user can configure Purview access policies to enforce deny actions on database columns with a specific sensitivity label, restricting access to sensitive data in those columns to only an allowed user or group of users.
Configure and enable access policy in Purview for Azure SQL database
Follow the list of steps below to configure and use Purview access policies for Azure SQL Database:
- Make sure you have the required license prerequisites for Microsoft 365 and Purview.
- Set up roles and permissions for your users.
- Create or extend sensitivity labels in Purview to Azure SQL Database. Also ensure that you publish the sensitivity labels to the required users in your organization.
- Register and scan your Azure SQL database to apply sensitivity labels automatically.
- Create and configure access control policy in Purview for Azure SQL Database.
Once the access policy has been configured and published in Purview, any attempt by an unauthorized user to run a T-SQL query to access columns in a SQL database with sensitivity label scoped to the policy will fail. If the same query doesn't include sensitive columns, the query would succeed.
Limitations
When creating a database geo-replica or copy, sensitivity labels assigned to columns in the primary database don't automatically flow to the new/secondary database, and Purview access control policies won't automatically apply to the new/secondary database. To enable access control on the new/secondary database, register and scan it separately in Purview. Then configure any access policies to also include the new/secondary database.
Audit access to sensitive data
An important aspect of the classification is the ability to monitor access to sensitive data. Azure SQL Auditing has been enhanced to include a new field in the audit log called data_sensitivity_information. This field logs the sensitivity classifications (labels) of the data that was returned by a query. Here's an example:
These are the activities that are actually auditable with sensitivity information:
- ALTER TABLE ... DROP COLUMN
- BULK INSERT
- SELECT
- DELETE
- INSERT
- MERGE
- UPDATE
- UPDATETEXT
- WRITETEXT
- DROP TABLE
- BACKUP
- DBCC CloneDatabase
- SELECT INTO
- INSERT INTO EXEC
- TRUNCATE TABLE
- DBCC SHOW_STATISTICS
- sys.dm_db_stats_histogram
Use sys.fn_get_audit_file to return information from an audit file stored in an Azure Storage account.
Permissions
These built-in roles can read the data classification of a database:
- Owner
- Reader
- Contributor
- SQL Security Manager
- User Access Administrator
These are the required actions to read the data classification of a database are:
- Microsoft.Sql/servers/databases/currentSensitivityLabels/*
- Microsoft.Sql/servers/databases/recommendedSensitivityLabels/*
- Microsoft.Sql/servers/databases/schemas/tables/columns/sensitivityLabels/*
These built-in roles can modify the data classification of a database:
- Owner
- Contributor
- SQL Security Manager
This is the required action to modify the data classification of a database are:
- Microsoft.Sql/servers/databases/schemas/tables/columns/sensitivityLabels/*
Learn more about role-based permissions in Azure RBAC.
Note
The Azure SQL built-in roles in this section apply to a dedicated SQL pool (formerly SQL DW) but are not available for dedicated SQL pools and other SQL resources within Azure Synapse workspaces. For SQL resources in Azure Synapse workspaces, use the available actions for data classification to create custom Azure roles as needed for labelling. For more information on the Microsoft.Synapse/workspaces/sqlPools provider operations, see Microsoft.Synapse.
Manage classifications
You can use T-SQL, a REST API, or PowerShell to manage classifications.
Use T-SQL
You can use T-SQL to add or remove column classifications, and to retrieve all classifications for the entire database.
Note
When you use T-SQL to manage labels, there's no validation that labels that you add to a column exist in the organization's information-protection policy (the set of labels that appear in the portal recommendations). So, it's up to you to validate this.
For information about using T-SQL for classifications, see the following references:
- To add or update the classification of one or more columns: ADD SENSITIVITY CLASSIFICATION
- To remove the classification from one or more columns: DROP SENSITIVITY CLASSIFICATION
- To view all classifications on the database: sys.sensitivity_classifications
Use PowerShell cmdlets
Manage classifications and recommendations for Azure SQL Database and Azure SQL Managed Instance using PowerShell.
PowerShell cmdlets for Azure SQL Database
- Get-AzSqlDatabaseSensitivityClassification
- Set-AzSqlDatabaseSensitivityClassification
- Remove-AzSqlDatabaseSensitivityClassification
- Get-AzSqlDatabaseSensitivityRecommendation
- Enable-AzSqlDatabaseSensitivityRecommendation
- Disable-AzSqlDatabaseSensitivityRecommendation
PowerShell cmdlets for Azure SQL Managed Instance
- Get-AzSqlInstanceDatabaseSensitivityClassification
- Set-AzSqlInstanceDatabaseSensitivityClassification
- Remove-AzSqlInstanceDatabaseSensitivityClassification
- Get-AzSqlInstanceDatabaseSensitivityRecommendation
- Enable-AzSqlInstanceDatabaseSensitivityRecommendation
- Disable-AzSqlInstanceDatabaseSensitivityRecommendation
Use the REST API
You can use the REST API to programmatically manage classifications and recommendations. The published REST API supports the following operations:
- Create Or Update: Creates or updates the sensitivity label of the specified column.
- Delete: Deletes the sensitivity label of the specified column.
- Disable Recommendation: Disables sensitivity recommendations on the specified column.
- Enable Recommendation: Enables sensitivity recommendations on the specified column. (Recommendations are enabled by default on all columns.)
- Get: Gets the sensitivity label of the specified column.
- List Current By Database: Gets the current sensitivity labels of the specified database.
- List Recommended By Database: Gets the recommended sensitivity labels of the specified database.
Retrieve classifications metadata using SQL drivers
You can use the following SQL drivers to retrieve classification metadata:
- Microsoft.Data.SqlClient
- ODBC Driver
- OLE DB Driver
- JDBC Driver
- Microsoft Drivers for PHP for SQL Server
FAQ - Advanced classification capabilities
Question: Will Microsoft Purview replace SQL Data Discovery & Classification or will SQL Data Discovery & Classification be retired soon? Answer: We continue to support SQL Data Discovery & Classification and encourage you to adopt Microsoft Purview which has richer capabilities to drive advanced classification capabilities and data governance. If we decide to retire any service, feature, API or SKU, you'll receive advance notice including a migration or transition path. Learn more about Microsoft Lifecycle policies here.
Next steps
- Consider configuring Azure SQL Auditing for monitoring and auditing access to your classified sensitive data.
- For a presentation that includes data Discovery & Classification, see Discovering, classifying, labeling & protecting SQL data | Data Exposed.
- To classify your Azure SQL Databases and Azure Synapse Analytics with Microsoft Purview labels using T-SQL commands, see Classify your Azure SQL data using Microsoft Purview labels.

